| KIT #: | 09311 |
| PRICE: | €24 when new |
| DECALS: | Two options |
| REVIEWER: | Spiros Pendedekas |
| NOTES: |
| HISTORY |
No. 198 Squadron was formed at
Rochford on 1 June 1917 with Avro 504K biplanes to teach pilots elementary night
flying and later a comprehensive night flying course for home defense pilots. It
disbanded at Rochford in September 1919, but reformed on 8 December 1942 at RAF
Digby as a fighter squadron equipped with the Hawker Typhoon.
From
March 1943, 198 Squadron joined 609 Squadron at RAF Manston where it provided
fighter-escorts to the twin-engined Westland Whirlwind fighter-bombers on
sorties into continental Europe. Over the next nine months 198 Squadron and 609
Squadron were the only Typhoon units to operate full-time on escort duties for
RAF and USAAF bombers and long-range fighter sweeps (code-named "Ramrods") over
France, Belgium and the Netherlands.
 During these operations
the squadron used long-range Typhoons, each equipped with a cigar-shaped 45 imp
gallon fuel tank mounted below each wing. In these roles the unit was very
successful, becoming one of the top scoring Typhoon units. During this time,
most of the other Typhoon units began to be equipped with bomb racks or RP-3
rocket rails and had started training to carry out ground attack operations in
preparation for the cross-Channel invasion.
During these operations
the squadron used long-range Typhoons, each equipped with a cigar-shaped 45 imp
gallon fuel tank mounted below each wing. In these roles the unit was very
successful, becoming one of the top scoring Typhoon units. During this time,
most of the other Typhoon units began to be equipped with bomb racks or RP-3
rocket rails and had started training to carry out ground attack operations in
preparation for the cross-Channel invasion.
After building up a
score of enemy aircraft destroyed, the squadron changed role to ground attack at
the beginning of 1944, when the Typhoons were fitted with RP-3 rockets. In
January 1944 the squadron became part of the Second Tactical Air Force's "123
Airfield" (later known as 123 Wing), partnered with 609 Squadron.
The
squadron lost several of its pilots during this reorganization to bring them
into line with 2nd TAF's established strength requirements, and the ground crew
echelon was completely changed. Morale slumped for a short while, but soon
picked up as the squadron became familiarized with its new role. In March 1944
the 123 Wing moved to an "Armament Practice Camp'' (APC) at Llanbedr in Wales,
before moving in April to RAF Thorney Island in preparation for D-Day.
After
the landings the squadron was heavily involved in fighting around Caen using the
rocket-equipped Typhoons against tanks and enemy positions. In July it moved to
France and followed the advancing troops into the Netherlands and eventually
moved to Wunstorf in Germany in May 1945. On 15 September 1945 the squadron was
disbanded.
The RAF's top scoring
Typhoon pilot was 198 Squadron's John Robert Baldwin, who claimed 15 aircraft
shot down during 1942–44. Baldwin became Commanding Officer of the squadron in
November 1943 and relinquished command in April 1944. He continued his
association with 198 Squadron and ended the war as a Group Captain commanding No
84 (Typhoon) Group.
| THE KIT |
This is yet another version of the venerable Hasegawa series of quarter scale Typhoons, which first hit the market in 1999. For a look at the kit contents, as well as a history of the airplane, please read the kit preview here.
| CONSTRUCTION |
 I started with the
cockpit, attaching the side frames and rear bulkhead onto the floor (which has a
tubular construction), then attached the rudder pedals and the 3-piece
instrument panel (which includes the distinctive looking inclined side mini
panels. The good looking seat received seat belts made from masking tape, with
their buckles done with a fine tip silver pen. Cockpit basic color was Hu78 (for
the English cockpit green), with black instrument panel, side consoles and stick
grip. The supplied main instrument panel decal was applied, whereas the side
consoles were dry brushed with silver and had some red and yellow paint knobs
done with a 10/0 brush.
I started with the
cockpit, attaching the side frames and rear bulkhead onto the floor (which has a
tubular construction), then attached the rudder pedals and the 3-piece
instrument panel (which includes the distinctive looking inclined side mini
panels. The good looking seat received seat belts made from masking tape, with
their buckles done with a fine tip silver pen. Cockpit basic color was Hu78 (for
the English cockpit green), with black instrument panel, side consoles and stick
grip. The supplied main instrument panel decal was applied, whereas the side
consoles were dry brushed with silver and had some red and yellow paint knobs
done with a 10/0 brush.
The 2-piece radiator
was also assembled, painted black and heavily dry brushed with silver. Its front
housing top half was painted underside color, whereas its bottom and all rear
housing was painted “cockpit color”. After painting the fuselage visible
sidewalls with cockpit color, I joined the fuselage halves, trapping the cockpit
and radiator (together with its top front housing) in between.
It was then wings time:
I attached the top wing halves onto the lower half, paying attention to the guns
for good alignment (they are split in halves, together with the wing halves),
then attached the wing to the fuselage. Thankfully, fit at the wing roots was
very good!
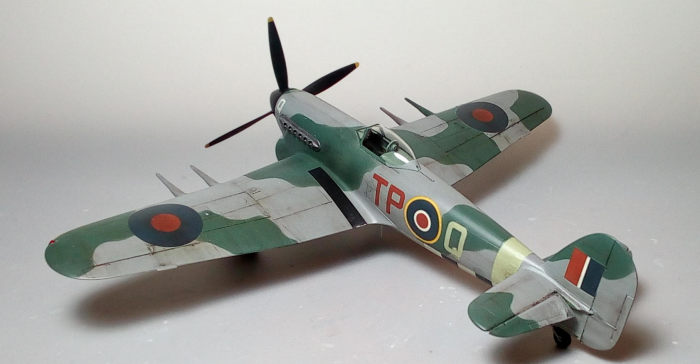
 The
2-piece tail planes were then assembled. After seeing a few reference pics
clearly showing drooped elevators, I decided to separate them as to pose them
dynamically: I thus patiently ran the back of my hobby knife into the engraving,
applying light pressure, until the elevator got separated from the stabilizer.
In order to deal with the hollowed innards that emerged, I glued some sheets to
the stabilizers’ hollowed areas, whereas the elevators were treated with
liquefied styrene. After sanding everything smooth, I attached the stabilizers
to the fuselage, but left the elevators aside, to be attached at final stages
The
2-piece tail planes were then assembled. After seeing a few reference pics
clearly showing drooped elevators, I decided to separate them as to pose them
dynamically: I thus patiently ran the back of my hobby knife into the engraving,
applying light pressure, until the elevator got separated from the stabilizer.
In order to deal with the hollowed innards that emerged, I glued some sheets to
the stabilizers’ hollowed areas, whereas the elevators were treated with
liquefied styrene. After sanding everything smooth, I attached the stabilizers
to the fuselage, but left the elevators aside, to be attached at final stages
It was only then that
the well-known Hasegawa upper cockpit wall inserts that account for the bubble
canopy version were attached. They were a tad longer, so they had to be sanded
down. Their fit was not perfect, with a longitudinal gap appearing at both the
front and rear anti glare areas. Applying symmetrical pressure to the parts, so
the complete gap would disappear, would result in them not sitting flush to the
fuselage: their rear part would "bed" deeper, and it would be hard to fill and
sand that recessed area smooth. On the other hand, the front gap had to close,
as otherwise the windscreen would sit too narrowly: I had no choice but to clamp
together only the front part of the inserts and pray that the rear area would
not “bed” in, which, to my joy, was what more or less happened. The rear gap was
treated with liquefied styrene. The distinctive canopy single railing that had
inevitably been sanded off during the rear gap treatment process was replaced
with a suitable piece of stretched sprue.
The model was then
filled (not in that many places really, fit was generally good) and sanded
smooth, the gear doors were tacked at their positions and we headed to the paint
shop!
| COLORS & MARKINGS |
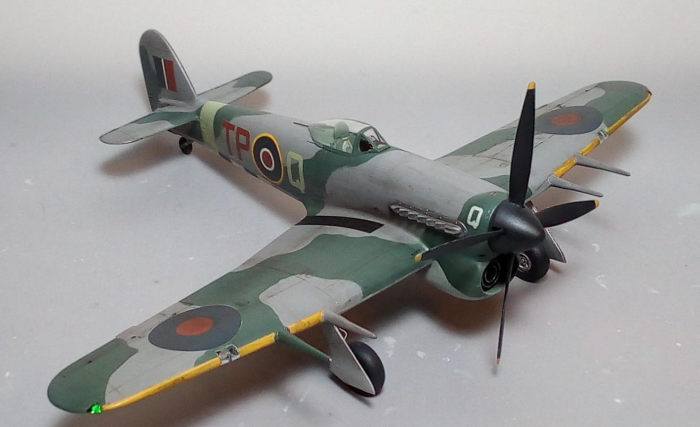
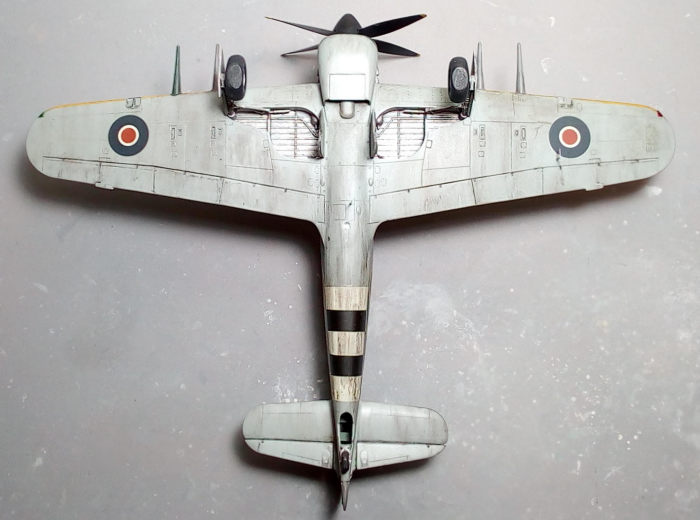 I first applied Hu127 Ghost Gray at
all undersides, masked it off, and applied Hu128 compass Gray on topsides (for
the Ocean Gray), which was subsequently coated with Future. Since the camo lines
observed at the Typhoons tended towards “hard”, I formed the camo pattern with
strings of tack. Then with my airbrush at “fine” settings, I applied Hu30 Dark
Green, carefully spraying at the tack edges at certain angles, in order to
create an almost (but not totally!) hard line. Upon removing the tack strings, a
nice, tight camo pattern emerged (together with some green oversprays that had
to be treated - the price to pay if , like yours truly, are lazy masking the
gray top areas!).
I first applied Hu127 Ghost Gray at
all undersides, masked it off, and applied Hu128 compass Gray on topsides (for
the Ocean Gray), which was subsequently coated with Future. Since the camo lines
observed at the Typhoons tended towards “hard”, I formed the camo pattern with
strings of tack. Then with my airbrush at “fine” settings, I applied Hu30 Dark
Green, carefully spraying at the tack edges at certain angles, in order to
create an almost (but not totally!) hard line. Upon removing the tack strings, a
nice, tight camo pattern emerged (together with some green oversprays that had
to be treated - the price to pay if , like yours truly, are lazy masking the
gray top areas!).
The external wing
leading edges were masked and sprayed Hu154 yellow. After a coat of Future, I
proceeded to decaling.
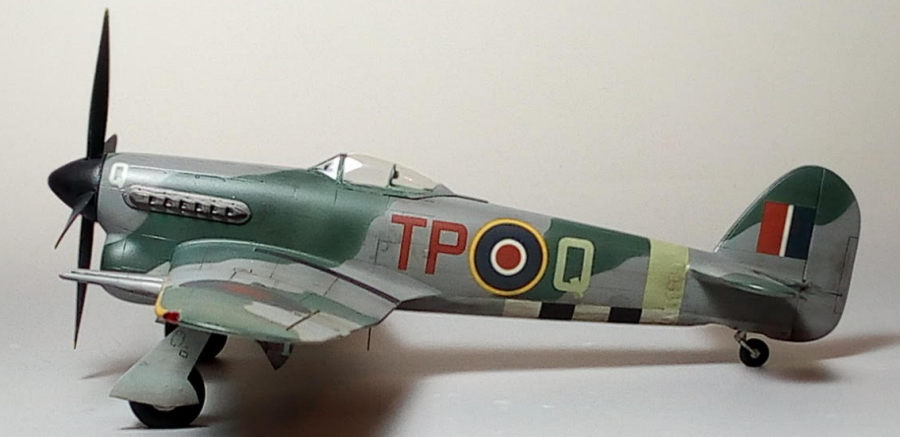
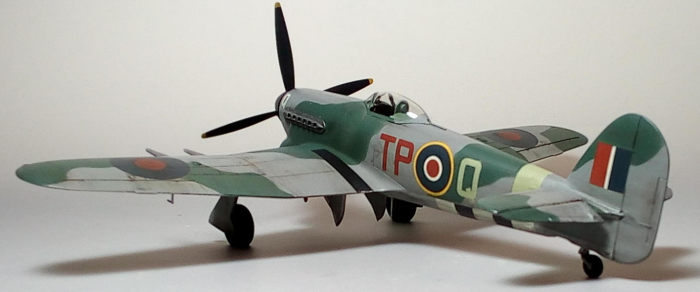
I
used the kit decals, in order to represent 198 Squadron’s “TPQ”, as it would
stand by the end of summer 1944. The particular Typhoon survived to have only
underwing and under fuselage stripes by the end of summer, and then lost the
underwing stripes but kept the under fuselage stripes. Since I hate painting b/w
stripes, I joyfully used the kit supplied decal that accounts for the
underfuselage striping. Typically for Hasegawa, the decals not only took
centuries to detach from their backing sheet (despite soaking them in hot
water), but also exhibited that “ivory” shade at the white areas (b/w stripe
areas and the smaller “Q” letter bilaterally of the engine cowling). They
adhered excellently, though, and snuggled down to every detail! A coat of Future
sealed them.
| FINAL CONSTRUCTION |
The correct exhausts for the “TPQ”
were drilled out for extra realism, painted with Testors Burned Metal and
attached into position. The leading edge mounted landing lights had their
“lenses” painted chrome and the surrounding inner area “cockpit color”. The
elevators were attached “drooped” at this time, as well (with the control stick
having been attached accordingly“forward”).
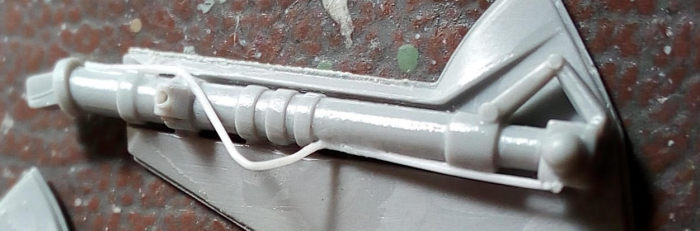 The
MLG struts were attached to their corresponding (dragged) doors. I could not
resist adding brake lines from stretched sprue, in a pattern inspired by viewing
seasonal pics. Then all landing gear parts were attached. The MLG legs stand
prominently fore at a distinctive angle and it is a good idea to have a "gear
down" side view handy (of the many net-available) in order to render it
correctly.
The
MLG struts were attached to their corresponding (dragged) doors. I could not
resist adding brake lines from stretched sprue, in a pattern inspired by viewing
seasonal pics. Then all landing gear parts were attached. The MLG legs stand
prominently fore at a distinctive angle and it is a good idea to have a "gear
down" side view handy (of the many net-available) in order to render it
correctly.
Upon
glue curing, I attached the 2-piece weighted main wheels and the single piece
tail wheel, which I tad “weighted” by sanding, in order to look homogenous with
the prominently weighted mains. All landing gear parts, including wells and door
innards, were painted Testors Steel, oleos were highlighted with a fine tip
silver pen and tires were painted black. A hefty black wash deepened all details
and gave the whole area a well used look. Of note is that the assembled MLG is
quite flimsy and sensitive to mishandling, so some extra care there will do no
harm whatsoever…
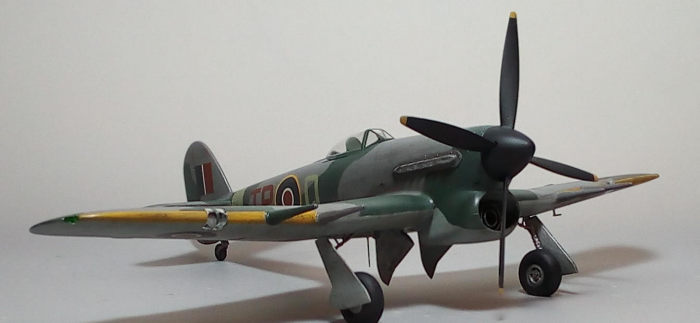
The
3-piece nice prop was assembled, with the handy poly-cap trapped in. It was
painted black with yellow tips (it is true that “TPQ” profiles exist, depicting
the spinner red or, more rarely, sky: while this might have been the early case,
at the end of summer spinners were painted black, in order to be less visible).
The wing pitot and underside antenna were attached and accordingly painted at
this time, as well. I did not attach the famous rockets, not even their pylons,
as they compromised the Typhoons' aerodynamic lines a lot ( I would love to add
the kit supplied good looking bomb pylons, but they would - most probably - be
wrong for the 198 Sq Typhoons).
 Since those Typhoons
were real work horses, I decided not to be subtle in weathering. I thus started
by applying an allover black wash that brought out all surface details. The wash
was heavier at the moving surfaces' hinge areas and fuel caps, where, before
fully dry, was spread aft with a 10/0 brush, towards the direction of the
airflow, resembling grease/oil leaks. Then a dark brown/black dry pastel
application followed, mainly at places where soot, dirt or grime would
accumulate and certainly at most of the undersides! Finally, some chipping was
done with silver dry brushing at wing roots black walk areas and prop blades
leading edges, before the model received its final satin - almost matt coating.
Since those Typhoons
were real work horses, I decided not to be subtle in weathering. I thus started
by applying an allover black wash that brought out all surface details. The wash
was heavier at the moving surfaces' hinge areas and fuel caps, where, before
fully dry, was spread aft with a 10/0 brush, towards the direction of the
airflow, resembling grease/oil leaks. Then a dark brown/black dry pastel
application followed, mainly at places where soot, dirt or grime would
accumulate and certainly at most of the undersides! Finally, some chipping was
done with silver dry brushing at wing roots black walk areas and prop blades
leading edges, before the model received its final satin - almost matt coating.
The gun sight had its
base painted black and attached. The transparencies (including the landing light
covers) had their well defined frames hand painted with a 10/0 brush and
attached with tiny amounts of styrene glue, the resulting mini gaps faired with
white glue. The main canopy was a tad narrower than the cockpit opening, but,
surprisingly, when pressed into position, it was spread wide by the rear anti
glare curvature just enough to sit properly! So, all I had to do was to glue and
hold the canopy in position for several minutes until the glue set!
The
wingtip lights were affixed with Clearfix and then carefully painted with
Humbrol red and green clear paints. The under-fuselage identification light had
its innards painted chrome and its circular cover affixed with Clearfix as well,
before calling the typhoon done!
| CONCLUSIONS |
This is a very good kit
of the iconic Typhoon with correct general shape and good fit. Detailing at key
areas is very good, instructions are clear and decals behaved well (with the
drawbacks of relative thickness and the white represented as ivory - the latter
affecting only one of the two specific kit schemes).
Whereas parts count is
not that low, a good number of them cater for the rockets ordnance, so it is not
a complex kit, its only “complication” being the not perfect fit of the famous
Hasegawa inserts that account for the bubble canopy version, resulting in a gap
that has to be specifically treated in order for the windscreen to fit but also
for the rear insert area not “bed” lower than the surrounding area. This issue
can be successfully handled by an average modeler.
Aftermarket of all kinds exists, being plentiful and impressive. Eduard have
also reboxed all versions in 2017 and 2018, with their amazing assortment of
goodies inside (PE, resin, masks, very interesting schemes and so on), but their
editions are of the “limited” kind and are not too easy to find nowadays (2022).
I had an extremely
pleasant time building this kit, which, apart from the added brake lines, was an
out of the box (OOB) build.
Whereas Hasegawa hasn’t
reissued any version of the kit since 2012, they can still be found at good
prices. If you fancy building a Typhoon and own one of these kits or come across
one, you are warmly advised to do so: an imposing model of the iconic
fighter/attacker will result for sure.
My
sincere Thanks to Tom Cleaver for providing valuable info on my specific plane’s
camo evolution.
Happy modeling!
Spiros Pendedekas
11 July 2022
Copyright ModelingMadness.com. All rights reserved. No reproduction in part or in whole without express permission.
If you would like your product reviewed fairly and fairly quickly, please contact the editor or see other details in the Note to Contributors.