
Revell 1/32 Beaufighter
| KIT #: | 4756 |
| PRICE: | $15.00 'used' |
| DECALS: | Two options |
| REVIEWER: | Spiros Pendedekas |
| NOTES: | 1974 tooling; 2009 release |
| HISTORY |
The origins of the iconic Beaufighter can be traced back in the late 30’s where the Bristol Aeroplane Company recognised that its Beaufort torpedo bomber had the appropriate layout and structural strength to be quickly modified and reequipped with more powerful engines, in order to become an efficient fighter. Using the same jigs with the Beaufort not only meant that the Beaufughter would be readily available, but also that production could easily be switched from one aircraft to the other.
Replacing the Beaufort’s Taurus engines with the more powerful but more heavy Hercules radials, required a shift of the plane’s center of gravity backwards, something not that difficult to achieve by deleting the now unnecessary bomber position (and giving the Beaufighter its characteristic stubby appearance). As envisaged, it became possible for the two planes to share many common parts (wings, control surfaces, landing gear and aft section of the fuselage were identical).
The pilot sat in a
fighter-type cockpit, while the navigator-radar operator sat to the rear under a
small Perspex bubble where the Beaufort's dorsal turret had been. Each member
would enter the plane via his own hatch. Armament was located in various
positions on the lower fusela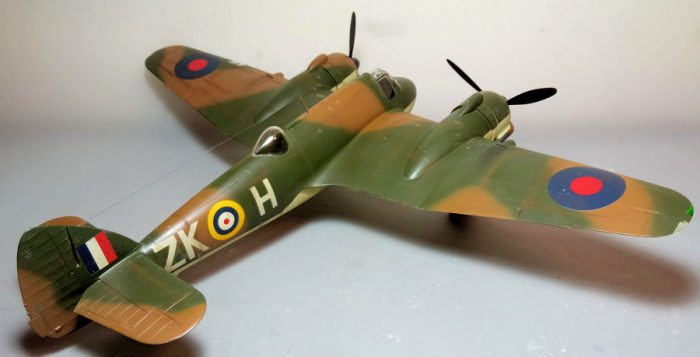 ge
and wings, with the type being among the most heavily armed fighters of the
time. The bomb bay of the Beaufort had been entirely omitted, but a small bomb
load could be carried externally.
ge
and wings, with the type being among the most heavily armed fighters of the
time. The bomb bay of the Beaufort had been entirely omitted, but a small bomb
load could be carried externally.
The initial skepticism regarding the ability of the Hercules engines to provide sufficient power, especially as extra equipment will be installed to the plane, together with the fact that the Hercules would also be needed for other important aircraft, such as the Short Stirling, led to the adoption of the Merlin XX as an alternative engine. However, Merlin powered Beaufighters not only proved underpowered, but also had a pronounced tendency to swing the plane to port, making take-offs and landings difficult and resulting in a high accident rate. It came as no surprise that, out of the 5,928 Beaufighters produced, only 337 were Merlin powered.
The plane was additionally developed as a fighter-torpedo bomber, using its firepower to suppress flak fire and hit enemy ships, especially escorts and small vessels. The recoil of the cannons and machine guns could reduce the speed of the aircraft by around 25 knots.
The Beaufighter found its niche as a night fighter. As early as during the Battle of Britain, it was available in good numbers by the time the first interception radars became available, with the plane’s vacant nose and spacious fuselage providing ideal places to accommodate the radar antennas needed and the early, bulky aircraft interception equipment respectively. With its radar it would detect the German bombers and with its speed would catch up on them. Using its heavy armament it would cause considerable damage, with its overall efficiency improving with time as more advanced radar equipment became available.
Although emerging from a bomber and with its conservative aerodynamics somehow not favoring speed and maneuverability, the Beaufighter can be considered a highly successful plane, performing very well in its assigned roles, especially as a night fighter. Bristol’s very wise decision to base it on the Beaufort, resulted in quickly mass producing the Beaufighter at the time it was needed the most.
| THE KIT |
 Revell came
in 1974 with a new tool 1/32 Beaufighter, reboxing it another 13 times ever
since, the last reboxing having taken place in 2014. By all means an elderly,
simplified but decent kit with a very nice decal sheet, it is still (as of 2024)
your only option if you want to build a 1/32 Beaufighter. The specific kit is
the 2009 rebox, bought “used” (the previous owner had removed most parts from
the sprues) at a good price and for a look at its contents you may look at its preview found
in the ever growing MM archives.
Revell came
in 1974 with a new tool 1/32 Beaufighter, reboxing it another 13 times ever
since, the last reboxing having taken place in 2014. By all means an elderly,
simplified but decent kit with a very nice decal sheet, it is still (as of 2024)
your only option if you want to build a 1/32 Beaufighter. The specific kit is
the 2009 rebox, bought “used” (the previous owner had removed most parts from
the sprues) at a good price and for a look at its contents you may look at its preview found
in the ever growing MM archives.
| CONSTRUCTION |
I started by assembling the cockpit and navigator’s compartments and trapped them between the fuselage halves. Basic cockpit color, including seat frames, was Hu78 Interior Green, while the instrument panel, all side consoles, the yoke and the seat cushions were painted black. I used three very nice instrument decals provided and also added seat belts from masking tape. While the cockpit is undeniably very simplistic, its sparseness is not too obvious under the thick, distorting transparencies.
Onto the main wing, where I first attached the top bay walls from the insides of the lower central wing half, then attached it to the fuselage, the top inner wing halves were then attached by first gluing them to the fuselage wing root area and then letting them “rest” onto the lower wing, where they were glued by capillary action of water thin glue: this way, I ensured a good fit at the wing roots.
 Continuing
with the main wing, I assembled its external sections and attached them to the
central wing, taking care to obtain the characteristic Beaufighter/Beaufort
dihedral (a front view provided by Revell would have been very helpful, but, as
usual, the Net saved the day…). The tail planes and rudder were assembled and
attached, together with the 2-piece carburettor inlets, the oil cooler faces,
the nacelles’ rear outlets and the wingtip transparencies.
Continuing
with the main wing, I assembled its external sections and attached them to the
central wing, taking care to obtain the characteristic Beaufighter/Beaufort
dihedral (a front view provided by Revell would have been very helpful, but, as
usual, the Net saved the day…). The tail planes and rudder were assembled and
attached, together with the 2-piece carburettor inlets, the oil cooler faces,
the nacelles’ rear outlets and the wingtip transparencies.
It was then engine time: the two average looking Hercules were assembled, each a six piece affair, followed by the four-piece cowlings and the three piece exhausts. Engine cylinders were painted black, then heavily dry brushed with silver, while the crankcases were painted a home brewed metallic gray. Cowling front rings were painted “copper”, while their innards were painted Hu78 iInterior Green. The exhausts were painted Testors Burned Metal. As a note, only the smooth type exhausts are provided (which are correct for my version). No porcupine style exhausts are provided (commonly seen at night fighter versions).
This concluded basic assembly, which was quite easy and quick for an 1/32 WWII twin engine plane: apart from the obvious overall simplicity, the easiness of assembly was also due to the good overall fit, requiring only small amounts of putty at the expected areas (wing roots and cowling joins). Off to the paint shop then!
| COLORS & MARKINGS |
I first gave all undersides, including the gear doors, a coat of Hu95 Concrete, which, to my eye, comes close to the Sky type S I was opting for. After masking it off, I freehanded the top camo by using Hu29 and Hu30 for the Dark Earth and Dark Green respectively. The red gun wing patches were hand painted after some masking, with a coat of Future preparing the bird for decals.
I used the kit decals to represent No. 25 Sqn. R2069/ZK-H machine, as it stood in March 1941. Decals looked to be in excellent condition and behaved well. Slight silvering was noted only at the green painted areas, so, it was most likely operator error. The maintenance stencils helped adding some interest to the otherwise big, simplistic model. A coat of Future sealed the decals.
 All landing
gear parts were attached, with the bird securely standing on its feet. Wheel
wells and door innards were painted Hu78 Interior Green, gear struts and wheel
rims were painted steel, tires were painted black, while the oleos were
highlighted with a fine tip silver pen. The wheels were filed down to look
weighted. To somehow add some interest to the very simplified landing gear, I
added brake lines from stretched sprue. The props were assembled, painted black,
had some light chiping done at their tips and attached at this time, as well.
All landing
gear parts were attached, with the bird securely standing on its feet. Wheel
wells and door innards were painted Hu78 Interior Green, gear struts and wheel
rims were painted steel, tires were painted black, while the oleos were
highlighted with a fine tip silver pen. The wheels were filed down to look
weighted. To somehow add some interest to the very simplified landing gear, I
added brake lines from stretched sprue. The props were assembled, painted black,
had some light chiping done at their tips and attached at this time, as well.
I decided to add some weathering, consisting of dark brown and black dry pastels at places where dirt, grime or engine soot would reside. Some very light chipping was also dry brushed at areas where the personnel would walk or leave its tool box. A mat coat gave the bird its final hue.
The transparencies had their well defined frames hand painted and attached, with fit being quite good. Same for the port leading edge located dual landing light cover, with the lens before hand painted silver and the surrounding frame interior green. The top antenna mast was attached and thin stretched sprue was run from its top towards the fin, and also downwards to the fuselage to represent the aerial wire. The wing tip front lights were painted with red and green clear colors, before calling the Big Beau done!
| CONCLUSIONS |
Still (as of 2024) your only option for a 1/32 Beaufighter, this is a solid if simplified 1/32 kit: while molding is fairly good, construction is simple and pleasant and the decals are great, detailing falls short for contemporary 1/32 standards, particularly in the crew compartments, landing gear, and engines.
That said, there is nothing really wrong in obtaining such a kit at a low price and building it, either easily out of the box or putting some extra effort and possibly aftermarket stuff and detailing it: once you allocate some serious shelf space, you will be rewarded with a big, good looking Beau added to your collection.
Happy Modeling!
Spiros Pendedekas
22 October 2024 Copyright ModelingMadness.com. All rights reserved. No
reproduction in part or in whole without express permssion from the editor.
If you would like your product reviewed fairly and fairly quickly, please
contact
the editor or see other details in the
Note to
Contributors.