Tamiya 1/48 Mosquito Mk.II
| KIT #: | 61602 |
| PRICE: | $40.00 |
| DECALS: | Two Options |
| REVIEWER: | Hans Gertje |
| NOTES: | Eagle Strike 48-175 |
| HISTORY |
 Although
initially met with skepticism by the Air Ministry, the de Havilland Mosquito
soon became an important asset to RAF operations in WWII due to its great
speed and versatile design. Originally a fast, unarmed tactical bomber, it
was quickly developed into a fighter bomber. This heavy fighter design was
also a natural fit as a night fighter, the first of which was designated NF
Mk. II. It was equipped Airborne Intercept (AI) Mk. IV radar. Visually, one
could tell the NF was equipped with the AI radar from the “arrowhead” nose
antenna and dipole antennas mounted on the wingtips.
Although
initially met with skepticism by the Air Ministry, the de Havilland Mosquito
soon became an important asset to RAF operations in WWII due to its great
speed and versatile design. Originally a fast, unarmed tactical bomber, it
was quickly developed into a fighter bomber. This heavy fighter design was
also a natural fit as a night fighter, the first of which was designated NF
Mk. II. It was equipped Airborne Intercept (AI) Mk. IV radar. Visually, one
could tell the NF was equipped with the AI radar from the “arrowhead” nose
antenna and dipole antennas mounted on the wingtips.
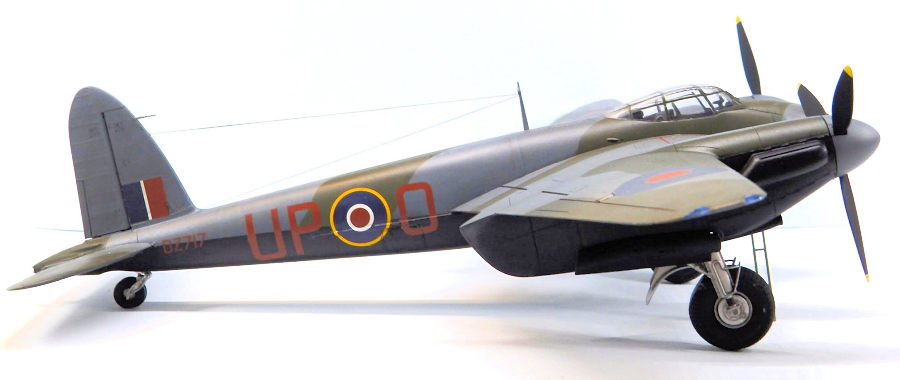
Due to the highly secret nature of AI radar, such equipped Mosquitos were not permitted to fly over mainland Europe. Mosquitos such as NF Mk. II DZ717 (UP O) were stripped of their radar equipment to serve in the night intruder mission. Night intruders were meant to support the offensive bomber mission by attacking enemy airfields to reduce enemy night fighter pressure. With their radar removed, they had extra space for fuel, which improved loiter time and was beneficial to the longer mission times lurking over enemy territory. DZ717 was assigned to 605 “County of Warwick” Squadron based at Castle Camps beginning in mid-1943. This plane was flown by Flt. Lt. D. H. Blomely, who shot down over ten aircraft during this time, including 4 in one night in Fall 1943. The paint scheme of this aircraft retained the night fighter matte black on the underside with typical Mosquito camo on top.
| THE KIT |
 Still a
high-quality kit since its release in 1998, Tamiya’s Mosquito FB Mk. VI/NF Mk.
II is a fine choice to build a 1/48 scale model of the Wooden Wonder. Readily
available for $30-45 at hobby shops, this is one of those well-distributed
standbys that helps make Tamiya one of the best in the business. The mold
quality is still beautiful, with nice surface details appropriately restrained
for this subject. There are quite a few individually bagged grey sprues, a clear
part tree, and a set of decals protected in a bag with lens paper. There is a
set of instructions for construction, painting, and decals for three different
aircraft. The variety of options is nice—the modeler can build a night fighter
with the included parts, or even a Coastal Command plane equipped with rockets.
Still a
high-quality kit since its release in 1998, Tamiya’s Mosquito FB Mk. VI/NF Mk.
II is a fine choice to build a 1/48 scale model of the Wooden Wonder. Readily
available for $30-45 at hobby shops, this is one of those well-distributed
standbys that helps make Tamiya one of the best in the business. The mold
quality is still beautiful, with nice surface details appropriately restrained
for this subject. There are quite a few individually bagged grey sprues, a clear
part tree, and a set of decals protected in a bag with lens paper. There is a
set of instructions for construction, painting, and decals for three different
aircraft. The variety of options is nice—the modeler can build a night fighter
with the included parts, or even a Coastal Command plane equipped with rockets.
Keeping this a straightforward and simple build, my focus was the paint scheme I wanted to do, so the only aftermarket I purchased was Eagle Strike’s “Mosquito Best Sellers” decal sheet and some Eduard canopy/wheel masks. Originally, I liked the idea of building the night fighter, but an all-black scheme felt rather limiting as a modeler who wants to try new things like painting camo schemes, so the night intruder scheme with camo on top and black undersides felt like the best of both worlds. Eagle Strike provides decals for a 605 Squadron night intruder, so from the outset of the build I had decided on this plane.
| CONSTRUCTION |
This quickly turned out to be important, as there is a variety of choices to make in early assembly. Construction starts with the engine nacelles and wings. The wings have optional holes to drill depending on what you intend to build: rockets for coastal patrol, bombs for fighter-bomber, or dipole wing antennae for the night fighter. I ended up drilling none of them, as the night intruder Mosquitos had no radar systems. All the early building was pretty simple with parts fitting well, although I found the nacelle halves were somewhat fiddly and needed more seam cleanup than expected. More on that later.
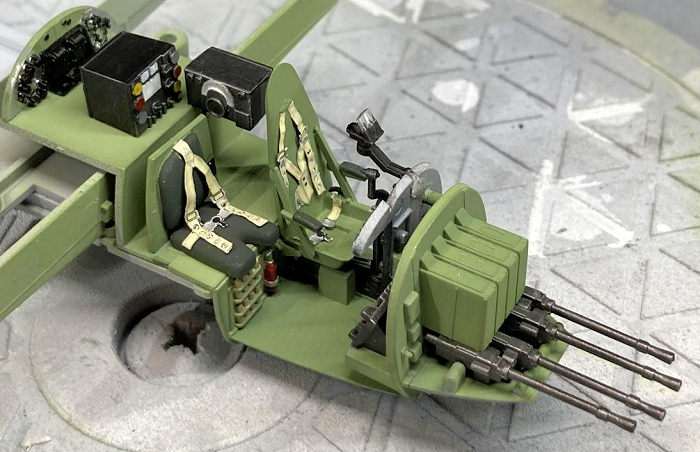 The
cockpit was the lengthiest part of the build. I took plenty of time mixing
Tamiya acrylic paints per the instructions to get a good shade of RAF interior
green, and carefully painted the various components of the interconnecting
cockpit assembly. The forward .303 guns and ammo cans connect to the flight
deck, which has pilot and navigator seats. The rear flight deck is adorned with
radios and is connected to the bomb bay ceiling, which is assembled with wing
spars and serves as the central structure of the plane. Since I was not going to
build a plane with bombs, I didn’t bother to paint the bomb bay interior.
The
cockpit was the lengthiest part of the build. I took plenty of time mixing
Tamiya acrylic paints per the instructions to get a good shade of RAF interior
green, and carefully painted the various components of the interconnecting
cockpit assembly. The forward .303 guns and ammo cans connect to the flight
deck, which has pilot and navigator seats. The rear flight deck is adorned with
radios and is connected to the bomb bay ceiling, which is assembled with wing
spars and serves as the central structure of the plane. Since I was not going to
build a plane with bombs, I didn’t bother to paint the bomb bay interior.
Before joining the fuselage around the cockpit assembly, I made seatbelts by applying the kit decals to a sheet of aluminum foil and cut them out after they had time to set. These decals have a sort of “graphic” or “cartoony” appearance with heavy black lines emphasizing detail, so to make them more realistic I touched up those lines with similar colored paint. When applied to the seats, I found they really add to the overall appearance of the cockpit (I got the idea from an old IPMS Stockholm article featuring the 1/72 version of this kit).
Putting the rest of the plane together was mostly straightforward, although in hindsight I could have spent more time aligning the fuselage parts, since there were some steps and seams to sand down. I glued on the closed bomb bay doors, assembled the stabilizers and wingtips, and then glued all the flight surfaces to the fuselage. Tamiya added a very clever set of pins that help secure the wings snug to the fuselage.
| COLORS & MARKINGS |
 Once I was
satisfied with the finish, I started painting the undersides Tamiya matte black.
For the topside camo (Tamiya RAF Ocean Grey and Dark Green), I used Tamiya
curved tape to make the “hard edge” camo lines and filled in the part to be
masked with regular Tamiya tape and paper towels. It turned out great—Tamiya
curved tape is awesome for this kind of camo as long as you smooth it down flat
and don’t let it bunch up or overstretch. I intentionally did little preshading
except in areas with obvious panel lines and gaps.
Once I was
satisfied with the finish, I started painting the undersides Tamiya matte black.
For the topside camo (Tamiya RAF Ocean Grey and Dark Green), I used Tamiya
curved tape to make the “hard edge” camo lines and filled in the part to be
masked with regular Tamiya tape and paper towels. It turned out great—Tamiya
curved tape is awesome for this kind of camo as long as you smooth it down flat
and don’t let it bunch up or overstretch. I intentionally did little preshading
except in areas with obvious panel lines and gaps.
In between paint coats, I assembled the propellors and landing gear. This was a bit of a lengthy process too, as I painted all the parts prior to assembly. The landing gear was flat aluminum with some flat black highlights, burnt red oil tanks, and flat black tires with flat aluminum wheels (all Tamiya acrylics).
The Eagle Strike decals went on beautifully, the standard Micro Set/Sol was good enough for them to settle in. I used the few data stencils provided by the Tamiya kit which went on just fine as well with some SolvaSet. After attaching the gear, crew hatch & ladder, and some E-Z line for the antennas, the model was done.
| CONCLUSIONS |
Tamiya makes a great Mosquito. To my knowledge it’s mostly very accurate. Great engineering grants overall ease of construction means the modeler with a casual interest can take it for an easy stroll, and fans of RAF and WWII combat aircraft won’t be disappointed in the range of options that are buildable here. I also highly recommend the “Mosquito Best Sellers” decal sheet. You can probably do better than the Eduard canopy masks, some of which were too large for the frames. Overall, I’m very happy with the result, particularly how the menacing paint scheme turned out. Highly recommended to modelers of all stripes.
16 September 2024 Copyright ModelingMadness.com. All rights reserved. No
reproduction in part or in whole without express permission from the editor.
If you would like your product reviewed fairly and fairly quickly, please
contact the editor or see other details in the
Note to
Contributors.