Airfix 1/72 Gladiator
| KIT #: | 81002-1 |
| PRICE: | $5.00 |
| DECALS: | One options |
| REVIEWER: | Joe Essid |
| NOTES: | Character building with a crude antique |
| HISTORY |
Most history buffs of the Second World War have heard of Faith, Hope, and Charity, from group of six Gladiator biplanes that fought the Italians at Malta. Based at Hal Far, these aircraft served alongside Hurricanes that arrived later to keep North Africa out of Axis hands. Had Malta fallen, Rommel’s Afrika Corps might have taken the Suez Canal, so I might not be writing this today, or you building models of anything but Axis aircraft.
 I won’t rehash the history of
the Malta battle or of England’s final biplane fighter. I do, however, seem
to have an interest in end-of-the-line technologies. It explains why I drive
the final model-years of certain vehicles. Such vehicles have reached an
apex of design and engineering.
I won’t rehash the history of
the Malta battle or of England’s final biplane fighter. I do, however, seem
to have an interest in end-of-the-line technologies. It explains why I drive
the final model-years of certain vehicles. Such vehicles have reached an
apex of design and engineering.
The Gladiator shared that fate, one akin to that of the Mustang or Sea Fury when jets arrived. In 1940, it meant being a superb biplane just as modern monoplanes equipped fighter squadrons.
Nothing about war is poetic, but there’s something fitting and proper about duels in the Mediterranean skies between Gladiators and Fiat CR-42s, themselves a final manifestation of the biplane fighter.
| THE KIT |
 A few years ago, I picked up a
small lot of Airfix old-tool kits on eBay at a song. I’d been hunting for a
Brewster Buffalo, and the Gladiator that arrived with the Buffalo is one of
Airfix’s older, most basic kits. I figured it would give me some biplane
experience and let me try my hand at scratch building. My only biplanes to date
have been 1/72 Revell Fokkers, neither of which feature rigging wires.
A few years ago, I picked up a
small lot of Airfix old-tool kits on eBay at a song. I’d been hunting for a
Brewster Buffalo, and the Gladiator that arrived with the Buffalo is one of
Airfix’s older, most basic kits. I figured it would give me some biplane
experience and let me try my hand at scratch building. My only biplanes to date
have been 1/72 Revell Fokkers, neither of which feature rigging wires.
Airfix’s gentleman-scale Gladiator dates back to 1936, when the aircraft was still in frontline service. My example appears to be a hoary 1970s issue, before the old kit got new decals in 2009. Neither issue should be confused with Airfix’s new-tool kit from 2013. The old tooling offers a choice of four different schemes, one a prewar silver Gladiator. The decals feature a common backing film, mine aged poorly, and probably should have been tossed out. The transfers gave me fits.
You can use a propeller with two or three blades, and that’s about it for options.
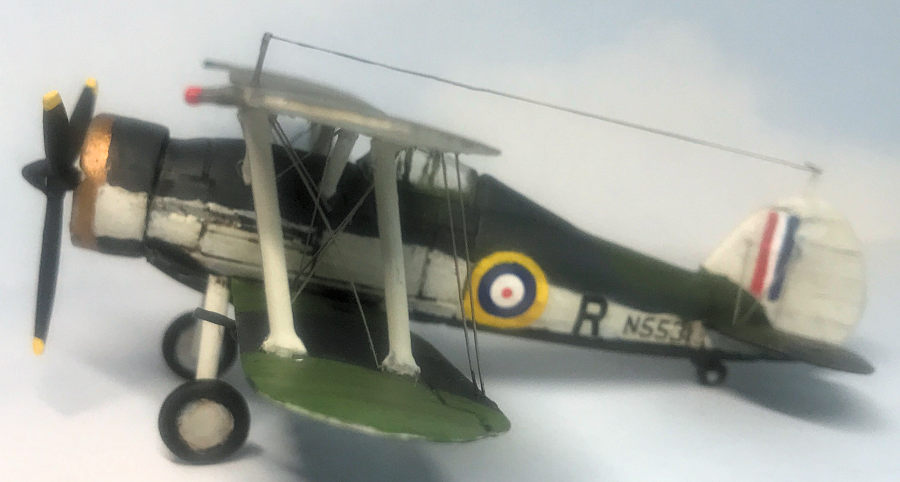
While an early silver Gladiator with a wooden prop has its charms, the Maltese defenders were what I was after.
| CONSTRUCTION |
This kit features a crude cockpit and engine. Maybe its rudimentary nature reveals why no one at MM has covered it? It fares better otherwise, featuring recessed panel lines around the cockpit and fine spar-details on the wings and fuselage.
I began by cutting out the pilot torso, a little mummy of a man molded on a flat plate, where there should be an opening for a cockpit. It seemed as realistic as having a tiny Snoopy flying-ace on board. Once he was consigned to oblivion, I added a few details to the cockpit walls, then modified a generic seat from the stash. I used a a bit of Evergreen to add an oxblood-leather seat cushion. It provides some contrast, as do seat belts made from masking tape.
For an instrument panel, I cut a semicircle of Evergreen sheet and painted it with Vallejo flat black. When I didn’t find a panel decal in the dungeon, with a very sharp Prismacolor silver pencil I drew instruments under a magnifier and touched them up with a line or two in white or red paint. In the tiny cockpit it looks good enough for my experiment. I added a floor, throttle, joystick, and a doo-dad that sits on a rod ahead of the pilot. Compass? Holder for a pint of bitter? I have no idea of its purpose, but it’s big enough to see, even with the thick canopy closed, as I’d planned.
Most everything got painted interior green with some silver or black bits, as I gleaned from photos online.
 The fuselage went together with no
issues, then I added the bottom wing and horizontal stabilizers. The fuselage
has a slot for a stand, but as my kit did not feature one, I puttied the gap
shut. As I planned to drill holes ready for rigging, I left off the top wing
while I studied photos of actual aircraft as well as models.
The fuselage went together with no
issues, then I added the bottom wing and horizontal stabilizers. The fuselage
has a slot for a stand, but as my kit did not feature one, I puttied the gap
shut. As I planned to drill holes ready for rigging, I left off the top wing
while I studied photos of actual aircraft as well as models.
Then it was time to fabricate a reasonable facsimile of a Bristol Mercury Engine. The kit’s cowling does not include very prominent “teardrop” rocker-gear bulges visible on Gladiators, though there are a few little bumps. I made do with them. The kit also features some notional cylinder heads right up front in the cowling. I’m not a stickler for precise detail, but this attempt at a motor fell far off the mark. The real engine sat much further back and had some interesting details on the cylinder-heads I figured I could create. Out came the Dremel and I ground out the cowling to leave an empty ring.
After some false starts, I glued a hub to the firewall and wrapped pieces of sprue with jeweler’s wire before joining them to the hub. I liked the results, but in the end, I only had room for a set of eight, not nine cylinders. I called it the rare prototype engine and let it go, as with the cowling crammed with braces of resin, intakes, and other bits of detail, only a contest-judge might ding me for being one cylinder short.
This kit is not bound for a contest.
With the engine in place, I shaved down the tops of the cylinders and the inside of the cowling until they all fit. Tips from a cocktail stirrer poked onto a bit of toothpick provided two intakes inside the cowling (I prefer my pre-dinner martini shaken, thank you Mr. Bond).
The kit’s under-wing guns come in pods that do not match a real Gladiator’s, so with some bomb-halves from the stash and stretched sprue I fabricated pods with gun-barrels. The size was right, but I never got the ends pointy enough. Onward!
| COLORS & MARKINGS |
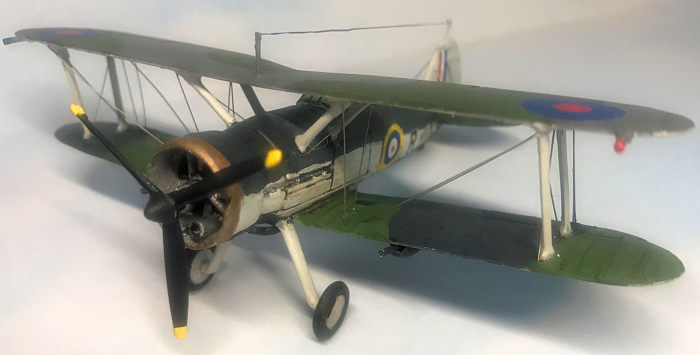
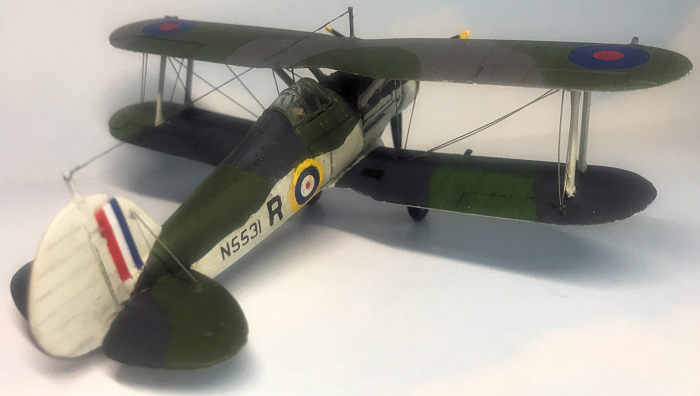
I chose to build Charity. Here my troubles involved Airfix’s color callouts. I have never seen a Sea Gladiator in Dark Earth camo, though that may be my lack of experience. Looking at builds online, I figured that the Humbrol paint-codes given (numbers only) might in places refer to older discontinued colors and not the current numbers in the catalog.
So I turned to the Internet and other modeler’s descriptions of their builds. I paid heed in particular to Carmel Attard’s Frog 1/72 kit from 2006, to be found in the archives here https://modelingmadness.com/review/allies/gb/attardfglad.htm . Carmel, of Malta, would certainly have wanted to get his aircraft close to correct.
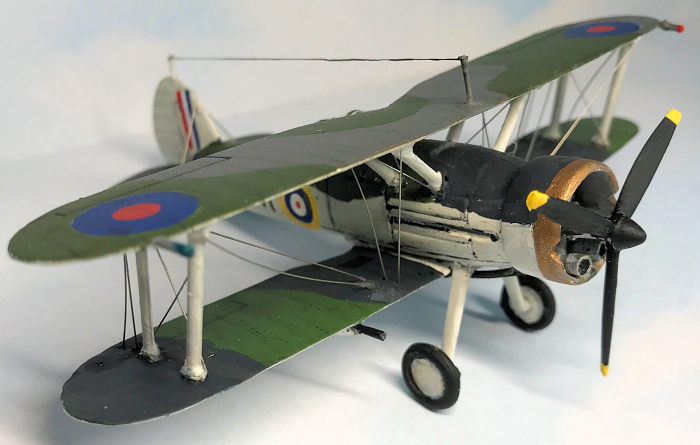
The plane ended up with a gray-on-gray scheme, yet as with a certain novel: we have 50 shades of gray. My browsing didn’t reveal any agreement for what goes exactly where: some modelers use Extra-Dark Sea Gray for the lower wing and Dark Sea Gray for the top. Others reverse that order. Carmel uses the same hues on the top and bottom wings. Maybe are all correct!
Then there is Slate Gray, which looks rather like RLM 02. I went with Mission Extra-Dark Sea Gray, while Vallejo RLM 75 Gray-Violet stood in for Dark Sea Gray and Vallejo RLM 82 Light Green for Slate Gray. I lightened this with Vallejo Scorpion Green to mix up Light Slate Gray.
Accurate? I think not, but I like the contrast of my scheme. Gladiator experts, please correct me. I’ll get Faith or Hope right in some future build.
 The paint went down well on the
top wing with my airbrush, and after the Sea Gray was dry, I hit the wing with
Tamiya Flat, then masked with Silly Putty before spraying the Slate Gray. The
fuselage got Vallejo White Gray airbrushed, but the lower wing and stabilizers
had to be brush-painted carefully. Vallejo Air brushes well if one is patient
and uses a high-quality brush. Touch-ups proved very easy too.
The paint went down well on the
top wing with my airbrush, and after the Sea Gray was dry, I hit the wing with
Tamiya Flat, then masked with Silly Putty before spraying the Slate Gray. The
fuselage got Vallejo White Gray airbrushed, but the lower wing and stabilizers
had to be brush-painted carefully. Vallejo Air brushes well if one is patient
and uses a high-quality brush. Touch-ups proved very easy too.
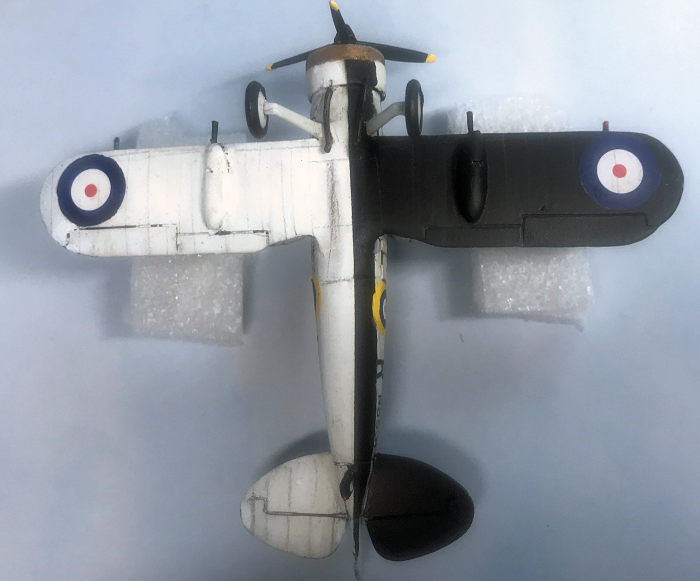
When all was done topsides, I covered the paint again with Tamiya flat, then masked everything to airbrush the undersides in the Gladiator’s fascinating half black, half white scheme. The front of the cowling got Testors Brass brushed on, right out of the square bottles of my misspent, geeky youth.
Removing the masking removed some paint on the lower wing, and this had to be corrected, though I’d hoped Vallejo would prove sturdier than Mission paints. It did, mostly. Mission became very fussy in one place I had primed. The flat overspray removed spots of paint to show white primer! I only got it to say down by touching it up with more Mission paint to which I’d added about 10% of the company’s poly additive.
Those repairs made, it was time for Future and decals; I apply Future only where the decal will go instead of misting the entire kit. I used the kit’s decals, after testing one I would not use to make sure it would not shatter. While it did not, the tail insignia broke into bits when being moved, and one roundel tore on the bottom wing. Some touch-up painting fixed all this but one decal on the tail earns the adjective “grotty” for its paint. Let’s say it was a hasty in-field fabric repair.
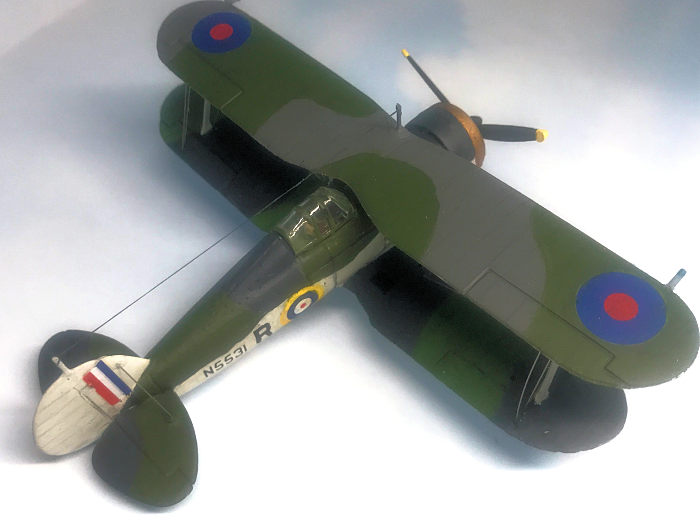
With the decals done, I sealed them with Tamiya flat and added some pencil lines along the wing and fuselage sparts, blending them with an artist’s pencil blender and a wash of White Gray for the lower surface of the top wing. This was a new technique for me and I like the results.
On the bottom a gray artist’s pencil gave the contrast for fuselage and wing-spar lines for both the white and black undersides. Other than exhaust soot, that would suffice for weathering a fabric-skinned aircraft. I hand-painted canopy framing and that job proved easy, given the ancient kit’s overly thick raised detail.
| FINAL CONSTRUCTION |
When the canopy was in place and dry, I glued the cabane struts to the top wing, leaving the interplane struts glued to the bottom wing. Everything looked aligned. As I got ready to attach the interplane struts, I dropped the kit. Off came the top wing and most of the struts.
I did not curse, as this was an experiment. I looked online at some designs for jigs and built one with a Styrofoam base, then used toothpicks to hold the plane steady. Other toothpicks got the wing angle correct. My plan then involved glueing the interplane struts first to the bottom, then to the top wing and holding it all together with rubber bands. A thin piece of packing foam would insulate the wing from the rubber bands.
That worked, but the wing got out of alignment, left to right, by several millimeters. The starboard interplane struts came off again and I got things square, even though the top wing is perhaps 2 mm off-center. For the next biplane I’ll need a more comprehensive method for attaching the interplane struts, plus not dropping the kit on the ground.
 Unless you look at the plane
head-on, it looks almost aligned. What else could go wrong? Not the rigging,
right?
Unless you look at the plane
head-on, it looks almost aligned. What else could go wrong? Not the rigging,
right?
Here I got luckier, but finishing things took a LONG time; stainless wire suffers fools poorly. I had pre-drilled holes for .2 mm stainless wire. I tested a few strands when building and think I’ve come upon a fix for my aversion to building biplanes. With a dab of CA I set one end of the wire. I could trim the other end with a pair of titanium-bladed scissors, until it fit perfectly into the other hole. Another dab of CA with a toothpick set the rigging well.
Or it flexed and sailed off into the blue.
The results still look “grotty” to me, like many of my builds, but I carefully sanded the extra CA around the wires and touched up the paint. I knocked more rigging wires loose or sent them flying. Do not enter my study in socks unless you like random acupuncture therapy.
I then added the exhausts, fabricated radio masts and wing lights, stretched an EZ-Line aerial, glued on the wheels, and attached the prop to my scratch-built Bristol. More touch-ups, some oxidation on the exhausts and tarnish at the front of the cowling from Prismacolor pencils, a last spray of flat clear, then pastel exhaust staining ended my rigged-biplane experiment.
| CONCLUSIONS |
How did little kids make biplane kits? Maybe they were made of tougher stuff that we moderns, or maybe they didn’t care about where the struts hit the wings. They just had fun, not .2mm stainless wires.
My experiment was mostly fun, too, over 20 hours of work (!). It built confidence for future biplanes kits with scratch-building, new techniques for painting, and jigs. Finally, it cultivated my Stoic side and looks just fine in the case with other old-tool Airfix kits I love.
Airfix’s antediluvian antiquity can be had cheaply, and though it fails any test for a modern kit, it suffices as a desk model or ceiling-hanger. Toss the decals.
For those wanting more detail in 1/72, get the new-tool Airfix, or the Pavla or Sword releases. I’m going to opt for the latest Airfix when I add another Gladiator to my collection.
16 June 2025 Copyright ModelingMadness.com.
All rights reserved. No reproduction in part or in whole without express
permission. If you would like your product reviewed fairly and
fairly quickly, please
contact
the editor or see other details in the
Note to
Contributors.