| KIT #: | 61053 |
| PRICE: | $37.60 |
| DECALS: | Three options |
| REVIEWER: | Dave Cummings |
| NOTES: | Aeromaster decals. Eduard masks |
| HISTORY |
 In the
critical years preceding WWII, the RAF was aware of its lack of any long- range
fighter for bomber escort, any cannon armed fighter effective against bombers,
and a suitable night fighter. Though no official requirement was published, the
management at Bristol was aware of these needs. They proposed a new
twin-Hercules powered two-seater carrying enough armament to blast anything out
of the sky. By using the wings, tail, landing gear, and jigs of the existing
Beaufort, it could be put into production quickly. The Air Ministry was
enthusiastic and the first of what was to be a historic war-winning aircraft
took to the air only six months later. The first production models rolled off
the assembly line in May 1940. A snub-nosed battleship, it was immensely strong,
surprisingly manoeuvrable, and a great basis for development. However, the first
production versions were underpowered by the early Hercules and barely exceeded
300 mph. It also had a nasty tendency to swing on take off and landings. With
the urgency of the Battle of Britain, production was slowed with priority given
single engine fighters. But when the need for night fighters became urgent to
beat the Blitz, radar equipped Beaufighters were given priority and were
instrumental in causing the Luftwaffe to give up the Battle of Britain. Later
marks with more power and remedy for the swing issue proved highly effective
multi-role attack aircraft and 5,564 were built in England. In Australia, the
Beaufighter proved invaluable. Its long range was suitable for the vast over
ocean operations of the Pacific and its firepower proved devastating in the air
support and anti-shipping roles. The aircraft was of such value that license was
procured to produce Beaufighters in Australia. These were basically the
Beaufighter Mk.X with a few modifications and dubbed Beaufighter Mk.XXI of which
364 were produced. Australian modifications include installation of the Sperry
auto pilot system to aid long overwater flights and replacing the wing mounted
.303 machineguns with heavier hitting .50s. These along with their American B-25
gunship counterparts devastated Japanese shipping.
In the
critical years preceding WWII, the RAF was aware of its lack of any long- range
fighter for bomber escort, any cannon armed fighter effective against bombers,
and a suitable night fighter. Though no official requirement was published, the
management at Bristol was aware of these needs. They proposed a new
twin-Hercules powered two-seater carrying enough armament to blast anything out
of the sky. By using the wings, tail, landing gear, and jigs of the existing
Beaufort, it could be put into production quickly. The Air Ministry was
enthusiastic and the first of what was to be a historic war-winning aircraft
took to the air only six months later. The first production models rolled off
the assembly line in May 1940. A snub-nosed battleship, it was immensely strong,
surprisingly manoeuvrable, and a great basis for development. However, the first
production versions were underpowered by the early Hercules and barely exceeded
300 mph. It also had a nasty tendency to swing on take off and landings. With
the urgency of the Battle of Britain, production was slowed with priority given
single engine fighters. But when the need for night fighters became urgent to
beat the Blitz, radar equipped Beaufighters were given priority and were
instrumental in causing the Luftwaffe to give up the Battle of Britain. Later
marks with more power and remedy for the swing issue proved highly effective
multi-role attack aircraft and 5,564 were built in England. In Australia, the
Beaufighter proved invaluable. Its long range was suitable for the vast over
ocean operations of the Pacific and its firepower proved devastating in the air
support and anti-shipping roles. The aircraft was of such value that license was
procured to produce Beaufighters in Australia. These were basically the
Beaufighter Mk.X with a few modifications and dubbed Beaufighter Mk.XXI of which
364 were produced. Australian modifications include installation of the Sperry
auto pilot system to aid long overwater flights and replacing the wing mounted
.303 machineguns with heavier hitting .50s. These along with their American B-25
gunship counterparts devastated Japanese shipping.
| THE KIT |
 Released
in 1997, the kit is what one expects from Tamiya. Well-engineered with good fit,
accurate dimensions, beautiful engraving and good detail. Interior may be a bit
sparse for more modern tastes, but closed up under a bit thick canopy it works
for me. There are two pilot figures included. A little thick, but the clear
parts are clear and clean with well-defined framing. The wing tip navigation
lights on Beaus are much larger than those on a typical fighter type so having
these as clear parts is a good thing. The Hercules engines are just an engine
face. But it’s OK, since all the plumbing is on the back side of these engines
so there isn’t much to them, and set back in the cowlings you can’t see much of
them anyway. Wings are a 5-part affair with outer wings attaching to a bottom
center section that is also the bottom of the fuselage. Makes a neat and strong
structure. Decals and parts options are for three aircraft. A rocket armed
strike fighter of 272 squadron, Malta 1942 in the desert camo scheme. A 92nd
Squadron night fighter in standard day camouflage, Scotland 1943. And an
all-black night fighter of 600 Squadron. Though I didn’t use them, the decals
appear typical Tamiya quality. Tamiya obviously planned additional releases so
there are unused parts for other Beaufighter marks included in the kit. So, if
you acquire the appropriate decals any of the later production Hercules Beaus
with the positive tail plane dihedral can be made. I guess with a little tail
plane surgery some earlier marks as well. Spare parts include the thimble nose
for those types and the Sperry Autopilot housing for the Australian Mk.XXI. I
have heard something about the elevator trim tab actuators being on the wrong
side of the tail planes. But I am ignoring that rumor, holding my ears, don’t
want to hear it.
Released
in 1997, the kit is what one expects from Tamiya. Well-engineered with good fit,
accurate dimensions, beautiful engraving and good detail. Interior may be a bit
sparse for more modern tastes, but closed up under a bit thick canopy it works
for me. There are two pilot figures included. A little thick, but the clear
parts are clear and clean with well-defined framing. The wing tip navigation
lights on Beaus are much larger than those on a typical fighter type so having
these as clear parts is a good thing. The Hercules engines are just an engine
face. But it’s OK, since all the plumbing is on the back side of these engines
so there isn’t much to them, and set back in the cowlings you can’t see much of
them anyway. Wings are a 5-part affair with outer wings attaching to a bottom
center section that is also the bottom of the fuselage. Makes a neat and strong
structure. Decals and parts options are for three aircraft. A rocket armed
strike fighter of 272 squadron, Malta 1942 in the desert camo scheme. A 92nd
Squadron night fighter in standard day camouflage, Scotland 1943. And an
all-black night fighter of 600 Squadron. Though I didn’t use them, the decals
appear typical Tamiya quality. Tamiya obviously planned additional releases so
there are unused parts for other Beaufighter marks included in the kit. So, if
you acquire the appropriate decals any of the later production Hercules Beaus
with the positive tail plane dihedral can be made. I guess with a little tail
plane surgery some earlier marks as well. Spare parts include the thimble nose
for those types and the Sperry Autopilot housing for the Australian Mk.XXI. I
have heard something about the elevator trim tab actuators being on the wrong
side of the tail planes. But I am ignoring that rumor, holding my ears, don’t
want to hear it.
| CONSTRUCTION |
 The
interior builds on a one-piece full-length floor chassis with the pilot’s office
on one end and the observer/gunner’s office at the other end. There are
multi-part instrument decals that are applied to the black painted instrument
panel. The Tamiya paint mixing formula shows the interior as RAF gray green.
There are decal seatbelts. Completing Steps 1 and 2 gives you a complete cockpit
assembly. Step 3 is trapping this assembly between fuselage halves and gluing
the halves together. But wait, also in this step is attaching the rear crew
entry hatch. Now, I’m not very smart, I need clear instructions what to do. So,
the instructions has you going through all kinds of gyrations. Cutting off a
section of this hatch, and trapping between fuselage halves without gluing. But
it makes no mention of why? Turns out this is an option to display the hatch
open or closed. But it doesn’t tell you this. So not being able to figure it
out, I just glued the whole thing shut. Same thing with wing assembly. It has
you not cement the forward entry hatch to the wing center section, but to
temporarily hold it in place with tape. Then the instructions forgets all about
that hatch and never mentions it again. So I just glued my shut. Don’t forget to
open the holes for the rocket mounts if you are using them. Landing gear is
assembled and attached to the wheel wells, this assembly becomes an insert into
a nacelle opening. I like this because you can attach to the nacelle after
painting saving a masking chore. Next is attaching the wing assembly to the
fuselage. The engines and cowling are then assembled and attached to the wing
nacelles along with the air intake caps on the wing leading edge. Then the tail
planes are attached. So, fit is good, no real assembly issues. The fuselage seam
required minimum scraping and sanding. Only needed a small dab of filler on one
wing root seam and around the air intake caps. Next, I masked the canopy and
gunner’s bubble. The Eduard set performed wonderfully as usual. These were then
attached with Zap Canopy Glue. And ready for painting.
The
interior builds on a one-piece full-length floor chassis with the pilot’s office
on one end and the observer/gunner’s office at the other end. There are
multi-part instrument decals that are applied to the black painted instrument
panel. The Tamiya paint mixing formula shows the interior as RAF gray green.
There are decal seatbelts. Completing Steps 1 and 2 gives you a complete cockpit
assembly. Step 3 is trapping this assembly between fuselage halves and gluing
the halves together. But wait, also in this step is attaching the rear crew
entry hatch. Now, I’m not very smart, I need clear instructions what to do. So,
the instructions has you going through all kinds of gyrations. Cutting off a
section of this hatch, and trapping between fuselage halves without gluing. But
it makes no mention of why? Turns out this is an option to display the hatch
open or closed. But it doesn’t tell you this. So not being able to figure it
out, I just glued the whole thing shut. Same thing with wing assembly. It has
you not cement the forward entry hatch to the wing center section, but to
temporarily hold it in place with tape. Then the instructions forgets all about
that hatch and never mentions it again. So I just glued my shut. Don’t forget to
open the holes for the rocket mounts if you are using them. Landing gear is
assembled and attached to the wheel wells, this assembly becomes an insert into
a nacelle opening. I like this because you can attach to the nacelle after
painting saving a masking chore. Next is attaching the wing assembly to the
fuselage. The engines and cowling are then assembled and attached to the wing
nacelles along with the air intake caps on the wing leading edge. Then the tail
planes are attached. So, fit is good, no real assembly issues. The fuselage seam
required minimum scraping and sanding. Only needed a small dab of filler on one
wing root seam and around the air intake caps. Next, I masked the canopy and
gunner’s bubble. The Eduard set performed wonderfully as usual. These were then
attached with Zap Canopy Glue. And ready for painting.
| COLORS & MARKINGS |
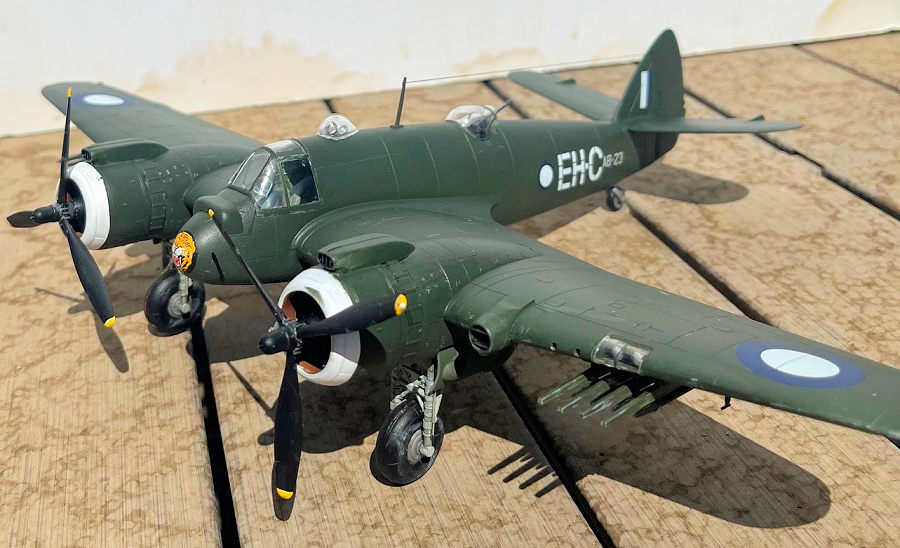
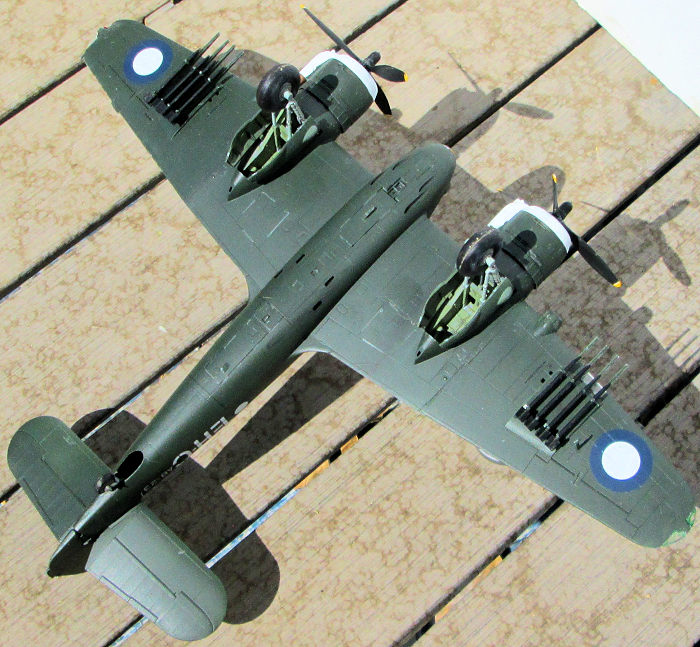
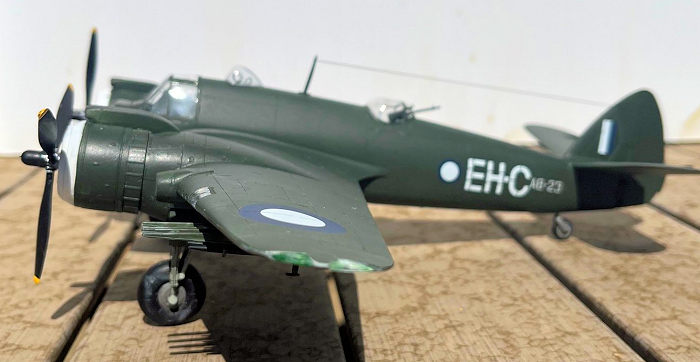
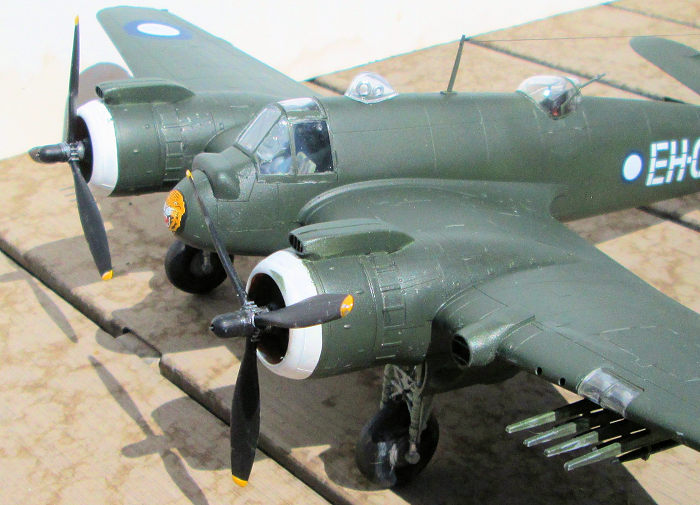 My dad
served in New Guinea and the Admiralty Islands campaigns. The soldiers there
were aware of the air operations against Japanese shipping. They were the
beneficiaries of their success in limiting Japanese supplies and reinforcements
to the battlefield. So, I wanted to do the Australian Mk.XXI and obtained the
Whispering Death sheet that has markings for 6 aircraft including two Mk.XXIs. I
chose EH C of RAAF 31 Sqn. This one caught my eye as the exhaust collectors that
serve as the front of Hercules cowlings were painted with white heat reflective
paint. This adds a little interest to the monotonous one-color scheme. That
color is RAAF Foliage Green. Researching the various builds on MM and elsewhere,
it seems to be a judgement call on just what that is. Looking at my paints on
hand, I chose a German color, RLM 72 Green mixed with a dab of US Forest Green.
Looks as good as anyone else’s to my eye. I first painted the white cowls,
masked, and sprayed the green. I didn’t do a lot of weathering. Some paint
chipping, much of it outlining access panels was done with a silver Prisma
pencil. I did some light exhaust and oil staining with Mission Models
Transparent Smoke and a light gray pastel. But when the clearcoats went on it
mostly disappeared, oh well. A gloss clearcoat paved the way to decaling. The
Aeromaster set behaved beautifully as usual. Except for the squadron logo on the
nose due to trying to get it settled down evenly over that rounded dome shape.
In the event I used a razor blade to cut four small slits into the decal and
that did the trick. A coat of Vallejo Matt Varnish finished the job.
My dad
served in New Guinea and the Admiralty Islands campaigns. The soldiers there
were aware of the air operations against Japanese shipping. They were the
beneficiaries of their success in limiting Japanese supplies and reinforcements
to the battlefield. So, I wanted to do the Australian Mk.XXI and obtained the
Whispering Death sheet that has markings for 6 aircraft including two Mk.XXIs. I
chose EH C of RAAF 31 Sqn. This one caught my eye as the exhaust collectors that
serve as the front of Hercules cowlings were painted with white heat reflective
paint. This adds a little interest to the monotonous one-color scheme. That
color is RAAF Foliage Green. Researching the various builds on MM and elsewhere,
it seems to be a judgement call on just what that is. Looking at my paints on
hand, I chose a German color, RLM 72 Green mixed with a dab of US Forest Green.
Looks as good as anyone else’s to my eye. I first painted the white cowls,
masked, and sprayed the green. I didn’t do a lot of weathering. Some paint
chipping, much of it outlining access panels was done with a silver Prisma
pencil. I did some light exhaust and oil staining with Mission Models
Transparent Smoke and a light gray pastel. But when the clearcoats went on it
mostly disappeared, oh well. A gloss clearcoat paved the way to decaling. The
Aeromaster set behaved beautifully as usual. Except for the squadron logo on the
nose due to trying to get it settled down evenly over that rounded dome shape.
In the event I used a razor blade to cut four small slits into the decal and
that did the trick. A coat of Vallejo Matt Varnish finished the job.
| CONSTRUCTION CONTINUES |
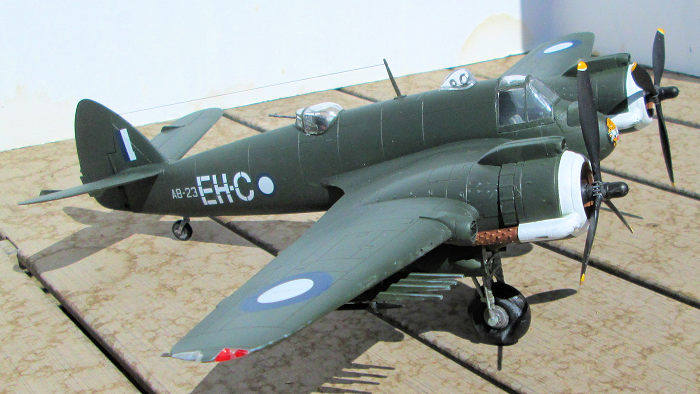
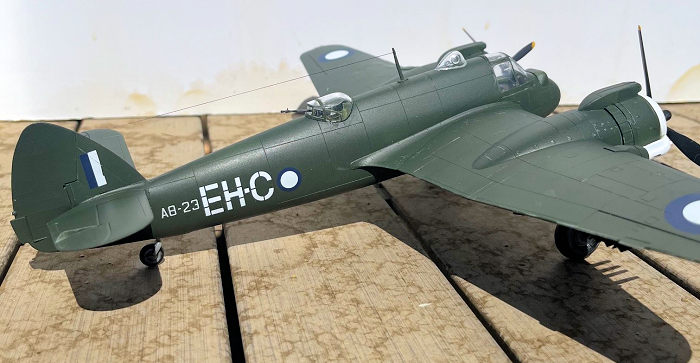 All the
masking was removed. Then the landing gear assemblies attached. Tight fit here,
use your fingers to press down and insure these inserts seat all the way.
Rockets were assembled, painted and attached. The clear dome over the DF
antennae and the clear landing light lense glued in place. Instructions have you
paint the front sections of the formation light lenses clear red and clear
green. Not having those on hand, I painted the inside edges red and green which
shows through by prism effect. The props were painted matt black. The tips
painted white first, then coated with the yellow. The radio mast and pitot next
and I finished off with an EZ Line antenna wire.
All the
masking was removed. Then the landing gear assemblies attached. Tight fit here,
use your fingers to press down and insure these inserts seat all the way.
Rockets were assembled, painted and attached. The clear dome over the DF
antennae and the clear landing light lense glued in place. Instructions have you
paint the front sections of the formation light lenses clear red and clear
green. Not having those on hand, I painted the inside edges red and green which
shows through by prism effect. The props were painted matt black. The tips
painted white first, then coated with the yellow. The radio mast and pitot next
and I finished off with an EZ Line antenna wire.
| CONCLUSIONS |
Conclusion – The kit is nearing 30 years old, so there are probably newer offerings on the market with more modern bells and whistles (and attendant price increase). But I am more than happy with the resulting replica and can recommend the kit highly. Some minor omissions in the instructions are a bit annoying, but now that you are aware of them, no worries. Even less experienced modelers should have little trouble with assembly. Highly recommended.
| REFERENCES |
The Encyclopedia of Aircraft of World War II. Paul Eden, Amber Books 2017. Modeling Madness Kit Reviews.
Dave Cummings
13 October 2026
Copyright ModelingMadness.com. All rights reserved. No reproduction in part or in whole without express permission from the editor.
If you would like your product reviewed fairly and fairly quickly, please contact the editor or see other details in the Note to Contributors.