Revell 1/32 Typhoon Mk.I
| KIT #: | 08051 |
| PRICE: | $30.00 or so |
| DECALS: | One option |
| REVIEWER: | Christopher Campbell |
| NOTES: | Dated kit. |
| HISTORY |
Ah, the Hawker Typhoon, an interesting bird indeed. While it flew, calling it a bird hardly seems fitting. This thing was a beast, plain and simple. In many ways it was analogous to the P-47 Thunderbolt on form and function. Both were massive, powerful, and heavily armed. Both could more than hold their own in a dogfight, though where they truly excelled was in ground attack.
The Typhoon was conceived as an aircraft in many was similar to the Thunderbolt, though earlier. Hawker designer Sydney Camm began working on the design as far back as 1937, though, predating the P-47. Designed around one of two possible twenty-four-cylinder liquid cooled engines, the ill-fated Rolls- Royce Vulture or the Napier Sabre. The same basic design would be used for prototypes featuring each.
What resulted was an aircraft with a distinctive Sidney Camm wing, much like that of a Hurricane enlarged and give a very slight inverted gull bend. The radiator and air intake were mounted in a massive chin scoop and the power delivered through a huge, three-blade propeller.
Armament would be mounted in the wings, initially consisting of a staggering twelve .303 machine guns with 500 rounds each. Quad Hispano 20mm cannon would also be an option. In either case, it would be hard hitting, capable of throwing quite a weight of projectiles at a target
The Vulture-engined prototype would be known as the Hawker Tornado and looked much like the subsequent Typhoon. The principal visual difference were the quad exhaust stacks, looking like rather like two seats of Merlin pipes fitted to the upper and lower cowl on each side. This aircraft would fly first, in October of 1939, and showed promise in testing.
This was perhaps the high point of the
Rolls-Royce Vulture engine, however. While it had evidenced no problems in
the Tornado, that was not the case with the Avro Manchester, the pri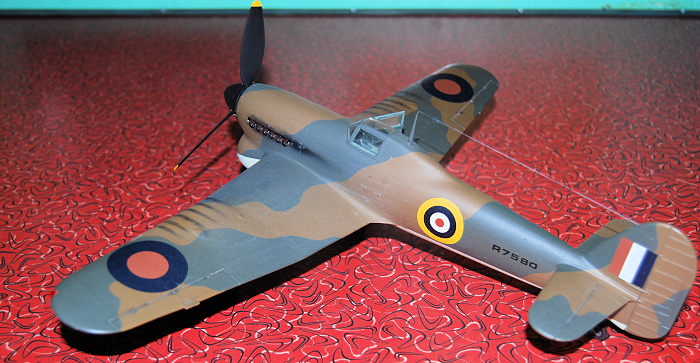 mary
user of the engine. As the troublesome Manchester evolved into the legendary
and infinitely superior Lancaster, Rolls-Royce shut down Vulture production
in favor of more Merlins that were being use by, well, everything.
mary
user of the engine. As the troublesome Manchester evolved into the legendary
and infinitely superior Lancaster, Rolls-Royce shut down Vulture production
in favor of more Merlins that were being use by, well, everything.
Focus now shifted to the alternate power plant, The Napier Sabre. While also a twenty-four-cylinder design, the Napier engine was vastly different. The Rolls engine had been an X-type block, essentially a pair of V-12’s back to back, sharing a common crankshaft. It also used traditional poppet valves.
The Sabre was a horse of a very different color, being and H-block, essentially two flat twelves placed one atop the other, not sharing a crank, but delivering power through a gearbox to the propeller shaft. Additionally, it would utilize sleeve valves, eliminating the complex valve train and cams of more conventional designs (though not without their own unique problems).
On paper the more orthodox Rolls design would seem a simpler solution to powering this juggernaut of an aircraft. In practice, the Napier engine proved infinitely better and more reliable. Thus, was born the mighty Typhoon and its successors.
Mighty it was, dragged aloft in February of 1940 by its massive, three blade propeller and more than 2,000 horsepower at a time when many aero engines and most fighters had barely 1,000. Things went mostly well during test., Almost surprisingly, it would not be the complex supercharged H-block engine that would give trouble during development. It was the airframe itself.
During one flight a significant crack developed just aft of the pilot’s seat. This could have resulted in the aircraft breaking up, though thankfully did not and the aircraft was successfully landed. It would be a foreshadowing of things to come, though.
With the extant Spitfires and Hurricanes seemingly having things well in hand so far as fighter needs were concerned in 1940, the Typhoon was given a low priority. At least, that was until a nasty little fighter called the Focke-Wulf Fw.190 began appearing over the Channel and all of a sudden the Spitfire Mk.V found itself outclassed. Typhoons, which were still in a development stage were rushed into service and production put into high gear.
While the Typhoon proved capable of facing the Fw.190 on more or less even terms, there were definite problems. First, many of the early Mk.I types had a solid faring aft of the canopy offering almost no reward visibility. Many aircraft were armed with the machine gun suite, not the 20mm cannon for which the aircraft would be so well. Worst of all, their were unexplained losses, not accountable by enemy action.
The cause of the losses was ultimately determined to be airframe failure, though it would be nearly a year until this problem was rooted out and addressed after and aircraft broke up in level flight during a high speed, test, killing its pilot. It was determined that the tail had sheared away as a result of a structural failure. This would be resolved by adding a belt of strengthening plates encircling the fuselage at in the critical area. While seeming like a far to simple, even temporary solution, it worked.
The solid rear canopy would vanish with the introduction of the Mk.Ia and four 20mm cannon with 140 rounds each were now the standard armament. The canopy was still not without some issue, though. Instead of a sliding bubble or a swing open type, the Typhoon would continue to employ a car door type entry for some time, very similar to that infamous on the Bell P-39 (In another similarity to the P-47, the initial Thunderbolt prototype had used a similar door, though immediately abandoned in favor of a sliding canopy before production ever started). This could make it somewhat difficult to exit in an emergency, but overall the aircraft was maturing into the into a most formidable weapon.
Yet another problem would reveal itself in combat, though. While a larger aircraft with a notably different profile, if looked at from above or below, especially in against the glare of the sun, the plan form of the wings and fuselage when viewed from such an angle and that of the Fw.190 had a very similar silhouette, resulting in friendly fire incidents as losses. Identification stripes would be added to all aircraft to reduce this effect.
These would be six black and white stripes on the ventral wings applied in a manner similar to subsequent Invasion stripes. A single yellow stripe was also usually added to each upper wing. (Personally, I had always found this similarity rather questionable. Then, over the years, I played two different air combat simulators that featured the Typhoon and in both found the silhouette much easier to confuse than I had expected. In one I actually turned into and shot down the squadron leader. Even while only a game, from that moment on, the point was well made for me.) They do have very similar silhouette from certain angles.
 While designed to operate at altitude, it was a t low level that the Typhoon
would find its true calling. Equipped with up to two thousand pounds of
ordinance, which could include both bombs and rockets, the Typhoon excelled
at destroying tanks, trains, trucks, and just about anything thing else on
the ground you can think of. In some respects, even more than the P-47, it
was the A-10 of its day.
While designed to operate at altitude, it was a t low level that the Typhoon
would find its true calling. Equipped with up to two thousand pounds of
ordinance, which could include both bombs and rockets, the Typhoon excelled
at destroying tanks, trains, trucks, and just about anything thing else on
the ground you can think of. In some respects, even more than the P-47, it
was the A-10 of its day.
It also was the ancestor of future Wild Weasel aircraft in a sense. While not only fitted with some of the earlier versions of I.F.F. gear, a simple radar sensor was tried on some which it was found enabled them, to ride the beam back to its source and kill the radar being used to direct flack guns, and perhaps very late in the war, even primeval S.A.M.’s. Add to its many roles that of being a Buzz Bomb interceptor and buster as well, its low level speed and steadiness being invaluable here. All in all, the Typhoon was nothing if not versatile, much as was its predecessor, the Hurricane.
Fitted with long range fuel tanks, it could escort bombers or hunt as needed of steadily decreasing Reich territories. A rather interesting looking recon version, the FR-1B, was built, which included a relatively standard set up of British splayed and oblique cameras, though fitted in the wing rather than the aft fuselage. Unlike most British recon birds, the Typhoon carried a fourth camera facing forward as well, in place of one of the wing guns. This gave it a most unique look indeed.
A full sliding bubble canopy was eventually added, replacing the heavily framed “car door,” improving both egress and visibility. The propeller transitioned from a three to a four-blade type as the Typhoon entered its quintessential form.
Ultimately it was evolving into and then being largely replaced by its physically similar successor, the Tempest Mk.V as the war began to draw to a close. While the Tempest would have a postwar career with the R.A.F. and with export customers, itself eventually evolving into the amazing Sea Fury, the Typhoon would be gone from service very quickly. It was phased out and scrapped wholesale, almost as soon as the guns fell silent. Today, only a single complete and restored example survives in the Smithsonian Air and Space collection. Sadly, we will never see one take to the air or hear the distinctive whine of its sleeve valve Sabre in full cry. It is even a rare sight as stock footage in films, the best example that I know of being footage of one making rocket attack in the classic Battle of the Bulge film Battleground, a favorite of mine, and a scene that I never miss. Still, it will forever be a favorite of aviation enthusiasts and modelers alike, for there is nothing else quite like it.
| THE KIT |
Released in 1973, the Revell Hawker Typhoon, it remains the only one in this scale to date. While there have been several 1/48 Typhoons and Airfix had recently released the enormous 1/24 bird, so far as 1/32 scale is concerned, Revell is it.
I have been a little fixated on the Typhoon since I first saw one in a British children’s book simply called “Aircraft” from a company called Visual Books. It was part of a set of five books from the same company, including titles of Ships, Cars, Trains, and Space Exploration. I got the books for my fifth birthday in 1971, the year that they were published and I still have them today.
In that book there was a page with illustrations of multiple W.W.II aircraft, mostly in profile. The Typhoon was shown in a rather dramatic attack run, however. The huge chin scoop, looking something like a misplaced jet intake is probably what first drew me to the aircraft. Despite that, somehow I missed ever getting my hands on either the Revell or Monogram kit until I was in college. Though I was thoroughly entrenched in the camp of Typhoon fandom by then.
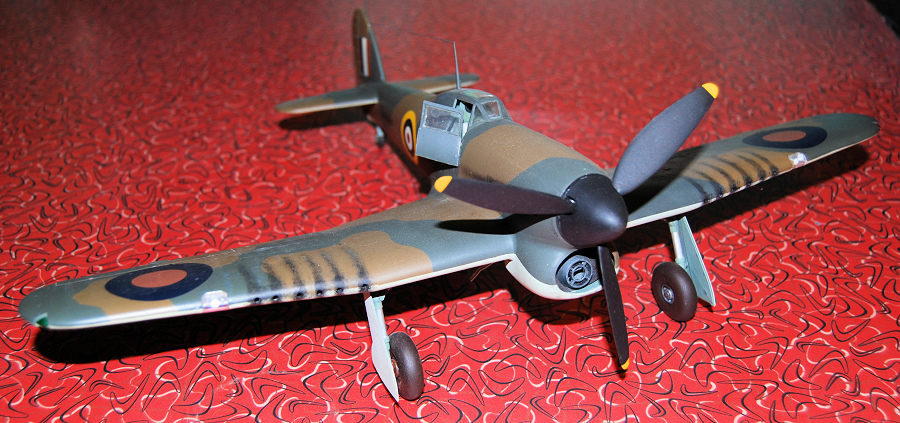
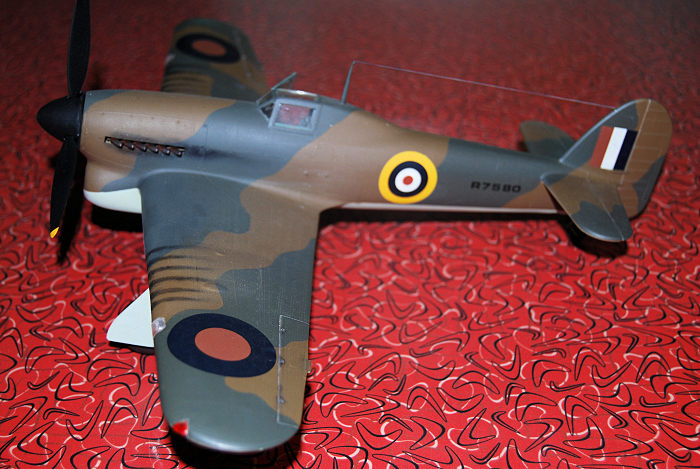
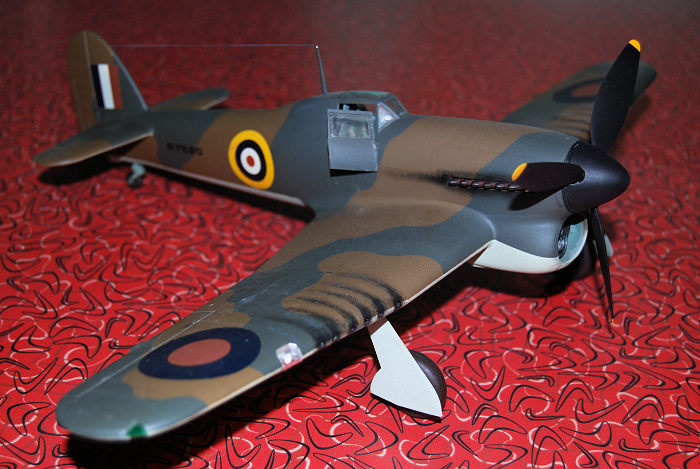
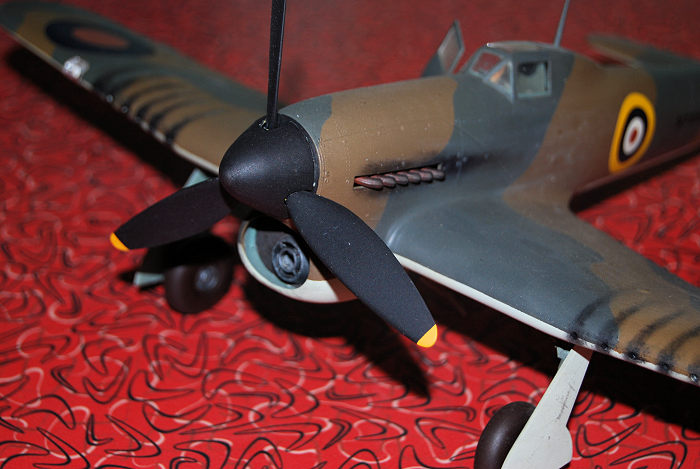
The kit represents a mid-model Typhoon Mk.IB, with the car door (though only the right side door can be posed open without some surgery, though.) While the Typhoon was well known for carrying rockets, only bombs are provide for underwing armament, though they do look appropriately more or like British bombs. The propeller is three bladed type, also marking it as a mid-production model.
 There is a reasonably detailed engine, especially so for its day. I have seen
the model built up with the cowl panel ether open or removable and the kit
engine detail tweaked to death and, being a motorhead, rather liked it.
There is a reasonably detailed engine, especially so for its day. I have seen
the model built up with the cowl panel ether open or removable and the kit
engine detail tweaked to death and, being a motorhead, rather liked it.
The cockpit is very basic. It does correctly feature a tubular frame structure, properly shapes seat and control stick. In many ways, it is the best cockpit of their kits of this era. Unfortunately, it is let down by the lack of a modeled instrument panel, with a decal representing it instead. A resin replacement with some resin detail would work wonders here.
Surface details are raised, as was the order of the day in which this kit was molded. They can be toned down with a little surface sanding and can be made to look presentable. The only part of these kits that has ever really given me trouble is the wing guns.
The cannon barrels are molded into asymmetrical components that have to be glued together and fitted to the wing during assembly. It is does not make for an easy component to keep intact. I have built the kit three times and broken at least one theme very time before I was to the painting stage.
There have been several iterations and releases of this kit over the decades, rarely out of production for more than about six years at time. All feature British W.W.II R.A.F. marking, quite obviously, usually with only a single option.
| CONSTRUCTION |
Since, aside from steps needed for the conversion, this kit was built more or less right from the box. I will address a few problem areas to be aware of, though. First of all, the kit is festooned with rivets and raised detail as noted. The actual aircraft was flush riveted, so if this is s sticking pint for you, rescribing and re-engraving will be the order of the day. Personally, in most cases, unless the rivets are grossly oversize and the detail excessively toylike, I opt for toning it down by some light overall sanding.
Having decided that I wanted to build one of these massive beasts up in its early form, with the deathtrap solid rear canopy faring and its twelve-gun armament, the wing was the first thing to address. Basic assembly of the wing was per usual, to include the somewhat odd cannon barrels.
These would not be finished and would actually be sawed off nearly flush with the wing using a razor saw (I had to plug the holes with something, right?). This was sanded smooth and then I set about marking off the twelve holes to be drilled and the ejection slots to be cut beneath the wings in pencil based on the illustrations in Squadron-Signals Typhoon & Tempest in Action book.
The drilling in the wings was accomplished by drilling a hole using a small bit chucked into a pinvise. Once all twelve were drilled (and a corresponding hole nearly worn through my palm), I enlarged the holes using a larger bit chucked in a handy little drill that I picked up a couple of at a model show a few years back. I call it a palm drill, and have seen them under various names. The handles tends to be a round knob on most, though I have seen other (less comfortable) designs. Both that I own have an actual keyed drill chuck and will accept bits up to nearly ¼”. I have found it a most convenient modeling tool and recommend them to all modelers.
Unfortunately, as I inspected my work, I noticed that one of my holes was notably out of line. This had to closed and drilled again obviously. This was accomplished by filling it with some solid Plastruct rod and gap filling CA glue, sanding it flush and starting all over. Fortunately, I got it right the second time around.
 At this point the cannon bulges were removed from the upper wings with some
scraping and sanding and the area smoothed out. I had initially though that
sanding would do, but found it was taking a bit too long and I needed to resort
to something more drastic, in the form of a heavier X-Acto blade, then finish
the job by sanding.
At this point the cannon bulges were removed from the upper wings with some
scraping and sanding and the area smoothed out. I had initially though that
sanding would do, but found it was taking a bit too long and I needed to resort
to something more drastic, in the form of a heavier X-Acto blade, then finish
the job by sanding.
The numerous shell and link ejection ports would be created by a similar process. First, external detail of the cannon shell ports were deleted and the slots filled with a lengthwise piece of plastic rod and gap filling CA glue. One this has been smoothed out, the new, much smaller slots were created using a fine bit in a pinvise and a No.11 X-acto blade.
To accomplish this, I marked off each of the ejection ports with a pencil. Then a hole was drilled at either end of the mark and one approximately in the center. This was scored the X-Acto blade until it was cut through and any necessary trimming was done. Only a small amount of finish sanding was needed and I was very satisfied with the results.
The next step after this would be to attach the wing assembly to the fuselage. Here is a trouble spot to be prepared to fill and sand. There is some typical generally some minor gapping at the wing root. However, in all of these that I have built, there has been some issue with something of a step both at the rear ventral fuselage join and the area where the massive chin radiator scoop fits over the leading edge. Both of these typically require quite a lot of sanding and accordingly some loss of detail.
Again, the fishplates (strengthening tabs on the aft fuselage, fitted mid models and later to prevent the aircraft from shedding its tail) have to removed. This done with some initial scraping with an X-Acto, then sanded smooth until they were gone, using 320 & 400 grit sandpaper.
The interior framing of the canopy would be painted in Model Master R.A.F. Cockpit Green, in this case to include the entire what would be depicted as solid after section. It was then glued in place with C.A. glue and the door was stuffed with a paper towel while the seams where the aft faring joined the fuselage were filled with CA glue and sanded. Stuffing the door shut helped keep unwanted sanding debris and dust out of the interior. With this all fared in nicely, it was time to paint it.
| COLORS & MARKINGS |
Painting was relatively straight forward on this. The most difficult thing about it was finding photos and/or color illustrations of this early Typhoon type. You can just about count them on your fingers.
Also, the Typhoon was just coming into service as the transition from Dark Earth/Dark Green to Ocean Grey/Dark Green upper surfaces was taking place or about to. Thus a few would wear Dark Earth, and that was what I wanted to depict.
After painting the underside in Model Master R.A.F. Sky, the upper surfaces were sprayed in Model Master R.A.F. Dark Green. This would then be masked off and the Dark Earth applied.
The landing gear were assembled and it is worth noting that due to the size and weight of this kit, these can be a little fragile. Metal replacements may be something to consider here. Not so for the tires, though.
 These are some of the bulkiest tires I can recall for a model. Glued up and
sanded down to clear out the seam, they were sprayed in Testor’s Rubber and the
landing gear and hubs painted in Model Master Dark Anodonic Grey. Collapsible
struts were painted in Testor’s silver. Some parts oftehlanding gear were also
painted in R.A.F. Interior Green, as were the wheel wells. In the case of the
landing gear bays, there are so deep and well defined, I elected to masked them
off and spray them after the main painting was complete. This is not my usual
sequence, but things went very well. Lastly, the final thing before gluing the
wheels to the gear was to paint the brake drums in Testor’s Rust, accented by
dry brushing with Model Master Burnt Iron, as were the exhaust pipes, having
first been drilled out with a larger bit in a pinvise.
These are some of the bulkiest tires I can recall for a model. Glued up and
sanded down to clear out the seam, they were sprayed in Testor’s Rubber and the
landing gear and hubs painted in Model Master Dark Anodonic Grey. Collapsible
struts were painted in Testor’s silver. Some parts oftehlanding gear were also
painted in R.A.F. Interior Green, as were the wheel wells. In the case of the
landing gear bays, there are so deep and well defined, I elected to masked them
off and spray them after the main painting was complete. This is not my usual
sequence, but things went very well. Lastly, the final thing before gluing the
wheels to the gear was to paint the brake drums in Testor’s Rust, accented by
dry brushing with Model Master Burnt Iron, as were the exhaust pipes, having
first been drilled out with a larger bit in a pinvise.
Decals were sourced from various 1/32 R.A.F. sheets and presented no problem. I have LOT of R.A.F. decals to choose from. Applied with a little Microset or Solvaset, they went of well.
Gun blast and exhaust stains were added by dry brushing Model Master Flat Black. Everything was then given a coat of Dullcoat and allowed to dry after which the canopy mask was removed, and the landing light covers and wingtip light, tinted accordingly, were added. The final thing was to replace the dual tail wheel with a single wheel taken from the “wheel drawer.”
Low and behold, it did look like a Typhoon, sort of. Wait, that’s not a Typhoon! It looks more like that weird version see in books sometimes. That one you never hear about and never see modeled. Oh, that one! The one you just see in a few pictures. Yep. That’s it.
| CONCLUSIONS |
This conversion was far simpler than some that I have attempted. If you decide to try your own, I hope that you like drilling holes; A LOT OF HOLES! A little moleskin on the palm may be helpful here.
Probably the toughest part is actually drilling out the gun ports in leading edge of the wings. One would logically expect the shell ejection port to be more of a problem. For me, at least, they were a breeze. However, aligning and correctly spacing all those gun ports on the wing can be a bit tricky. Other than that, I found it reasonably trouble free.
It is a dated kit, and a newer mold would be nice to see, perhaps in a couple of different versions. However, in this case, I found that it lent itself reasonably well to backdating to a Typhoon Mk.I. And for now, it is what we have. So, have fun and make the best of it, out of the box, or detailed and customized into different versions.
For someone wanting try a homegrown aircraft conversion that was definitely a bit of work, and unquestionable visual difference, the early Typhoon might be An interesting choice, whatever scale one chooses.
| REFERENCES |
Hawker Typhoon/Tempest in Action, Aircraft No. 102 by Jerry Scutts, Squadron Signal Publications, 1990
The Hawker Typhoon and Tempest by Francis K. Mason, Motorbooks International, 1988
Hawker Typhoon: Warpaint Series No. 5 by Chris Thomas, Hall Park, 1993
https://en.wikipedia.org/wiki/Hawker_Tornado
https://en.wikipedia.org/wiki/Hawker_Typhoon
https://en.wikipedia.org/wiki/Napier_Sabre
23 May 2023
Copyright ModelingMadness.com. All rights reserved. No reproduction in part or in whole without express permission of the editor.
If you would like your product reviewed fairly and fairly quickly, please contact the editor or see other details in the Note to Contributors.
Back to the Main Page Back to the Review Index Page Back to the Previews Index Page