Trumpeter 1/48 Fairey Albacore
| KIT #: | 02880 |
| PRICE: | NZ$ 58.75 |
| DECALS: | Two options |
| REVIEWER: | Michael Rohde |
| NOTES: | 2003 Limited Edition |
| HISTORY |
The Fairey Albacore was intended as a replacement for the antiquated Fairey Swordfish. Deemed to be a major improvement to the Swordfish ,the new aircraft was neat in appearance with flaps, an enclosed cockpit , heating system, windscreen wiper and automatic emergency dinghy ejection. However, despite of all these improvements , the Albacore merely complemented the older biplane and was , in the end, outlived in service by the Swordfish.
 Designed to Specification S.41/36, the Albacore
was ordered off the drawing board in May 1937. The Air Ministry placed a
contract of two prototypes and 98 production aircraft. The first
prototype flew on 12th Decenber 1938 from Fairey’s great West
Aerodrome and production began in 1939. The prototype was also tested
with floats in 1940 , but the results did not encourage further development
along these lines. Later in the same year the first prototype underwent further
tests at the Aircraft and Armament Experimental Establishment at Martlesham
Heath and this series of tests revealed that not all was well with the Albacore.
Designed to Specification S.41/36, the Albacore
was ordered off the drawing board in May 1937. The Air Ministry placed a
contract of two prototypes and 98 production aircraft. The first
prototype flew on 12th Decenber 1938 from Fairey’s great West
Aerodrome and production began in 1939. The prototype was also tested
with floats in 1940 , but the results did not encourage further development
along these lines. Later in the same year the first prototype underwent further
tests at the Aircraft and Armament Experimental Establishment at Martlesham
Heath and this series of tests revealed that not all was well with the Albacore.
Elevators and ailerons were said to be very heavy and stall with slots free was ‘ uncomfortable’.The front cockpit was too hot in normal summer weather and the rear cockpit was cold and draughty. There were a few things on the credit side, however: the Albacore was steady in a dive, with a smooth recovery when carrying a torpedo, and the pilot’s view was excellent. Despite this rather unpromising background, Albacores began to roll off the production line after a hold up caused by engine development problems: the 1065 hp Bristol Taurus II installed in early aircraft was replaced by the Taurus XII of 1130 hp.
No. 826 Squadron was formed at Ford, Sussex, specially to fly the Albacore , and received 12 aircraft on 15th March 1940. The Squadron went into action on 31st May, attacking E boats off Zeebrugge and road and railway targets at Westende., Belgium. In the following month the Squadron moved to Bircham Newton, Norfolk to operate under the direction of Coastal Command until November. During this period the Squadron made night attacks, laid mines and bombed shipping. Three more Squadrons were formed before the the end of 1940: No. 829 at Lee-on-Solent, No. 828 at Ford and No. 827 at Yeovilton, the latter moving to Stornoway for anti submarine patrols.
 Albacore finally went to sea when
Nos 826 and 829 Squadrons joined HMS Formidable on 26th November
1940, for convoy escort duty to Cape Town. Aircraft from these units took part
in the battle of Cape Matapan in March 1941, pressing home their torpedo attacks
in the true Swordfish tradition against the Italian battleship Vittorio Veneto ,
the first occasion on which they had used torpedoes in action.
Albacore finally went to sea when
Nos 826 and 829 Squadrons joined HMS Formidable on 26th November
1940, for convoy escort duty to Cape Town. Aircraft from these units took part
in the battle of Cape Matapan in March 1941, pressing home their torpedo attacks
in the true Swordfish tradition against the Italian battleship Vittorio Veneto ,
the first occasion on which they had used torpedoes in action.
By mid 1942 some 15 Air Arm squadrons were equipped with Albacore, operating from the Arctic Circle on Russian convoys, to the Western Desert, the Mediterranean and the Indian Ocean, and in November 1942 Albacores of Nos. 817, 822 and 832 Squadrons were in action during the Allied invasion of North Africa, flying anti submarine patrols and bombing enemy coastal gun positions. Albacores had reached their operational zenith in 1942, and the following year Fairey Barracudas began to replace them in all squadrons except No. 832, which was to be equipped with Grumman Avengers.
The last two squadrons to give up their Albacores were Nos. 820 and 841 in November 1943,aircraft from the latter being passed on to No . 415 Squadron of the Royal Canadian Air Force, at Manston for use in the English Channel operations on D- Day. Total Albacore production between 1939 and 1943 was 800 aircraft including two prototypes, all built at Fairey’s Hayes factory and test flown at the Great West Aerodrome.
| THE KIT |
 This uncomplicated kit comes in a sturdy cardboard
box and contains a set of four frames of light grey plastic holding 128 parts
and one clear frame with 6 parts. Surface detailing is restricted to the main
panel lines and maintainance panels only. Bomb shackles are very crude and
come as solid pieces. Elevators ,ailerons and rudder are separate items. No
arrester hook provided . There are no provisions made for attaching the rigging
wires and it is up to the modeller to add these.
This uncomplicated kit comes in a sturdy cardboard
box and contains a set of four frames of light grey plastic holding 128 parts
and one clear frame with 6 parts. Surface detailing is restricted to the main
panel lines and maintainance panels only. Bomb shackles are very crude and
come as solid pieces. Elevators ,ailerons and rudder are separate items. No
arrester hook provided . There are no provisions made for attaching the rigging
wires and it is up to the modeller to add these.
Instructions consist of 6 pages with good drawings arranged into 19 stages of assembly, and a coloured print for the paint schemes. The decal sheet does provide decals for 3 options: No. 826 Sq. NAS, FAA L 7097 Bircham Newton September 1940, No. 817 Sq. BF 612 FAA 1942, and Unknown unit . Serial No. L 7074. The decal quality is acceptable. Only national and unit markings are provided. No stencils.
| CONSTRUCTION |
The cockpit stage 1 and 2 : It takes only 16 parts to complete the cockpit. In this case I have added a set of Eduard PE harnesses. After painting the cockpit assembly I enhanced details by dry brushing and used pastel for a bit of weathering. The effects of this can be seen quite well through the rather large panels of the canopy .
Stage 3 to 7 Fuselage and landing gear: Before the fuselage is closed up the side wall windows need to be installed, main instrument panel glued into place and the pre painted tail wheel unit inserted. The fuselage halfes went together well with only minimal filler required along the seams. The main landing gear fairings are a 4 piece assembly and slot into place in the fuselage recess perfectly. The main wheels are painted but not yet glued into place. Unfortunately the arrester hook is only presented as the actual hook protruding from the fuselage . I added thin strips of Evergreen to highlight the arrester hook tubes. These were sanded down to a low profile.
 Stage 8-12Lower and upper Wings, struts and
canopy: These parts went together easily . Just to make sure I checked the fit
of the struts into the openings on the upper and lower wings .Small corrections
were made to enable the struts to slot in without interference. Note: I
recommend to keep an eye on the numbering of the struts in the instructions. The
struts are not all identical but can be mis-indentified easily. I dry fitted the
front and rear canopy and made small adjustments to get a nice gap free fit. The
ailerons are separate parts and fit well into place. After the glue had set I
test fitted the upper wings. The port and starboard wing center slotted into
place without any problems and the struts fitted nicely into their recesses . I
must admit that this was one of the easiest bi plane builds I have ever done. At
this point I drilled all the holes for the rigging ( 28 in all) There is no info
in the instructions where to put them and the modeller needs to research these
details.
Stage 8-12Lower and upper Wings, struts and
canopy: These parts went together easily . Just to make sure I checked the fit
of the struts into the openings on the upper and lower wings .Small corrections
were made to enable the struts to slot in without interference. Note: I
recommend to keep an eye on the numbering of the struts in the instructions. The
struts are not all identical but can be mis-indentified easily. I dry fitted the
front and rear canopy and made small adjustments to get a nice gap free fit. The
ailerons are separate parts and fit well into place. After the glue had set I
test fitted the upper wings. The port and starboard wing center slotted into
place without any problems and the struts fitted nicely into their recesses . I
must admit that this was one of the easiest bi plane builds I have ever done. At
this point I drilled all the holes for the rigging ( 28 in all) There is no info
in the instructions where to put them and the modeller needs to research these
details.
Stage 13 --The engine , propeller and cowling: Including the propeller we only have 9 parts to assemble. For good measure I added the ignition leads . The cowling consists of two halfes which fit well. The complete engine slides easily into place.
Stage 14-16 Tailplane . Here we have 6 parts in all: Fin and horizontal tail plane 2 each and the elevators with angled tabs to mount these in the ‘down ‘position. The complete unit slots into a recess on the upper fuselage . The fit is quite good and only required small adjustments .Remaining gaps were filled with a bit of CA glue.
Stage 17-19 : Torpedo and bombs: The bomb shackles are solid disks and do not look right. I decided to cut out the center and carefully trim the shackle arms to make these look more realistic. I this case I deleted the outer bomb racks and fitted only the torpedo
| COLORS & MARKINGS |
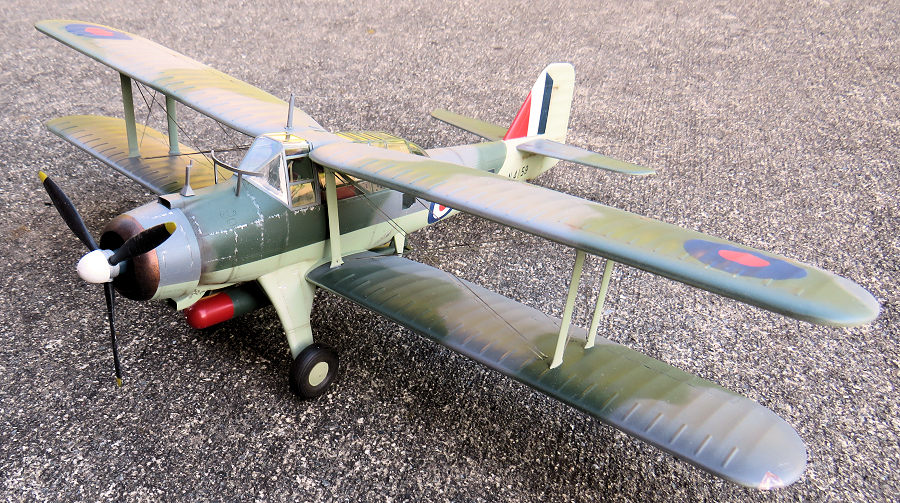
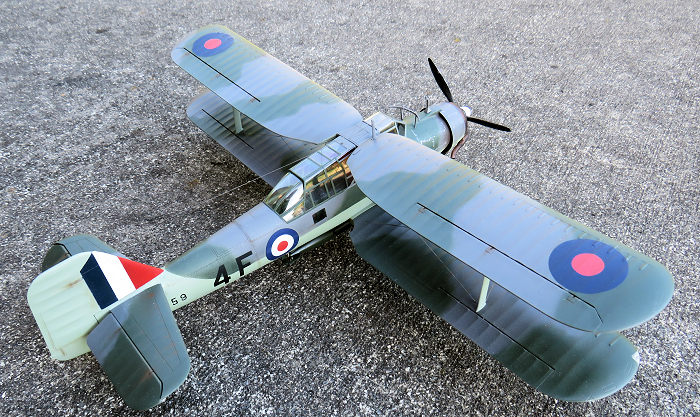
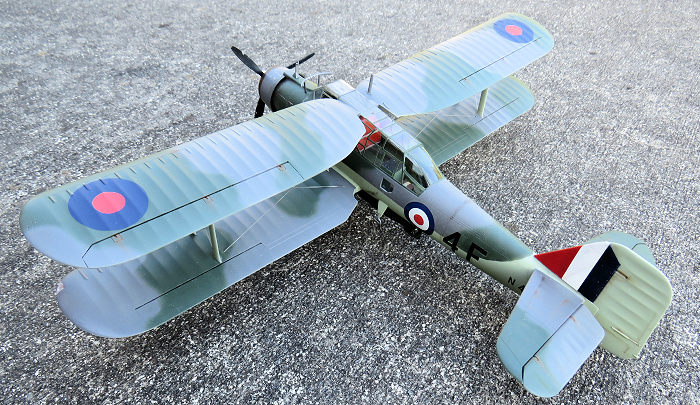
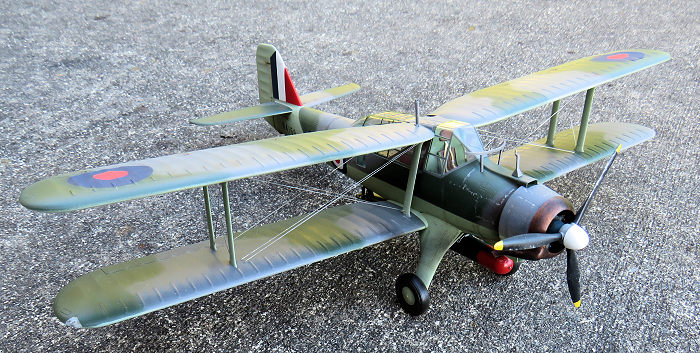
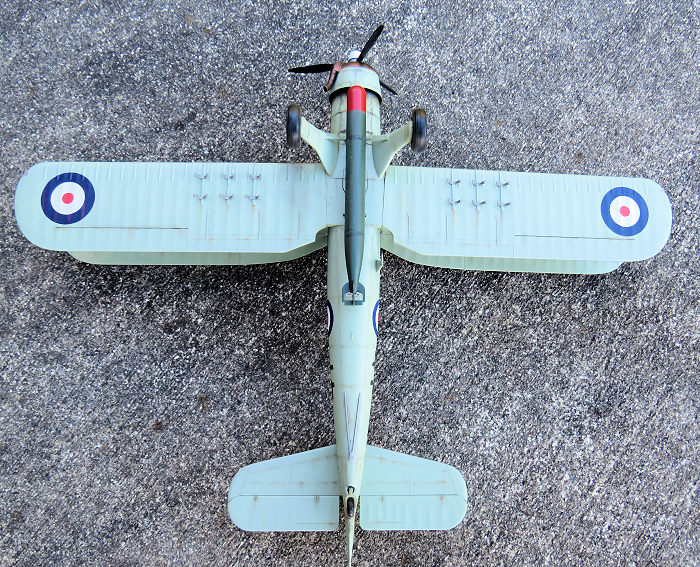
I found a picture of an early 826 Sq. Aircraft which had the large fin flashes and the white/ blue/red roundels .The fin flashes were air brushed and the markings I cobbled together partly from stuff I found in my decals stash
The camouflage scheme : Sky on all lower surfaces with a high demarkation line on the fuselage.( Tamiya XF 21 )Dark Sea Gray, Dark Green ( Tamiya XF 54 Humbrol 30) The exhaust ring on the cowling was painted with Humbrol Met Copper and blackened with pastel . The upper wings were painted separately and I pre -rigged the model before I attached the upper wing. Tamiya panel liner black and pastels were used for weathering.
| CONCLUSIONS |
A easy and uncomplicated process to assemble this model. Compared to the Special Hobby Albacore it is rather simplistic in detail . Suitable for modellers with little experience in building bi planes.
11 August 2020
November 2017
Copyright ModelingMadness.com
If you would like your product reviewed fairly and fairly quickly, please contact the editor or see other details in the Note to Contributors.
Back to the Main Page Back to the Review Index Page Back to the Previews Index Page