
| KIT #: | ?02018 |
| PRICE: | $16.98 |
| DECALS: | One option |
| REVIEWER: | Nicolai Plesberg |
| NOTES: | 1980s boxing |
| HISTORY |
 The Fairey
Firefly Mark 5 was the best known of the new generation of Fireflies that began
to enter service in 1947. The new generation consisted of the Marks 4, 5 and 6
and although they appeared variously in the fighter, reconnaissance and
anti-submarine versions, there was little exterior difference between them. They
all stemmed from the well-known Firefly Mark 1, which equipped 19 different
Fleet Air Arm Squadrons in World War II. The war in Korea gave the Firefly its
chance to prove itself, operating from the Royal Navy carriers HMS Thesus,
Glory, Ocean, Triumph and the Royal Australian Navy carrier, the HMAS Sydney.
The Fairey
Firefly Mark 5 was the best known of the new generation of Fireflies that began
to enter service in 1947. The new generation consisted of the Marks 4, 5 and 6
and although they appeared variously in the fighter, reconnaissance and
anti-submarine versions, there was little exterior difference between them. They
all stemmed from the well-known Firefly Mark 1, which equipped 19 different
Fleet Air Arm Squadrons in World War II. The war in Korea gave the Firefly its
chance to prove itself, operating from the Royal Navy carriers HMS Thesus,
Glory, Ocean, Triumph and the Royal Australian Navy carrier, the HMAS Sydney.
Later roles consisted of Fireflies being converted into trainers, target tugs, remote controlled drones or even use in civilian roles. The last Firefly rolled of the production line in May 1955.
| THE KIT |
This is one of the Airfix Classic kits from the mid 1960s with mediocre details, exaggerated surface detail, moving parts and thick clear parts. Molded in medium grey plastic and consisting of 73 parts including three in clear. The instructions are those from the period where the instructions from Airfix became three lingual; in English, French and German. Painting instructions refers to the long gone in-house Airfix paint range, but as this a mid / late 1980s edition there is a sheet included that translates the Airfix paints into Humbrol Enamels. The detail painting, however, lacks a bit detail, but more on that later. The decals, being a Humbrol boxing, are actually quite nicely printed although matt, but probably working just fine. We’ll see – now on to construction.
| CONSTRUCTION |
 The
first order of business was to clean all parts plus eliminate ejector pin marks
in fuselage, wing parts and landing gear – this kit has a lot of those! So
filler was utilised to deal with them and after sanding to shape I began to
assemble and detail the interior. From the instructions of the Airwaves etched
detail set (I didn’t buy it, but printed out the instructions as it was
available online) I got inspiration on how to do that. The seats got sides
added, the rudder pedals were scratch build from various bits and pieces
although they would be hard to see anyway. The side panels, in especially the
pilot’s cockpit, were detailed with the few things the Airwaves instructions
showed. The rear bulkhead (part 8) was glued in the right fuselage half to have
a reference point to locate the exact spot to glue things in place. An
instrument panel was cut from sheet styrene and glued to the right fuselage
half. Some fiddling was necessary to get things aligned quite up – it wasn’t as
easy as it sounds I tell you, as I had to adjust the instrument panel several
times! I also modified the exhaust stacks so they could be fitted from the
outside
instead from the inside as they were designed, which would facilitate easier
painting. As a further modification I also reduced the length of the exhaust
pipes themselves in order to get a more realistic look. When the interior had
been finished, it was painted flat black as advised in the instructions from
Airwaves. The gear bays and interior of radiators were painted grey (Humbrol
164).
The
first order of business was to clean all parts plus eliminate ejector pin marks
in fuselage, wing parts and landing gear – this kit has a lot of those! So
filler was utilised to deal with them and after sanding to shape I began to
assemble and detail the interior. From the instructions of the Airwaves etched
detail set (I didn’t buy it, but printed out the instructions as it was
available online) I got inspiration on how to do that. The seats got sides
added, the rudder pedals were scratch build from various bits and pieces
although they would be hard to see anyway. The side panels, in especially the
pilot’s cockpit, were detailed with the few things the Airwaves instructions
showed. The rear bulkhead (part 8) was glued in the right fuselage half to have
a reference point to locate the exact spot to glue things in place. An
instrument panel was cut from sheet styrene and glued to the right fuselage
half. Some fiddling was necessary to get things aligned quite up – it wasn’t as
easy as it sounds I tell you, as I had to adjust the instrument panel several
times! I also modified the exhaust stacks so they could be fitted from the
outside
instead from the inside as they were designed, which would facilitate easier
painting. As a further modification I also reduced the length of the exhaust
pipes themselves in order to get a more realistic look. When the interior had
been finished, it was painted flat black as advised in the instructions from
Airwaves. The gear bays and interior of radiators were painted grey (Humbrol
164).
Seat belts were added (from Tamiya tape) and painted buff. Some detail painting according to the Airwaves instructions were also done and some touch up of flat black was done together with painting the propeller blades. Belt buckles were marked with silver spots on the seat belts and the tips of the propeller blades were marked with yellow paint. Finally the wing pieces were glued together – also the ailerons were glued firmly in place, as I had decided me for that they shouldn’t move! They were just an example of the toy concept of kits of the past which I don’t abide by!
 The
retainer was glued on to the propeller shaft, as it wasn’t really possible to
avoid this when mounting the prop assembly to the fuselage. The finished
interior was glued in the right fuselage half and the inner and outer wing
sections were joined as well. The carburettor air intake under the nose was
painted burned metal. When all this had dried the prop was put in place and the
fuselage halves were joined. The wings were then sanded and puttied on the seams
as it is custom / necessary to do on such old kits! Some more seam treatment was
accordingly done on the wings and subsequently on the fuselage when it had set.
This was done over a couple of sessions as it is very rare that one complete
session is enough to eliminate seam lines, especially on a kit like this.
Perfect and smooth seams were eventually had and then tail planes plus wings
were glued to the fuselage. Especially the fuselage / wing joints requires
attention as there are some pretty large gaps, when the required dihedral on the
wings is obtained, as the fit isn’t really something to write home about. That’s
why I, as soon as the wings and tail planes had dried, gluefilled all seams with
my liquid glue bottle to strengthening the joins even more. When that had set
the seams were puttied and sanded as per usual practice. When all the remaining
issues had been dealt with the clear parts were cleaned and attached to the
cockpit rim with clear gloss. Gaps were filled with the same and sanded with a
light hand when set.
The
retainer was glued on to the propeller shaft, as it wasn’t really possible to
avoid this when mounting the prop assembly to the fuselage. The finished
interior was glued in the right fuselage half and the inner and outer wing
sections were joined as well. The carburettor air intake under the nose was
painted burned metal. When all this had dried the prop was put in place and the
fuselage halves were joined. The wings were then sanded and puttied on the seams
as it is custom / necessary to do on such old kits! Some more seam treatment was
accordingly done on the wings and subsequently on the fuselage when it had set.
This was done over a couple of sessions as it is very rare that one complete
session is enough to eliminate seam lines, especially on a kit like this.
Perfect and smooth seams were eventually had and then tail planes plus wings
were glued to the fuselage. Especially the fuselage / wing joints requires
attention as there are some pretty large gaps, when the required dihedral on the
wings is obtained, as the fit isn’t really something to write home about. That’s
why I, as soon as the wings and tail planes had dried, gluefilled all seams with
my liquid glue bottle to strengthening the joins even more. When that had set
the seams were puttied and sanded as per usual practice. When all the remaining
issues had been dealt with the clear parts were cleaned and attached to the
cockpit rim with clear gloss. Gaps were filled with the same and sanded with a
light hand when set.
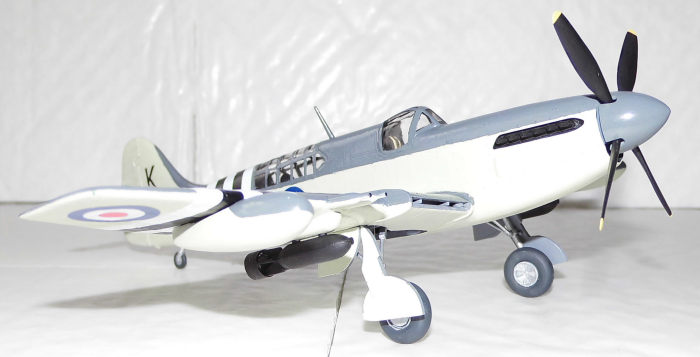
Next issues were the landing gear and remaining under wing thingies (bombs and drop tanks). Parts were cleaned up and glued together; the drop tanks needed some puttying as the fit is just typical Airfix from those days. Eventually they came to their senses and looks now like something from Tamiya (joke!). Gear and wheel hub was painted silver and the inner side of gear doors went grey (same grey color as gear bays). Tires went tire black. When gear had been finished it was glued to the model, together with the bomb racks. As soon as the airframe had been cleaned the model went to the paint shop.
| COLORS & MARKINGS |
First of
all, the canopy framing was painted flat black as were
the bombs and exhaust stacks. The arrester hook was painted silver. The sides
and undersides were all painted Sky (Humbrol 90) including the drop tanks and
outer sides of gear doors. As usual a couple of coats were the secret to obtain
a good coverage. When all was done to my satisfaction, the upper surfaces were
painted Extra Dark Sea Grey (Humbrol 123) including some upper areas on the drop
tanks and the spinner, which still w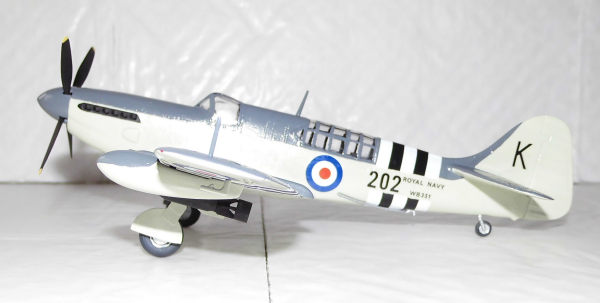 as
on its own – i.e. not glued to the propeller yet! When the obligatory touch ups
had been done the whole surface was glossed to prepare for the decals.
as
on its own – i.e. not glued to the propeller yet! When the obligatory touch ups
had been done the whole surface was glossed to prepare for the decals.
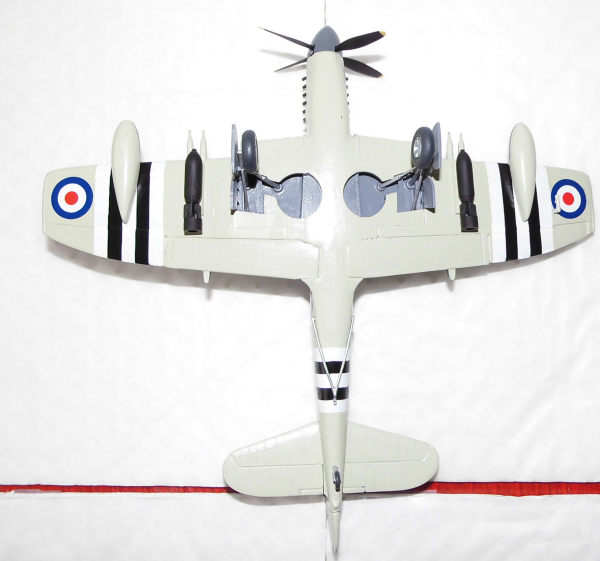
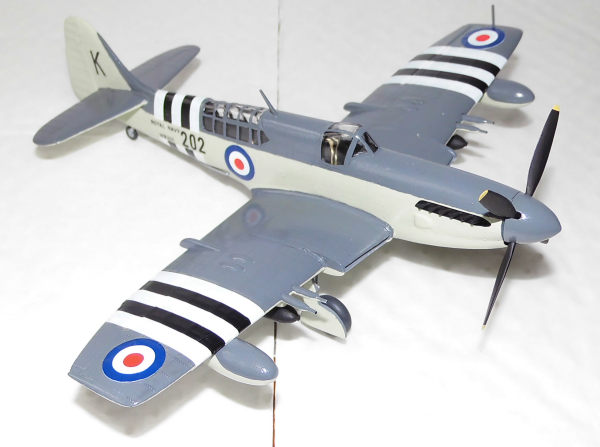
The decals behaved well though the “invasion stripes” on the wings had to be “wringed” to fit as intended. This resulted in some gaps that required the use of black and white paint to close them up. The last details were also attached at this stage and painted their required colors. The gear doors were also attached and their edges touched up as necessary. When all these things had set the decals, together with the touch ups, was given a gloss clear coat to finalize / seal in everything. The last things were attached; bombs and the spinner went so tight, that no gluing was required, while the hook needed two tiny drops of CA glue to get in place as did the drop tanks. The last detail painting consisted of the position lights and the cannon muzzles got a slight dab of black paint at the very tip to simulate the business end. And with that my Airfix Firefly was finished.
| CONCLUSIONS |
While this is one of Airfix’ old kits it nevertheless builds into a fine model of an interesting subject despite its deficiencies. However, as a modeler it doesn’t hurt with some challenges now and then, so if the modern crop of kits tends to bore you, grap an oldie like this an maybe you’ll be inspired to do some extra out of it – and maybe learn a thing or two!
| REFERENCES |
Part of the history section courtesy the kit instruction sheet.
The Illustrated Encyclopedia of Combat Aircraft of World War II by Bill Gunston Tiger Books International PLC, London 1990 ISBN 1-85501-096-8
15 June 2021
Copyright ModelingMadness.com. All rights reserved. No reproduction without express permission.
If you would like your product reviewed fairly and fairly quickly, please contact the editor or see other details in the Note to Contributors.