MPM 1/48 Fairey Fulmar Mk I
| KIT #: | 48056 |
| PRICE: | €35 when new |
| DECALS: | Three options |
| REVIEWER: | Spiros Pendedekas |
| NOTES: |
| HISTORY |
Emerging from the Fairey Battle project, the Fulmar was submitted as a
response to a prewar British specification, calling for a two-crew fighter
capable of observation and fleet defense operations. As the aircraft was
intended to routinely perform lengthy flights over the ocean, the presence
of a navigator / wireless operator was considered an essential element,
especially when flying at night time or during poor weather.
Since Nazi Germany, Britain's only foreseen enemy during that era, possessed
no aircraft carriers of its own, the prospective aircraft was not expected
to encounter any major fighter opposition, deeming aspects such as long
range and heavy armament more important than high levels of maneuverability
or speed. The resulting Fulmar, though possessing a substantial resemblance
to the earlier Fairey Battle, was an aerodynamically cleaner aircraft, also
featuring a folding wing.
 Initial
testing revealed the prototype inherited Battle’s relatively poor
performance, with things somehow improving following the adoption of the
more powerful Merlin VIII engine (a variant unique to the Fulmar with
supercharging optimized for low level flight), as well as various
aerodynamic improvements made to the airframe.
Initial
testing revealed the prototype inherited Battle’s relatively poor
performance, with things somehow improving following the adoption of the
more powerful Merlin VIII engine (a variant unique to the Fulmar with
supercharging optimized for low level flight), as well as various
aerodynamic improvements made to the airframe.
Due to the then desperate requirement for more modern fighters to equip
Britain's carrier fleet, the moderately performing but promising to be
available quickly and in quantity Fulmar was Royal Navy’s choice, with an
initial order for 127 production aircraft placed in mid-1938.
The further improved Fulmar Mk II started to be produced by January 1941. It
featured a more powerful Merlin XX engine and provisions for either a
center-line drop tank or 250/500 lb bomb. The type was also launched from
catapults on merchant ships, a convoy defensive plan that was being
evaluated at the time.
The Fulmar proved to be operationally sufficient, counteracting its clearly
inferior to typical land-based fighters performance with its frequently
desirable longer range. During the 1941 chase of the German battleship
Bismarck, multiple Fulmars were used as carrier-borne spotters, playing a
crucial role not only in tracking the movements of the vessel, but also in
performing an attack upon it.
In the North African Campaign, the relatively sturdy Fulmar was able to
achieve dozens of victories against its Italian and German adversaries, with
the type proving particularly effective against Italian reconnaissance
aircraft. At the Battle of Taranto, the Fulmar was deployed to provide top
cover for the attacking Swordfish torpedo bombers, whereas during the Battle
of Cape Matapan it provided escort to the FAA's attack aircraft against the
Italian Navy.
 The
type was also deployed in other theaters. At the Eastern Front, it was a
common constituent of the numerous Arctic convoys to the Soviet Union and
also played a prominent role in Operation EF, the ill-fated air raid on
Axis-held Kirkenes and Petsamo facilities that was conducted during July
1941. During early 1942, multiple Fulmar-equipped squadrons were deployed to
the Pacific Theater, in response to the Japanese advance in the Far East,
with two such squadrons dispatched to defend Ceylon (though it was soon
realized that the type was grossly outclassed by the Zero).
The
type was also deployed in other theaters. At the Eastern Front, it was a
common constituent of the numerous Arctic convoys to the Soviet Union and
also played a prominent role in Operation EF, the ill-fated air raid on
Axis-held Kirkenes and Petsamo facilities that was conducted during July
1941. During early 1942, multiple Fulmar-equipped squadrons were deployed to
the Pacific Theater, in response to the Japanese advance in the Far East,
with two such squadrons dispatched to defend Ceylon (though it was soon
realized that the type was grossly outclassed by the Zero).
As a naval fighter, the Fulmar was being gradually replaced throughout 1942
by single-seat aircraft that had been adapted from land fighters, such as
the Sea Hurricane, the Seafire and the Martlet. From then on, the type
continued to be operated in night convoy escorting, long-range
reconnaissance and as an intruder. It was also used to train crews for the
newer and more advanced Fairey Barracuda, with dearmed Fulmars also seeing
service in Africa as communications and dispatch aircraft. Approximately 100
examples were converted to night fighters, achieving only limited success in
this role. In February 1945, the Fulmar was withdrawn from front line
service.
Fulmar pilots were satisfied not only with the type’s fuel capacity and
range, but also with its pleasant flight characteristics and the widely
spaced undercarriage that provided less sweating deck landings. Most Fleet
Air Arm fighter aces scored at least some of their victories while flying
Fulmars.
Recorded as having destroyed a total of 112 enemy aircraft against the loss
of 40, makes the Fulmar the leading fighter type in terms of aircraft shot
down to be operated by the Fleet Air Arm during the course of the conflict.
A total of 600 were built, with only one known survivor, #N1854, which was
the Fulmar prototype (and first production Mk I) at the Fleet Air Arm
Museum, Yeovilton.
| THE KIT |
This “new generation” MPM kit hit the shelves in 2007. Done in full styrene, and seemingly a CAD/CAM project, though not “Tamiya”, it is really not easy to distinguish it from other good mainstream kits of the era. For a detailed look at this nice kit’s contents, please visit the MM preview here.
| CONSTRUCTION |
 I started by
attaching per instructions all interior bits and pieces onto the sidewalls. The
instrument panel, the front and rear floors and corresponding bulkheads were
mini subassemblies that were individually built, then everything was trapped
between the fuselage halves. Basic cockpit color was Hu78 cockpit green with
instrument panels, various consoles and throttle box in black, brass (as stated
in the instructions) fire extinguishers and leather pilot’s headrest,
navigator’s seat cushion and stick gaiter. The raised instrument details were
dry brushed with silver and some red knobs were “pinned” with red paint by a
fine brush. Seat belts were added from masking tape, whereas a piece of acetate
replicated the gun sight. Due to the many parts, of which some interlock with
others, putting together the cockpit took some careful approach, as to make sure
that everything went into place, but in the end all lined up nicely with the
cockpit looking acceptably busy.
I started by
attaching per instructions all interior bits and pieces onto the sidewalls. The
instrument panel, the front and rear floors and corresponding bulkheads were
mini subassemblies that were individually built, then everything was trapped
between the fuselage halves. Basic cockpit color was Hu78 cockpit green with
instrument panels, various consoles and throttle box in black, brass (as stated
in the instructions) fire extinguishers and leather pilot’s headrest,
navigator’s seat cushion and stick gaiter. The raised instrument details were
dry brushed with silver and some red knobs were “pinned” with red paint by a
fine brush. Seat belts were added from masking tape, whereas a piece of acetate
replicated the gun sight. Due to the many parts, of which some interlock with
others, putting together the cockpit took some careful approach, as to make sure
that everything went into place, but in the end all lined up nicely with the
cockpit looking acceptably busy.
Moving onto the main wing, I first attached the six bay sidewall pieces onto the
lower wing half. Whereas instructions then want you to attach the upper wing
halves onto the lower half and then secure the complete subassembly under the
fuselage, I took a different approach, in order to minimize the wing root gaps
or mismatch: I first removed the locating pins from the sing halves, then
attached only the lower wing half to the fuselage, followed by the upper halves,
which were affixed to the roots (ensuring a gap-free joint) and then let them
rest naturally onto the lower half, the joints taken care of water thin glue.
The wing gun housings and wing tip transparencies were next attached, followed
by assembly and attachment of the tail planes.
 Some gaps
emerged at the underside wing to fuselage joints, which were first treated with
liquefied styrene and then sanded smooth. It was only then that the distinctive
radiator chin was assembled and attached, presenting its own gaps. The hook
housing belly part was also attached at this time, followed by the hook itself
(sans its final protruding part, which I decided to add at later stages in order
to avoid damaging it).
Some gaps
emerged at the underside wing to fuselage joints, which were first treated with
liquefied styrene and then sanded smooth. It was only then that the distinctive
radiator chin was assembled and attached, presenting its own gaps. The hook
housing belly part was also attached at this time, followed by the hook itself
(sans its final protruding part, which I decided to add at later stages in order
to avoid damaging it).
The wing leading edge landing light opening lacked the quite prominent interior
walls, which were fabricated from thin sheet styrene (a strange omission, since
instructions indicate to attach the lens onto where no attachment area exists).
The blant gun openings were also drilled out by this time, as well as their
equal underwing shell ejector holes.
Having a more or less basic model assembled, I treated all gaps first with
liquefied styrene, then coare sanded them smooth, followed by application of
normal putty and sanding. After attaching the radiator exit louver (at a slight
“open” position that was witnessed at seasonal pics), I masked the wing tip
transparencies with Maskol and took this elegant bird to the paint shop!
| COLORS & MARKINGS |
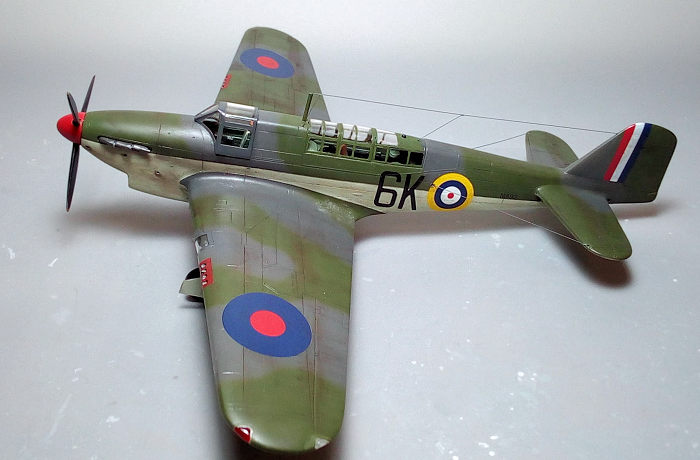
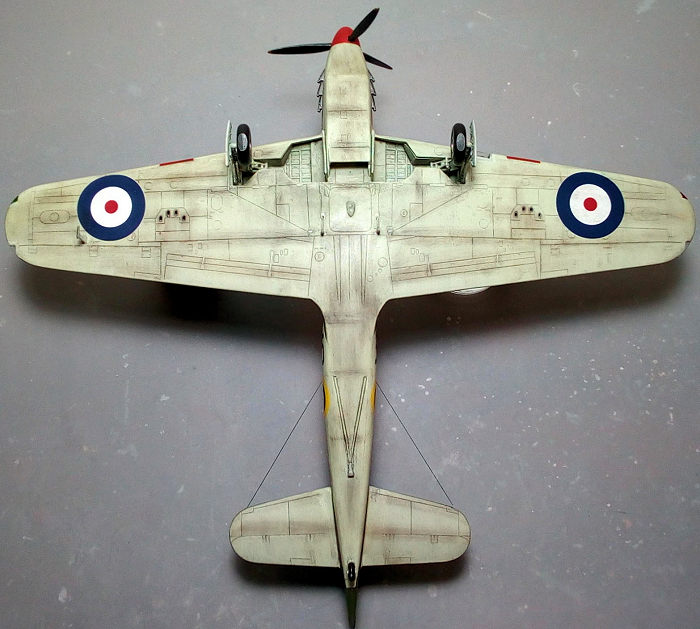 For the
underside color I started by applying a coat of Hu90 Beige Green, which, to my
eye, sort of came close to “sky”. Bays, door innards, as well as landing gear
legs received the same color, per the standard FAA practice (at least from a
point soon after the start of the war onwards). After masking it off, I went on
and applied a coat of Hu123 Extra Dark Sea Gray on top, followed by freehanding
Hu117 Light Green (which, again, to my eye came close to slate gray). The
leading edge gun areas were masked and painted red, with a coat of Future
preparing the bird for decaling.
For the
underside color I started by applying a coat of Hu90 Beige Green, which, to my
eye, sort of came close to “sky”. Bays, door innards, as well as landing gear
legs received the same color, per the standard FAA practice (at least from a
point soon after the start of the war onwards). After masking it off, I went on
and applied a coat of Hu123 Extra Dark Sea Gray on top, followed by freehanding
Hu117 Light Green (which, again, to my eye came close to slate gray). The
leading edge gun areas were masked and painted red, with a coat of Future
preparing the bird for decaling.
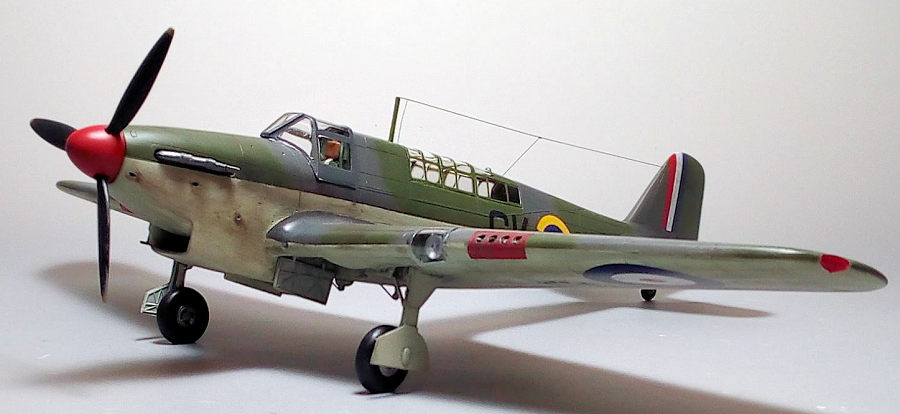
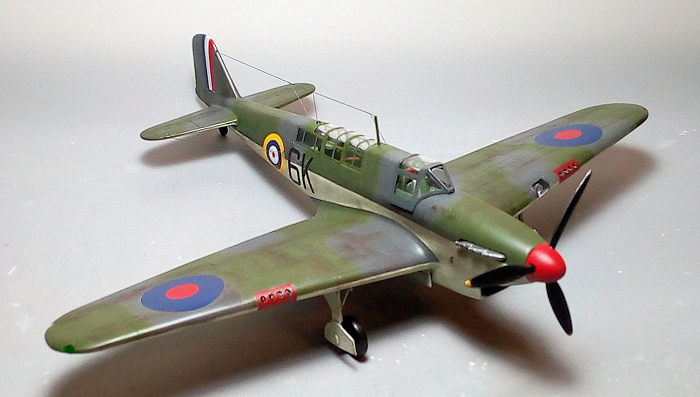
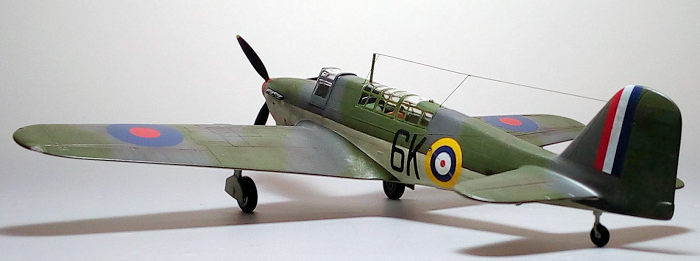
I used the kit decals, in order to represent N1892/6K machine, belonging to 809
Squadron, as it stood in HMS Victorious in December 1940. The thin Aviprint
decals, despite being more than 15 years old, behaved very well, easily
detaching from their backing paper and adhering positively, while they were keen
on following surface curvatures and succumbing to the engraved panel lines.
Since they proved not too tolerant in repositioning, better be sure that they
are positioned correctly once applied. A coat of Future sealed them.
| FINAL CONSTRUCTION |
The gear legs were assembled, including the nice looking but quite flimsy retraction mechanisms. Brake lines made from stretched sprue were attached per seasonal pics. Attachment of the legs into the bays is not totally positive, with some spot trimming needed in order to bed into position. Overall color was underside color, with black brake lines and silver oleos done by a fine tip silver pen.
The two piece
main wheels were tad filed to look weighted (not too much, as, I
believe, they were kept at high pressure in order to counteract the
intense carrier landings) and attached, together with the one piece rear
wheel/strut. They had steel rims and black tires.
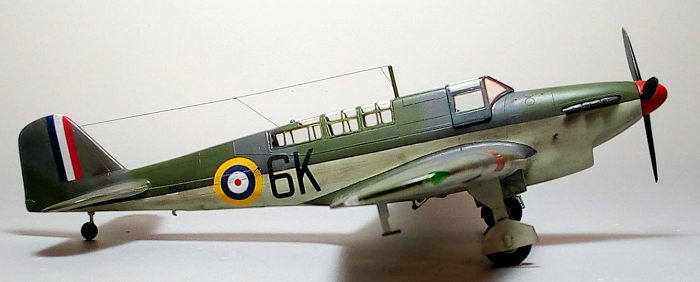
The exhausts had their tubes drilled out for extra realism, then painted
Testors Burned Metal (from my dwindling reserves) and attached in
position. By the same time I attached the hook end, the wing pitot plus
some various underside small stuff, all accordingly painted. Since no
gun barrels were provided, I fabricated them from stretched sprue,
painted them gun metal and attached them. As a side note I believe the
gunports were usually fully covered with linen and red dope to seal them
from the elements, so the original bland holes provided by the kit might
look correct after all. However, I wanted to go for the box art looks,
depicting the holes opened and the barrels visible.
 Since
carrier conditions would nevertheless be harsh, inspired by the nice box
art, I decided to apply some respectable amount of weathering. This
included a hefty black wash at all undersides, more intensely at landing
gear parts, bays and door innards and dark brown/black dry pastelling at
all places that dirt, grim, or even engine soot would accumulate. Minor
oil/fluid leakages from tiny drains around the engine area were
represented by dark brown tempera and a very fine brush. Finally, some
chipping was dry brushed with silver at places where personnel would
walk (or hastily leaving their toolbox), like the wing roots aft areas.
Since
carrier conditions would nevertheless be harsh, inspired by the nice box
art, I decided to apply some respectable amount of weathering. This
included a hefty black wash at all undersides, more intensely at landing
gear parts, bays and door innards and dark brown/black dry pastelling at
all places that dirt, grim, or even engine soot would accumulate. Minor
oil/fluid leakages from tiny drains around the engine area were
represented by dark brown tempera and a very fine brush. Finally, some
chipping was dry brushed with silver at places where personnel would
walk (or hastily leaving their toolbox), like the wing roots aft areas.
The 5-piece propeller featured separate blades, but was a breeze to
assemble. It had red spinner, black blades and yellow tips, with some
silver dry brushing applied to its leading edges, in order to simulate
erosion. After butt fitted in position, a final satin coat gave the bird
its final finish.
The transparencies had their frames hand painted and attached. Fit was
all over good, with the exception of the wing leading edge light cover,
most probably being operator error, since yours truly managed to sand
the leading edge opening to a wrong shape, only realizing the
discrepancy when it was too late. Anyways, white glue took care of the
emerging gaps.
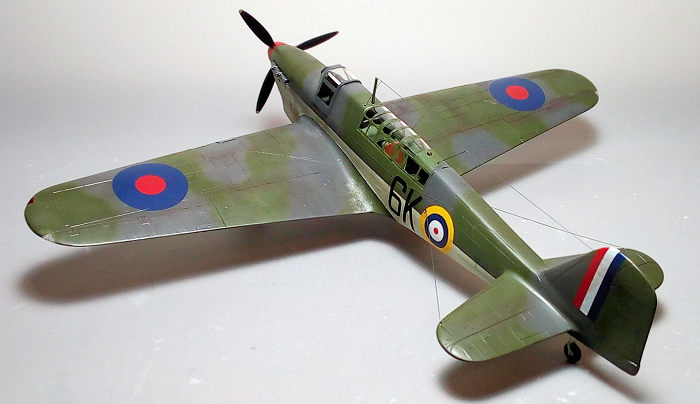
I attached the top antenna mast fore of the navigator’s office, then ran
a wire antenna made from stretched sprue towards the fin, connected with
another two small pieces with the fuselage as per drawings. Two more
wires were run from each horizontal stabilizer towards the fuselage
sides. The front wing tip lights were painted with red and green clear
paints, before calling the Fulmar done!
| CONCLUSIONS |
This is by all means a
very good kit of the elegant Fulmar, with correct overall shape and all key
areas (like cockpit, landing gear and radiator) sufficiently represented
detail-wise. Fit is very good, posing no unpleasant surprises anywhere. Clear
parts are well rendered, instructions are consistent and decals are superb. Out
of the box a very satisfying Fulmar can emerge, with the not complicated
construction deeming it suitable even for less experienced modelers.
MPM has to be congratulated for coming not later than 2007 with a Fulmar in 1/48
scale, tackling a subject that not only leaned towards “esoteric” in
attribution, but also rendering it in full styrene, practically providing a
“mainstream” kit!
This kit can still be found nowadays (as of 2021) at the same very sensible
prices offered back then. The latest (2015) Special Hobby reboxing is slightly
higher priced, but with a more detailed full resin interior, PE goodies and
extended decal sheet. As a side note, the styrene interior seems not to be
included in the Special Hobby reboxing, so the modeler who wishes to go for the
(very adequate) styrene interior must look for the original MPM version.
If you own such a kit or come across one, by all means grab it and build it! You
will be totally satisfied by coming up with a nice result of a very elegant and
by all means important aircraft that, though moderate in general “posture”,
performed its assigned tasks in an effective and sufficient manner.
Happy modeling!
25 November 2022
Copyright ModelingMadness.com. All rights reserved. No reproduction in part or in whole without express permission from the editor.
If you would like your product reviewed fairly and fairly quickly, please contact the editor or see other details in the Note to Contributors.