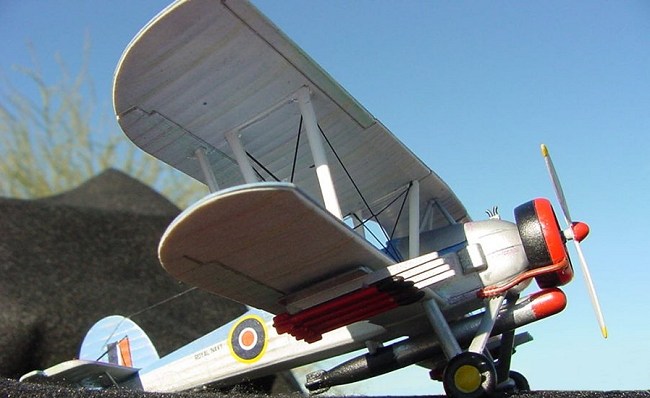
Revell 1/72 Fairey Swordfish Mk I/III
| KIT #: | 04115 |
| PRICE: | $8.50 MSRP |
| DECALS: | Two options |
| REVIEWER: | Greg Ewald |
| NOTES: | OOB review |
| HISTORY |
No sense in repeating the excellent research done for the 1/48 scale variants already reviewed, enough to say that this is the possibly the most famous of the biplanes to be in active service throughout world war 2, especially well known for the wrecking of the Bismark’s steerage which lead to her destruction. “Stringbags” were exceptionally stable flying machines according to available accounts, and performed wonderfully in a rapidly evolving theatre of war.
| THE KIT |
 This is
one of the straightforward kit designs produced by Revell Germany that
makes them so much fun to build, the reason it was chosen initially (
Halfway through the rigging of a 1/96 frigate, I had to take a sanity
break). Detail is adequate for a small 1/72nd plane, with
recessed lines and good fabric simulation. There is quite a lot of room
for superdetailing, a large
This is
one of the straightforward kit designs produced by Revell Germany that
makes them so much fun to build, the reason it was chosen initially (
Halfway through the rigging of a 1/96 frigate, I had to take a sanity
break). Detail is adequate for a small 1/72nd plane, with
recessed lines and good fabric simulation. There is quite a lot of room
for superdetailing, a large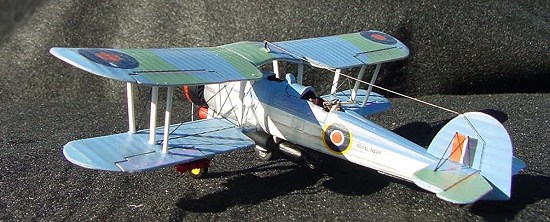 double cockpit and a very visible engine, both of which could use a lot of
work, but I wanted to just have fun!
double cockpit and a very visible engine, both of which could use a lot of
work, but I wanted to just have fun!
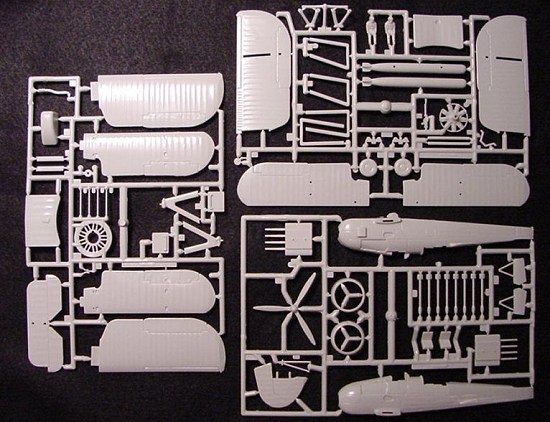
My sample was unusually free of flash for a Revell kit, and the parts were cleanly molded in 68 pieces of light grey styrene. The sprues were more flexible than I am used to from Revell, and was pleasantly surprised…perhaps they have changed their styrene formula from the brittle kits of the past? (my model was molded in 2003, according to the box) The decals were simple but well made, transferring to the surface easily, and markings for two aircraft are supplied, a mark 1 from 810 squadron, and a mark 3 from 838 squadron.
| CONSTRUCTION |
 Construction is straightforward, the instruction sheet (11 pages of
newsprint) outlining everything in the simple kit. You are asked several
times which version you want to build, and make decisions regarding this
during the basic building. Most of the locator holes are molded into the
kit, so little drilling is necessary, just two small squares in the bottom
of the fuselage for the torpedo mounts. A fair amount of sanding was
required to get the seams just right, but very little putty was used to get
the lines to look correct. I did leave off the engine/propeller assembly
until the very last, as it would only get in the way during the rest of the
construction.
Construction is straightforward, the instruction sheet (11 pages of
newsprint) outlining everything in the simple kit. You are asked several
times which version you want to build, and make decisions regarding this
during the basic building. Most of the locator holes are molded into the
kit, so little drilling is necessary, just two small squares in the bottom
of the fuselage for the torpedo mounts. A fair amount of sanding was
required to get the seams just right, but very little putty was used to get
the lines to look correct. I did leave off the engine/propeller assembly
until the very last, as it would only get in the way during the rest of the
construction.
 The control surfaces are molded separately, which makes for a breeze in
painting, and mate together really well, I actually left the location pins
on! In step 10 do not completely glue together the three pieces that make
up the upper wing until you get all of the support ribs fastened securely
to the bottom wings. Gently fit on the upper wing pieces and glue into
place from one side to the other, or the dihedral will be incorrect. Also,
don’t bother gluing in parts 52 and 53 (the aft supports) until the whole
upper wing is in place and straight…this took some doing, with a few choice
euphemisms uttered from my studio, to get it just right.
The control surfaces are molded separately, which makes for a breeze in
painting, and mate together really well, I actually left the location pins
on! In step 10 do not completely glue together the three pieces that make
up the upper wing until you get all of the support ribs fastened securely
to the bottom wings. Gently fit on the upper wing pieces and glue into
place from one side to the other, or the dihedral will be incorrect. Also,
don’t bother gluing in parts 52 and 53 (the aft supports) until the whole
upper wing is in place and straight…this took some doing, with a few choice
euphemisms uttered from my studio, to get it just right.
 When you attach the landing gear struts, be sure to use a strong CA glue,
the location marks are somewhat ambiguous, and most of the weight will be
resting on them…I ended up having to use a gel/gap filling glue to get the
wheels on securely.
When you attach the landing gear struts, be sure to use a strong CA glue,
the location marks are somewhat ambiguous, and most of the weight will be
resting on them…I ended up having to use a gel/gap filling glue to get the
wheels on securely.
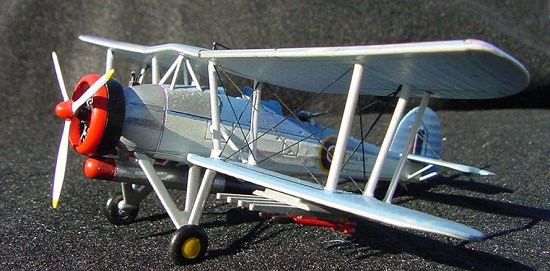
Oh no…even the plane has rigging! Using some scrap black sprue, I stretched out about three feet of line and let it cool. I have found that an inexpensive yardstick (70 cents at the local hardware store) saves a lot of grief when it comes to rigging…with it taped onto the construction table, I can easily make a template and cut all of the rigging to fit quickly, and glue into place fairly easily ( a pair of hemostats is almost required here). Once all of the rigging is done you can go ahead and glue in the rear wing supports.
| COLORS & MARKINGS |
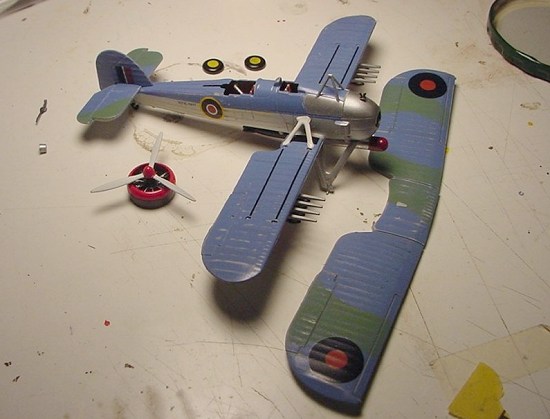
These planes ran the gamut when it came to
different patterns, from plain aluminium dope to heavily camouflaged and
intricate styles…I primed the outside Swordfish in grey, then overpainted
with a light spray of flat white. When sanded just a
 bit (220 grit, wet)
you get great fabric lines and some neat weathering effects. Upper
surfaces were painted an enamel matte blue mixed by eye from a variety of colours to give a bit of a mottled surface, then also sanded in the same
manner. Decals went on without a hitch, and the whole kit was sprayed with
a clear acrylic satin finish. Don’t forget to scuff up the decals late
also, those surfaces took all the same wind and water damage as the rest of
the plane.
bit (220 grit, wet)
you get great fabric lines and some neat weathering effects. Upper
surfaces were painted an enamel matte blue mixed by eye from a variety of colours to give a bit of a mottled surface, then also sanded in the same
manner. Decals went on without a hitch, and the whole kit was sprayed with
a clear acrylic satin finish. Don’t forget to scuff up the decals late
also, those surfaces took all the same wind and water damage as the rest of
the plane.
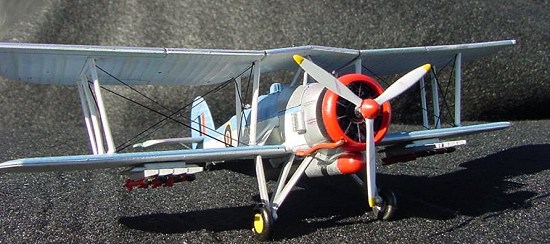
The torpedo and rockets were painted while stuck in a small bit of Styrofoam, the easiest way to avoid drips and discolouration. I used Testor’s metalizer for the chrome and dull metal finishes.
I also like to use coloured pencils to bring out lines across the plane in different areas, and don’t stick to just brown and black…sometimes a bright purple line will really set off a wing edge. If you look at box art, you will notice that the painters rely quite a lot of different tones to make a plane have some “oomph”…which is just what I wanted with this little gem.
| CONCLUSIONS |
 My wife and I entertain quite a lot, and one of the first
things that visitors ask about is the latest kit on the block…this little
plane certainly was a hit with everyone. We had a lot of kids over the
other night, and they were fascinated to learn about biplanes still being
used in world war two, and how brave the aviators were to fly in fabric
ships against the might of the German war machine. Revell’s kit is a fun,
simple build with enough leeway to do whatever you want with it…for me, it
was a great break from block and tackle, and I heard from one of our
friends that their kids bought a book on the history on the sinking of the
Bismark because of seeing the plane. Not bad for just a little model,
huh?
My wife and I entertain quite a lot, and one of the first
things that visitors ask about is the latest kit on the block…this little
plane certainly was a hit with everyone. We had a lot of kids over the
other night, and they were fascinated to learn about biplanes still being
used in world war two, and how brave the aviators were to fly in fabric
ships against the might of the German war machine. Revell’s kit is a fun,
simple build with enough leeway to do whatever you want with it…for me, it
was a great break from block and tackle, and I heard from one of our
friends that their kids bought a book on the history on the sinking of the
Bismark because of seeing the plane. Not bad for just a little model,
huh?
| REFERENCES |
Quite a lot of googling, plus the fantastic reviews of the 1/48 scale Tamiya kit on this site.
December 2004
Copyright ModelingMadness.com
If you would like your product reviewed fairly and fairly quickly, please contact the editor or see other details in the Note to Contributors.