|
KIT: |
Tamiya 1/48 Swordfish II |
|
KIT # |
61068 |
|
PRICE: |
$68.00 MSRP($55.00 at N.A. Hobbies) |
|
DECALS: |
See review |
|
REVIEWER: |
|
|
NOTES: |
Xtradecals and Tamiya photo-etched rigging ($13.00) used. |
|
HISTORY |
Most of the Swordfish produced during the Second World War were constructed by Blackburn Aviation, including all Swordfish Mks. II and III. This situation must have felt good to Fairey Aviation - the company responsible for the original design - inasmuch as the two had been locked in competition throughout the 1920s and 1930s as suppliers of aircraft to the Fleet Air Arm. Blackburn producing the Swordfish would have been the equivalent of Chance Vought having to produce Hellcats because they had no Corsair. These Swordfish built by Blackburn were called "Blackfish."
 The
ungainly-looking biplane was in fact the most successful naval strike
aircraft of the war. (I'm sure that there are SBD crews who would
argue the point. Ed) Taranto, the "Bismarck" pursuit, and "The
Channel Dash" are epic actions during which the Swordfish passed into
legend. What is less well-known but perhaps more important than all of
these combined was the day-to-day work of the Swordfish during the Battle
of the Atlantic. From 1940 to 1945, the Fleet Air Arm sank 18 Axis
submarines and shared 16 other sinkings with escort vessels or RAF
units. The Swordfish was responsible for 15 of the 18 solo kills, and
participated in 10 of the 16 shared sinkings - and it didn't even enter
the Battle of the Atlantic until February 1943! That is quite a record
for an airplane that was considered obsolete at the time the war broke
out.
The
ungainly-looking biplane was in fact the most successful naval strike
aircraft of the war. (I'm sure that there are SBD crews who would
argue the point. Ed) Taranto, the "Bismarck" pursuit, and "The
Channel Dash" are epic actions during which the Swordfish passed into
legend. What is less well-known but perhaps more important than all of
these combined was the day-to-day work of the Swordfish during the Battle
of the Atlantic. From 1940 to 1945, the Fleet Air Arm sank 18 Axis
submarines and shared 16 other sinkings with escort vessels or RAF
units. The Swordfish was responsible for 15 of the 18 solo kills, and
participated in 10 of the 16 shared sinkings - and it didn't even enter
the Battle of the Atlantic until February 1943! That is quite a record
for an airplane that was considered obsolete at the time the war broke
out.
The Swordfish first went aboard the escort carrier H.M.S. "Biter" in February 1943. Later that year the first MAC ships - converted grain ships or tankers even smaller than the CVEs, with no below-decks hangar space to get the 4-6 aircraft they carried out of the weather for maintenance or protection - began operations. The Swordfish was famous for being able to stagger off these decks in weather conditions that kept other aircraft tied down for safety, and for bringing its crews back to decks pitching through 20-30 feet in North Atlantic storms where the freezing level was at 500 feet. Escorting Archangel convoy RA-58 in April 1944, Swordfish of 819 Squadron flew from H.M.S. "Activity," while Avengers of 846 Squadron - the premier Avenger sub-hunting squadron - flew from H.M.S. "Tracker." The Swordfish flew on days when 846's Avengers couldn't even be brought on deck to attempt a launch.
 The Swordfish
that accomplished all this was the Mk.II, a progressive modification of
the original Mk.I, that was primarily distinguishable by its strengthened
lower wings, the lower surfaces of which to just outboard of the bomb
racks were metal covered. These wings were fitted to the Swordfish for
the remainder of the Blackburn production run, staring with W5836, which
also utilized the more powerful Pegasus 30 engine. Late-production
Swordfish IIs and all Swordfish IIIs are distinguishable by an enlarged
oil cooler on the starboard forward fuselage.
The Swordfish
that accomplished all this was the Mk.II, a progressive modification of
the original Mk.I, that was primarily distinguishable by its strengthened
lower wings, the lower surfaces of which to just outboard of the bomb
racks were metal covered. These wings were fitted to the Swordfish for
the remainder of the Blackburn production run, staring with W5836, which
also utilized the more powerful Pegasus 30 engine. Late-production
Swordfish IIs and all Swordfish IIIs are distinguishable by an enlarged
oil cooler on the starboard forward fuselage.
The aircraft had been experimentally equipped with radar in 1941. By 1943, all Swordfish II carried early ASV radar, with the Mk.III - which entered service in late 1943 - carrying centimetric air-to-surface radar in a radome between the landing gear.
The Swordfish first successfully fired rockets during tests in October, 1942. The Swordfish took rockets into action beginning in 1943, with the first successful use of rockets against a U-boat occurring on May 23, 1943, when a Swordfish of 811 Squadron flown by Sub-Lt. Horrocks pierced the hull of U-752, which subsequently sank after further attacks by Wildcats and a bomb-carrying Swordfish. The last contact between a Swordfish and a U-boat occurred April 20, 1945.
|
THE KIT |
For those of you who want to know how to build the Swordfish "out of the box," I refer you to my earlier article. Since much of the work on this model other than the modifications, is exactly similar to what is described there, I shall limit my discussion here to those items that were changed or modified to create a Swordfish Mk.II.
|
CONSTRUCTION |
The Cockpit:
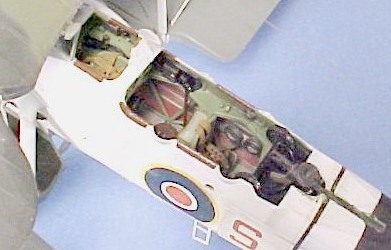 The only
modification to the cockpit was the addition of the "black box" for the
ASV radar. I used one from the Tamiya Mosquito N.F.II/F.B.VI kit that I
had saved, and mounted it in the space below the pilot's cockpit, where
it was accessible to the observer in the middle seat.
The only
modification to the cockpit was the addition of the "black box" for the
ASV radar. I used one from the Tamiya Mosquito N.F.II/F.B.VI kit that I
had saved, and mounted it in the space below the pilot's cockpit, where
it was accessible to the observer in the middle seat.
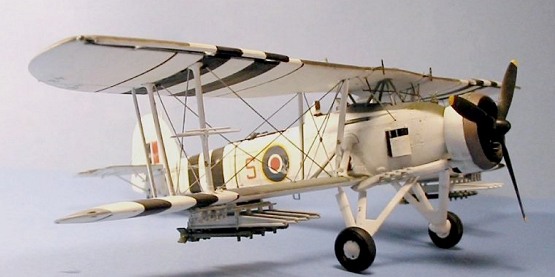
The Wings:
The big thing to do here is sand off the rib detail, out to the seventh rib in from the wingtip. I also got rid of the landing light in the starboard wing, filling in that space with plastic sheet and puttying over the area. I scored panel lines after the rib detail was removed, doing that every four "ribs" across this section.
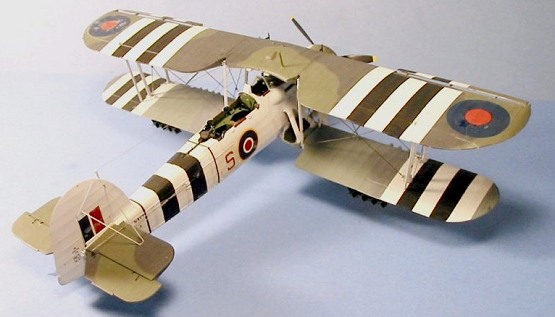
The major change was to deploy the slats on the upper wing. This is a simple modification, that can be done to any Swordfish you are making. I simply cut out the slats from the upper and lower surfaces and glued them together. I then assembled each upper wing outer panel, and covered over the area under the flap with a piece of plastic sheet that was curved to give an aerodynamic appearance. When the slats had set up, I sanded them down using a sanding block, to obtain the proper cross-sectional shape. I made the attachments from Evergreen rod material.
The Yagi Antennas:
The Swordfish II has the yagi antennas for the ASV radar prominently attached to the forward outer interplane strut. I went again to the parts box, and took the "T" antennas I had saved from the Tamiya Beaufighters I didn't turn into night fighters. I attached the inner and outer ones together, then added additional antennas made from thin Evergreen rod, and set them aside.
 The
Oil Cooler:
The
Oil Cooler:
The larger oil cooler seemed at first to be the biggest problem in modifying the kit item to this structure. I ended up using some 15-mill plastic sheet, cutting eight to the same shape as the lower side of the kit part, with seven pieces cut slightly smaller in dimension. I then stacked these and attached them to the bottom of the kit part.
Miscellany:
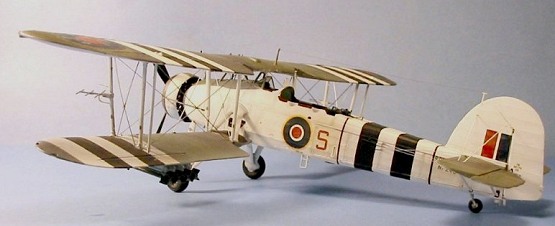
To create the Swordfish II, the modeler also needs to use part G-11 instead of G-10 in assembly section 11, and to use the collector ring part D-8 instead of D-7 when assembling the cowling. You also need to use the longer exhaust, rather than parts A-16 and A-17.
The rockets provided in the kit look accurate when compared with photos, and merely need to be assembled. When boring out the holes in the lower wing, merely bore out the holes the instruction sheet does not call for you to open, and leave closed the ones on the inner part of the lower wing that the instructions tell you to open.
A modeler could install the flares as per the kit instructions. I decided not to, and filed the racks so they would look "open" when installed.
|
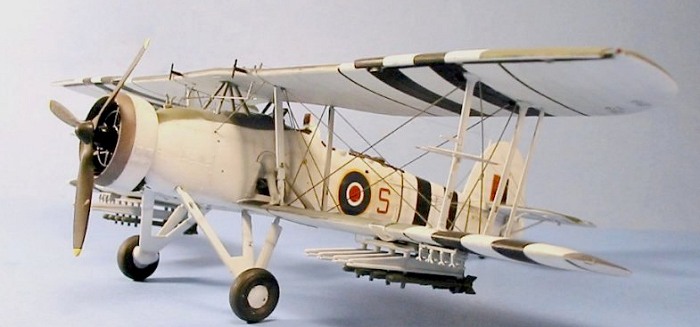
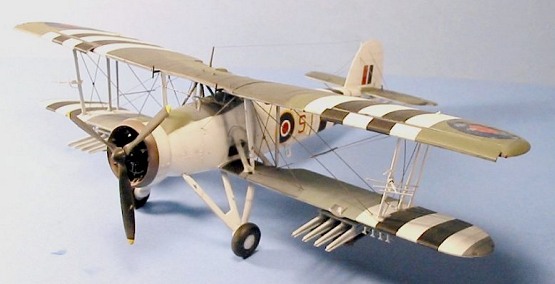
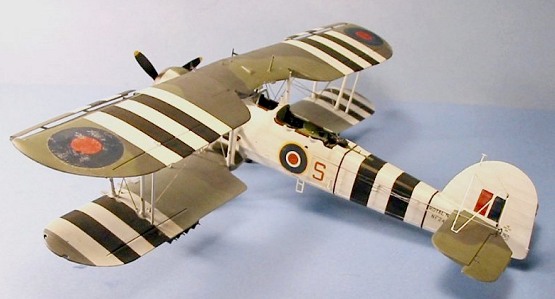
CAMOUFLAGE & MARKINGS |
I used Gunze-Sanyo H-312 "Light Green" for British Interior Green in the cockpit; I used H-414 "Rot23 Red" for the fabric primer paint and H-85 "Sail Color" for the doped fabric, which I painted in the manner explained in detail in the earlier review.
 I painted the
D-Day invasion stripes before doing anything else and masked these off.
I made sure the white areas of these stripes that would be against the
white of the camouflage was un-tinted, so that it would "stand out" from
the tinted-white camouflage, as if it had been newly-applied as it would
have been on the real thing.
I painted the
D-Day invasion stripes before doing anything else and masked these off.
I made sure the white areas of these stripes that would be against the
white of the camouflage was un-tinted, so that it would "stand out" from
the tinted-white camouflage, as if it had been newly-applied as it would
have been on the real thing.
I used Tamiya paints throughout in finishing off the model externally. I used XF-22 "RLM Grey" for Slate Grey and XF-24 "Dark Grey" for Dark Sea Grey. I used XF-2 Flat White, tinted with a brushful of Neutral Grey, for the rest of the aircraft. I also prepared the model by "pre-shadowing" all the panel lines with airbrushed lines of "Flat Black" prior to applying the camouflage. Once the model was painted, I then used Tamiya "Smoke" applied lightly along panel lines and ribs for a subdued effect. Once everything was dry, I overcoated the model with two coats of Future, in preparation for applying the markings.
Decals:
There is a decal sheet originally created by MDC for their resin Swordfish, which is all Mk.II aircraft, and available from Hannant's in the XtraDecal line. This was used for the model.
|
FINAL CONSTRUCTION |
 I mounted the
photo-etch cross-bracing to the interplane struts, then widened the slots
they would attach to on the outer wings, so that they could fit without
damaging the P-E. On my previous Swordfish, I had found these slots were
too tight to allow assembly with the photo-etch bracing. Once the outer
wings were assembled, I waited on the rest of the rigging until the whole
airplane was assembled.
I mounted the
photo-etch cross-bracing to the interplane struts, then widened the slots
they would attach to on the outer wings, so that they could fit without
damaging the P-E. On my previous Swordfish, I had found these slots were
too tight to allow assembly with the photo-etch bracing. Once the outer
wings were assembled, I waited on the rest of the rigging until the whole
airplane was assembled.
I then attached the outer wings to the fuselage/stub-wing assembly and allowed all that to set up overnight. I then attached the main landing gear and the engine. Once all this was set up, I attached the rocket sub-assemblies and the flare rack sub-assemblies to the lower wings.
When all was set up, I rigged the wings with the rest of the photo-etch rigging supplied, and then made the tail control wires using straightened "High-E" guitar string (actually .008 stainless steel wire).
|
CONCLUSIONS |
There you have it: a biplane with invasion stripes, rockets, and radar - what an anachronism!! The amount of scratchbuilding for this conversion is minimal, and all the major parts you need to do this variety of Swordfish is already in the kit. I wonder when Tamiya will get around to releasing a Swordfish II of their own.
Thanks to North American Hobbies for the review kit.
If you would like your product reviewed fairly and quickly by a site that has over 200,000 visitors a month, please contact me or see other details in the Note to Contributors.