|
KIT: |
Hasegawa 1/48 Spitfire IX |
|
KIT # |
9079 |
|
PRICE: |
$26.95 |
|
DECALS: |
Two aircraft |
|
REVIEW & |
|
|
NOTES: |

|
HISTORY |
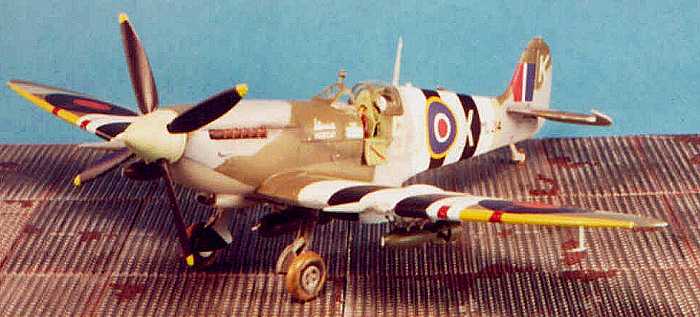
Had not the RAF been able to bring a new Spitfire into combat in the summer of 1942 to face the Fw-190A that could outfly the Spitfire V on every point but turning circle, the war over Northern Europe would have likely taken a different course. As it was, the Spitfire IX - a "stopgap" airplane that mated the airframe of the Spitfire Vc with a Merlin 61 engine with two-stage supercharger - did not fully equip all RAF fighter squadrons in the UK until late 1943. The "interim" Mk.IX became the second most-produced Spitfire, running close behind the Spitfire V, and gave the RAF parity with the best German equipment. As British ace Johnny Johnson noted in his autobiography, "Wing Leader," the Spitfire IX and the Fw-190A were so closely-similar in performance that the outcome of a fight was a matter of pilot ability.
The the time of D-Day, the Spitfire IX had been replaced as the RAF's high altitude air-superiority fighter by the Griffon-powered Spitfire XIV; turned into a fighter-bomber to support the invasion, the Mk.IX would show on numerous occasions that it was still the mount of aces, right up to the concluding weeks of the war.
John Plagis, a Rhodesian of Greek parentage, first made a name for himself
flying Spitfire Vs over Malta with 249 and 185 Squadrons in 1942-43, with whom
he scored ten victories over German and Italian opponents. Returning to England,
he joined 64 Squadron, the original unit to take the Spitfire IX into combat,
and scored four more victories. In June,
 1944, he was Officer Commanding 126
"Persian Gulf" Squadron. The unit took on that name because half the
establishment were Spitfire IXs purchased by British residents of the Persian
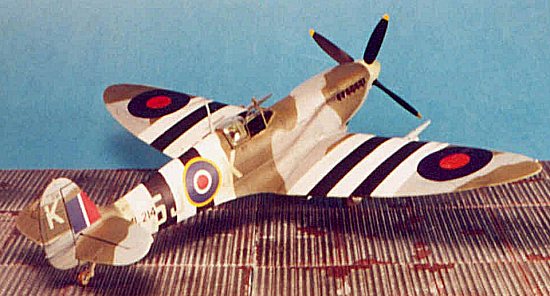
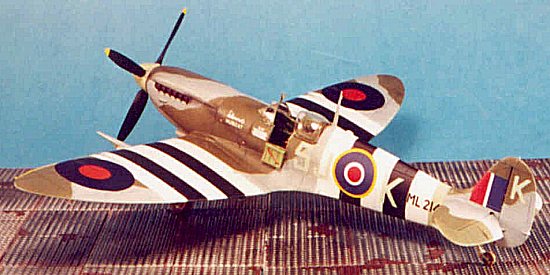
Gulf; they were named for the states of the region, with Plagis' ML214 named for
the sheikdom of Muscat.
As were most Spitfire Squadrons in Second Tactical Air Force, 126 Squadron was a fighter-bomber unit, its Spitfires carrying two 250-lb bombs underwing and one 500-pounder on the centerline. However, on July 24, 1944, Plagis and his wingman were jumped by a group of Bf-109Gs, and - in the ensuing melee - Plagis nailed on Messerschmitt, his last definite kill of the war. His final tally was 15 destroyed, 2 shared destroyed, 2 shared probably destroyed, 6 damaged and 1 shared damaged.
|
THE KIT |
As noted in my first-look review, the only real complaint one has about this new Spitfire kit is the attempt by Hasegawa to stretch the use of the wing among a few too many different marks, which requires the modeler to sand off the raised fairing over the wheel well on the upper wing. This was easily accomplished, but a modeler is well-advised to mask over the surrounding areas, so that the fine engraved detail in the vicinity of the wing bulge isn't taken off with it.
|
CONSTRUCTION |
As regards overall construction, this kit is much better designed than the earlier Hasegawa Mk.V, so there are none of the problems with fit to get the lower cowl to match to the fuselage, or the wing to the fuselage.
I did discover that there is an order of assembly that can be used, that will result in the modeler not needing any putty other than Mr. Surfacer along the centerline seam.
The Easy Way To Get Things Right:
 First, assemble the
wing and set it aside. After the cockpit is painted and assembled, glue to to
the starboard fuselage half, and then glue the fuselage together. BE CAREFUL
HERE, that you do not get a tight fit of the cockpit floor and the fuselage
sides, past the area forward of the control stick. If you leave this rear area
of the cockpit unglued - you can't see this once it's all assembled anyway - you
will get a puttyless fit of the wing to the fuselage. The rear gull area on the
wing fits into the fuselage, which pushes the fuselage sides apart at that
point, sufficient that the upper surface wing-fuselage joint is dead one. If you
have glued that rear section of the cockpit floor nice and tight, the fuselage
won't spread out properly, and you'll end up puttying that joint and not getting
the fit you want. After the wing is attached to the fuselage, then attach the
lower cowling and air intake filter, which will pop into position perfectly due
to the excellence of the production design.
I separated the elevators from the horizontal stabilizers to pose them more dynamically; that and the use of an old set of True Details photo-etch RAF seatbelts were my deviations from an OOB construction.
A Choice of Marks:
The kit provides the option of doing either a late production Mk. IXc., or an early-production Mk.XVI. I am not sure if the early-production Mk.XVI with the "c" wing had the upper surface wheel well bulges, but the bulges are certainly visible on the wings of other Mk.XVI; since this was a dedicated ground attack airplane, it is likely that the larger wheels needed with an airplane that would be 1,000 pounds heavier at takeoff, would have been used from the outset. Only 443 Squadron appears to have been equipped with these "C" wing airplanes, and I have not found a photo that shows that area of the wing clearly. If I was doing a Mk.XVI, I would leave the bulges alone.
It is also very easy to make a Mk.VIII Spitfire with this kit, since the parts for the alternate tail wheel installation are in the kit. All one needs to do is putting in the outboard aileron hinge line, since there is an engraved line for the short-span ailerons. Conversely, for a Mk.IX or Mk.XVI, one putties over the aileron break line for the long-span aileron.
Camouflage and Markings:
I decided I was going to do a different airplane from that available through the kit decals, and decided I wanted to do an invasion fighter-bomber. I had the Super-Scale decal sheet 48-563, "Mk.IX Spitfire Aces," and decided to to John Plagis ML214, 5J-K, which is in full D-Day regalia. If you choose to use this sheet, try to get one of the earlier ones where the sky decals are the proper shade; SuperScale has decided that "Sky" means "Sky Blue" on their more recent printings. The earlier one is a dead match to Tamiya "Sky." Aeromaster also has Plagis' airplane on two different "Spitfires at War" sheets.
|
PAINT & DECALS |
Painting:
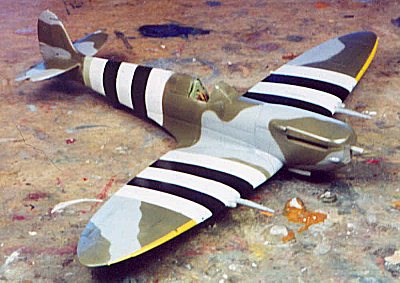 I began painting by
applying the "pre-shading" of semi-gloss black over the panel lines,
and also painted in the areas of the invasion stripes. Following that, I applied
Tamiys "Sky" to the area of the fuselage band and the spinner. I then
masked off the black stripes and the Sky band, and applied flat white, toned
down with a brushfull of dark grey in it. I applied the white very thin, with
repeated coats to be just enough to cover all the black beneath, so as to get a
different tone overall.
I then masked off the invasion stripes and did the camouflage scheme. For the upper surface camouflage, I did Ocean Grey first, only in the areas that would be that color, with some overspray; these areas were masked off with drafting tape. I ran thread along the demarcation lines, just in from the edge, to lift it. That way the Dark Green would not have a hard "edge" where paint pooled against the tape, and would have a "scale overspray" to look like sprayed-on camouflage - which has a "hard" edge in 1/48 scale.
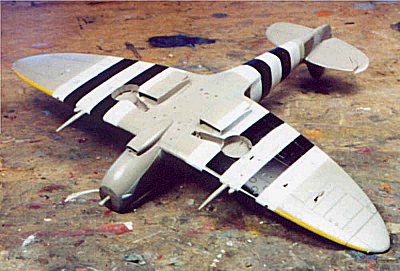 I unmasked everything,
shot two coats of Future, and was ready for the decals.
Decals:
I decided to use a C.1 fuselage decal from a recent Aeromaster sheet, since these are thicker decals and the decal would have to go over the black and white stripes, which I did not want "bleeding through." When I do Spitfires, I always start with the stencilling first, then the national insignia and individual markings, some of which may go over stenciling at various places.
Final Assembly:
I attached the bomb pylons and sway braces. I had found a centerline rack in the spares box from a Hasegawa Mk.V, and decided to use that with the 500-lb. bomb from the Occidental Spitfire kit (you have to get some value out of that thing, right?). My only other departure from doing the kit OOB was to use a vacuformed canopy; there was nothing wrong with the Hasegawa canopy, which has no problem being used in the open position, it was just that this one was "better" to me.
For weathering, I applied the oil staining so familiar on the underside of the wing and fuselage, exhaust stains on the forward fuselage, and gunfire stains for the outer machine guns, with some scuffing on the wing at the boarding point.
|
CONCLUSIONS |
Finally, we have a Spitfire MK.IX with the right shapes for the cowling, the right length and shape for the fuselage, etc. The Hasegawa Spitfire IX effectively renders all other Merlin-60 series Spitfire kits obsolete for accuracy, ease of assembly and production quality. The model is not that much more expensive than the inaccurate ICM kit if you shop for bargain prices; given the accuracy problems and poor production quality of the ICM kit (you really can't fix the fact that it's 8 scale inches too long in the rear fuselage), there is no comparison of the two. From the way the kit is designed, it is certain that an early-production Mk.IX, a Mk.VII and MK.VIII will be released (as noted above, you can already make a Mk.VIII).
Regarding the ICM fuselage length, I was provided measurements taken by Norwegian Spitfire modeler Olav Hungnes - the guy who published the drawings of how to correct the Occidental kit - that he took from a 1:1 Spitfire IX. This table had all measurements reduced to 1/48, and covered more than merely fuselage length and wingspan. When I received this review kit, I measured it against all these measurements. It was within a millimeter of all of them. That is about as close as it gets with a plastic model kit. Modelers can reliably depend on the fact that Hasegawa has created a correct Spitfire IX with this kit
This Spitfire is as nice as those late-model 109s with the proper asymmetric cowlings Hasegawa gave us. Hurrah!
And now, on to that Mk.VIII I'm working on...
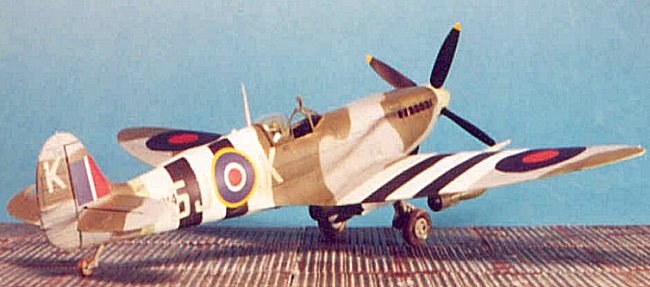
Review kit courtesy of Marco Polo Importers.
If you would like your product reviewed fairly and quickly by a site that averages over 2,800 visits a day, please contact me or see other details in the Note to Contributors.