
|
KIT # |
408 |
|
PRICE: |
$27.98 MSRP |
|
DECALS: |
Five Aircraft |
|
REVIEWER: |
|
|
NOTES: |
|
HISTORY |
By the early 1930s, it was apparent to any aircraft designer that the day of the biplane was over: the inherent drag of the layout could not be overcome by any increase in performance, and the layout prevented the airplane from carrying a truly effective air-to-air armament.
While that was apparent in the design shops, it was not so apparent in the headquarters of most of the various Air Forces.Fighter pilots were still convinced that high-G maneuverability and a fighting style unchanged from that of 1917-18 was still what was needed. The Air Ministry had been "anti-monoplane" from the days of the Bristol M.1C, and there seemed little likelihood of this changing anytime soon.
 Reality had begun to
set in by 1930, at least in the RAF, with the issuance of specification F.7/30,
which called for a single-seat fighter capable of 250 m.p.h. and carrying four
rifle-caliber machine guns, which doubled the armament of all previous RAF
fighters. The successful design was to be capable of both day and night
operation, with particular stress on a wide field of view for the pilot and
excellent landing characteristics. It was also hinted that "sympathetic
consideration" would be given to designs utilizing the new steam-cooled
Rolls-Royce Goshawk engine.
Reality had begun to
set in by 1930, at least in the RAF, with the issuance of specification F.7/30,
which called for a single-seat fighter capable of 250 m.p.h. and carrying four
rifle-caliber machine guns, which doubled the armament of all previous RAF
fighters. The successful design was to be capable of both day and night
operation, with particular stress on a wide field of view for the pilot and
excellent landing characteristics. It was also hinted that "sympathetic
consideration" would be given to designs utilizing the new steam-cooled
Rolls-Royce Goshawk engine.
Fortunately for the RAF, the monoplane fighters that resulted from this competition were so thoroughly pedestrian that they failed to make the cut; had this been different, the RAF might have found itself in the position of the French Air Force in 1939 - trying to replace fighters that had been developed just too early to fully participate in the revolution of design that happened after 1934.
Amazingly enough, the winner of the competition that was supposed to result in the production of the service's first modern monoplane fighter, was the Gloster S.S.37, an evolutionary development of the Gloster S.S.19 - which was just being accepted into the RAF as the Gloster Gauntlet. The only acknowledgement to modernity of H.P. Folland's design was the use of hydraulically-operated flaps and an enclosed cockpit canopy - though the original prototype had been equipped with an open cockpit. In July 1935, the S.S.37 was ordered into production to specification F.14/35, with the name "Gladiator" - less than a year before the first flights of the Hurricane and Spitfire prototypes, and nearly a year after the successful first flight of the Bf-109V1 in Germany.
In the spring of 1937 - the same year that the Messerschmitt Bf-109 would commence operational deliveries to the Luftwaffe - the Gladiator was taken on charge by 72 Squadron at Tangmere.
Fortunately, within the next two years, the Gladiator would be almost completely replaced within Fighter Command by the Spitfire and Hurricane. At the outbreak of war in September 1939, only a few squadrons of the RAF and the R.Aux.A.F. were still equipped with the Gladiator in Great Britain.
 However, in the next
two years, the Gladiator would become one of the "immortals" of the Second World
War. It was a fame derived from the heroism of those who flew it under
difficult circumstances, not from any intrinsic value of the airplane. It was
highly maneuverable, but - as RAF pilots in the Middle East would quickly
discover after the entry of Italy into the war on June 10, 1940 - it was
outperformed by just about everything it came up against.
However, in the next
two years, the Gladiator would become one of the "immortals" of the Second World
War. It was a fame derived from the heroism of those who flew it under
difficult circumstances, not from any intrinsic value of the airplane. It was
highly maneuverable, but - as RAF pilots in the Middle East would quickly
discover after the entry of Italy into the war on June 10, 1940 - it was
outperformed by just about everything it came up against.
Flying in desperate conditions in Norway in the spring of 1940, over Malta that summer, and over Egypt and Greece in the following twelve months, 13 Commonwealth fighter pilots would become aces with the Gladiator, and a total of 50 aces would obtain their initial victories in the little biplane.
Malcolm Thomas St. John Pattle:
"Pat" Pattle was the leading Gladiator ace, with 15.5 victories of his total of approximately 50, which makes him the leading ace of the British Empire in the Second World War. He served his entire career with 80 Squadron, RAF, which was also the leading Gladiator squadron in combat.
He first entered
combat on August 4, 1940, when he and three other pilots led by future intruder
ace Peter Wykeham-Barnes were assigned as escort for a 208 Squadron Lysander on
a mission to photograph Italian positions near Bir Taieb el Esem. The foursome
spotted and attacked a formation of seven Breda Ba.65s that attacked the
Lysander, which were reinforced by their C.R.42 escorts. The four Gladiators
quickly became involved in a dogfight. Wykeham-Barnes
 scored a Ba.65 while Kenneth
Rew attacked another Ba.65 but was shot down and killed by the C.O. of the
C.R.42s, Capitano Duilio Fanali. Wykeham-Barnes was also shot down but bailed
out successfully.
scored a Ba.65 while Kenneth
Rew attacked another Ba.65 but was shot down and killed by the C.O. of the
C.R.42s, Capitano Duilio Fanali. Wykeham-Barnes was also shot down but bailed
out successfully.
Pattle and his wingman, Johnny Lancaster, attacked the second group of Ba.65s and Pattle downed one. Lancaster was hit by a C.R.42 and managed to crash land at Sidi Barrani, while Pattle shot down a C.R.42 and then escaped with only one gun still unjammed. He was then attacked by 12 C.R.42s and after a running fight in which his rudder controls were shot away, managed to bail out successfully as his Gladiator crashed. Both he and Wykeham-Barnes were rescued from the desert the following day by the 11th Hussars.
Pattle was described by a fellow pilot of 80 Squadron thusly: "A quiet, pleasant South African, he was a superb pilot, who was a better shot using deflection than any other member of the squadron."
Eventually transferring to the Hurricane during the battle against the Italian invaders in Greece, Pattle was promoted to Officer Commanding 33 Squadron on the occasion of being awarded his second DFC in March, 1941. On April 20, 1941, Pattle shot down two Bf-109Es, one Ju-88A-4, on Bf-100C, and a final Ju-88 over the Greek port of Piraeus, before he was shot into the sea by two Bf-109Es. He was just 25 years old.
|
THE KIT |
For a description of what's in the box, please visit the preview).
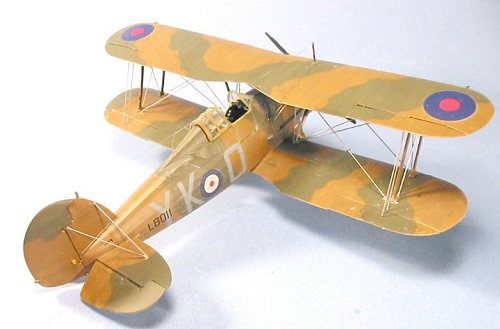
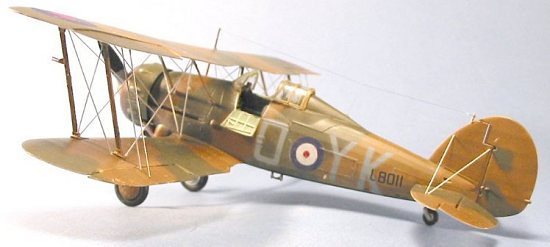
The kit provides
decals for five airplanes, including the Gladiator flown by "Bill" Vale - the
eventual #2 Gladiator ace - with 33 Squadron in Palestine in 1939; L8011, the
Gladiator flown by Pattle through most of the spring and early summer of
 1940; L8009, the Gladiator
flown by Peter Wykeham-Barnes in the battle on August 4, 1940; K7995, flown by
F/Lt. John Semple of 607 "County of Durham" Squadron when first sent to France
as part of the Advanced Air Striking Force in October, 1939; and K6134 of 112
Squadron, K Flight, flown in the Sudan by F/Lt John Scoular in 1940. All of
these come from the profiles found in the Osprey Aircraft of the Aces "Gloster
Gladiator Aces," by Andrew Thomas.
1940; L8009, the Gladiator
flown by Peter Wykeham-Barnes in the battle on August 4, 1940; K7995, flown by
F/Lt. John Semple of 607 "County of Durham" Squadron when first sent to France
as part of the Advanced Air Striking Force in October, 1939; and K6134 of 112
Squadron, K Flight, flown in the Sudan by F/Lt John Scoular in 1940. All of
these come from the profiles found in the Osprey Aircraft of the Aces "Gloster
Gladiator Aces," by Andrew Thomas.
I have built numerous Inpact/Pyro/Lifelines/Lindberg Gloster Gladiators since first finding this kit in a hobby shop back in 1969. This kit does not necessarily make the old kit superfluous - in fact I like the earlier kit's engine cowling better than what comes in this kit and eventually used one for this build. However, this kit by Roden is "more right" than the old kit. Among other things, the fuselage cross section is the proper "egg shape" as opposed to the oval shape of the other. Additionally, I think the "fabric effect" of the new kit is superior, There are other subtle curves around the cockpit, and the quite-subtle "gull effect" of the lower wing at the point of attachment to the fuselage where the new kit is vastly superior to the old. I also like the separate flying surfaces, which accurately portray the "Frieze" type ailerons it used.
|
CONSTRUCTION |
 The kit is basically
quite simple to build, and following the instructions revealed only the
following "areas of difficulty":
The kit is basically
quite simple to build, and following the instructions revealed only the
following "areas of difficulty":
When assembling the cowling and engine, you should follow these steps in this order:
1. Assemble and clean up the cowling and paint the interior.
2. Paint, assemble and clean up the engine, without the exhaust stacks.
3. Once the engine is set up, sand down the "blocks" on the ends of the sleeve valves, until the engine will slide easily into the cowling.
4. Attach the exhaust stacks.
5. Attach the engine inside the cowling.
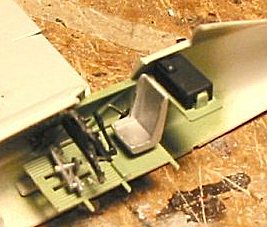
 The other area of
difficulty is the instrument panel. It does not want to fit, and the only way I
eventually found to get it to do so was to remove the mounting ridges inside the
fuselage half and sand down the panel till it fits the internal shape
correctly. In the process, I managed to screw up the instrument decals, so I
ended up painting the instruments in the panel.
The other area of
difficulty is the instrument panel. It does not want to fit, and the only way I
eventually found to get it to do so was to remove the mounting ridges inside the
fuselage half and sand down the panel till it fits the internal shape
correctly. In the process, I managed to screw up the instrument decals, so I
ended up painting the instruments in the panel.
Other than that,
things fit well, though I suggest you open up the mounting holes in the fuselage
and wings for the cabane and interplane struts to obtain better final fit of the
struts.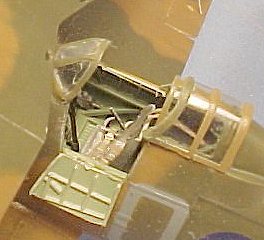
While I used the old Inpact cowling on this model - cleaned up internally to allow use of the Roden engine and exhaust stacks - this was only because I personally feel it "looks better." Had I not had one available, I would have happily used what was in the new kit.
Because this is something of a "limited run" kit, be sure to "test fit twice and glue once." I found I needed to re-shape the landing gear attachment area so it would fit to the fuselage properly; this was a matter of a few minutes with a sanding stick and some test-fitting till all was right.
When I had the fuselage, landing gear, lower wing and tail assembled, the model was ready for painting.
|
PAINT & DECALS |
I first "pre-shaded"
the model in flat black, including the painting of the lower left wing and
fuselage half. When that was dry the solid area was masked off and I painted
the rest of the lower surfaces white. When that was masked, I painted the upper
colors using Gunze Sangyo "Dark Earth" and "RAF Dark Green." These airplanes
were originally in pre-war silver,
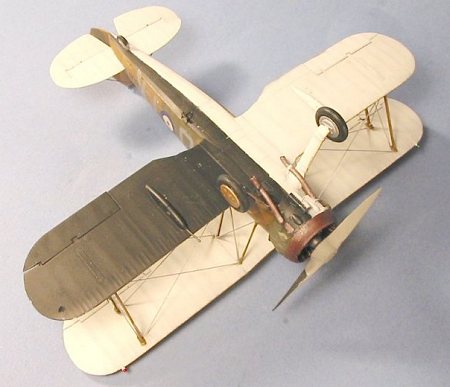 and from photos it is
apparent they were painted "in the field". No two are really alike. Thus, I
freehanded the camo scheme. When this was dry, I gave the model a coat of
Future and it was time for the decals.
and from photos it is
apparent they were painted "in the field". No two are really alike. Thus, I
freehanded the camo scheme. When this was dry, I gave the model a coat of
Future and it was time for the decals.
Decals:
People have complained in other reviews of Roden kits that the decals are not good. That was the case here. Only when I applied the national insignia roundels did I notice the very thing "misprint" of white along one edge - it's what looks like "silvering" in the photos here. It's too narrow to effectively over-paint, so I suggest you very carefully cut out the national insignia decals very closely to the roundel to eliminate this on your model. After an initial application of Micro-Sol, followed by some Micro-Set, the decals still didn't want to sit down over the surface detail. I "tapped" them with the tip of a #11 blade to put holes in them, and re-applied Micro-Set. After several applications they finally sat down, but in retrospect I will bring out the "heavy artillery" of SolvaSet for the "final blow" on my next kit (yes, there will be more than one).
When this was done, I washed off the decal solvent residue and gave another coat of Future.
|
FINAL CONSTRUCTION |
I first gave
everything two coats of thinned Dullcote. When that was dry I attached the
cabane and interplane struts. When they were set up, I attached the upper
wing. In retrospect, I would (and will) do it differently: Attach the cabane
struts with C-A glue. Then attach the upper wing to the cabane struts with C-A
glue, and get it aligned with the lower wing. Then attach the interplane
struts, again with C-A glue. And be sure that you widened the attachment holes
so everything goes in easily without having to "fiddle."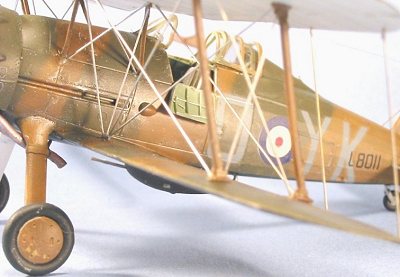
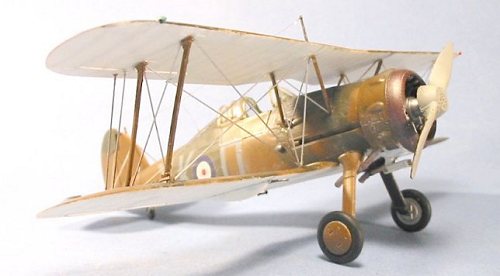
I attached the wheels and tail wheel and the prop, then attached the cockpit canopy in the open position.
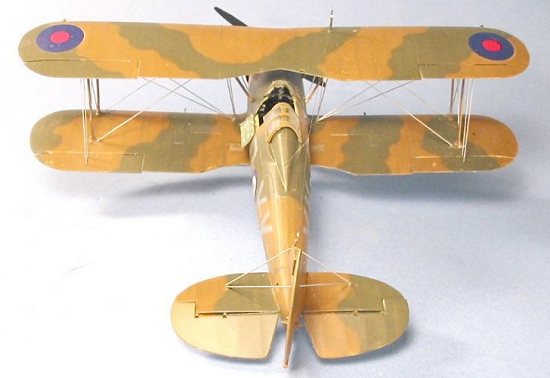
Rigging:
The Gladiator used "raf wires" very similar to the Fairey Swordfish. These are thicker than the rigging of WW1 airplanes, and should be "flat", about twice as wide as they are thick - as you get with the photo-etch rigging in the Tamiya Swordfish. Unfortunately, I do not know of any source for wire like this. I decided to go get some .010x.020 Evergreen strip and use that, but the local hobby shop was out of stock. I ended up using .012 brass wire (painted silver). From some angles it looks "exactly right," but not from others. I may re-rig this model when I can lay hands on some more Evergreen strip, and will definitely use that on my future Gladiator models.
|
CONCLUSIONS |
I have been waiting for this model from Roden since it was first announced nearly three years ago, and my wait was not disappointing. This is an excellent kit that results in a model that has all the subtle lines and shapes of the original. The Gladiator was the last great fighting biplane, and a true "immortal." I look forward to the release of the Mark II kit in March 2003, and the Sea Gladiator this coming summer - there will be more than one of each on my shelves!
December 2002
Thanks to Roden ( www.rodenplant.com ) for the review kit.
If you would like your product reviewed fairly and fairly quickly, please contact the editor or see other details in the Note to Contributors.
Back to the Reviews Index Page 2015