Grand Phoenix 1/48 Firefly I
|
KIT # |
001 |
|
PRICE: |
$45.00 MSRP |
|
DECALS: |
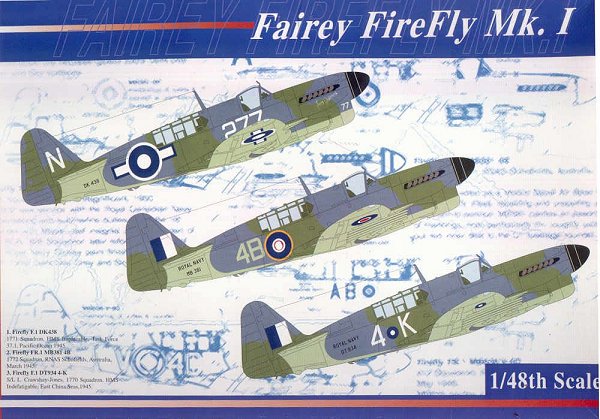
Three aircraft |
|
REVIEWER: |
|
|
NOTES: |
|
|
HISTORY |
The Fleet Air Arm was the only carrier air arm to carry on with the development
and operation of the two-seat carrier fighter past the early 1930s. Both
the Japanese and American naval air forces determined that the extra weight of
the second crewman had too much negative effect on aircraft performance to
justify the "safety" of over-water operations with a dedicated
navigator-radioman aboard. As was shown during the Second World War, this
was the right decision.
The Fleet Air Arm continued with development and operation of the Osprey,
a carrier-based version of the land-based Hawker Demon through the 1930s, and
followed this up with the Fairey Fulmar, which first flew in January 1940.
Using the same engine as the Hurricane and Spitfire, the Fulmar was 50 percent
larger and more than 50 percent heavier, with subsequent loss of performance and
maneuverability. Unfortunately for the FAA, the war was upon them and the Fulmar
was the only aircraft even approaching the performance of modern fighters that
was operating on their carriers. With a top speed of only 258 mph, even
though it had the same eight-gun armament as its land-based compatriots, the
Fulmar was hard-pressed in combat against agile Italian fighters in the
Mediterranean, and could only hope to intercept the S.79 Aerosiluranti if
it was favorably positioned for a diving attack from sufficient altitude to
build up the necessary speed. Nonetheless, until the arrival of the Sea
Hurricane in sizeable numbers in 1942, the Fulmar gave a good account of itself
over the Mediterranean, as well as on the Arctic convoys where it fought Ju-87
and Ju-88 dive bombers and He-111 torpedo bombers.
The airplane was the first to make use of the Fairey-patented area-increasing
Youngman flaps, which provided the necessary maneuverability in combat, and
lowered the landing speed of this heavy aircraft to a speed compatible with
carrier operation. The first production aircraft was turned over to the
FAA on March 4, 1943, a very respectable timetable for wartime aircraft
development. The FAA was fortunate with this, because every other
British-designed carrier aircraft that was ordered in the same timeframe as the
Firefly ran into development difficulties and failed to fly before the end of
the war. Thus, the Fulmar would be the only really modern,
high-performance carrier aircraft of British design to fly off British carriers
in the war it was designed for.
Unfortunately, even with the 1,735 horsepower of the Griffon IIB, the Firefly
lacked performance, with a top speed of only 319 mph and a climb rate under
2,000 fpm, though it had a useful range of 774 miles on internal fuel. The
Firely was destined to become a strike and tactical reconnaissance aircraft,
rather than the fleet defense fighter originally called for. Fortunately,
it was more than capable of the mission, and the aircraft in its developed
versions would form the backbone of the Royal Navy's aerial strike force through
the end of the Korean War.
Interestingly, on all points save speed, a Firefly I sent to the US Navy test
center at Patuxent River in 1944 more than held its own in air combat against
the standard U.S. Navy carrier fighter, the F6F Hellcat - those Youngman flaps
worked.
From January 1-7, 1945, 1770 Squadron's Fireflies flew rocket strikes against
the Pangkalan Brandon refinery on Sumatra, during which Lieutenant D. Levitt
shot down a Ki.43
Hayabusa while Sub Lieutenants Redding and Stot shared another in air combat
on January 4. 1770 scored two more Ki.43s on January 24, during strikes on the
Palembang refineries at Pladjoe and Songei Gerong that required the aircraft to
attack through balloon barrages and heavy AAA fire. On January 29, the
Fireflies added three more Ki-43s to their score before departing Southeast Asia
for service with Task Force 57, the British Pacific Fleet, during the coming
invasion of Okinawa.
Five days before D-Day, TF 57 launched strikes on Miyako-jima, southwest of
Okinawa, following up during the next 25 days with 13 days of strikes against
Japanese forces on Okinawa and Taiwan, with the Fireflies participating in all
these actions.
When the BPF retired to Sydney for replenishment in late May, they were joined
by HMS "Implacable" and the Fireflies of 1771 Squadron. After
strikes against Truk, 1771's Fireflies gained the distinction of being the first
British aircraft to fly over Japan on July 10, 1945; on July 24, Fireflies from
1771 and 1772 Squadrons - the latter having relieved 1770 aboard "Indefatigable"
- became the first British aircraft over Tokyo. By VJ-Day, another Firefly
squadron - 1790 - was operating with the BPF in the night fighter role. A
year of successful combat had only begun to show what the airplane was capable
of.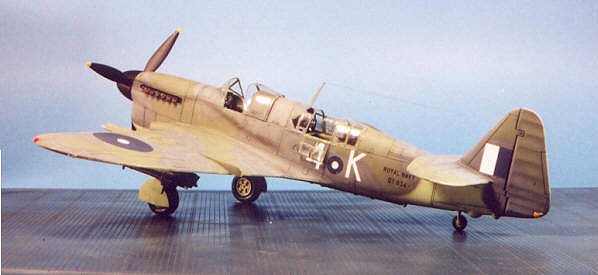
 In July 1939, while the Fulmar was still under construction, the FAA put out
another requirement for a modern carrier-based fighter to be powered by the then
new and untried Rolls-Royce Griffon. Specification N8/39 calling for a
two-seater powered by this engine and armed with 4 20mm cannon or eight .30-cal
machine guns. Fairey responded with a somewhat smaller, Fulmar-type
aircraft, to be armed with 20mm cannon, with an empty weight barely less than
the Fulmar's loaded weight. By June 6, 1940, the mock-up had been
inspected and approved, and specification N5/40 was written around the design.
Thirteen months later, the first Firefly I, Z1826, flew on December 22, 1941.
In July 1939, while the Fulmar was still under construction, the FAA put out
another requirement for a modern carrier-based fighter to be powered by the then
new and untried Rolls-Royce Griffon. Specification N8/39 calling for a
two-seater powered by this engine and armed with 4 20mm cannon or eight .30-cal
machine guns. Fairey responded with a somewhat smaller, Fulmar-type
aircraft, to be armed with 20mm cannon, with an empty weight barely less than
the Fulmar's loaded weight. By June 6, 1940, the mock-up had been
inspected and approved, and specification N5/40 was written around the design.
Thirteen months later, the first Firefly I, Z1826, flew on December 22, 1941.
 1770 Squadron formed on Fireflies on October 1, 1943, followed by 1771 Squadron
in February 1944. 1770 participated in Operation Mascot, the failed
attack against the German battleship "Tirpitz" on July 17, 1944, operating from
HMS "Indefatigable." 1771 Squadron, aboard HMS "Implacable,"
flew strikes in Norwegian waters that October, by which time "Indefatigable"
and her Fireflies had moved on to join the British Far Eastern Fleet.
1770 Squadron formed on Fireflies on October 1, 1943, followed by 1771 Squadron
in February 1944. 1770 participated in Operation Mascot, the failed
attack against the German battleship "Tirpitz" on July 17, 1944, operating from
HMS "Indefatigable." 1771 Squadron, aboard HMS "Implacable,"
flew strikes in Norwegian waters that October, by which time "Indefatigable"
and her Fireflies had moved on to join the British Far Eastern Fleet.
|
THE KIT |
Please follow this link to see a preview of this kit.
|
CONSTRUCTION |
Construction begins with
cleaning up the resin detail parts. I had the good fortune of having Ian
Hartup's information on the kit, which he had built for Scale Aircraft Modeler a
few weeks earlier. Thus, I knew that the key to this kit is to remove all
of the resin blocks on the main gear wells and the cockpit tubs, and to insure
that the tops of the wheel wells and the side panels of the cockpits are sanded
paper-thin so you can see light through them. This insures that everything will
fit and that the rest of the construction phase is easy. It also helped to have
access to a page of walk-around photographs of the Firefly I on display at the
Fleet Air Arm Museum in Yeovilton. Follow this link: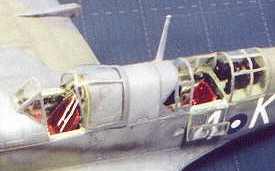 http://faamodels.netfirms.com/firefly_mk1.htm to see these photos.
After I had cleaned up the resin parts, I painted the cockpit parts in British Interior Green, for which I used Gunze-Sanyo H-312 "Light Green." I painted the pilot's and observer's seats with Tamiya XF-64 "Flat Red Brown" since these were made of Bakelite, with the leather padding painted with Gunze-Sanyo H-17 "Cocoa Brown." The instrument panel and other details were painted with Tamiya X-18 "Semi-gloss Black," and then picked out with other colors from study of the cockpit photos at the walk-around. The radiator interior, wheel wells, landing gear and interior of the main gear doors were also painted British Interior Green per the photos in the walk-around.
 Once all this was
accomplished, I glued the wheel wells in position on the lower wing part, and
then attached the upper wing halves. If you are certain to cut off all the
mold-release pins inside these injection-molded parts, the fit will be very
easy.
Once all this was
accomplished, I glued the wheel wells in position on the lower wing part, and
then attached the upper wing halves. If you are certain to cut off all the
mold-release pins inside these injection-molded parts, the fit will be very
easy.
I then turned to the pilot's and observer's cockpits. I attached the photo-etch seatbelts and other photo-etch detail, then assembled the cockpits and glued them in position inside the fuselage. I also glued the radiator in position.
Gluing the fuselage halves together was the one place I encountered any difficulty; the injection parts would not come together immediately forward of the pilot's cockpit and immediately aft of the observer's cockpit without the use of cyanoacrylate glue and accelerator - once I did that, everything closed up without trouble. I then glued the wing subassembly to the fuselage sub assembly, and assembled and attached the horizontal stabilizers.
I found I needed Mr. Surfacer 500 on the leading edges of the wings, the upper wing-fuselage joint, the horizontal stabilizer-fuselage joints, and the centerline seam of the fuselage. When that was sanded down, the seams disappeared; I rescribed panel lines where necessary and the model was ready to paint.
|
PAINT & DECALS |
Painting:
When this was dry, I gave
the model two coats of Future and let it set up overnight. One thing to note
here is that, once the model has been painted, the very-deep engraved panel
lines do not look so bad as one might expect. Decals: I was originally planning
to do the markings for the 1772 Squadron airplane with the British Pacific
Fleet. However, I made the mistake of applying the upper wing national insignia
with Micro-Sol put down on the surface of the wing first. These decals are
thin, and a bit sticky. Trying to maneuver the decal into position, I managed
to tear it badly. I then went to the fall-back position of doing the 1770
Squadron airplane with the British Far Eastern Fleet during the Sumatra refinery
strikes in January 1945. This time, I put water on the model surface before
placing the decals - I was able to move them in position easily, blot the water
with a Kleenex, then apply a coat of Micro-Sol. The decals melted into the
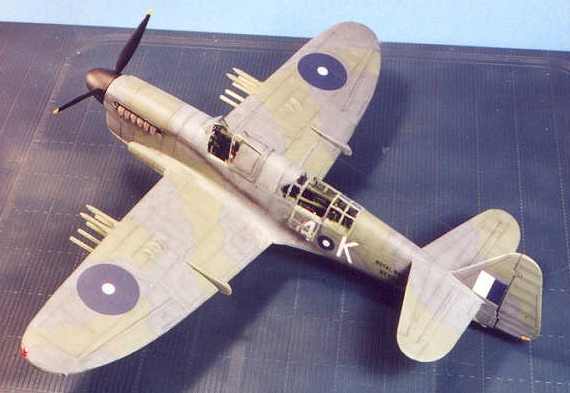
surface and into the panel lines without difficulty. Under wing Armament: I really wish Grand
Phoenix had included under wing armament with this kit. However, it was not
that hard to scratch build the under wing blast plates for RPs with Evergreen
sheet. I used the rocket rails and rockets from a Tamiya Mosquito F.B.VI kit,
which looked exactly right according to the photos I had. This was particularly
needed for the particular airplane I was doing, since the Fireflies that flew
the Sumatra strikes used the 25-lb solid shot rockets in their attacks on the
oil refineries. Final Finishing: Once the decals set up, I
washed the model to get rid of any decal solvent residue, then gave the model
another coat of Future. When that was dry, I "scuffed" the wingwalk areas by
drybrushing with Testor's ModelMaster Metalizer Aluminum, and applied exhaust
stains with Tamiya X-19 "Smoke". When all that was dry, I applied three coats
of thinned Testor's "Dullcote." Canopies:
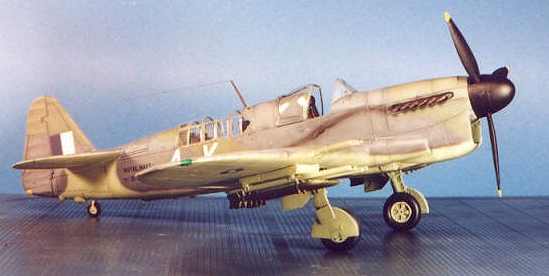
Since I had already
decided to vacuform the pilot's canopy, I also vacuformed the observer's
canopy. Once I did that, I had a bit of trimming along the canopy base to get
it to fit correctly to the fuselage. I decided to open the observer's canopy,
which has a very interesting configuration: the upper-right-center section
folds down, into the cockpit; the upper-left-center section also folds down like
the right side, then the left side of the canopy folds down externally. Final Assembly: I attached the canopies
with cyanoacrylate glue (since they had been Futured, and wouldn't fog), then
filled the narrow gaps with white glue which dries the color of the paint. I
glued the blast plates in position, then attached the rockets and rocket rails
to the blast plates. I painted the exhausts with Testor's Model Master Metalizer
"Burnt Metal." The antenna wire is nylon repair thread, attached with
cyanoacrylate glue.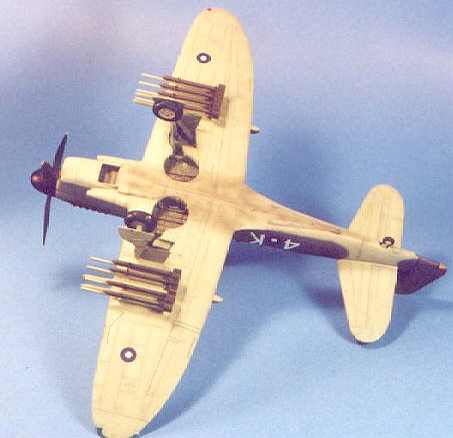 I first "preshaded"
all the panel lines with Tamiya Semi-gloss black, then painted the camouflage.
I used Tamiya XF-21 "Sky" on the lower surfaces. The upper camouflage of Dark
Sea Grey and Dark Slate Grey were done with Tamiya XF-54 "Flat Dark Sea Grey"
and Tamiya XF-22 "RLN Grey" for Slate Grey. I freehanded all of these, fading
each color before proceeding to the next. The propeller was painted with Tamiya
Semi-Gloss Black. Do note that the camouflage pattern shown in the decal
profiles that accompany the kit is wrong - I used the pattern shown in a profile
in an article on the Firefly published in the November 1971 issue of "Air
Enthusiast."
I first "preshaded"
all the panel lines with Tamiya Semi-gloss black, then painted the camouflage.
I used Tamiya XF-21 "Sky" on the lower surfaces. The upper camouflage of Dark
Sea Grey and Dark Slate Grey were done with Tamiya XF-54 "Flat Dark Sea Grey"
and Tamiya XF-22 "RLN Grey" for Slate Grey. I freehanded all of these, fading
each color before proceeding to the next. The propeller was painted with Tamiya
Semi-Gloss Black. Do note that the camouflage pattern shown in the decal
profiles that accompany the kit is wrong - I used the pattern shown in a profile
in an article on the Firefly published in the November 1971 issue of "Air
Enthusiast."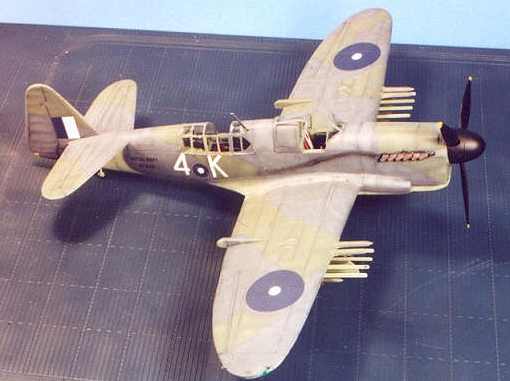 The cockpit canopies are
thick, but clear. I decided at first to use the kit-supplied canopy for the
observer's cockpit. However, I found when I attached it that it is just a bit
wide on its base as molded; when I squeezed it to get it to fit, I ended up with
a pressure crack on the inside surface.
The cockpit canopies are
thick, but clear. I decided at first to use the kit-supplied canopy for the
observer's cockpit. However, I found when I attached it that it is just a bit
wide on its base as molded; when I squeezed it to get it to fit, I ended up with
a pressure crack on the inside surface.
|
CONCLUSIONS |
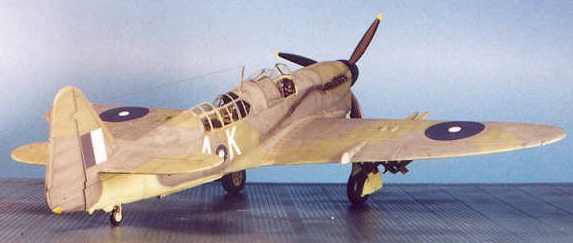
I have always thought the Firefly I was a very good-looking airplane, and this model certainly lives up to my expectations. It looks great on the shelf next to my PP Aeroparts Firefly V in the Fleet Air Arm section of my collection. I really hope Falcon comes up with vacuformed canopies for this kit soon - I'll replace mine immediately. If an aftermarket decal company comes up with markings for the Firefly Is that were on HMS "Triumph" in 1950, I'll do another to sit beside my Seafire 47.
This is a great first kit from Grand Phoenix. It assembles easily and makes up into a good-looking model. I'm looking forward to the coming Firefly V.
Copyright ModelingMadness.com. All rights reserved. No reproduction in part or in whole without express permission.
If you would like your product reviewed fairly and fairly quickly, please contact the editor or see other details in the Note to Contributors.
Back to Reviews Page 2022