Hasegawa 1/48 Typhoon IB 'Bubble Top'
|
KIT # |
9060 (JT 60) |
|
PRICE: |
$25.98 |
|
DECALS: |
See Review |
|
REVIEW : |
|
|
NOTES: |
|
|
HISTORY |
As related in the previous article, the Hawker Typhoon appeared operationally in late 1942, and was used as a low altitude fighter throughout 1943, with some development of the aircraft as a fighter-bomber during that period.
In February, 1944, all Typhoon squadrons except 137 Squadron in Fighter Command were transferred to Second Tactical Air Force, the RAF's contribution to the air support component of the upcoming invasion of northern Europe. The squadrons began training in earnest for the fighter-bomber role, learning to use both the 60-lb RP and general purpose bombs. The training was put to use over the Channel coast with attacks on the V-1 launch sites under construction, and losses were not light at low level under fire from the massive number of light flak positions defending these sites.
The first "bubbletop" Typhoon had appeared in September 1943. The bubble canopy gave the Typhoon pilot the best all-round vision of any fighter used by any combatant at the time, and its influence was seen within six months with the introduction of the P-51D Mustang and later-production P-47D Thunderbolt, both of which featured bubble canopies. For the Typhoon squadrons, the slow delivery of this modification in the basic airplane meant that bubbletops that reached the squadrons were reserved for squadron and flight leaders. The last "car-door" Typhoons did not leave first-line service until March 1944.
 In April and May 1944,
a further modification was made to the Typhoon, when the Tempest horizontal
stabilizer and elevators were fitted to the airplane. The Tempest unit was only
slightly larger in chord than the original unit, but it provided increased
stability, which had always been a problem with the Typhoon design. Generally,
aircraft thus fitted were also fitted with the Tempest 4-blade prop, but this
was not always the case, and it is also possible that aircraft with the original
tail unit were fitted with the 4-blad prop in the field.
In April and May 1944,
a further modification was made to the Typhoon, when the Tempest horizontal
stabilizer and elevators were fitted to the airplane. The Tempest unit was only
slightly larger in chord than the original unit, but it provided increased
stability, which had always been a problem with the Typhoon design. Generally,
aircraft thus fitted were also fitted with the Tempest 4-blade prop, but this
was not always the case, and it is also possible that aircraft with the original
tail unit were fitted with the 4-blad prop in the field.
On June 6, 1944, the Typhoon was the main RAF fighter-bomber supporting the invasion. By this stage, the system of forward air control that had first begun in the North African campaign and had been honed in the Italian campaign, insured that air support was able to be given as closely and accurately as the weapons themselves would allow. The Forward Air Controller, who was a pilot, was equipped with a vehicle that had aircraft radios. The controller could vector in fighter bombers by telling them the ground features to look for that a pilot would notice. The Typhoons patrolled the front lines in what was known as "cab rank" formation, in which a flight would be called in by a controller, execute and attack, and return to base for refueling and rearming, while other flights were constantly overhead.
This system really came into its own during the fighting in the Falaise Gap, following the American breakthrough at St. Lo and the British victory around Caen in late July, which meant the invasion forces could finally break out of the Norman bocage they had been stuck in for nearly two months. While the Canadians swept southeast from their breakthrough north of Caen, and Patton's Third Army lunged east after cleaning up the Cotentin Peninsula, the two armies did not meet and trap all the German forces they had been fighting. Had the Falaise Gap been closed in early August 1944, there would have been no German Army to have been rebuilt for the defense of the homeland in the Fall of 1944, and the war in Europe likely would have ended before New Years.
As it was, this 20 mile gap became a graveyard for the mechanized units of the Wehrmacht, with the rocket-armed Typhoons of 2TAF wreaking such carnage that in his book, "Wing Leader," British ace Johnny Johnson commented that the stench of death was apparent as high as 7,000 feet above the battlefield. The Germans were so badly mauled that the Allied leadership was convinced they would not be able to rebuild in time to hold at the Rhine.
Unfortunately, the Allies could not restore Cherbourg or any other harbor on the Channel coast, and were forced to continue bringing supplies across the Normandy beachhead, which slowed the advance toward the Rhine following the liberation of Paris. As a result, fuel shortages forced the Allies to choose an advance through the German-French frontier lead by Patton's Third Army, or an advance through the low countries led by Montgomery and the Commonwealth forces. Patton was brought to a screeching halt when he could have punched through an unmanned Siegfried line, and the story of "A Bridge Too Far" is well known.
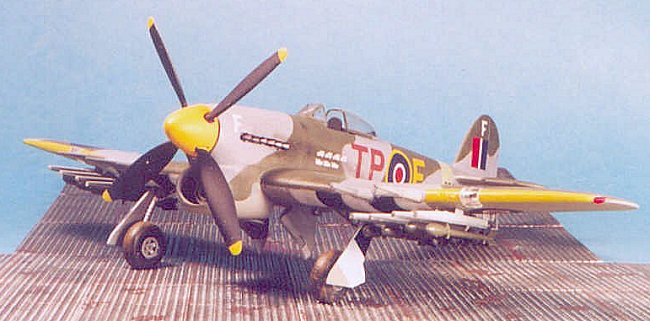
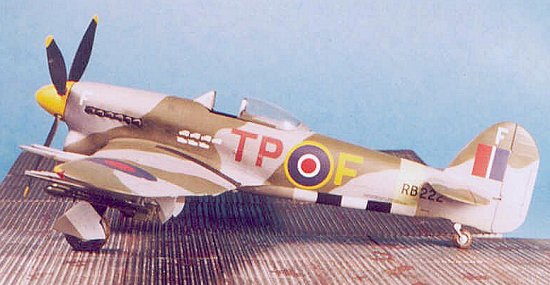
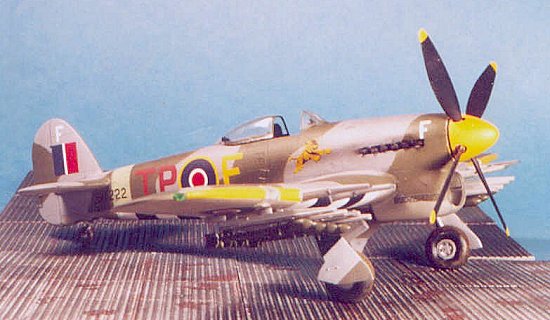
Regardless of the success of the overall strategy dictating their use, the Typhoon as a rocket-armed airplane with the explosive punch of a light cruiser became so successful that all memory of the troublesome fighter of a year previously was forgotten. That was not to say that the airplane was faultless; "F for Freddie" of 198 Squadron carried the following instructions on its lower cowl: "If this engine catches fire on starting, don't just wave your arms at the pilot. Try putting the bloody thing out as well!"
Even tasked as fighter bombers and encumbered with rocket rails and bomb racks, ten more Typhoon pilots became aces in the fighting over Northwestern Europe, and five Typhoon aces from the pre-invasion fighting added to their scores against the Luftwaffe.
|
THE KIT |
The "bubbletop" Typhoon IB was released by Hasegawa about 6 months after the release of the "car door" version, which came out at the end of 1998. Other than the different upper-central fuselage section which is fitted for the bubble canopy, the canopy itself and the eight rocket rails with separate RPs, the kit is the same as the earlier version.
|
CONSTRUCTION |
The kit assembles in the same way as the earlier kit, with the same difficulties.
 Because of the poor
engineering of the center section of the fuselage, I recommend you attach each
part to the separate fuselage half before assembling the fuselage. This will
allow you to get as good a fit to the parts as possible. When you then assemble
the fuselage halves, there will be a gap down the center joint of the center
section, which can be filled with a piece of .010 evergreen strip.
Unfortunately, none of the joints of this assembly run along panel lines, so you
will particularly need to ensure the best fit possible when attaching the parts,
and will then need to use more than a bit of Mr. Surfacer 500, likely with
repeated application, to successfully fill in the seams. This is crucial -
failing to do so will ruin the look of the model. Don't be afraid to apply Mr.
Surfacer, let it harden, sand it down, airbrush some gray paint over the area,
and reapply Mr. Surfacer to any seams that still show up. Once you have those
filled, cover the area with Mr. Surfacer 1000 and when dry sand it down with
fine-grit sandpaper for a final surface. You will have to rescribe the engraved
panel lines in this area, which is not that difficult.
Because of the poor
engineering of the center section of the fuselage, I recommend you attach each
part to the separate fuselage half before assembling the fuselage. This will
allow you to get as good a fit to the parts as possible. When you then assemble
the fuselage halves, there will be a gap down the center joint of the center
section, which can be filled with a piece of .010 evergreen strip.
Unfortunately, none of the joints of this assembly run along panel lines, so you
will particularly need to ensure the best fit possible when attaching the parts,
and will then need to use more than a bit of Mr. Surfacer 500, likely with
repeated application, to successfully fill in the seams. This is crucial -
failing to do so will ruin the look of the model. Don't be afraid to apply Mr.
Surfacer, let it harden, sand it down, airbrush some gray paint over the area,
and reapply Mr. Surfacer to any seams that still show up. Once you have those
filled, cover the area with Mr. Surfacer 1000 and when dry sand it down with
fine-grit sandpaper for a final surface. You will have to rescribe the engraved
panel lines in this area, which is not that difficult.
Once you have installed the cockpit (on this version of the Typhoon, the cockpit is entirely black, with the seat left in NMF), the next thing is to attach the wing sub-assembly. Be sure if you are doing the rocket carrying version that you have drilled out the holes on the lower wing surface for the rocket rails. Glue the central part of the lower wing to the fuselage. You will notice there is quite a gap where the upper wing should attach to the fuselage. If you don't want to be bogged down with a lot of puttying and sanding, use this trick: rubber band the wing to raise the dihedral until the upper wing and fuselage meet properly. Now glue that joint. Allow this to dry overnight with the rubber bands holding the wing in position. After it has fully set up the next day, when you remove the rubber bands the wing will revert to its proper dihedral, and pull the fuselage out with it. You'll still want to apply Mr. Surfacer to that wing-fuselage joint, as well as to the under-fuselage joint of lower wing to rear fuselage; this last will require a similar effort to what you did getting the seam filled for the area around the cockpit. At the same time you can attach the horizontal stabilizer and aply Mr. Surfacer to that joint. In the case of the particular airplane I was making, I used the horizontal stabilizers from the old Monogram kit, since they are the proper size for Tempest stabilizers; these fit with little effort.
I used a 4-blade prop from an Eduard Tempest V (which was being turned into a Tempest II) for this model. The Eduard prop fits perfectly and looks just right.
Once you have gotten all those seams nice and smooth and rescribed the panel lines where necessary, the model is ready to head for the paint shop.
|
PAINT & CAMOUFLAGE |
 First thing, I
airbrushed the wheel wells, landing gear and inner gear doors with SNJ
Aluminum. When dry, I stuffed the wheel wells with tissue paper and proceeded
with the rest of the painting.
First thing, I
airbrushed the wheel wells, landing gear and inner gear doors with SNJ
Aluminum. When dry, I stuffed the wheel wells with tissue paper and proceeded
with the rest of the painting.
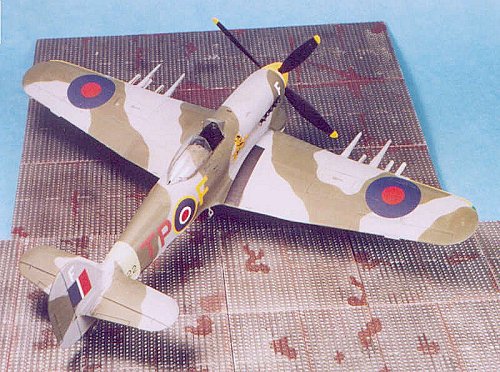
I "pre-shaded" the model by airbrushing flat black over all the panel lines. I also painted the areas where the invasion stripes would go on the lower surfaces of the wings and lower rear fuselage. When that was dry, I masked off the black areas of the invasion stripes. The stripes on the Typhoon were 18 inches wide, which translates in 1/48 scale to 3/8 inch. I then airbrushed the white areas. I toned down the flat white with a brushful of flat black, and thinned the paint enough that it took quite a bit of effort to apply over the black pre-shading. I stopped when I had an overall "scruffy" look to the white, and could still see through to the shadows, just barely. When these stripes were dry, I masked them off. I then painted the rear fuselage stripe with Tamiya XF-21 "Sky." When this was dry, I masked it off - this strip is also 18" wide.
I started the camouflage by applying the underside color of Sea Grey Medium. For this, I used Tamiya XF-20 "Medium Grey." When this was dry, I masked it off, using the "thread" system so the edge of the mask was not directly against the model's surface. I then free-handed an approximation of the Ocean Grey part of the upper surface scheme, using Gunze-Sanyo H-337 "Grayish Blue." Once done, I added a bit of Gunze-Sanyo "Neutral Grey," which is lighter and has a distinct violet tone, to the "Grayish Blue," and went over the painted areas to increase contrast and simulate ultraviolet sun fading. Remember - Europe is cloudy; airplanes did not generally sun-fade sitting on the airfield, but rather faded at altitude above the clouds, when subject to UV radiation, which turns the paint toward the red end of the spectrum.
When that was dry, I masked over with drafting tape, running thread along the edges 1/16 inch in from the edge, to lift it so there would be no "ridges with the next coat of paint. This is a tiresome process, but the result is worthwhile, trust me on that.
I used Gunze-Sanyo H-73 "RAF Dark Green" for the rest of the camouflage. Once applied, I then put a brushful of the light green I use for British Interior Green in the paint cup, and did the same contrast-heightening and sun-fading for the green areas I had done for the grey areas.
After unmasking everything, I gave the model two coats of Future and was ready for decals.
Decals:
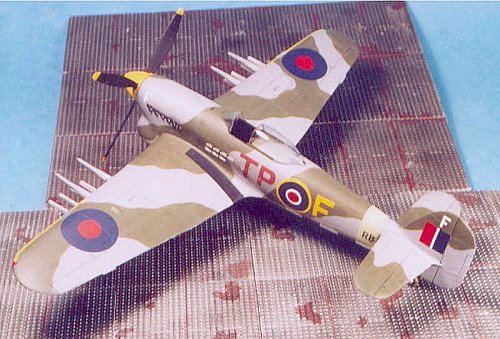 I have always liked
"F for Freddie" from 198 Squadron, since I built my first Monogram kit with
those markings these many many moons ago. The unknown pilot had a sense of
humor, with his instructions to the mechanic to "Try And Put The Bloody Thing
Out As Well" in case of fire on the nose, and his fatalistic "If Fate
Decrees That I Should Fail, Then Fate Will Not Have Watched My Tail" on the
rear fuselage. These markings are available in a good set with the re-released
Monogram "classic" Typhoon, and also on Aeromaster 48-059 "Storms In The Sky
I". I used the Aeromaster decals for this model.
I have always liked
"F for Freddie" from 198 Squadron, since I built my first Monogram kit with
those markings these many many moons ago. The unknown pilot had a sense of
humor, with his instructions to the mechanic to "Try And Put The Bloody Thing
Out As Well" in case of fire on the nose, and his fatalistic "If Fate
Decrees That I Should Fail, Then Fate Will Not Have Watched My Tail" on the
rear fuselage. These markings are available in a good set with the re-released
Monogram "classic" Typhoon, and also on Aeromaster 48-059 "Storms In The Sky
I". I used the Aeromaster decals for this model.
Once they had set, I washed the model to get rid of dried setting solution, and gave it another coat of Future.
Final Finish:
After the Future was dry, I airbrushed rocket exhaust stains on the lower wings and engine exhaust on the fuselage, and "dinged" the airplane around the walkways, the engine cowling, leading edges of flying surfaces, etc. I then applied two coats of thinned Dullcote overall.
When that was dry, I attached the landing gear and prop, then the rocket rails and rockets, and the bubble canopy.
|
CONCLUSIONS |
This Typhoon looks great sitting next to its cardoor brother to one side, and its Tempest cousin to the other on my Hawker Aircraft shelf, just down from the herd of Hurricanes. The kit has its share of fit problems and is no "shake 'n' bake," but the end result is certainly worth the effort.
Copyright ModelingMadness.com. All rights reserved. No reproduction in any form without express permission from the editor.
If you would like your product reviewed fairly and quickly, please contact the editor or see other details in the Note to Contributors.
Back to Reviews Page 2026