Special Hobby 1/48 Barracudda
|
KIT # |
48021 |
|
PRICE: |
$34.95 MSRP |
|
DECALS: |
Three options |
|
REVIEWER: |
Tom Cleaver |
|
NOTES: |
Short Run |
|
HISTORY |
As the premier provider of aircraft for the Fleet Air Arm since the introduction of the Flycatcher and the IIIF in the 1920s, Fairey Aviation tried twice to produce a replacement for their Swordfish torpedo/strike/reconnaissance aircraft which entered service with the FAA in 1935. The first, the Albacore, never replaced the Swordfish and in fact only served alongside the earlier design before being replaced by the airplane it had been designed to replace.
 The second
attempt was more successful. Responding to Air Ministry Specification
S.24/37 in 1937 for a three-seat torpedo and dive bomber aircraft, Fairey
submitted the design later that year. Two prototypes were ordered in
July 1938, and the first prototype Mk.I flew on December 7, 1940.
The second
attempt was more successful. Responding to Air Ministry Specification
S.24/37 in 1937 for a three-seat torpedo and dive bomber aircraft, Fairey
submitted the design later that year. Two prototypes were ordered in
July 1938, and the first prototype Mk.I flew on December 7, 1940.
Named Barracuda, the airplane was a large shoulder-wing monoplane of all-metal construction, which utilized Fairey-Youngman trailing-edge flaps that gave the it an improved performance over the preceding Swordfish and Albacore. The three-man crew sat in tandem cockpits enclosed by a long “greenhouse” canopy. Use of the large flaps at a negative angle to slow the airplane in a dive-bombing attack disturbed the airflow over the rear of the airplane, dictating the high-set tailplane.
Due to the high priority for new RAF fighters and bombers, the prototype did not begin service flight test until June 29, 1941, and service trials and evaluation were not completed until February 1942. Flight tests revealed a need to strengthen the airframe. With the addition of equipment not included in the original specification, the result of these changes was that the Barracuda suffered from a weight problem that was never resolved, which seriously reduced take-off and climb performance.
 The Barracuda
Mk.I was seriously underpowered by the 1,300 h.p. Merlin 30.
After 30 Mk.Is were delivered, the 1,640 h.p. Marlin 32 was introduced,
with the specification changing to Barracuda Mk.II. This was the most
important version of the Barracuda, with 1,688 produced between 1942-45
by Fairey, Blackburn, Boulton-Paul and Westland. The Barracuda T.R.III
was developed to carry a new centimetric ASV radar in a blister radome
under the rear fuselage. The first Mk.III, converted from a Boulton-Paul
built Mk.II, appeared in 1943, with production commencing in early 1944.
Built alongside the Mk.II, 852 T.R.IIIs were manufactured by Boulton-Paul
and Fairey. The final version was the Mk V, which flew with a 2,030 h.p.
Rolls Royce Griffon 37, which would have finally solved the problem of
being under-powered, except their Lordships of the Admiralty determined
it would carry even more electronic equipment. As with the T.R.III,
earlier versions were converted to prototypes. Only 30 production
Barracuda Vs were built, and none saw operational service, being used by
705, 744 and 753 Squadrons for training until 1950. A total of 2,572
Barracudas of all marks were delivered to the FAA.
The Barracuda
Mk.I was seriously underpowered by the 1,300 h.p. Merlin 30.
After 30 Mk.Is were delivered, the 1,640 h.p. Marlin 32 was introduced,
with the specification changing to Barracuda Mk.II. This was the most
important version of the Barracuda, with 1,688 produced between 1942-45
by Fairey, Blackburn, Boulton-Paul and Westland. The Barracuda T.R.III
was developed to carry a new centimetric ASV radar in a blister radome
under the rear fuselage. The first Mk.III, converted from a Boulton-Paul
built Mk.II, appeared in 1943, with production commencing in early 1944.
Built alongside the Mk.II, 852 T.R.IIIs were manufactured by Boulton-Paul
and Fairey. The final version was the Mk V, which flew with a 2,030 h.p.
Rolls Royce Griffon 37, which would have finally solved the problem of
being under-powered, except their Lordships of the Admiralty determined
it would carry even more electronic equipment. As with the T.R.III,
earlier versions were converted to prototypes. Only 30 production
Barracuda Vs were built, and none saw operational service, being used by
705, 744 and 753 Squadrons for training until 1950. A total of 2,572
Barracudas of all marks were delivered to the FAA.
827 Squadron was the first to equip with the Barracuda on January 10, 1943. On April 3, 1944, 42 Barracudas participated in “Operation Tungsten,” arriving over Alten Fjord, Norway, at the very moment the German battleship Tirpitz was about to leave her anchorage to engage in sea trials. The 42 dive bombers scored 24 direct hits on the German ship with 1,600 lb. armor-piercing bombs. While the Tirpitz was so heavily damaged it was put out of action for several months while it was repaired, none of the hits was fatal. Later attacks between June and August 1944 were even less successful.
 In April 1944,
HMS Illustrious - operating in conjunction with USS Saratoga
- introduced the Barracudas of 810 and 847 Squadrons, introduced the type
to the Pacific theater with a dive-bombing attack on Japanese oil
installations on Sumatra. HMS Victorious joined the Far Eastern Fleet in
June 1944 with one Barracuda squadron embarked. These first saw action
in action on July 25, 1944, with a strike by aircraft from both carriers
on Sabang Island. The Barracuda was involved in the strikes on the
Nicobar Islands in October 1944, and the two strikes on the Pangkalan
Brendan oil refinery on Sumatra on January 4, 1945, and the major strike
on the ex-Shell refinery at Pladjoe, near Palambang on Sumatra on January
24 and 29. The Barracuda went on to serve with the British Pacific Fleet
as Task Force 57 and 37 during the invasion of Okinawa in April 1945, and
strikes on the Japanese homeland in late May and then again in July,
1945. Major losses during this period were due to kamikaze
attacks on the British carriers in which aircraft on the armored flight
decks were destroyed by fire.
In April 1944,
HMS Illustrious - operating in conjunction with USS Saratoga
- introduced the Barracudas of 810 and 847 Squadrons, introduced the type
to the Pacific theater with a dive-bombing attack on Japanese oil
installations on Sumatra. HMS Victorious joined the Far Eastern Fleet in
June 1944 with one Barracuda squadron embarked. These first saw action
in action on July 25, 1944, with a strike by aircraft from both carriers
on Sabang Island. The Barracuda was involved in the strikes on the
Nicobar Islands in October 1944, and the two strikes on the Pangkalan
Brendan oil refinery on Sumatra on January 4, 1945, and the major strike
on the ex-Shell refinery at Pladjoe, near Palambang on Sumatra on January
24 and 29. The Barracuda went on to serve with the British Pacific Fleet
as Task Force 57 and 37 during the invasion of Okinawa in April 1945, and
strikes on the Japanese homeland in late May and then again in July,
1945. Major losses during this period were due to kamikaze
attacks on the British carriers in which aircraft on the armored flight
decks were destroyed by fire.
 The Barracuda
III was used for ASW, operating from escort carriers in the Atlantic with
the use of rocket-assisted take-off units to get the heavy Barracuda off
the short decks.
The Barracuda
III was used for ASW, operating from escort carriers in the Atlantic with
the use of rocket-assisted take-off units to get the heavy Barracuda off
the short decks.
The Barracuda was mainly used by the Royal Navy, though it was also used as initial equipment for 825 and 826 Squadrons of the new Royal Canadian Navy air service when formed in 1945, before being replaced by the Fairey Firefly. It was also initial post-war equipment for squadrons of the Royal Dutch Navy air arm pending their equipment with the Firefly. The last Barracudas in front line FAA service were replaced in 1953 by Grumman Avengers.
|
THE KIT |
For a look at what’s in the box, please visit the preview.
|
CONSTRUCTION |
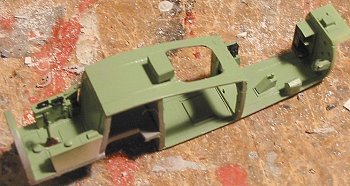 Having been
forewarned by Bruce Archer about the difficulties he experienced in
building this kit, I knew that the “secret” to building the Barracuda was
to get the cockpit interior bulkheads to fit. I first cut off all the
mold-release plugs inside the fuselage halves, then started fitting the
cockpit floors and bulkheads. The big problem is to get the floor of the
rear cockpits to fit properly. This part is about 1/16" too wide on each
side to allow fit. I cut it, sanded it, test-fitted it, and repeated the
process several times until I had it down to a proper fit. The rearmost
bulkhead was the one that was too wide by the most, with the problem
becoming less as I moved forward, until the fore and aft bulkheads of the
pilot’s cockpit required only a bit of sanding down to fit. Once
these parts were
Having been
forewarned by Bruce Archer about the difficulties he experienced in
building this kit, I knew that the “secret” to building the Barracuda was
to get the cockpit interior bulkheads to fit. I first cut off all the
mold-release plugs inside the fuselage halves, then started fitting the
cockpit floors and bulkheads. The big problem is to get the floor of the
rear cockpits to fit properly. This part is about 1/16" too wide on each
side to allow fit. I cut it, sanded it, test-fitted it, and repeated the
process several times until I had it down to a proper fit. The rearmost
bulkhead was the one that was too wide by the most, with the problem
becoming less as I moved forward, until the fore and aft bulkheads of the
pilot’s cockpit required only a bit of sanding down to fit. Once
these parts were 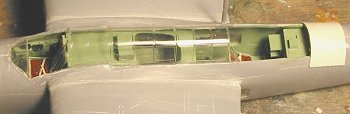 corrected
and good fit was established, the rest of the parts - instrument panels,
seats, etc. - fit with no problems. The radiator intake interior
fit easily with only a bit of sanding. Once the cockpit frame was
assembled, I painted the interior parts in British Interior Green, with
semi-gloss black instrument panels and other boxes, which were
dry-brushed with aluminum to bring up detail.
corrected
and good fit was established, the rest of the parts - instrument panels,
seats, etc. - fit with no problems. The radiator intake interior
fit easily with only a bit of sanding. Once the cockpit frame was
assembled, I painted the interior parts in British Interior Green, with
semi-gloss black instrument panels and other boxes, which were
dry-brushed with aluminum to bring up detail.
I then assembled the wings, which presented no difficulty not usually associated with limited-run kits, i.e., sanding down the wheel well bulkheads to fit, etc. I attached the wings to the fuselage halves before further assembly of the fuselage, so that I could work the joint from both sides and get a good solid fit, given that the wing is only butt-joined to the fuselage. I drilled out the attachment holes for the wing-mounted bomb racks I was going to install; these came from the parts box and were from the Tamiya Swordfish kit, with the sway bracing replaced by sway braces from an old Monogram Crusader.
 With that done,
I thinned down the cockpit sill, so that I would be able to open the
pilot’s and gunner’s canopies, and also opened the rear of the gunner’s
cockpit under the sliding hatch, so that I would be able to display the
twin-gun defensive armament in the open position. I attached the engine
exhausts from the inside, then glued the fuselage together and set it
aside.
With that done,
I thinned down the cockpit sill, so that I would be able to open the
pilot’s and gunner’s canopies, and also opened the rear of the gunner’s
cockpit under the sliding hatch, so that I would be able to display the
twin-gun defensive armament in the open position. I attached the engine
exhausts from the inside, then glued the fuselage together and set it
aside.
The tail surfaces presented no problems, and with a bit of test-fitting and sanding out the slot in the horizontal stabilizer, it positioned easily on the vertical fin and was glued in place. I finished off basic assembly by attaching the main gear doors in position.
By test-fitting everything thoroughly before committing to assembly, I got an overall fit that was good enough I only needed to use a small amount of Mr. Surfacer 500 to get rid of the centerline seams, and the attachment seams for the wings, tail surfaces and landing gear.
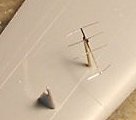 One thing I
did wrong at this point was to glue the photoetch Yagi antennas in
position. These are extremely thin, so thin that they will droop under
the weight of your glance, let alone your touch. Eventually, over the
course of the rest of the work on the model, these were bent, bent back,
re-bent, re-bent back, to the point they looked terrible. I ended up
having to scratchbuild my own from some .010 wire. So, do yourself a
favor and do not attach these until you have completed everything else as
regards building, painting, decaling and weathering your model. The very
last thing you should do is attach the Yagi antennas - and afterwards,
never ever touch the wingtips of the model!
One thing I
did wrong at this point was to glue the photoetch Yagi antennas in
position. These are extremely thin, so thin that they will droop under
the weight of your glance, let alone your touch. Eventually, over the
course of the rest of the work on the model, these were bent, bent back,
re-bent, re-bent back, to the point they looked terrible. I ended up
having to scratchbuild my own from some .010 wire. So, do yourself a
favor and do not attach these until you have completed everything else as
regards building, painting, decaling and weathering your model. The very
last thing you should do is attach the Yagi antennas - and afterwards,
never ever touch the wingtips of the model!
|
COLORS AND MARKINGS |
Painting:
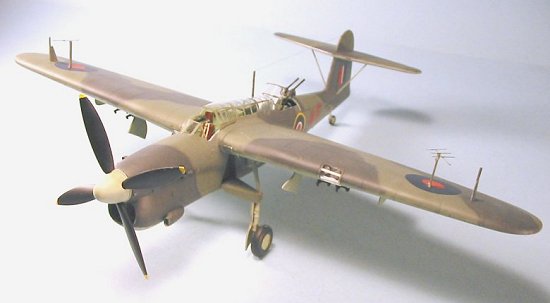
I first masked off the windshield and the long “greenhouse” canopy, as well as the pilot’s canopy I had cut loose from the windshield and the rear gunner’s folding canopy. This was tedious, but the Scotch transparent tape held up well for masking. I then painted the canopies with British Interior Green before proceeding further.
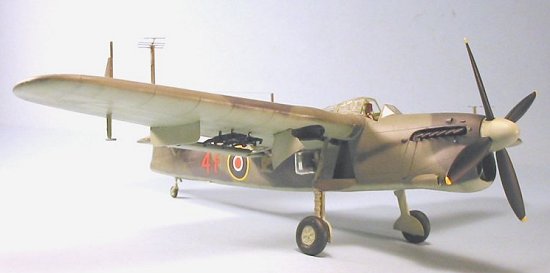
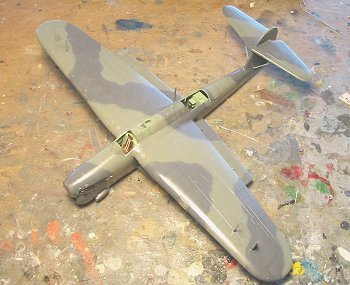 Next, I
pre-shaded the model with flat black along all the panel lines. The
model was painted the standard FAA camouflage of Dark Sea Grey, Slate
Grey and Sky, using Tamiya “Dark Grey” for the Dark Sea Grey, Tamiya “RLM
Grey” for Slate Grey, and Tamiya Sky, which is a perfect match for the
World War II color. I noted from a photo I found taken from above that
the camouflage pattern shown in the kit instructions is incorrect, so I
freehanded a “standard A pattern” as shown in the photo. When all was
dry, I gave the model a good coat of Future and let it dry overnight.
Next, I
pre-shaded the model with flat black along all the panel lines. The
model was painted the standard FAA camouflage of Dark Sea Grey, Slate
Grey and Sky, using Tamiya “Dark Grey” for the Dark Sea Grey, Tamiya “RLM
Grey” for Slate Grey, and Tamiya Sky, which is a perfect match for the
World War II color. I noted from a photo I found taken from above that
the camouflage pattern shown in the kit instructions is incorrect, so I
freehanded a “standard A pattern” as shown in the photo. When all was
dry, I gave the model a good coat of Future and let it dry overnight.
First Final Assembly:
Before
proceeding further, I attached the landing gear. The main gear is as big
a pain as it looks like, and is particularly weak. I strengthened the
attachment of the gear legs to t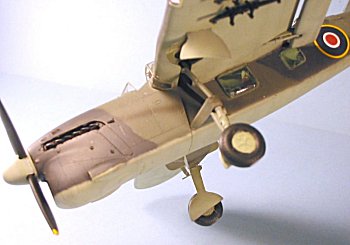 he
gear door by drilling both out and using some .010 plastic rod to provide
a more solid attachment.
he
gear door by drilling both out and using some .010 plastic rod to provide
a more solid attachment.
Decals:
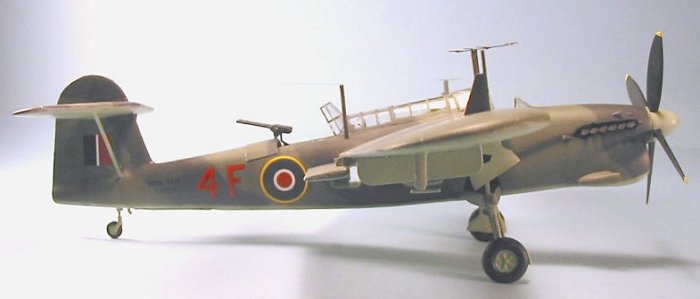
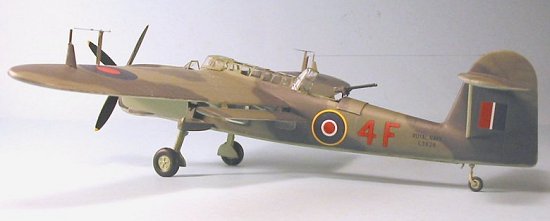
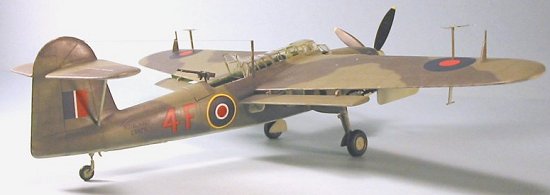
The kit decals are no good. The upper national insignia is too big, and the red in all the national insignia decals is too bright. Additionally, only one of the three individual aircraft markings is verified by any photograph or profile I was aware of. I used the Sierra Scale Models decals for their vacuform Barracuda, which are (or were) available separate from the kit. These are the correct size and color, and the individual marking for an 813 Squadron Barracuda is correct. These decals are printed by MicroScale, and went down with no problems under a coat of MicroSol. Once they set up, I washed the model to get rid of setting solution residue, then gave it another coat of Future.
|
FINAL ASSEMBLY |
I unmasked the canopy, and then glued the tail guns I had scratchbuilt using some nose guns from the Tamiya Mosquito in position. I then attached the pilot’s canopy, and fit the gunner’s canopy in position. The canopies are injected, and thicker than they would be if vacuformed (which I prefer), but the pilot’s canopy fit well, and I was able to give a little squeeze to the gunner’s canopy to position it. I attached the bomb racks and the prop.
These were well-maintained airplanes at the time of their first service - which this model depicts - so all I did was apply some exhaust stains for weathering.
|
CONCLUSIONS |
Overall Comments:
 What a
“Fairey-looking” airplane! If you look at any Fairey product from the
Flycatcher to the Gannet, you’ll know exactly what I mean. The Barracuda
is even more ungainly-looking than most British-designed naval aircraft.
Anyone interested in the aircraft of the Fleet Air Arm will want this in
their collection. It looks great sitting next to the Tamiya Swordfish
and the Grand Phoenix Firefly I, among all my other FAA models.
What a
“Fairey-looking” airplane! If you look at any Fairey product from the
Flycatcher to the Gannet, you’ll know exactly what I mean. The Barracuda
is even more ungainly-looking than most British-designed naval aircraft.
Anyone interested in the aircraft of the Fleet Air Arm will want this in
their collection. It looks great sitting next to the Tamiya Swordfish
and the Grand Phoenix Firefly I, among all my other FAA models.
If you concentrate on getting the fit of the cockpit interior floor and bulkheads right, there is nothing else in this kit that will present any difficulties to any modeler who has built a couple of Classic Airframes limited-run kits. Those who want to arm this model as it was for the Tirpitz strikes could use the 1,600 lb. A.P. bomb that comes in the Accurate Miniatures Avenger kits.
January 2004
Copyright ModelingMadness.com
Thanks to David Hannant for the review kit.
If you would like your product reviewed fairly and fairly quickly, please contact the editor or see other details in the Note to Contributors.