Airfix 1/72 Avro Anson I
| KIT #: | 289/02009 |
| PRICE: | $2.00 when new |
| DECALS: | one option |
| REVIEWER: | Torben Plesberg |
| NOTES: | Initially released in 1963 |
| HISTORY |
The AVRO 652 A, later Anson, was developed from the AVRO 652 airliner as a maritime reconnaissance aircraft wanted by the British Air Ministry. The plans were convincing enough, a prototype was ordered, and conducted its first flight in March 1935. The AVRO 652 A was competing with the De Havilland DH 89 Dragon Rapide, and was announced winner, followed by an order for 174 aircraft in July 1935. At this time, the aircraft got its name: Anson – after British admiral George Anson.
The Anson entered service with the
RAF in the maritime patrol role. However, as time passed and the war broke out,
it was already considered obsolete. The Anso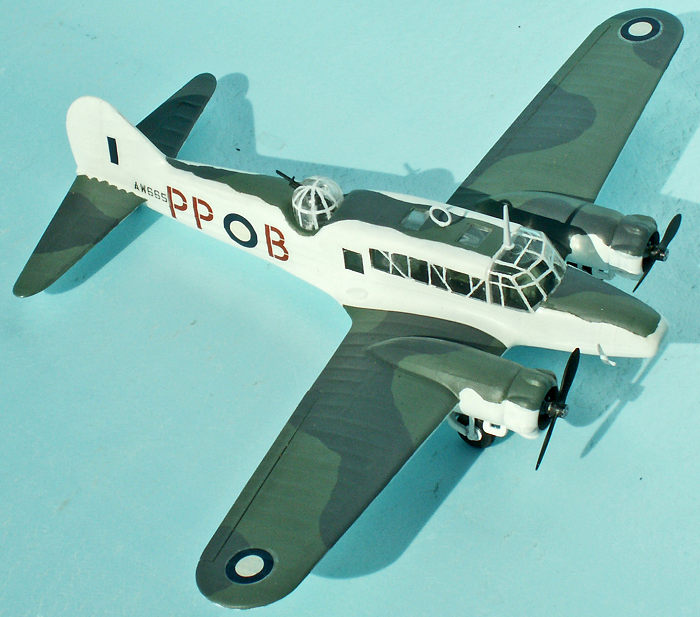 n was a most suitable multi-engine
trainer aircraft, and large numbers were in service in that role, and even after
the end of WWII. Actually, the Anson was in service more than 20 years after the
war!
n was a most suitable multi-engine
trainer aircraft, and large numbers were in service in that role, and even after
the end of WWII. Actually, the Anson was in service more than 20 years after the
war!
The Anson or “Annie” was produced in huge numbers, 11.000 + , and the only twin engine aircraft produced in greater numbers was the Vickers Wellington bomber. The production of the Anson ended in 1952. Seventeen years of continuous production was something at that time. Today, the Lockheed Hercules is still in production, ever since 1955!
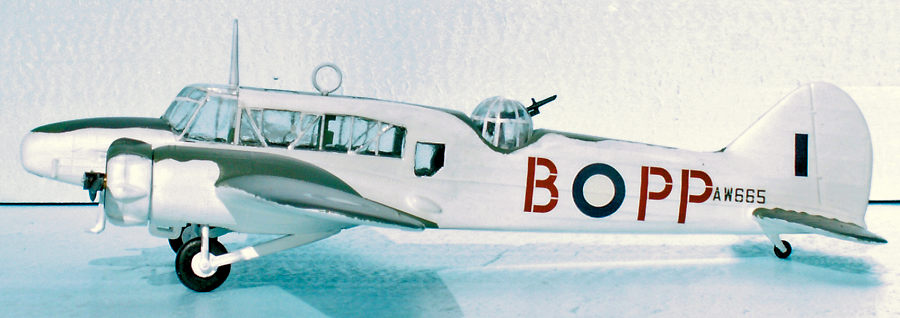
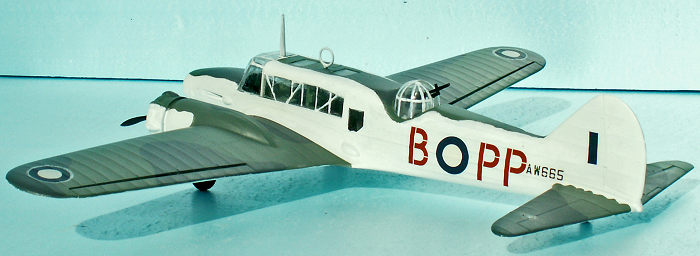
The majority of the Ansons were produced by AVRO, 8.000 +, a further 2800 + were produced in Canada by Federal Aircraft Ltd. It is strange that only two Wellingtons survive to this day, whereas there are more than thirty Ansons of which three are kept airborne. The explanation is probably that a Wellington is far more costly to operate than an Anson. Therefore, there was no interest in operating Wellingtons for civil use. The Anson was a relatively cheap aircraft to buy and operate, thus suitable for civil use. A lot of Anson produced after the war were for civil use by smaller airlines. In Denmark, there were five Anson on the civil register in the early fifties. One of these was operated by the Danish Directorate of Aviation. This aircraft would have been the subject of my model – if the kit were a C XIX Anson. However, I needed a companion for my Australian Boomerang fighter plane, and my Anson Mk. 1 is therefore a RAAF plane – convenient as one of the options of kit 02009 is for an Australian Anson – and my son Nicolai offered me the Australian decals from this kit.
| THE KIT |
The kit comes in a small box with a picture of an Anson on the lid. The box opens normally and is thus suitable as a base for keeping the parts during construction.
 The instructions of kit 289 is a
single folded sheet, a little smaller than A 4. There is a short history of the
Anson 1, some basic advice for the assembly and three steps with exploded
sketches showing the construction, and step four showing a suggested color
scheme on a three-view drawing, and advice for applying transfers, now called
decals.
The instructions of kit 289 is a
single folded sheet, a little smaller than A 4. There is a short history of the
Anson 1, some basic advice for the assembly and three steps with exploded
sketches showing the construction, and step four showing a suggested color
scheme on a three-view drawing, and advice for applying transfers, now called
decals.
The instructions of kit 02009 is far better, with more and bigger exploded sketches, and 3 three-view drawings showing colors and decaling of the three options of the kit. There are four sprues in a light grey styrene and a clear sprue with the transparent parts. The windows are rather crude. The transparencies were not perfect in the sixties. It is possible to make some improvements for a better look.
| CONSTRUCTION |
If you follow the instructions of kit 289, it is not sure you will succeed in assembling the model in a correct way. The instructions is simply too bad! However, the instructions of kit 02009 will almost guarantee a proper assembly of the kit. The nine exploded sketches solve all the problems that were not solved by the three small exploded sketches of kit 289.
 One of the problems was the main
landing gear, because the fastening pins to the rear were out of alignment,
meaning that the undercarriage would lean outwards. You can either cut off the
bad pin, and replace it by some wire, or you can relocate one of the bearings in
the wing – or a combination of both! However, this flaw cannot be detected,
until the wings are glued in place on the fuselage, and at that time, it is a
bit too late to do something about it. Beware of this problem in due time!
One of the problems was the main
landing gear, because the fastening pins to the rear were out of alignment,
meaning that the undercarriage would lean outwards. You can either cut off the
bad pin, and replace it by some wire, or you can relocate one of the bearings in
the wing – or a combination of both! However, this flaw cannot be detected,
until the wings are glued in place on the fuselage, and at that time, it is a
bit too late to do something about it. Beware of this problem in due time!
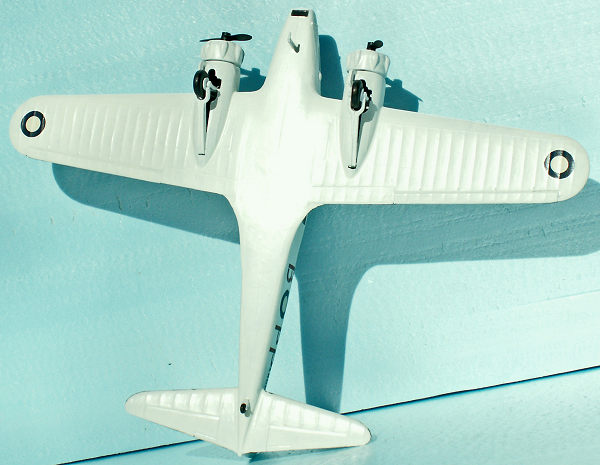
The window under the nose is a bit too large, and need some sanding to fit properly. The gauge of the propeller shafts is too small for the center hole in the engines, meaning that the propellers are wagging when being turned. I made some new shafts of 2 mm gauge brass wire. It was not a simple matter to drill the holes for the new shafts. A jig for the “spinner base” was necessary to secure the new hole exactly in the center. The holes in the engines had to be drilled up with a 2.1 mm drill. Finally, I made a couple of small brass stop rings with 2 mm holes, and they were thin enough to avoid cutting center holes in the front of the nacelles. Super glue was very well suited to lock the stop rings on the end of the shafts. Apply only glue on the outer side, if you still want the propellers to turn!
By
mishap, I lost one of the roof windows. It simply flew away, when I used
compressed air to clean the interior of the assembled fuselage. Fortunately, I
found a thin piece of acryl board in my stocks and was thus able to make a new
window, which was better than the lost one. Then I made a second acryl window,
and 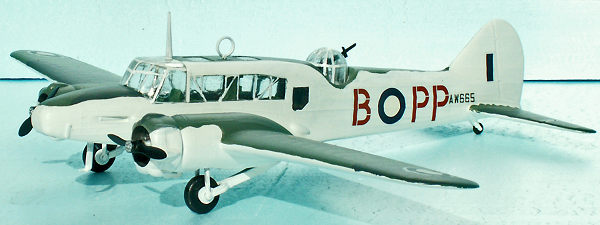 threw the second original window away. The side windows were sanded on the
inner sides, until they were plane, followed by treatment with a grain 8000
polishing stick to regain transparency. Unfortunately, I did not do the same on
the outer sides of the windows. This treatment would have removed all the raised
frames. However, these frames are not necessary. On the contrary: the frames are
far better marked by painting. I regret that I did not plane the outer sides of
the windows, too! The windscreen needed some sanding to fit properly.
threw the second original window away. The side windows were sanded on the
inner sides, until they were plane, followed by treatment with a grain 8000
polishing stick to regain transparency. Unfortunately, I did not do the same on
the outer sides of the windows. This treatment would have removed all the raised
frames. However, these frames are not necessary. On the contrary: the frames are
far better marked by painting. I regret that I did not plane the outer sides of
the windows, too! The windscreen needed some sanding to fit properly.
A dorsal turret is always a problem in itself. If the turret shall be able to rotate, it is necessary to make the gauge of the fuselage opening between 0.5 and one mm wider. When the fuselage halves are glued together, the complete and finished turret must be placed correctly between the guiding slots. Otherwise, the turret will either lean, or it will be impossible to assemble the fuselage halves properly.
| COLORS & MARKINGS |
 The color
scheme of an Australian Anson is rather special: The under sides including
landing gear, fuselage, fin and rudder are white, HB 34. However, it was a good
measure to use gloss white. That makes the decaling easier. The upper sides of
the wings and top of fuselage have a camouflage pattern of Slate Grey, HB 31,
and Blue Grey, HB 79. The camouflage pattern has wavy edges against the white,
with the exception of the wings where the line is ruler-straight.
The color
scheme of an Australian Anson is rather special: The under sides including
landing gear, fuselage, fin and rudder are white, HB 34. However, it was a good
measure to use gloss white. That makes the decaling easier. The upper sides of
the wings and top of fuselage have a camouflage pattern of Slate Grey, HB 31,
and Blue Grey, HB 79. The camouflage pattern has wavy edges against the white,
with the exception of the wings where the line is ruler-straight.
The decals were of good quality and easy to apply. Finally, the undersides got a layer of HB Satin Cote, the rest of the aircraft got a layer of matt varnish, Revell Aqua 361 02.
| CONCLUSIONS |
It is always fun to build a model from a classic kit. The transparencies are often a challenge with classic kits. Because of the flaw of the main undercarriage legs, it is not an easy built kit. A beginner will get into trouble, when doing the undercarriage. However, the kit is recommendable to all modelers who fancy WWII aircraft, especially crew trainers and transports. I hope one day to come across a C XIX Anson kit to make the civil Danish Anson OY-EVA from my boyhood era.
| REFERENCES |
Wikipedia article on the AVRO Anson.
22 June 2020
Copyright ModelingMadness.com
If you would like your product reviewed fairly and fairly quickly, please contact the editor or see other details in the Note to Contributors.