Tamiya 1/48 Lancaster B.III
| KIT #: | 61105 |
| PRICE: | $130.00 or so new |
| DECALS: | Four options |
| REVIEWER: | Scott Lyle |
| NOTES: |
| HISTORY |
A massive strategic bomber designed to take the war to Germany’s industrial heartland, the Lancaster was the mainstay of RAF’s Bomber Command from mid-1942 to the end of the war. With the United States engaged in its daylight precision bombing campaign, the RAF used the Lancaster to bomb German cities at night; together the two forces kept the military-industrial complex and cities of Nazi Germany under round-the-clock pressure, though the cost in terms of men and material for both allies would prove to be very high.
 Powered by four Merlin
engines and operated by a crew of seven, the Lancaster could carry a
bomb-load of up to 14,000 pounds in its long, tunnel-like bomb bay. The
airframe proved to be sturdy and flexible enough to be able to carry
virtually every munition the British could come up with including the
12,000-pound Blockbuster bomb, the 12,000-pound Tallboy, and (with
modifications) the truly massive 22,000-pound Grand Slam earthquake bomb.
Some Lancasters were specially modified to deliver the famous Upkeep
bouncing bombs that punched holes in the Ruhr river dams during the dramatic
dam busting raids of 1943.
Powered by four Merlin
engines and operated by a crew of seven, the Lancaster could carry a
bomb-load of up to 14,000 pounds in its long, tunnel-like bomb bay. The
airframe proved to be sturdy and flexible enough to be able to carry
virtually every munition the British could come up with including the
12,000-pound Blockbuster bomb, the 12,000-pound Tallboy, and (with
modifications) the truly massive 22,000-pound Grand Slam earthquake bomb.
Some Lancasters were specially modified to deliver the famous Upkeep
bouncing bombs that punched holes in the Ruhr river dams during the dramatic
dam busting raids of 1943.
All told Lancasters dropped 608,612 tons of bombs and flew over 156,000 sorties during the war, but these numbers came at a steep price. The RAF Bomber crews suffered some of the highest casualty rates of any service during the war, second only to those of the U-Boat crews some sources say. Despite that immense sacrifice however, the “Lanc” was and remains a beloved symbol of Britain’s iron resolve to end Hitler’s wretched regime once and for all.
| THE KIT |
Tamiya’s 1/48 Lancaster has much in common with Monogram’s 1/48 B-17G – they are both kits of iconic WW2 bombers, they were both created in the 1970s, they’re both highly detailed inside and out, and they’ve both never been surpassed.
In 1975 Tamiya brought out two 1/48 Lancaster kits, a “regular” night bomber version and a Dambuster version. In 2001 they issued the Grand Slam version as part of their Propeller Action series, and that was followed in 2009 by a regular night bomber version with some new parts to create some different variants. In 2012 those same new parts made their way into a reissue of both the regular and Dambuster versions, both featuring the original 1970s box art.
Given these choices I opted for the 2009
version with its very dramatic box art depicting a trio of Lancasters flying
over a ruined, burning city while flak and searchlights dot the night sky.
Opening the box, you’re greeted by ten light gray sprues of parts, two
sprues of transparent parts, the two fuselage halves, the instructions and
the decals. Some of the new parts in this kit include two types of main
wheels (smooth tread and the blocky, rectangular tread), two types of prop
(the thinner, needle type and the wider, padd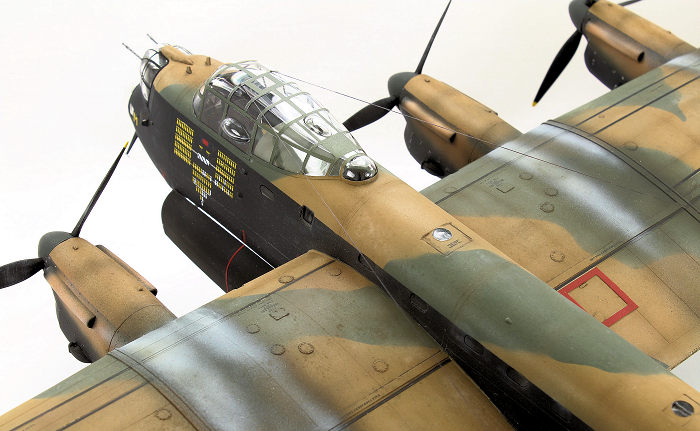 le-blade type), two types of
engine exhausts (the visible exhaust-stub type and the shrouded type), and
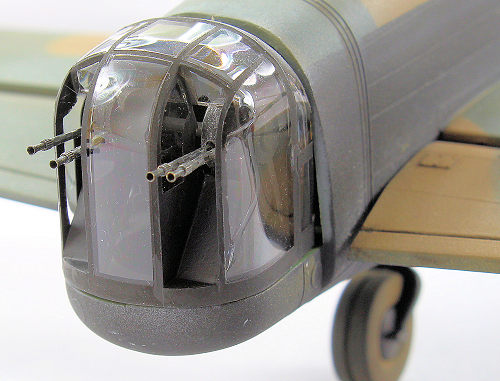
two types of rear turret, the early style and the later style. An H2S radar
dome is provided in clear plastic, as are the early and late style of
bombardier’s nose window.
le-blade type), two types of
engine exhausts (the visible exhaust-stub type and the shrouded type), and
two types of rear turret, the early style and the later style. An H2S radar
dome is provided in clear plastic, as are the early and late style of
bombardier’s nose window.
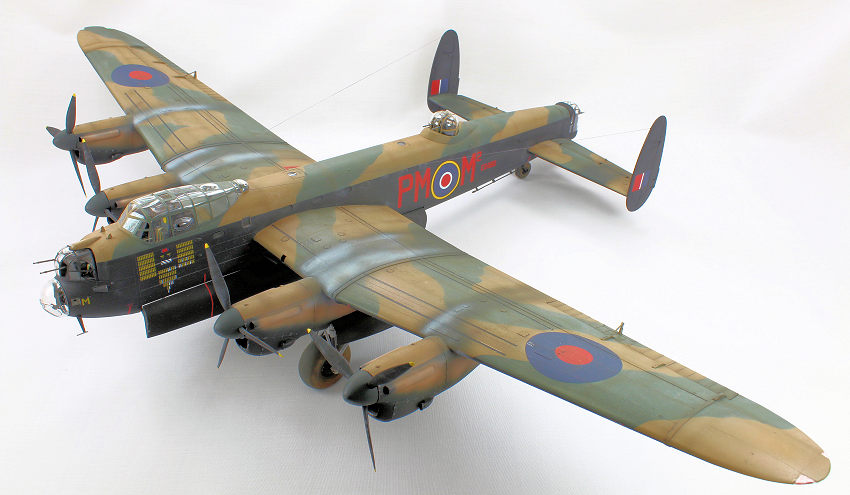
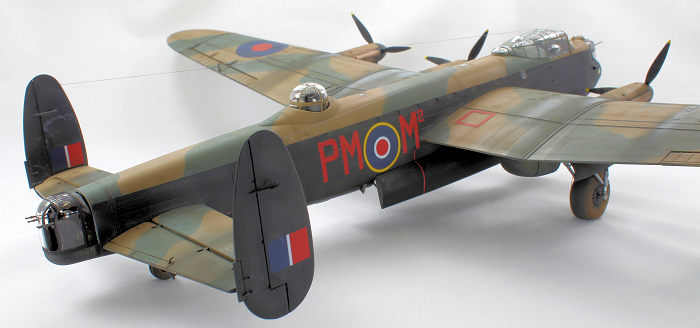
Tamiya gives you eighteen 200 pound bombs and one 4,000 pound “Cookie” for that big bomb bay, as well as two fully detailed Merlin engines which you can leave exposed for that Lancaster maintenance diorama you’ve been dreaming of. Five crewmen are included, four of which are molded to fit in different positions inside the bomber – a nice touch. Finally, there are decals for four aircraft; ED888, the famous “Mike Squared” from No. 103 Squadron (a B Mk. III), ED905 from No. 550 Squadron (a B Mk. III), NG347 from No. 424 Squadron (a B Mk. I), and TW880, a white and black B Mk. I (FE).
Eyeballing the parts, they look very good for being over 40 years old. I was pleasantly surprised to discover that all of the exterior surfaces are covered in row after row of tiny raised rivets which look very nice. The panel lines are raised, but are very fine.
A big, old bomber kit like this is crying out for some aftermarket goodies. I picked up Eduard’s “Lancaster Interior” set (#49371) which features their lovely color printed photo etch for the instrument panel, engineer’s panel, and several electronics boxes. I also picked up their seatbelt set (#49034) and their Mask set (#EX129) for all of that greenhouse masking. The engine nacelles are reportedly the weak point of the kit with the fit supposedly being very poor. Belcher Bits of Canada makes resin nacelles that apparently fit much better, but I decided to utilize the kit parts. Umm, more on that later...
There are many great online references for the Lanc, but one I found truly helpful is www.haraldjoergens.com/panoramas/lancaster/, a virtual tour of the entire interior of the aircraft. Letting you walk inside the aircraft and look anywhere, it’s a fantastic aid to the Lancaster modeler and fun for aircraft fans in general.
I decided to utilize the kit’s decals for the aforementioned “Mike Squared”, a Lancaster that survived an amazing 140 missions. So without further ado, let’s get this classic plastic started.
| CONSTRUCTION |
Life begins inside the front
of the aircraft, where I first decided to tackle a known flaw in the kit, the
location of the radio operator’s window. On both sides of the fuselage it is too
far forward; by how much I could not find a definitive answer. Scaling from the
line drawings in the back of my Osprey reference I ended up moving the window
aft only about 6mm, which meant the forward vertical edge of the new location
 was the exact aft vertical edge of the old location. Carefully cutting out the
new holes with my Dremel I patched up the old holes with some plastic card and
my new favorite modeling tool, Perfect Plastic Putty by Deluxe Materials. A
white, water-based putty, I instantly found it much easier to use than my putty
of yore, Squadron’s Green Putty. Being water-based you can smear it on a seam
and then use a wet Q-Tip to wipe away the excess. It dries in about 20 minutes,
so it is very fast to work with. I’m a fan.
was the exact aft vertical edge of the old location. Carefully cutting out the
new holes with my Dremel I patched up the old holes with some plastic card and
my new favorite modeling tool, Perfect Plastic Putty by Deluxe Materials. A
white, water-based putty, I instantly found it much easier to use than my putty
of yore, Squadron’s Green Putty. Being water-based you can smear it on a seam
and then use a wet Q-Tip to wipe away the excess. It dries in about 20 minutes,
so it is very fast to work with. I’m a fan.
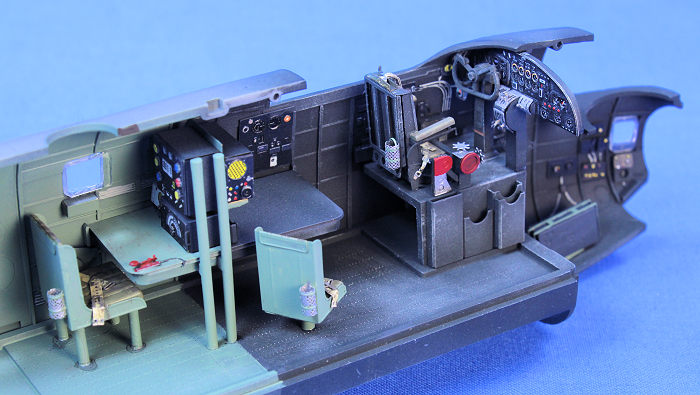
With that task out of the way I next attached the pilot’s seat, yoke, and instrument panel to the raised platform that mounts on top of the bomb bay roof plate. The Eduard interior set contains many unpainted parts and some with their excellent printed graphics (i.e. the instrument panel, faces of radios, etc.), so I attached all of the unpainted parts I could. I found the Eduard set to be a great benefit, adding just the right amount of detail without going overboard. Another new addition to my modeling arsenal also helped; that being Gorilla Glue’s “Super Glue Brush and Nozzle”. This CA glue comes in a bottle that includes a brush in the cap, which really helped speed up the application of the glue. Previously I would squirt a drop onto some scrap plastic and then use a glasses screwdriver as an applicator, but the brush-in-cap did away with that. So far I’m two for two with new modeling products…
The Lanc’s interior was black
forward of the first bulkhead and “British Interior Green” aft of that, so I
sprayed said areas with Tamiya XF-69 NATO Black and Testors RAF Interior Green
respectively. Details on the side walls were picked out by hand, and then I
added the Eduard color photo etch parts and the rest of the kit parts including
the side windows. I glued the bomb bay assembly to the port fuselage half and
then snapped a few pictures before closing up the fuselage halves and condemning
all of that nice interior work to a lifetime of dark sadness…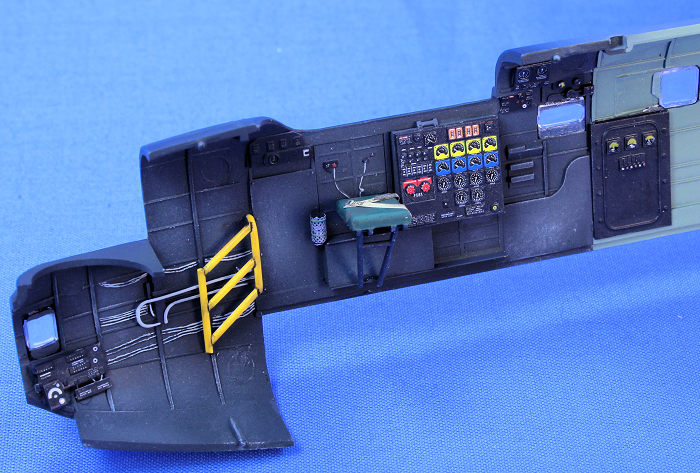
The fuselage seams were going to require some sanding, but before I started generating dust that could find its way inside, I glued all of the various blisters, bubbles, and greenhouses into position and then masked them with the Eduard mask set to protect them from scratches. With that done I tackled the seams which required some filling and sanding, but nothing too terrible.
With the fuselage done it was time to move on to the wings. The instructions have you assemble the lower portions of the engine nacelles to the lower wing halves, followed by assembling the main landing gear struts to the upper wing halves. With that done I then closed up both wing halves and tackled their seams, which were minimal. It was then time to assess the other much-criticized part of the kit, the fit of the upper portions of the engine nacelles. After much test fitting, I can tell you the criticism is warranted – the fit is not good. If I were to do it again I would probably opt for the Belcher Bits resin engine nacelle replacements, but instead, armed with my new putty and false confidence, I waded into them. All four of them. Ugghhh.
It took me about a week of filling and sanding to get all of the mismatched seams to a reasonable point. Many lost panel lines had to be re-scribed, and other molded on details were just plain lost. It is a 1970s vintage kit, but I think Tamiya could have done something about this in all of their subsequent re-releases.
The wings were attached to the fuselage next. The upper wing root seam was fairly tight on each side and only needed a small amount of putty; the lower wing root seam, not so much. With large gaps staring back at me, I glued in small pieces of plastic card and then went over each seam with more putty. Luckily the horizontal and vertical went together well.
To wrap up the construction phase I added the rudder balances and other small details that I figured could survive the painting process. I then took a moment to enjoy my work so far. It’s a big, solid model, and the Lancaster has a menacing look.
| COLORS & MARKINGS |
 I first primed the model with Mr. Surfacer 1000
before pre-shading all of the upper panel lines with Tamiya XF-1 Black. The
lower areas were sprayed XF-1 Black all over, leaving a little of the primer to
show through the centers of panels. Masking off the black areas, I used Testors
Acrylic RAF Dark Green for the first color on the upper surfaces.
I first primed the model with Mr. Surfacer 1000
before pre-shading all of the upper panel lines with Tamiya XF-1 Black. The
lower areas were sprayed XF-1 Black all over, leaving a little of the primer to
show through the centers of panels. Masking off the black areas, I used Testors
Acrylic RAF Dark Green for the first color on the upper surfaces.
At this point it was time to begin some weathering effects, so I started with the salt technique. Wetting the RAF Dark Green surfaces with water, I sprinkled liberal amounts of sea salt all over them and let it dry. I then misted on a very thin coat of lightened RAF Dark Green. The next night I washed the salt and its residue off with some luke warm water, revealing a very random, splotchy, and faded finish that I really liked.
Using the instructions as a guide I made paper masks to cover the Dark Green areas. For the RAF Dark Earth color, I made a homebrew of Tamiya XF-52 Flat Earth, XF-3 Flat Yellow, and XF-2 Flat White. Once it had dried I repeated the salt technique, and then the whole model was given a coat of Future. Unfortunately, the Future seemed to tone down some of the results of the salt technique – hopefully it will reappear once I apply the Flat Coat but either way, next time I will apply the salt technique after the Future has been applied!
I let the Future cure for two days and then applied the decals, which performed well overall but needed a couple of applications of Walthers Solvaset to get them to conform in a couple of places. I sealed them with another coat of Future.
I applied a panel line wash of MIG Productions “Dark Wash” around the ailerons, flaps, access hatches, and any other recessed lines. Next I airbrushed on Testors Model Master Flat Finish (which took me two nights – it’s a big model), and while that was drying I sprayed the bomb bay doors, landing gear doors, and props XF-1 Black.
 Once the flat coat had set I
airbrushed a very thin 50/50 mix of Tamiya XF-1 Flat Black/XF-64 Red Brown onto
the various panel lines to create a subtle post-shading effect. I then mixed
some more XF-1 Flat Black into the mix and sprayed the engine exhaust stains on
the wings, building them up in light coats. Pictures of actual Lancasters show a
build-up of white, chalky deposits on the wings, so I replicated those by
misting some Testors Light Gray and White on to those areas. Lastly some Testors
Military Brown was used to create the rusty exhaust stains on the sides of the
engine nacelles.
Once the flat coat had set I
airbrushed a very thin 50/50 mix of Tamiya XF-1 Flat Black/XF-64 Red Brown onto
the various panel lines to create a subtle post-shading effect. I then mixed
some more XF-1 Flat Black into the mix and sprayed the engine exhaust stains on
the wings, building them up in light coats. Pictures of actual Lancasters show a
build-up of white, chalky deposits on the wings, so I replicated those by
misting some Testors Light Gray and White on to those areas. Lastly some Testors
Military Brown was used to create the rusty exhaust stains on the sides of the
engine nacelles.
It was finally time for the finishing touches. All of the Eduard masks were removed, a nerve-wracking step but I have to say they performed flawlessly – well worth the money. The wheels were painted Tamiya XF-69 NATO Black and dusted with pigments to dirty them up. They were then installed along with the landing gear doors and some fine wire to represent the brake lines. The bomb bay doors were added, though the bombs were left off for now. The props were test-fitted to their shafts, but I found they didn’t line up very well so I snipped off the shafts and glued the props directly to the nacelles with CA glue. The gun turrets were assembled, masked and painted, and lastly the aerial wires were replicated using EZ Line. And with that, the model was done.
| CONCLUSIONS |
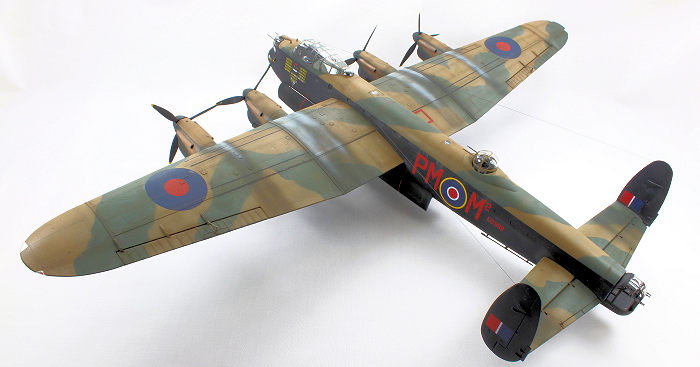
Tamiya’s 1/48 Lancaster builds into a big, beautiful model. It’s not a trouble-free build (those engine nacelles) and it took me a while (about four and a half months), but the surface detail is very nice and with the options in the box you can build one of several different versions.
While it may be over forty years old, if you’re willing to put a little elbow grease into it, you will have a great looking model of one of history’s most iconic bombers.
| REFERENCES |
- Osprey Publishing, Combat Aircraft #31, “Lancaster Squadrons 1942-43”
- Osprey Publishing, Combat Aircraft #35, “Lancaster Squadrons 1944-45”
- Squadron/Signal Publications, Aircraft in Action #52, “Lancaster in Action”
- Wikipedia, the Online Encyclopedia
16 October 2017
Copyright ModelingMadness.com
If you would like your product reviewed fairly and fairly quickly, please contact the editor or see other details in the Note to Contributors.
Back to the Main Page Back to the Review Index Page Back to the Previews Index Page