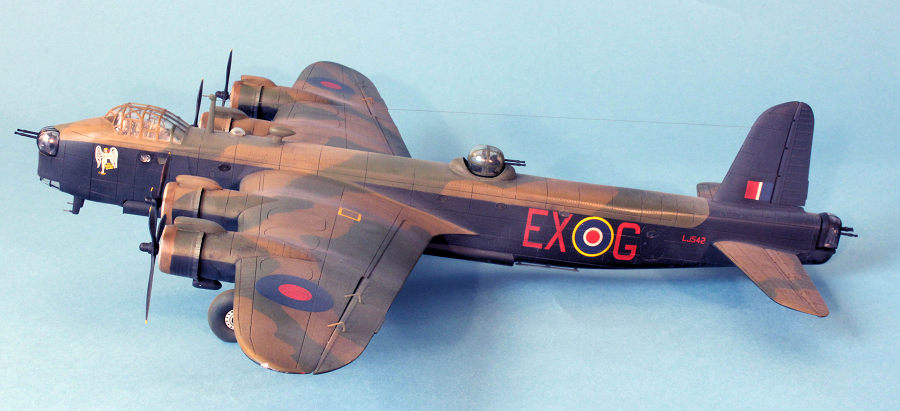
Italeri 1/72 Sterling Mk.III
| KIT #: | 1462 |
| PRICE: | $63.00 |
| DECALS: | Four options |
| REVIEWER: | Lee Kolosna |
| NOTES: | Basic kit build. |
| HISTORY |
The Stirling, named after the city in Scotland, was produced by the Northern Ireland-based aviation firm Short Brothers. The first four-engine “heavy” bomber in service with RAF Bomber Command beginning in early 1941, it was hampered by a number of operational issues. The aircraft suffered from long take-off distances, poor stall characteristics, an inability to operate at altitudes much above 16,000 feet, a delicate set of landing gear that had a propensity to collapse with hard landings, and a relatively small payload limited by the compartmental design of the bomb bays. It became a stopgap solution until the Avro Manchester (redesigned to become the four-engine Lancaster) and the Handley Page Halifax could come on line.
Much has
been written about the Stirling’s poor performance due to the small span and
thickness of the wing, which was based on the design of the Sunderland flying
boat that Short also produce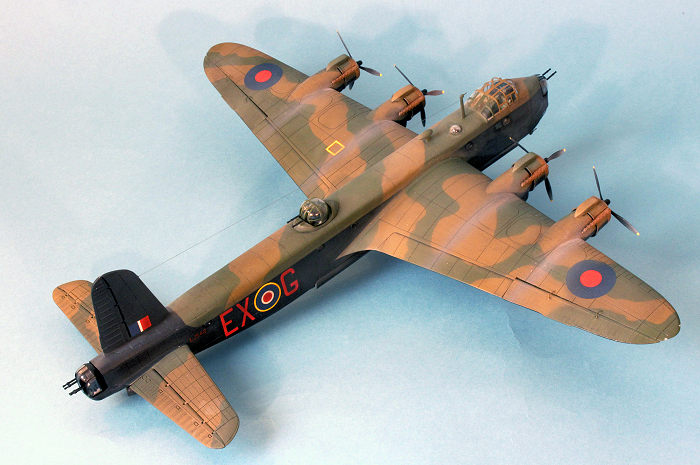 d. A common myth is that the wing was limited in
span to 100 feet because that was the size of the average RAF airfield hangar
door opening. This has since been debunked as the average door size was
actually 112 feet in width. The wing was limited to that size due to the
original specifications issued by the Air Ministry, which were defined by the
need to not let the bomber “get too large”.
d. A common myth is that the wing was limited in
span to 100 feet because that was the size of the average RAF airfield hangar
door opening. This has since been debunked as the average door size was
actually 112 feet in width. The wing was limited to that size due to the
original specifications issued by the Air Ministry, which were defined by the
need to not let the bomber “get too large”.
The characteristic nose-high attitude of the aircraft on the ground due to the tall landing gear was created to provide more incidence for the wing in an attempt to shorten the overly-long take-off distances. This added to the fragility of the gear and when coupled with the aircraft’s poor low-speed handling, led to a number of accidents. The aircraft was severely hampered from the beginning as an efficient tool for the nighttime bombing campaign. Bomb runs on target came at a relatively low altitude compared to the Wellingtons and Hampdens which flew higher, making the Sterlings particularly vulnerable to German flak batteries and night fighters. Still, the plane was considered quite pleasant to fly once in the air and crews were generally pleased with serving aboard it.
The Stirling was phased out of front-line service by the end of 1943 in favor of the Lancaster and Halifax and relegated to glider-towing and cargo-hauling duties during the later stages of the war. Stirlings towed and released the troop transport gliders in the ill-fated Market Garden operation in the Netherlands in September, 1944.
A “Super Stirling” design was proposed by Short to address many of the issues with the aircraft, featuring a longer wing, more defensive armament, and upgraded radial engines. This design was considered by the Air Ministry but eventually rejected as it was felt that manufacturing resources would be better devoted to the superior Lancaster.
| THE KIT |
Italeri first produced a Mk. IV glider-towing version of the Stirling in 2014, followed by a Mk. I a year later and this Mk. III kit in 2022. In addition to the injection-molded plastic parts, a fret of photo-etched brass provides seat harnesses, interior details, engine cowling supports, and an instrument panel. There are eighteen 250 lb. bombs that can be added to the main and wing bomb bays. The control surfaces can be posed in various positions, the landing gear can be assembled in the retracted position, and clear position light covers are provided if the modeler chooses to cut out their respective positions on the wingtips. Cockpit and rear fuselage detail is quite good although there is no way one will ever see much inside other than under the canopy greenhouse when the model is assembled.
Markings are provided for four Stirlings, all in the standard Dark Earth and Dark Green over Night camouflage scheme. The decals are printed by Cartograf and are of their usual excellent quality, but see the note below about the red color being too bright.
The kit has some issues. These are the ones that I focused my attention and this is not meant to be a definitive list:
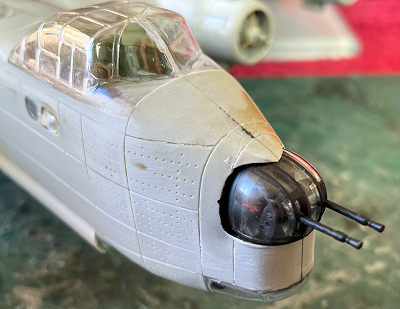 · The panel lines are too deeply inscribed and too wide,
particularly on the wings. It reminds one of the way Matchbox used to
engineer their kits back in the 1970s. Some modelers choose to fill the
lines with Mr. Surfacer or melted sprue, others use a heavy coat or two of
primer to tone down the effect. I chose the latter approach in my build.
· The panel lines are too deeply inscribed and too wide,
particularly on the wings. It reminds one of the way Matchbox used to
engineer their kits back in the 1970s. Some modelers choose to fill the
lines with Mr. Surfacer or melted sprue, others use a heavy coat or two of
primer to tone down the effect. I chose the latter approach in my build.
· The framing ribs on the ailerons and elevators are too prominent. A light sanding will knock these ridges down somewhat.
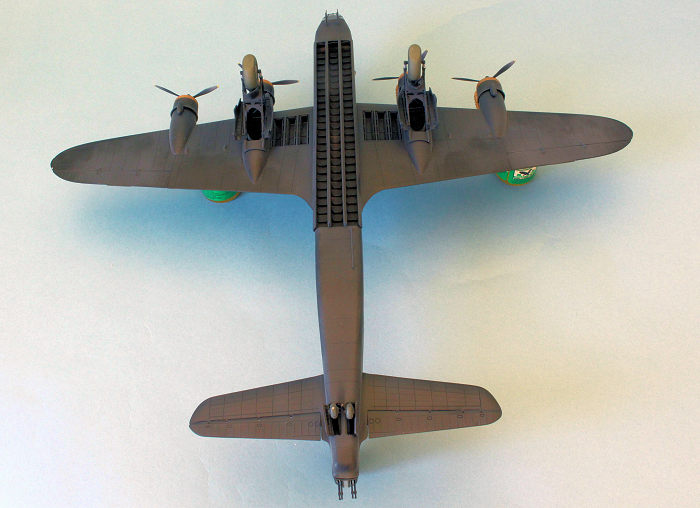
· There is a bomb bay under each wing. The doors don’t fit the opening very well if one chooses to pose them closed. If posed open, the doors need to be shortened by a millimeter or two to allow then to fit inside. On the actual aircraft, the doors retracted inwards and do not hang down from the wing.
· The main bomb bay interior has numerous ejector pin marks, which are quite visible. The four main doors are long and thin and present a challenge to get them all glued down with proper alignment.
· The tires are a little too flat. One can build up the bottoms with putty or CA glue to make them look less deflated.
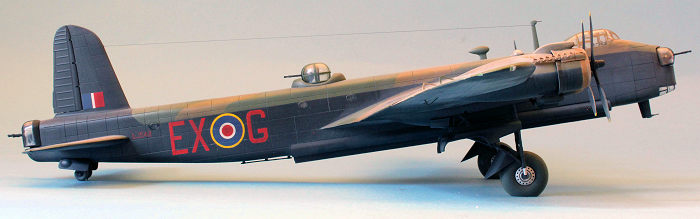 · The red used in the kit decal sheet is way too bright, rather
than the brick red color appropriate for period roundels and aircraft code
letters.
· The red used in the kit decal sheet is way too bright, rather
than the brick red color appropriate for period roundels and aircraft code
letters.
· The oval fuselage windows are not properly molded with almost all of them suffering from a sink mark that distorts the glass. A modeler may choose to use white PVA glue to fill in the spaces after the model is painted and decaled.
· The canopy that covers the cockpit area also exposes the fuselage sides that will need to be painted with camouflage colors before attaching the canopy to the model, lest the unpainted plastic will be painfully visible.
· There are photo-etched aileron hinges provided in the kit. There is nothing inherently wrong with this, but I must have broken them off handling the model more than a dozen times, which was infuriating as I repeatedly dropped down on my hands and knees to search under my workbench for the tiny departed pieces. I strongly recommend adding these pieces at the very end of the project.
· The main landing gear strut mechanisms must be installed during the construction process. Each one consists of fourteen pieces, including the gear bay doors, and are fairly robust once all glued together. The assemblies are then glued into the wing bottom piece before the top is glued on. There is no way to insert them afterwards.
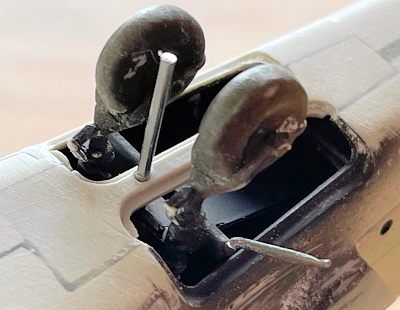 · The Stirling had a unique arrangement of two tail
wheels. The attachment points for both struts are small and not very
strong. They can barely hold the weight of the finished model, so after
breaking mine off a couple of times, I inserted a small length of metal cut
from a paper clip between the two wheels in order to reduce the load on the
wheels themselves.
· The Stirling had a unique arrangement of two tail
wheels. The attachment points for both struts are small and not very
strong. They can barely hold the weight of the finished model, so after
breaking mine off a couple of times, I inserted a small length of metal cut
from a paper clip between the two wheels in order to reduce the load on the
wheels themselves.
· The nose turret has to be installed into the fuselage before the top cover piece goes over it. This means the turret has to be assembled and painted before the rest of the model is, and then protected from paint applied to the overall model.
It seems like there are a lot of issues, but really this is pretty decent kit of a subject one doesn’t typically see built very often. With careful attention made during the building phase, most of these issues can be mitigated. Some modelers are quite unhappy with the exaggerated panel lines, but I found them to be not that off-putting and didn’t prevent me from building this this kit to help fill out my World War II bomber collection in 1/72 scale.
| CONSTRUCTION |
My first task was to address the multiple ejector pin marks in the main bomb bay. I cut out tiny squares of thin sheet styrene and placed them over the marks. The bomb bay was then painted Vallejo Black Surface Primer. I assembled the cockpit, bombardier station, and the rear fuselage. The cockpit interior was painted with Vallejo Model Air Interior Grey Green, and the area aft of the bomb bay was painted with Alclad II Lacquer Aluminum. The very front section of the fuselage was painted with Vallejo Flat Black. Italeri provides a decal for the instrument faces, to be placed behind the photo-etch panel itself. There are also photo-etch seat harnesses, which were placed on the various seats and painted a medium brown.
I left out
most of the detail in the rear half of the fuselage. As noted above, there is
no way any of this can be seen once the fuselage is assembled. The windows are
glued from the inside, and the twin tail w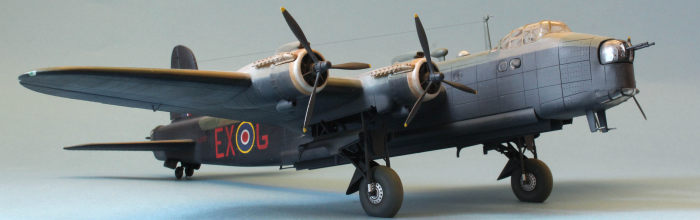 heels have to go in before the
fuselage halves are glued together. I assembled the turrets, with the interiors
painted flat black. I had to completely mask and paint the front turret frames
at this time because there is no way to safely install it after the fuselage
halves are glued together. The fuselage halves were glued together with CA glue
in order to prevent ghost seams from appearing later.
heels have to go in before the
fuselage halves are glued together. I assembled the turrets, with the interiors
painted flat black. I had to completely mask and paint the front turret frames
at this time because there is no way to safely install it after the fuselage
halves are glued together. The fuselage halves were glued together with CA glue
in order to prevent ghost seams from appearing later.
The main landing gear are complex assemblies that have to be completed and installed in the wing lower half before the top is glued on. Once together, the landing gear are quite solid, but one has to be careful handling the wing during construction in order to prevent breakage. I cut out wedges from each wingtip to insert the clear position light covers after adding a tiny drop of red (port) and green (starboard) paint at the corner to represent the colored lights. The surrounding seams were filled with CA glue and the clear pieces polished back to clarity using a tri-grit nail file and Novus Plastic Polish #2.
I chose to pose the wing bomb bays in the open position, but the doors provided fought me as I shortened their length by sanding off a couple of millimeters of material and then attempted to get them inside and properly aligned. These pieces were definitely not engineered to fit in such a manner, and in retrospect I probably should have just glued them closed.
The Hercules engines were painted with Alclad Jet Exhaust, a dark metallic color, with black crankcases. A dark wash was applied to bring out the detail. There is a photo-etch support brace that is placed in front of the crankcase as the front of the cowling is placed on top of the engines. The kit instructions are a little vague here, so I used photos of Stirling cowlings as a guide for proper orientation of the braces. The cowls were glued onto the nacelle fronts and then a three-piece carburetor air intake was glued on top. These intakes are not well engineered so seams had to be filled in each. Italeri instructs the modeler to add a photo-etch grate in front of each intake, but an addendum at the end of the instruction sheet gives counter-advice to not include these grates.
 I assembled
the elevators, ailerons, and rudder, sanding down the prominent molded frame
detail to make the control surfaces smoother in appearance. These were glued
into their respective locations in the neutral position as confirmed in period
photos of Stirlings at rest.
I assembled
the elevators, ailerons, and rudder, sanding down the prominent molded frame
detail to make the control surfaces smoother in appearance. These were glued
into their respective locations in the neutral position as confirmed in period
photos of Stirlings at rest.
The horizontal stabilizers and wings were glued on and the resultant seams filled with CA glue and smoothed over with Mr. Surfacer 500. All the panel lines obliterated in the seam filling process were restored with a scribing tool.
As written above, the canopy greenhouse is attached to the fuselage in a manner that leaves some of the fuselage sides exposed, so they need to be painted first with the appropriate camouflage colors. After this, I glued the canopy on and filled the seams with CA glue and Mr. Surfacer to blend the piece into the surrounding fuselage surface.
During the construction process, I snapped off both of the tail wheels. Gluing them back in, I realized that there is no way that they would be strong enough to hold the weight of this fairly large and heavy model, so I snipped a piece out of a paper clip and used CA glue to secure the post between the two wheels where it would not be immediately apparent to the viewer. It helps that everything underneath is flat black. The post barely extends past the bottom of the tires so that the weight of the model rests on the metal post, rather than on the fragile wheel struts themselves.
The model was washed with a mild solution of liquid dish soap and water to remove sanding dust and fingerprints and allowed to air dry in preparation for paint.
| COLORS & MARKINGS |
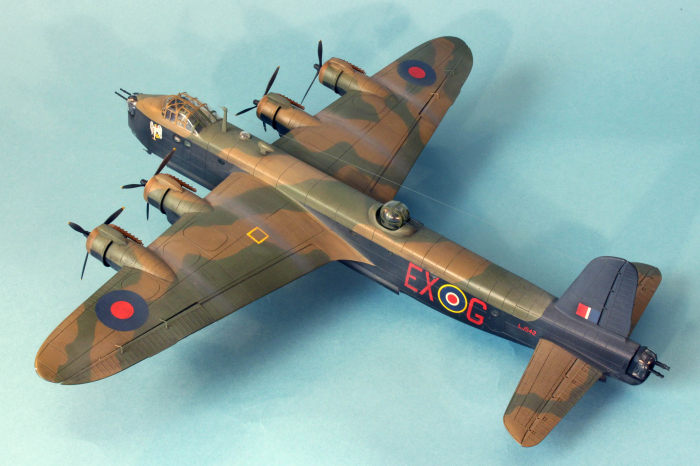
I primed the entire model with Vallejo Black Surface Primer. The color is slightly lighter than pure flat black, which in this scale I think is a reasonable match for Night. The bomb bays, landing struts, and wheel well interiors were also painted black. I masked off the demarcation lines for the topside camouflage and laid down a base of Vallejo BS Dark Earth. After that was dry, I used drafting tape to define the disruptive camouflage pattern for the Vallejo USAF Forest Green, which is a decent substitute for RAF Dark Green as I think Vallejo’s BS Dark Green is too light in tone. In actual life, a typical British bomber had a very slightly feathered transition between the green and the brown, just a few inches, which is nearly impossible to replicate in 1/72 scale – even with soft masks or Blu-tack or Silly Putty. So I just use a hard mask instead.
I then turned my attention to the exhaust collectors at the front edge of each cowl. Model kit manufacturers often direct the modeler to use bronze or copper for this color, but period color photographs simply don’t bear this out. On Stirlings, there is an aluminum ring at the very front followed by a patchy medium brown appearance of the collector further aft. On some aircraft, a heat-resistant black paint was used, but the aircraft that I wanted to depict did not have this paint applied. So Alclad Aluminum went on first, followed by an uneven application of Vallejo Red Brown. The corncob exhausts were dirtied up with a dusting of black and brown chalk pastel.
 I prepared the model
for decals by spraying the entire model with Quick Shine Multipurpose Floor
Polish, now that my inventory of the old standard Future is exhausted forever.
I prepared the model
for decals by spraying the entire model with Quick Shine Multipurpose Floor
Polish, now that my inventory of the old standard Future is exhausted forever.
The decals for a Stirling Mk. III, serial number J542, “Gremlin Teaser” of No. 119 Squadron, based at RAF North Creake in 1944 were selected and applied with a small puddle of Quick Shine used to insure good adhesion. Another coat of Quick Shine was sprayed on before a pre-mixed dark wash made by MIG Productions was applied to all the panel lines.
Detail painting came next. The propellers were black with yellow tips (4 inches!!), the tires were painted with Vallejo Tire Black, and the oleo struts were painted with Floquil Bright Silver.
Weathering was achieved by the use of a very thin medium gray airbrushed from the corncob exhausts across the top of the wing. There are photos of Stirlings that are absolutely covered in oil streaks over the wing surfaces. I attempted to replicate this with drops of the dark gray wash blown backwards with my airbrush but wasn’t happy with the result. It certainly looked grimy, but it also looked like an amateurish attempt at weathering. No matter how much I experimented with the technique, I wasn’t getting the results I wanted. So both of the wings were re-masked in the affected areas and painted over again. I added the exhaust streaks a second time without the oil leaks and called it good enough.
A light brown filter was sprayed all over the model, with a heavier application in the landing gear and on the circumference of the tires. Stirlings often had a well-worn appearance and the light overspray helped impart this effect. I then masked the canopy and the top and rear turrets and painted the frames with my usual North-South/East West technique to insure crisp lines.
I rubbed some dark gray pastel dust into the red areas of the roundels, fin flashes, and aircraft code letters to tone down the brightness of the red. It helped somewhat, but it’s still a bit too bright, I think. A final coat of Testors Acryl Clear Flat sealed everything up in preparation for the addition of the fiddly bits.
| FINAL CONSTRUCTION |
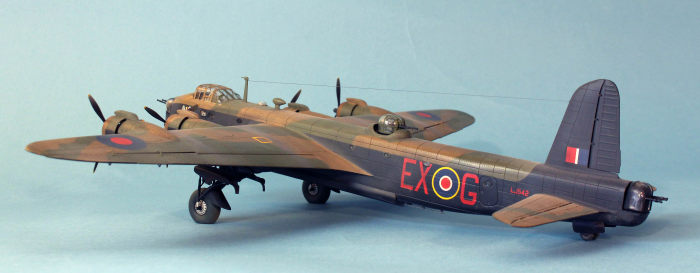 The tires were inserted between the dual struts, using masking tape to
prevent scraping off the paint as they went in place. The rear turret was
installed, and the top turret dropped down without glue into its fairing. The
propellers went on their shafts and the twin pitot tubes attached with a tiny
stiff brass wire pin in each to insure stability and to reduce the possibility
of breakage. The masks over the oval windows were removed and any paint leakage
underneath was removed with a toothpick modified to have a chisel point. They
all have sink marks in them, but the black paint surrounding them and the dark
interior make them a little less objectionable. The final step was to add the
aerial wire, for which I used nylon “invisible” thread and painted a dark gray.
The tires were inserted between the dual struts, using masking tape to
prevent scraping off the paint as they went in place. The rear turret was
installed, and the top turret dropped down without glue into its fairing. The
propellers went on their shafts and the twin pitot tubes attached with a tiny
stiff brass wire pin in each to insure stability and to reduce the possibility
of breakage. The masks over the oval windows were removed and any paint leakage
underneath was removed with a toothpick modified to have a chisel point. They
all have sink marks in them, but the black paint surrounding them and the dark
interior make them a little less objectionable. The final step was to add the
aerial wire, for which I used nylon “invisible” thread and painted a dark gray.
As mentioned above, I knocked each of the eight damn photo-etch aileron hinges off over and over again, so please heed my warning to add them at the very end of the project.
| CONCLUSIONS |
There is something majestic about the Stirling, which I liken to a naval ship of the air. It’s a surprisingly big model even in this scale, and it commands a presence unlike my other RAF bombers. It does have some issues, but accuracy-wise it’s pretty good and most of the issues can be dealt with during the construction process. Even though the aircraft was somewhat of a dud in service, it did lead the way for the vast armadas of heavy bombers that were deployed at night by Bomber Command over occupied France and Germany in the last stages of the war. I’m glad to have this model in my collection and can recommend it to others as an infrequently seen subject that is guaranteed to impress.
Lee Kolosna
12 October 2026 Copyright ModelingMadness.com. All rights reserved. No
reproduction in part or in whole without express permission. If you would like your product reviewed fairly and fairly quickly, please
contact
the editor
or see other details in the
Note to
Contributors.