
Revell 1/72 Halifax B. I/II
| KIT #: | 04394 |
| PRICE: | $10.00 in 2012 |
| DECALS: | Four options |
| REVIEWER: | Christian Dahl |
| NOTES: | Matchbox kit |
| HISTORY |
The Halifax was the 2nd
operational RAF 4 engine bomber, flying its first mission in March 1941, the 1st
operational 4 engine bomber Shorts Stirling first mission was the pervious
February. The Halifax and Stirling joined Bomber Commands stable of twin engine
bombers (Wellington, Hampden, Whitley and Manchester) as it built up to what
would become major campaign against Germany, some would say a front of its own.
Early Halifax operations were in small numbers but built up over time as the
twin engine types were removed from Bomber Command front line service, the last
being the Wellington in mid-1943. The Halifax was built in two major subtypes,
the 1940 Rolls Royce Merlin powered B.I/B.II and the 1943 Bristol Hercules
powered B.III (There were others but were basically subvariants of these two
types). Early Halifax B.I types had a large nose turret which was found to be
mostly useless weight and eventually replaced with the nose seen in this model.
Other changes included increasing the area of the vertical fins. This fuselage
form became definitive in the B.III. As the bombing campaign against Germany
intensified in 1943 the loss rate of the both the early B.II Halifax and
Stirling increased to unsustainable levels. The Lancaster had been fielded by
this time 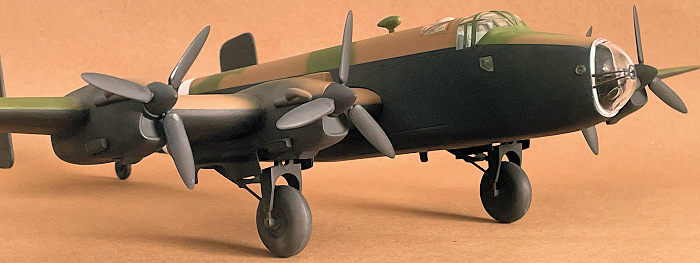 and
was able to carry a larger bomb load at higher altitude than the Merlin Halifax
or Stirling, this combined with the increasing effectiveness of the German
defenses lead to the removal of the Merlin powered Halifax from operations over
Germany in early 1944 (The Stirling had been removed in November 43). The more
powerful Halifax B.III would remain in front line service over Germany to the
end of the war. Useful work was found for the surplus B.II in the support of
special operations, weather reconnaissance, costal command ASW, tactical
bombing, strategic bombing in the MTO and towing airborne assault gliders. To
that end No 644 Squadron was formed in Feb 1944. 644 supported operations
Overlord, Market Garden and Varsity towing gliders, provided night tactical
bombing and SOE operations, especially in Norway. No 644 Squadron may be most
famous for its mention in the 2000 movie Chicken Run (No 644 Squadron Poultry
Division).
and
was able to carry a larger bomb load at higher altitude than the Merlin Halifax
or Stirling, this combined with the increasing effectiveness of the German
defenses lead to the removal of the Merlin powered Halifax from operations over
Germany in early 1944 (The Stirling had been removed in November 43). The more
powerful Halifax B.III would remain in front line service over Germany to the
end of the war. Useful work was found for the surplus B.II in the support of
special operations, weather reconnaissance, costal command ASW, tactical
bombing, strategic bombing in the MTO and towing airborne assault gliders. To
that end No 644 Squadron was formed in Feb 1944. 644 supported operations
Overlord, Market Garden and Varsity towing gliders, provided night tactical
bombing and SOE operations, especially in Norway. No 644 Squadron may be most
famous for its mention in the 2000 movie Chicken Run (No 644 Squadron Poultry
Division).
A couple of things have always amazed me about RAF Bomber Command operations.
First: Single pilot crews on most operations. The workload for a single pilot of a heavy unpressurised multi engine aircraft at night on oxygen in poor weather over many hours is hard to imagine. They did have a basic auto pilot, but the technology of the time would still require constant attention. They were certainly assisted by having a full time navigator and a flight engineer to manage fuel and assist in takeoff and landings but still the effort is extreme. Maintaining focus in the cold and noise of those aircraft had to be exhausting. Finally, the thought of returning to bases in England where the weather can be very poor, finding and making a successful approach to an airfield with the most basic of nav aids and instrumentation makes my heat race. Fire up your favorite flight sim software and try a Non Directional Beacon (NDB) approach to minimum altitude and then imagine doing it after hand flying an heavy airplane by yourself for 8 hours. When I was trained to make NDB approached in the late 1970s, it was clear that it was something to avoid, if possible, even with the nav gear available then. These pilots did it on every mission. It is small wonder that most of these men were in their twenties.
 Second: The
survival rate of crews. The primary reason the Merlin powered Halifax and
Striling bombers were removed service over Germany was the average loss rate per
operation crept above 8% of aircraft that carried on to the target (excluding
early returns for mechanical faults). This made surviving a tour unlikely. But,
putting that aside the chances of surviving being shot down over enemy territory
were also grim. One source quotes the chances of surviving being shot down in
the Halifax at 35% and this is an improvement over the Lancaster at 19% and the
Stirling at 26%. The factors in the difference in survival rate must include
aircraft design, location of escape hatches and crew locations etc. However, the
low survival rate in general can be partially attributed to the conditions of
night operation in heavy multiengine aircraft. Maintaining control of a damaged
heavy multiengine aircraft at night/poor visibility would be very difficult for
even highly experienced pilots, which most were not. Asymmetric thrust/loss of
an engine or distraction by a fire or injured crew member could easily result in
stall/spin that would be very difficult to recover from and could easily pin the
crews in the aircraft. Certainly, very brave men!
Second: The
survival rate of crews. The primary reason the Merlin powered Halifax and
Striling bombers were removed service over Germany was the average loss rate per
operation crept above 8% of aircraft that carried on to the target (excluding
early returns for mechanical faults). This made surviving a tour unlikely. But,
putting that aside the chances of surviving being shot down over enemy territory
were also grim. One source quotes the chances of surviving being shot down in
the Halifax at 35% and this is an improvement over the Lancaster at 19% and the
Stirling at 26%. The factors in the difference in survival rate must include
aircraft design, location of escape hatches and crew locations etc. However, the
low survival rate in general can be partially attributed to the conditions of
night operation in heavy multiengine aircraft. Maintaining control of a damaged
heavy multiengine aircraft at night/poor visibility would be very difficult for
even highly experienced pilots, which most were not. Asymmetric thrust/loss of
an engine or distraction by a fire or injured crew member could easily result in
stall/spin that would be very difficult to recover from and could easily pin the
crews in the aircraft. Certainly, very brave men!
| THE KIT |
This is the1979 vintage Matchbox release was reissued by Revell in 2006. Not a great kit. A mixture of 1970s raised detail on the fuselage and somewhat heavy engraved detail on the wings and tail feathers. The clear parts are thick and don’t fit well. The plastic is soft, and the sprue gates are very heavy. On the upside you get the option to build either the B.I or B.II in all their variations, different turrets, nose and tail configurations (Square or Triangular). I picked this up at my now closed LHS sometime 10 years ago thinking I was buying the much better later release of the Halifax B.I/B.II. In my defense Revell made the boxes very similar.
| CONSTRUCTION |
To start I set some rules for the game with the goal of completing this build over a couple of weeks. The goal was to spend a few hours each day. The rules:
No aftermarket anything, no photo etch, vac canopies, wheels or decals
No new paint, use only what I have on hand
No heroic corrections or add-ons.
One round of old fashion fill and sand
With that I launched into construction starting with the wings. This was completed very quickly with the low parts count. The fit was pretty good. Some light filling around the engines was all that was needed, and it was ready for a coat of Mr. Surfacer 1000. By day 2 of my build timeline that wings were ready to paint.
 The interior
consisted of just a few parts that were quickly secured into one of the fuselage
sides. Next the late version nose was glued to each fuselage side and by day 2
it was ready to get the interior green airbrushed on. That being done the
instrument panel was hand painted black. With the clear windows installed the
fuselage was closed.
The interior
consisted of just a few parts that were quickly secured into one of the fuselage
sides. Next the late version nose was glued to each fuselage side and by day 2
it was ready to get the interior green airbrushed on. That being done the
instrument panel was hand painted black. With the clear windows installed the
fuselage was closed.
So by day 3 I was able to fill the many issues on the fuselage and sand and scribe the raised details lost on Day 4. I hate re-scribing and almost didn’t do it. But one quick pass was acceptable, although I felt I got near violating rule #3. The bomb bay can be posed open but I closed it up. This took some extra time to do. Fit was not great.
Day 5 the tail was attached and cleaned up and the fuselage got the Mr. Surfacer 1000 treatment.
Day 6 was spent attaching, filling, sanding and masking the clear parts. The fit is not great, and I didn’t spend a lot of time on it, see rules #3 and #4. The clear parts are thick and have heavy raised detail that lent themselves to the old fashion method of pressing the masking tape down and cutting out the areas needed with a sharp x-acto blade.
| COLORS & MARKINGS |
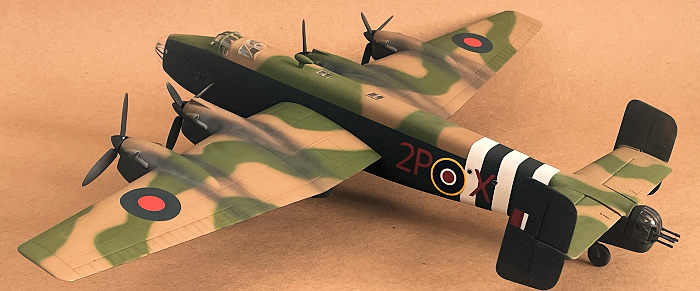
The rest of the building timeline was spent painting the beast. I use AK Real Colors for everything. All colors were mixed with 25ish % grey-white for scale effect. The upper wing national markings and code letters were painted using masks from my silhouette machine (possibly a violation of rule #3 – but I had no decals for the kit). The roundel on the fuselage came from the spares box. The wings were painted black first, then masked off and the camo was free handed by airbrush. The upper wing national markings were masked off and sprayed. The exhaust was free handed on, followed by a matte coat and the wings were done.
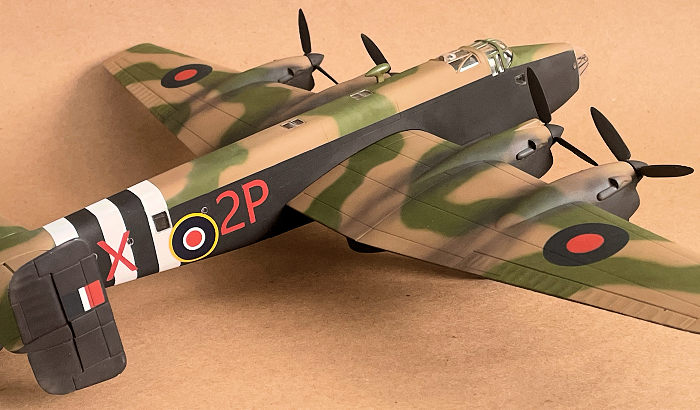
 On to the
fuselage; I painted the red for the code letter and tail flash first and put the
masks on for the duration of the rest of the painting. Next the white areas for
the invasion stripes were painted and masked and the whole thing got painted
black. Next the camo areas were masked off and free handed like the wings. I let
it all dry overnight and pulled markings masks. Cleaned up some errors here and
there with a brush, put on the two side national markings and hit it with the
flat coat. Day 14 was spent putting it all together. Weathering was at a minimum
since I hit my two week limit. Maybe sometime in the future.
On to the
fuselage; I painted the red for the code letter and tail flash first and put the
masks on for the duration of the rest of the painting. Next the white areas for
the invasion stripes were painted and masked and the whole thing got painted
black. Next the camo areas were masked off and free handed like the wings. I let
it all dry overnight and pulled markings masks. Cleaned up some errors here and
there with a brush, put on the two side national markings and hit it with the
flat coat. Day 14 was spent putting it all together. Weathering was at a minimum
since I hit my two week limit. Maybe sometime in the future.
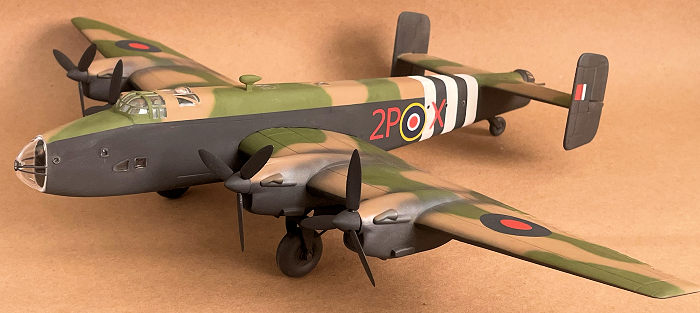
I really wanted to make one of these RAF bombers with the invasion stripes. I have always liked the combination of the dark earth/dark green camo, red code Letters, colorful national markings and the invasion stripes. I did a little online research and 644 squadron came up using those colors, I could delete the hideous kit mid-upper turret as 644s aircraft didn’t have them and the connection to a funny old British movie closed the deal.
| CONCLUSIONS |
So – why did I build this bad old kit when so much better options are out there? The main reason is I had it, and it was cheap (see rule #1 – I tend to go all in and never get done!). But probably most of all, this is what we did when I was a kid. The kits were not great, and you needed to make the best out of it with the tools at hand. Reliving the old days I suppose.
| REFERENCES |
The Bomber Command War Diaries – Martin Middlebrook 1985
21 October 2025
Copyright ModelingMadness.com. All rights reserved. No reproduction in part or in whole without express permission.
If you would like your product reviewed fairly and fairly quickly, please contact the editor or see other details in the Note to Contributors.