Tamiya 1/48 Lancaster
| KIT #: | 6421 |
| PRICE: | CAD$30 |
| DECALS: | Two options |
| REVIEWER: | Pablo Calcaterra |
| NOTES: | Xtradecals 48048 |
| HISTORY |
From Pathfinder to Dambuster….
John Emilius Fauquier was Canada’s most decorated airman and its leading bomber pilot during World War II. He was born in Ottawa in 1909. From young age he demonstrated his skills as a leader when he captained his school’s cricket team and excelled in rugby, hockey, soccer and other sports. Apparently he amassed 42 trophies during his youth.
He joined the Royal Highlanders of Canada in 1929 but two years later he became a stockbroker. Married to a Canadian socialite he raced in fast cars, motorcycles and started flying in Montreal. His passion for the air led him to drop his career in the stock exchange and established a bush pilot airline using two aircraft (a Waco and a Fairchild 51/71). Flying in the rustic Canadian north he found the fun and independence he loved. Living in the bush country helped him to developed skills to overcome problems.
By the time the war started in Europe Fauquier had flown 2,000 (some say 3,000) hours in several type of planes. He joined the RCAF on November 1, 1939. With his experience he became a pilot officer and a BCATP instructor. He was 30 years old. His superiors assessed him as above average excellent instructor. But his mind was set to fight in the war. On July 7, 1941 Fauquier (apparently not going thru the Reception Center) was working at the Central Landing Establishment at Ringway in the UK. After communicating his experience in dealing with cargo in harsh environments he was posted to a Bomber Command OTU in August. He joined 405 Sqn RCAF flying Wellingtons on September 20, 1941. He flew several tough missions over Germany and in February he took part in the RAF efforts to find and sink the escaping Scharnhorst and Gneisenau. His demonstration of skill and leadership during the first few months earned him the command of 405 Sqn as Squadron Leader on February 17, 1942. He became the first Canadian to lead a bomber squadron on operations overseas. His planes were coded “J” although if his plane was not available he would fly missions on borrowed ones.
After a furious and extensive program 405 Sqn converted to Halifax II in April/May 1942. Fauquier now a Wing Commander led his Squadron during the first 1000 Bomber Raid.
 His DFC
came mid 1942 based on his demonstrated “courage…skill, energy and fine
example…”. On August 7th he was rested after completing 35 sorties during those
early tough and difficult months were Bomber Command was starting the grind up
their way in their learning curve.
His DFC
came mid 1942 based on his demonstrated “courage…skill, energy and fine
example…”. On August 7th he was rested after completing 35 sorties during those
early tough and difficult months were Bomber Command was starting the grind up
their way in their learning curve.
Fauquier spent one month in Canada and then was posted to RCAF Overseas HQ. He hated this posting and wanted to go back to his planes. He was appointed Senior Operations Staff Officer to Air Commodore CR Slemon during the formation of the all Canadian 6 Group. The Group started operations on January 1, 1943. Johnny worked there for 7 months and finally he was sent back to 405 Squadron as their Commanding Officer on April 20, 1943.
Returning to his old squadron he found things were not as strict as he liked it. Thus he started to shape up the team in a more formal military way…but his boys “would go to hell and back with Johnny Fauquier”. Being the best Canadian bomber squadron (not in short measure due to Fauquier) 405 Sqn left 6 Group and joined the Pathfinders in 8 Group. They moved to a different base and were called “City of Vancouver Squadron”. They would be the only Canadian Squadron in the Pathfinders.
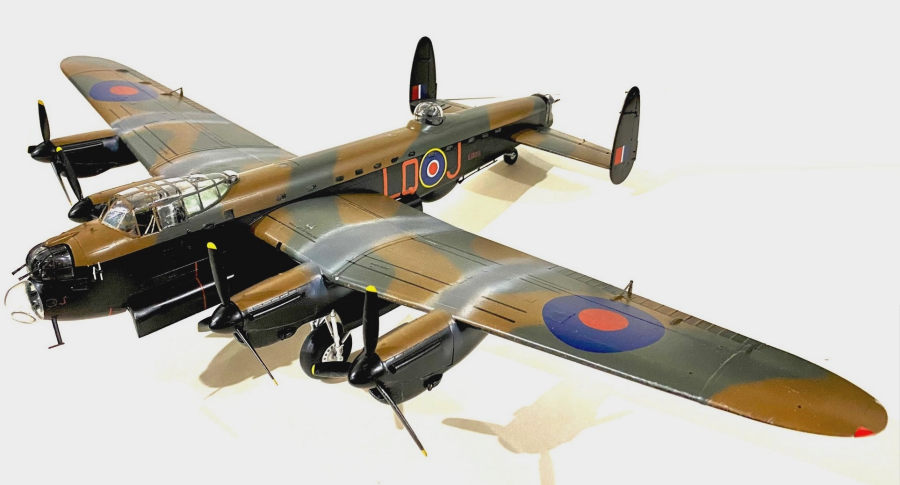
In August 1943 they started to convert to Lancasters III. The first mission flown by Fauquier on the type took place on August 10th when they flew LQ-E to Nuremberg. But on their return the Wingo made a mistake after landing, run the plane on a ditch and totalled it! The very first Lanc on a mission on the squadron, the first mission, and he damaged it beyond repair upon landing!
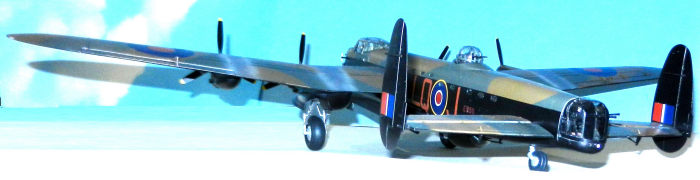
By now a respected member of the Pathfinder force he was Deputy Master Bomber during the Peenemunde raid on August 17, 1943 (Operation Crossbow). This is the subject of my model plane. Helped by the Mr. Dave Birrell of Bomber Command of Canada and my internet research (see references below) I have concluded that there are high chances that “J” on this raid was ED911 (a plane of the same lot as the Dambusters of the raid on the damns). I have just realized as I type these words that by a great coincidence I finished assembling my Lancaster on August 19, 2023…2 days after the 80th anniversary of the raid!!! The target was so well illuminated and the bombing so effective that Fauquier, orbiting the target for almost an hour, decided it was not needed to add his markers to those already leading the bomber force. As a consequence he returned with his 6 TIs (2 x red, 2 x green, 2 x yellow) to 405’s home base. There were lots of German night fighters in the area and 6.7% of the bombing force was lost (for the Canadian squadrons the rate was 19.3%! – but only one of those was from 405)
Another important event was the first raid during the Battle of Berlin. It took place on the night of August 23/24 and Fauquier was the Master Bomber during this opening raid of 727 planes.
On September 1, 1943 Johnny was awarded the DSO. “…a first class leader…skilful and courageous…displayed boundless energy…” On September 20 he was promoted to Group Captain. He was now 34 years old and had the same stamina as the one of any of his much younger airmen.
Having flown at least 38 more sorties Fauquier was rested on January 22, 1944. Wing Commander Lane took over and he recalled, many years later and being a Lt. General, that “Fauquier…was tough as nails…he had no fear…a tough commander…who would not stand for any shortcomings in his crews…a fine man…couldn’t even spell the word fear”. He was known as the “King of the Pathfinders”.
 On March
19, 1944 Fauquier was awarded a bar to his DSO. He was now an Air Commodore and
was appointed 6 Group’s Senior Operations Staff Officer. In June he took over 62
“Beaver” Operational Base. It is quite possible that he flew (unauthorized) in
Ops during this time. He was in charge of six RCAF bomber squadrons (408, 415,
420, 425, 426 and 432). After almost 4 months he returned to 6 Group as the
Senior Air Staff Officer. He was instrumental in the improvement of the bombing
accuracy…and if a crew did not achieve his set standard of 280 yards or less of
error…they would be send back to be trained again.
On March
19, 1944 Fauquier was awarded a bar to his DSO. He was now an Air Commodore and
was appointed 6 Group’s Senior Operations Staff Officer. In June he took over 62
“Beaver” Operational Base. It is quite possible that he flew (unauthorized) in
Ops during this time. He was in charge of six RCAF bomber squadrons (408, 415,
420, 425, 426 and 432). After almost 4 months he returned to 6 Group as the
Senior Air Staff Officer. He was instrumental in the improvement of the bombing
accuracy…and if a crew did not achieve his set standard of 280 yards or less of
error…they would be send back to be trained again.
But Johnny wanted to fly and fight. And to do this he accepted reversing his rank to Group Captain and as such he took command of the famous Dambusters on December 27, 1944 replacing G/C Willie Tait.
The excellent SABS bombsight and the Tallboys were introduced during his tenure as leader of the famous 617 Sqn. He led his men flying a Mosquito on occasion. Then Grand Slams started arriving in March 1945. He was supposed to lead the mission where the first one was going to be dropped on the Bielefeld Viaduct but his plane developed an oil leak on the SABS. Sqn Ldr Calder saw Fauquier running towards him (to tell him to get out of the plane so Johnny could lead from Calder’s)…and to Fauquier’s consternation the later took off and had the honour of dropping the first Grand Slam.
Having lead the Dambusters 20 times his last mission of the war (officially 93rd) was flown on April 19, 1945. On June 1 1945 Fauquier was issued a second bar to his DSO. He was back at HQ RCAF. He retired on December 4, 1945. He was awarded the Chevalier of the Legion of Honor and the Croix de Guerre avec Palm by the French Government.
After running some businesses with varied success and having settled in Toronto he passed away on April 4 1981. He is buried at the Ottawa’s Beechwood Cemetery (which is the National Military Cemetery of Canada).
| THE KIT |
This is the original version of the kit, molded in black, flat bombardier blister and paddle propellers. Being the Dambuster/Grand Slam version it does not have the bomb bay nor the bombs. There are several reviews of the kit (both the original and the new release and much improved) in different articles in MM.
| CONSTRUCTION |
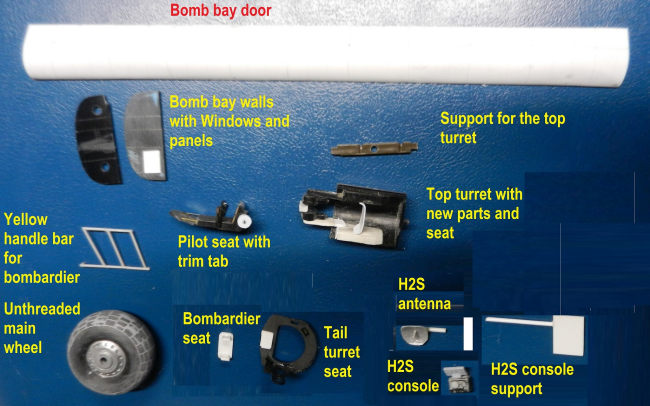
I gave CAD30 to the place where it had originally been donated assembled as a Grand Slam plane. It had been brush painted and the colours were quite off. The two side panels in the canopy were misplaced (glued like if they opened swinging upwards) or were missing. The kit was assembled with the nose turret (but it should not have as it was the Grand Slam version). Luckily I had kept all the parts for the dorsal turret when I built my own Dambuster almost 30 years ago...The only thing I had to do was to scratchbuild the bomb bay, her doors and the bombs plus coming up with new decals for the plane flown by Fauquier during the Crossbow (Peenemunde) raid.
What really made my project much easier was the fact that the previous owner had painted the parts and then glued them. This means that the kit fell apart quite easily as the glue had been placed on top of the paint. The only things that I could not remove were the horizontal tail planes and the engine housings. After plying open the fuselage halves I found that the interlocking wing mechanism had been firmly and properly glued together. Thus to take the wings out I was forced to cut the center of the interlock using a fine saw. With this accomplished the wings came off the fuselage halves.
I sprayed oven cleaner all over the now disassembled kit and with a brush with plastic bristles I removed practically all the paint with some of if remaining in the very thin and hard to reach areas here and there. The clear parts had been painted with some sort of soluble paint and this came off under the tap. No need to use bleach or other agents to remove the original paint.
 The first
part was to design the bomb bay. I had also kept among my spares the under
fuselage for the Grand Slam version. Between this and the one from the one I was
working on I was able to get 2 flat areas (removing the curved unions to the
front and back of the fuselage) that were long enough to create the bomb bay.
Using scale plans on line I created the frames on the roof of the bomb bay using
thin flat strips of Evergreen. It was not perfect, it was tedious and I should
have used a different strategy to cut and align them. But painted black and
under the plane with the TIs in place my less than perfect alignment would be
invisible. Using the original cockpit floor I marked and drilled small indents
to attach the different stations (radio, navigator) and seats on the top side of
the bomb bay roof.
The first
part was to design the bomb bay. I had also kept among my spares the under
fuselage for the Grand Slam version. Between this and the one from the one I was
working on I was able to get 2 flat areas (removing the curved unions to the
front and back of the fuselage) that were long enough to create the bomb bay.
Using scale plans on line I created the frames on the roof of the bomb bay using
thin flat strips of Evergreen. It was not perfect, it was tedious and I should
have used a different strategy to cut and align them. But painted black and
under the plane with the TIs in place my less than perfect alignment would be
invisible. Using the original cockpit floor I marked and drilled small indents
to attach the different stations (radio, navigator) and seats on the top side of
the bomb bay roof.
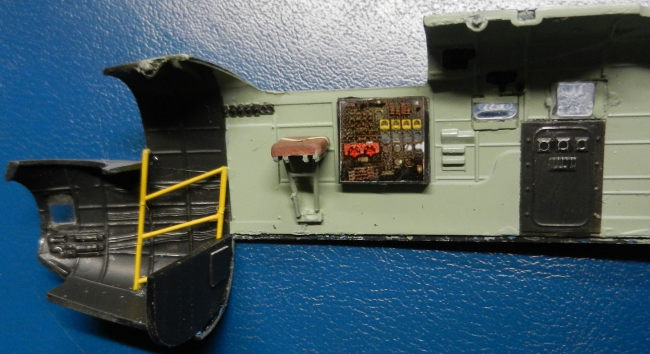
As I wanted to improve the kit taking into account the massive greenhouse canopy I scratchbuilt the trim tab and the by the pilot seat, the H2S support and console (using some instrument panels from the spares that had pretty similar dial faces), the bombardier seat, the antenna for the H2S (using the beule from a 109 G-6 and shaping it a bit). The yellow hand rail in the bombardier station was made using antennas left over from my Huey in 1/48. They were unbelievable perfect in size and length.
My original dorsal turret had lost some parts (B59 and B60) and then I copied them using plaster of Paris and 2 part plumbers putty. Seats were made for the dorsal and tail turrets. The gun barrels from my original dorsal turret were gone but I had 2 x 303 resin ones left from my Classic Airframes Blenheim (I believe it was….). I also made the two boxes for the ammo under the nose turret (B49 and B50). The support for the turret was gone from my spares ages ago. I found a flat thick and long enough part in my spares, trimmed it carefully to fit in the attaching points inside the fuselage and drilled a hole dead in the center. This was the support of the top turret (B57)
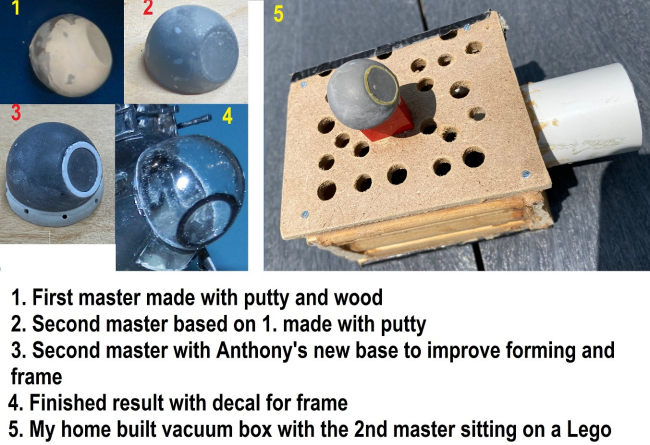 I thought
about purchasing the Falcon set for the bulged bombardier blister but at more
than CAD30 delivered to my house and to just use one piece I decided to do it
myself. I took the flat one, made a copy with Plaster of Paris and plumber’s
putty. To this copy I attached wooden shims and sanded them to deliver the extra
surface area and the proper profile. I used some putty and sand paper to smooth
it. When happy with the new one I repeated the process with plaster of Paris and
plumbers’ putty and made a brand new finished master that I had to sand (reduce
the size) to ensure that it was a fraction of a mm smaller than the fuselage. I
tried to make copies of the blister using the Squadron clear sheets but the
blister is quite deep and would not conform at the base of the master. I tried
with several packaging materials. Closer but not enough. I built my own vacuum
box in wood. Even better…but not quite yet. I believe I tried more than 10 times
with different materials in 3 different sessions. None was good enough. So
finally I asked the Secretary of the IMPS London, ON (Geoff Hyland) and he
referred me to Anthony Goodman who does magic with his dental vacuum machine. He
perfected my master by adding some vacuum channels at the base and gave me a
very good (much better than mine) thick walled and firm blister that perfectly
fits the nose. He had even added the round frame! Anthony you rock!
I thought
about purchasing the Falcon set for the bulged bombardier blister but at more
than CAD30 delivered to my house and to just use one piece I decided to do it
myself. I took the flat one, made a copy with Plaster of Paris and plumber’s
putty. To this copy I attached wooden shims and sanded them to deliver the extra
surface area and the proper profile. I used some putty and sand paper to smooth
it. When happy with the new one I repeated the process with plaster of Paris and
plumbers’ putty and made a brand new finished master that I had to sand (reduce
the size) to ensure that it was a fraction of a mm smaller than the fuselage. I
tried to make copies of the blister using the Squadron clear sheets but the
blister is quite deep and would not conform at the base of the master. I tried
with several packaging materials. Closer but not enough. I built my own vacuum
box in wood. Even better…but not quite yet. I believe I tried more than 10 times
with different materials in 3 different sessions. None was good enough. So
finally I asked the Secretary of the IMPS London, ON (Geoff Hyland) and he
referred me to Anthony Goodman who does magic with his dental vacuum machine. He
perfected my master by adding some vacuum channels at the base and gave me a
very good (much better than mine) thick walled and firm blister that perfectly
fits the nose. He had even added the round frame! Anthony you rock!
Talking about windows…some of them had been damaged with glue by the previous owner so I had to use different grits of sandpaper to eliminate the blobs. I had myself done the same mistake on my top turret clear parts. I was able to disassemble my previous disaster and tried as hard as I could to remove the excess of dried glue. Regretfully the clear plastic was burnt quite deep in some areas and you can notice some foggy spots here and there. Oh well…As one of the side blisters for the canopy was gone and I didn’t have one in my spares box I took the remaining one, made a master with my usual method and then made 2 copies using Squadron’s clear sheets.
The bomb bay doors were made by manufacturing another master: using some wood blocks, 90 degree finishing profile that (by chance!) matched perfectly the curvature of the fuselage With a heat gun I softened the plastic sheet, bent it and had 2 almost perfect doors (one ended up being a bit wavy and was a nightmare to stretch and glue in place). I engraved the panels and with the riveting wheel added the rivets. With thinner white plastic I closed the profile (front and back of the doors). The internal structure was created by cutting along a plastic straw, bending it outwards and creating a ridge (like a UU profile). This was glued inside the doors and putty covered the small step created by the thickness of the straw.
I drilled the two windows on the back wall of the bomb bay. Another one was drilled under the nose of the photo flash camera. The drill was also used to give depth to the inspection window of the dinghy on the wing.
 With all
the parts now created I was able to start painting the interior: RAF interior
green for the cockpit and fuselage (as far as I have found on line black was
used for the cockpit around the time ED911 was built…so this plane could have
had it either interior green or black…for the sake of making things more visible
I went with the first). The faces of the radio, engineer, pilot panel were made
printing pictures I found of the actual instruments on decal paper.
With all
the parts now created I was able to start painting the interior: RAF interior
green for the cockpit and fuselage (as far as I have found on line black was
used for the cockpit around the time ED911 was built…so this plane could have
had it either interior green or black…for the sake of making things more visible
I went with the first). The faces of the radio, engineer, pilot panel were made
printing pictures I found of the actual instruments on decal paper.
Seat belts were made with Tamiya masking tape strips except for the one for the pilot that came from the Hannant’s own photoetched RAF seat belts. Using tiny strips of photoetched from the spares I added the 2 supports for the pilot head armour.
Contrary to the Tamiya instructions I decided to glue the engineer seat (B17) folded down. At this I realized it is too long (checked pictures) and cut the length in half. Wiring and details inside the fuselage were highlighted drybrushing aluminum paint.
After a couple of months it was time to close the fuselage halves. I had to spend some sessions adding putty and sanding it along the fuselage seams and the bomb bay. Then I drilled a hole for the H2S antenna and the 3 coloured lights under the fuselage in the H2S dome area.
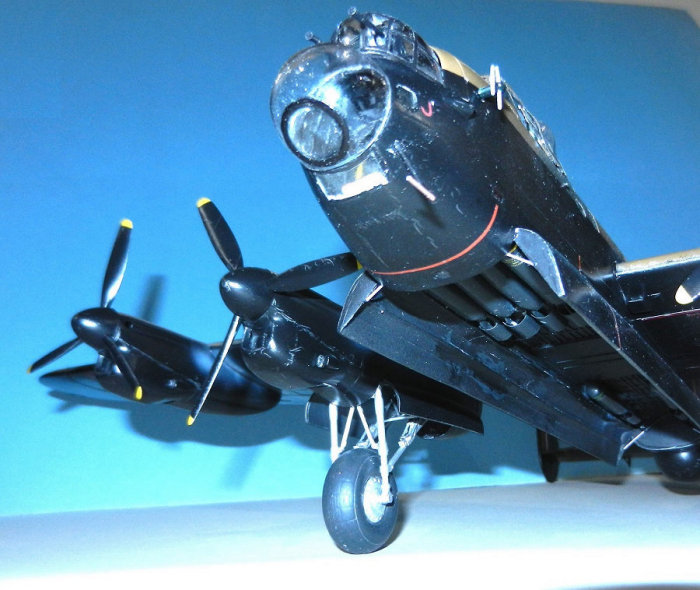
Engine nacelles had to receive putty as well. I eliminated the engines the previous owner had put together and closed the engine covers. I had not been able to detach the main landing gear but had success with the main wheels. As we all know the fit of the original kit parts is quite bad. One of the small intakes on the sides of the engines was missing so I had to make a new copy. In this case as it was a tiny part I made an ident on blue tac using one of the original parts and then that indent was filled with 2 part epoxy. A little of sanding shaped the new part.
With the wings ready I added them to the fuselage. As I had cut out the center of the interlocking system I added some thick white plastic sheet to reinforce the union of the damaged interlock. Then I was able to add the bomb bay with all the seats and instrument panels attached. Some putty and sandpaper made a decent transition to the fuselage. Finally I added the 2 vertical tail surfaces and the tail wheel. As expected I had to rescribe panel lines and rivets that were erased during the sanding process.
I masked most of the large open areas using foam and the fuselage windows with Micro Mask. It is quite a good product which I don’t believe it will dry up as Maskol does.
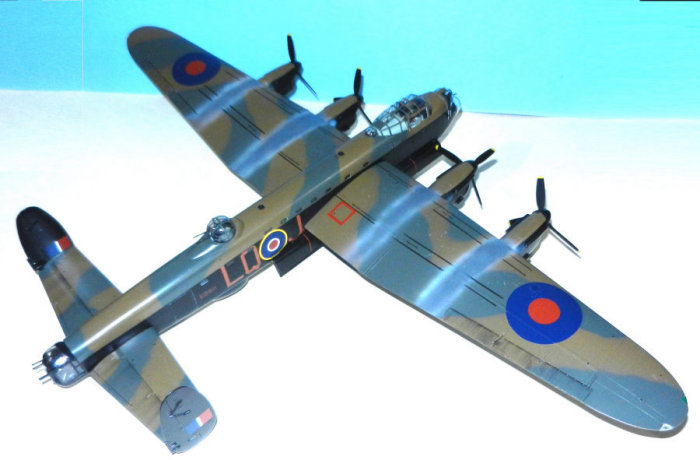
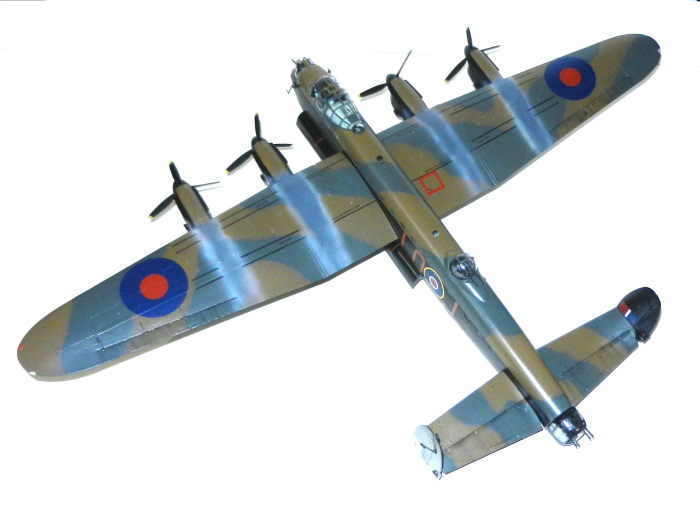
| COLORS & MARKINGS |
The top surfaces were primed with Vallejo Light Grey and the undersides with Vallejo German Dark Grey. I immediately painted in white the areas for the insignias (fuselage and tail). RAF red was sprayed in the areas where the long stencils are located under the plane. Then I cut long thin strips of masking tape and placed them on these red areas.
Making my own masks I successively painted the roundels on the wings, fuselage and the flash on the tail. When these sessions were over I totally masked out the insignias and I applied the cammo using ModelMaster RAF Dark Earth and Dark Green. I glued the H2S antenna, her dome (with the ID lights painted over a silver background). Undersides were painted with Vallejo black (except for the bomb bay that was left in the dark German grey to add some contrast). I painted black the walls of the hole of the inspection window for the dinghy on the wing with a very fine tip of a toothpick the dinghy itself in yellow.
As this plane had seen action for 3 months (which was extraordinary for a Lancaster in 1943) I made paint chips all over the plane using a silver pencil. Because of the age of ED911 very significant exhaust stains were added with white (under the wings), light and dark grey (top surfaces).
 Navigation
lights on wingtips were painted with ModelMaster Clear Red and Green. The one on
the tail under the turret was painted white. Four layers of Future prepared the
plane for the few decals I had to add.
Navigation
lights on wingtips were painted with ModelMaster Clear Red and Green. The one on
the tail under the turret was painted white. Four layers of Future prepared the
plane for the few decals I had to add.
To put a long story short I spent several weeks going thru the records of 405 Sqn, others on line per references. I wanted to build one of the Lancs flown by Fauquier. Problem was there are several “J” but there are few records of the serial number for those “J”s in 405 service between August 43 (Lancs incorporated) and January 44 (Fauquier departing from 405). Most of the “J”’s are from after he left 405. I was finally able to match 2 or 3 planes present in 405 at the time he served that were coded “J”. With total confidence I was able to find the serial number for the Lancaster he flew in his last mission with his Squadron mid-January. This one was shot down at the end of the month with the loss of the entire crew (ND462). It carried 1x 4000 cookie, 3 x 1,000 bombs and some TIs. It was great from the historical certainty…but not as iconic as the Crossbow one. Going thru the lists, matching records and discarding planes due to dates and losses I landed on ED911, one of the 3 earliest Lancs in record in 405 and that is the only one of those 3 with no known individual letter. It was inherited from 83 Sqn and was destroyed shortly after August in an accident. There was no known serial number for a “J” in service in 405 in August 43…so this has to mean that ED911(the only one with no known letter at the time) has to be “J”
Large letters are from Xtradecals RAF red codes. ED911 was created using red fonts and letters from a decal set I had used for my 305 (Polish) Sqn. I had to do some magic with it to deliver “ED911”. Same set was used for the small “J” on the nose.
Stencils were printed using clear decal paper after typing the texts using PowerPoint. These included several round black dots on wings and tail planes. For the red stencils I printed the text on white decal paper with a black edge. Once applied I had to use a bit of black paint to hide the white edge of the decal paper. The black marking lines on the wings were also printed in clear decal paper.
| FINAL CONSTRUCTION |
A mix of ModelMaster semi-gloss and matt clear sealed all the surfaces. The quite difficult attachment of the slightly bent bomb bay door took 3 tries using Tamiya liquid glue, instant glue, gel glue…and the help of my wife (I needed 2 hands to keep in place and my wife brushing the Tamiya glue…). Finally in frustration I tried to bend the door to shape and it cracked along one of my engraved panel lines. It was a hair thin crack but it allowed me to straighten it and gluing it was now very easy. I covered the crack with Klear and sprayed black paint once it had dried. The actuating arms were made with small Evergreen rods and thin resin antennas from the spares.
Added the main wheels (I had puttied and sanded the thread trying to achieve the non-threaded version…or a worn out threaded one). Then the landing gear doors followed.
The long antenna under the fuselage had been badly damaged during transportation so I had to re do it. The oval front came from the nose of a missile reshaped and the supports and thin long portions came from different parts from my spares.
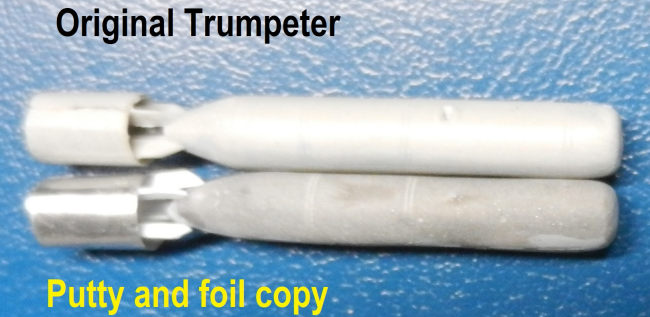 The TIs
were made taking 2 bombs from the Trumpeter Wellington that matched dimensions
per the USAF manual on British armament from 1952 that I was passed by one of MM
forum members (289P51). As I needed 6 I made 4 copies with Plaster of Paris, 2
part epoxy and aluminum foil tails. These were painted very dark grey and all
the stencils (per the reference) were made using white decal paper. See
references for TIs details. The indicators were glued in the bomb bay with cyano.
The TIs
were made taking 2 bombs from the Trumpeter Wellington that matched dimensions
per the USAF manual on British armament from 1952 that I was passed by one of MM
forum members (289P51). As I needed 6 I made 4 copies with Plaster of Paris, 2
part epoxy and aluminum foil tails. These were painted very dark grey and all
the stencils (per the reference) were made using white decal paper. See
references for TIs details. The indicators were glued in the bomb bay with cyano.
Windows in the bomb bay and the camera under the nose were made with Klear (also used to fill the hole of the inspection window for the Dinghy and the 3 communication lights under the fuselage). Several actuators and balances were attached. With the undersides ready I flipped the plane on her legs.
Using aluminum foil from an Argentinian alfajor (Havana!) I made the folded curtain for the table of the navigator. I painted it dark blue and even made the loop that attaches is to the wall. The H2S console was added in place ensuring the top pole matched the frame of the canopy.
The compass and clock above the instrument panel was made with a thin piece of plastic, bent in almost a Z shape, painted black and with the instrument faces made with decal paper onto which I had printed pictures of those.
 I cut open
one of my heat formed blisters for the canopy to glue it in the open positon (to
see some of the hard work I had put in the cockpit). To give them depth and
represent the frame of these panels I used very tiny strips of evergreen strips
painted in black. The canopy was finally attached with the pilot’s window open.
I had to scratchbuild the 2 windshield sprayers.
I cut open
one of my heat formed blisters for the canopy to glue it in the open positon (to
see some of the hard work I had put in the cockpit). To give them depth and
represent the frame of these panels I used very tiny strips of evergreen strips
painted in black. The canopy was finally attached with the pilot’s window open.
I had to scratchbuild the 2 windshield sprayers.
I added a scratchbuilt bomb sight made of several parts. Anthony’s bombardier blister was glued with Klear and a couple of tiny drops of plastic glue for reinforcement. I had tried to paint the round frame but finally I printed a perfectly sized black circle in clear paper and with a compass with a knife tip I removed the clear portion of the decal. Fit like a glove!
The 8 tiny transparent screens were painted silver with black frames and glued in place. Tail and top turret were attached. The nose turret and fairing were glued and the last 2 details were the 2 antennas on each side under the canopy and the scratch built pitot tube.
| CONCLUSIONS |
For months of work but I really like the end result especially taking into account with what the project started and how it ended. The Tamiya kit could be superseded by the new HK one…but still delivers a great model.
Special thanks to Dave Birrell and Anthony Goodman. Without your help this project would have never succeeded.
| REFERENCES |
Johnny, by Dave Birrell
https://www.bombercommandmuseum.ca/
https://www.bombercommandmuseum.ca/
ORB 540 and 541 for 405 Sqn
4 September 2023
Copyright ModelingMadness.com. All rights reserved. No reproduction in part or in whole without express permission.
If you would like your product reviewed fairly and fairly quickly, please contact the editor or see other details in the Note to Contributors.