
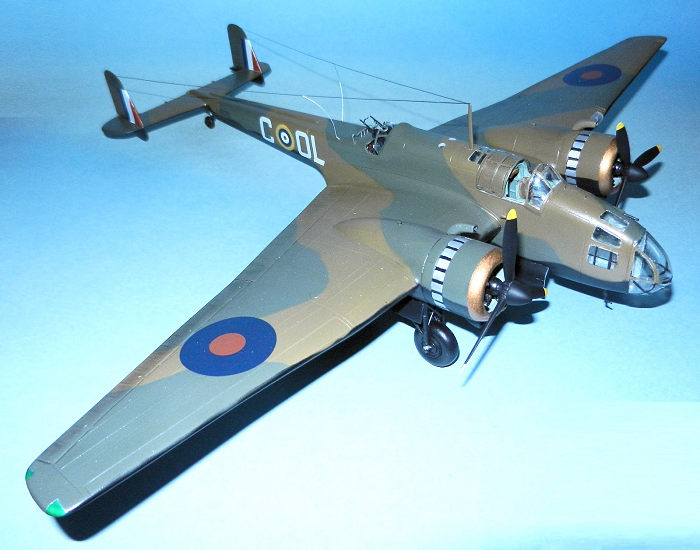
F.M. 1/48 Hampden
| KIT #: | 6056 |
| PRICE: | $ |
| DECALS: | |
| REVIEWER: | Pablo Calcaterra |
| NOTES: | The most challenging kit I have ever or will ever build. Kits at War decals |
| HISTORY |
When Pierre-Andre Boillat’s excellent review of the kit came out I had just purchased the same kit and decals to build the same plane for MM…By then the kit had been OOP for some years and I managed to get the last one I have ever been able to find on line (2013). I paid for it accordingly…or should I say dearly?
For a comprehensive history on Guy Gibson please read Mr. Cleaver’s excellent write up.
My “personal” connection to Gibson started when I was 13 or so when I purchased his book in Argentina. The name of the Argentine edition can be translated as Enemy Coast (they left out Ahead). It was a very simple edition with no pictures nor background or references to put the book in context. Anyways I got hooked to the life of the immortal Gibson. This was followed by The Dambusters by Paul Brickhill which had some pictures to illustrate the stories. This is all before the Internet era.
Fast forward several years and after building Tamiya’s
Dambuster I purchased a bio on Gibson written by S. Ottaway (not a good read).
Having lost my original book I purchased a 1955 Argentine edition called
 “Towards the Enemy Coast” (again a weak translation of the title…). A much
better version of Enemy Coast Ahead was purchased in the early 2000s (Bridge
Books edition) and finally the Uncensored version by Crecy later on. These books
were supplemented by at least other 5 books on the Dambusters including the one
by Jonathan Falconier with great colour pictures and finally the excellent
Osprey’s Raid 16 by Doug Dildy (with excellent drawings and analysis)
“Towards the Enemy Coast” (again a weak translation of the title…). A much
better version of Enemy Coast Ahead was purchased in the early 2000s (Bridge
Books edition) and finally the Uncensored version by Crecy later on. These books
were supplemented by at least other 5 books on the Dambusters including the one
by Jonathan Falconier with great colour pictures and finally the excellent
Osprey’s Raid 16 by Doug Dildy (with excellent drawings and analysis)
What really made me admire Gibson’s and his fellow Bomber Command pilots was how they fought with the tools they had for night bombing in the first couple of years of the war. How they were lost one by one until Gibson was the only one left from the original 83 Squadron with all his friend killed or becoming POWs. And still he kept on pushing forward accumulating the impressive number of 173 missions before the Dambusters raid. I would dare to say that in those 2 first years the Luftwaffe was more advanced in target finding than the RAF (i.e. the Night Blitz compared to the attacks of Bomber Command on Berlin where maybe a couple of bombs fell in the vicinity of the town…)
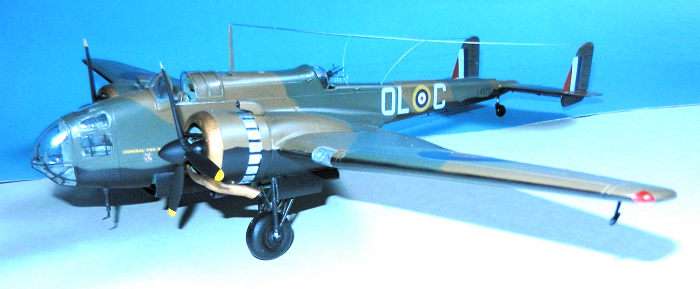
Admiral Foo Bang, his plane in 83 Sqn was transferred to 14 OTU, then 16 OTU and back to 14 OTU. It was destroyed on June 3rd 1943 when it overshoot landing and stalled at Gosport during a training flight being part of 1403 Flt with Sgt W Courtney Cox killed and one other injured .
| THE KIT |
 After the Sanger kit FM’s is the only kit in town in
1/48 scale. It is a multimedia one with excellent resin parts, very decent metal
ones (but a little bit too easy to bend and some flash), plastic main components
full of flash and thick connections to the trees (typical limited run) and other
issues (continue reading below…) and vacuum formed clear parts that are quite
opaque (my kit had one of the two copies of the nose blister seriously
wrinkled/crushed and the second one was in decent shape but not perfect either).
It is clear from the get go that the kit was going to be a huge challenge but
being the “only” one available then it was a matter of taking it or leaving it.
Bring it on I said!
After the Sanger kit FM’s is the only kit in town in
1/48 scale. It is a multimedia one with excellent resin parts, very decent metal
ones (but a little bit too easy to bend and some flash), plastic main components
full of flash and thick connections to the trees (typical limited run) and other
issues (continue reading below…) and vacuum formed clear parts that are quite
opaque (my kit had one of the two copies of the nose blister seriously
wrinkled/crushed and the second one was in decent shape but not perfect either).
It is clear from the get go that the kit was going to be a huge challenge but
being the “only” one available then it was a matter of taking it or leaving it.
Bring it on I said!
Decals seem to be pretty good but the red for the roundels and letters is too bright for sure. Having acquired the excellent Kit’s at World one the FM ones were sent to the spares binder.
| CONSTRUCTION |
First and foremost I started by removing all the flash present in the kit. This means that most of the windows openings had to be opened!. Once this was accomplished I matched the fuselage halves and the openings on top and bottom don’t match entirely. Some work in this area had to be tackled in the future.
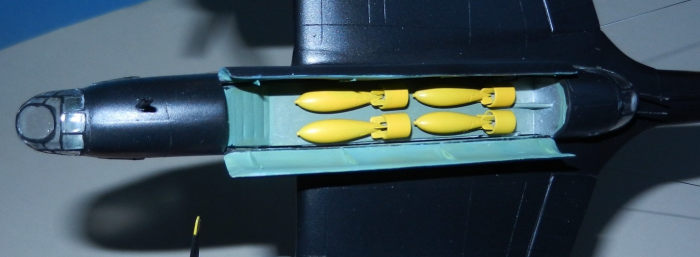
After reading some reviews on line I tried to thin out the wings as much as possible because their root is considerably thicker than the fuselage’s portion. For a change (compared to other kits reviewed on line) I decided to build mine with the bomb bay doors opened and use some of the Trumpeter 250 lb bombs. So the bomb bay doors were cut out and the edge of these thinned out as much as I dared.
All the main parts were lightly sanded to remove the grainy texture of the soft plastic and then washed in mild soap. The two round windows on top of the middle of the fuselage are missing so I drilled them out and filled them with pieces of clear plastic that was then sanded smooth with the surface.
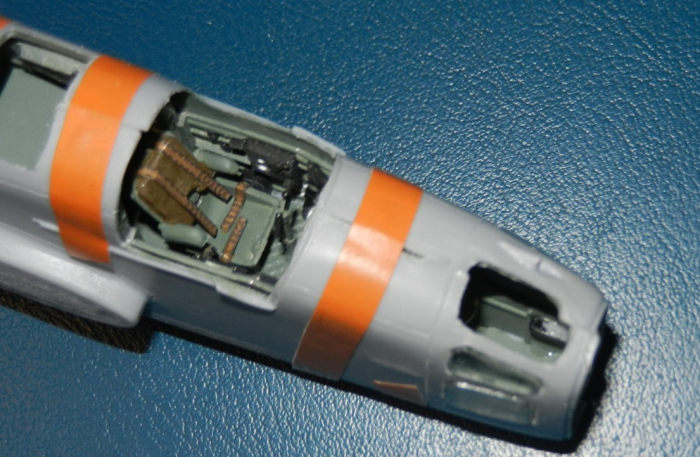
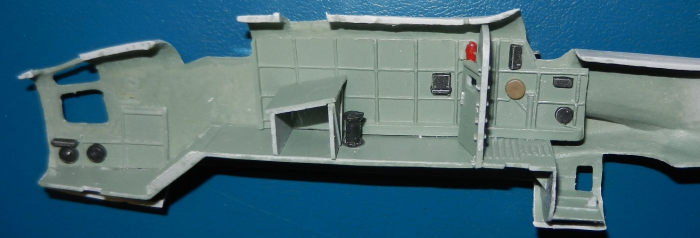 For the interior I started with a coat of MM Interior
Green (RAF). Everything fits so tight that the gap under the pilot’s position
that leads to the front of the fuselage is missing. I had to cut the rear
bulkead for the pilot and trim the sides of his floor in order to be able to
push it up and thus create a bit of a gap but not as tall as it should have
been. I used some photoetched seat belts and managed to glue the right hand side
wall with a lot of effort (it is quite top heavy and kept on falling even though
I was using Crazy Glue).
For the interior I started with a coat of MM Interior
Green (RAF). Everything fits so tight that the gap under the pilot’s position
that leads to the front of the fuselage is missing. I had to cut the rear
bulkead for the pilot and trim the sides of his floor in order to be able to
push it up and thus create a bit of a gap but not as tall as it should have
been. I used some photoetched seat belts and managed to glue the right hand side
wall with a lot of effort (it is quite top heavy and kept on falling even though
I was using Crazy Glue).
Machine gun pans were glued in place. There is a metal seat for the radio operator/gunner but it is also molded folded onto the fuselage wall. I decided not to use the metal one and paint the molded one. The toilet was glued in place, a piece of thin clear plastic covered the opening in the window on the door behind the top gunner and I scratchbuilt his radio and glued it behind his position towards the tail. On top of the wing spar I put a scratchbuilt cushion just below the observation window.
The fuselage side windows were improved with Future and glued in place. In hindsight I should have built a support underneath the lips of the fuselage contact surfaces in order to ensure the windows were flush with the surface of the fuselage. In my case they stick out a bit…probably 1 mm.
 With all the interior parts glued to the right
hand-side fuselage I presented the left side pilot consoles and glued the
fuselage halves. I had to use tape to keep it closed and a considerable amount
of plastic glue. The problem with the alignment of the openings for the windows
on top and bottom of fuselage was quite evident. With the glue dry a massive
number of putty sessions removed the imperfections around the fuselage joint.
With all the interior parts glued to the right
hand-side fuselage I presented the left side pilot consoles and glued the
fuselage halves. I had to use tape to keep it closed and a considerable amount
of plastic glue. The problem with the alignment of the openings for the windows
on top and bottom of fuselage was quite evident. With the glue dry a massive
number of putty sessions removed the imperfections around the fuselage joint.
I scratchbuilt the navigator table and glued it in place. The rest of the windows were attached and a lot of time was consumed adding putty and carefully sanding it to remove the gaps between them and the openings. I cut open the pilot’s canopy and the bottom turret one. The clear parts were then masked.
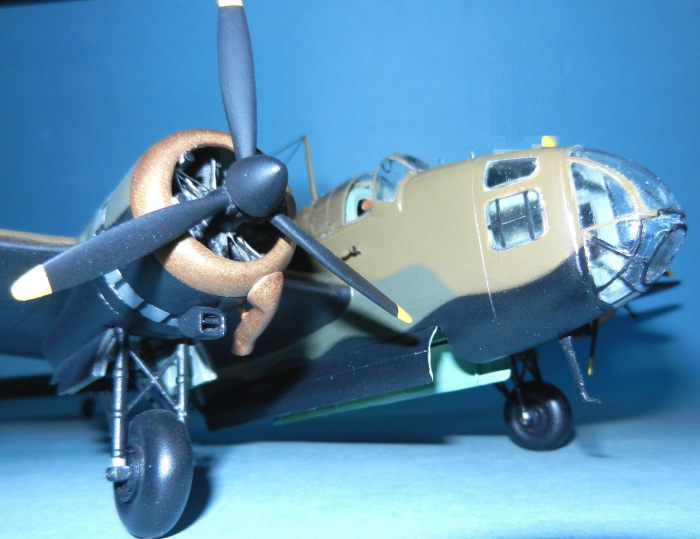
Engine cowlings were not that hard to put together with the very nicely cast resin engines though the support behind the engines had to be trimmed to ensure the front of the engine was almost flush with the collector ring.
Before I could attach the wings I had to do a couple
of things: first create the landing lights with 2 pieces of plastic (each being
half a ball of plastic painted in Silver) and place their cover with some putty
to cover the g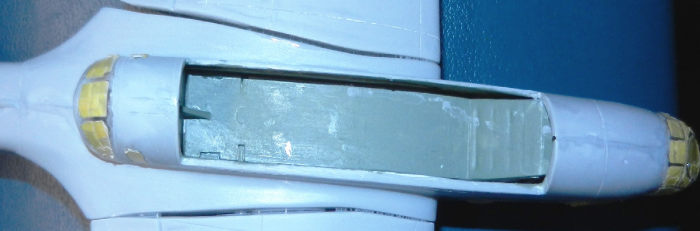 aps. And then I moved to the landing gear. This one is made up of
several plastic and white metal parts but lacks alignment points inside the
engine nacelles which means that the positioning is quite tricky. With the
landing gear in place I was able to attach the top wing halves and sand and
putty the joints. When the wings were ready I presented them to the fuselage
using a jig to try to ensure that the landing gear was perpendicular to the
floor and minimizing as much as I could the gaps created on the top of the
wing/fuselage union. This was really not perfectly achieved and gaps of roughly
2 (top) to 3 mm (bottom) were left between wings and fuselage. Once the glue had
dried I inserted plasticard of different thicknesses and length to try to cover
these trenches. At this point I got fed up with the kit and left it in the
box for more than one year (like many other builders that tackled the kit before
me).
aps. And then I moved to the landing gear. This one is made up of
several plastic and white metal parts but lacks alignment points inside the
engine nacelles which means that the positioning is quite tricky. With the
landing gear in place I was able to attach the top wing halves and sand and
putty the joints. When the wings were ready I presented them to the fuselage
using a jig to try to ensure that the landing gear was perpendicular to the
floor and minimizing as much as I could the gaps created on the top of the
wing/fuselage union. This was really not perfectly achieved and gaps of roughly
2 (top) to 3 mm (bottom) were left between wings and fuselage. Once the glue had
dried I inserted plasticard of different thicknesses and length to try to cover
these trenches. At this point I got fed up with the kit and left it in the
box for more than one year (like many other builders that tackled the kit before
me).
Finally, having finished my 2 RAF Harriers I decided to finish this expensive and complicated model.
First I sanded the excess of plasticard from the wing roots. Then massive amounts of putty were used to improve the union and this was followed by rescribing the panel lines.
I moved to the tail planes. Another nightmare. The
attaching points are too shallow and the pins are too wide. So the first were
drilled and the second thinned out with a Xcto knife. The hinges on the fixed
 moveable horizontal surfaces did not align with the moveable ones. So I cut out
the fixed ones and made new ones with plasticard ensuring the angle was right as
the moveable surface was presented in a dropped position. This meant that gaps
between fuselage and horizontal surfaces were probably worse than they could
have been. More plasticard and white putty to the rescue. I have to say that I
achieved a very fragile union (that cracked a couple of times during the rest of
the construction meaning more putty and sanding) but that was strengthened by
the firm attachment of the moveable surfaces.
moveable horizontal surfaces did not align with the moveable ones. So I cut out
the fixed ones and made new ones with plasticard ensuring the angle was right as
the moveable surface was presented in a dropped position. This meant that gaps
between fuselage and horizontal surfaces were probably worse than they could
have been. More plasticard and white putty to the rescue. I have to say that I
achieved a very fragile union (that cracked a couple of times during the rest of
the construction meaning more putty and sanding) but that was strengthened by
the firm attachment of the moveable surfaces.
Vertical tail surfaces were next. This was probably the easiest part of the project except for the lack of clear instructions or positive alignment pins or marks. A bit of putty filled the union.
The 3 x 3 supporting struts per engine were added using stainless steel wire (not supplied in the kit) and then the engines were presented to the wings after some more sanding to ensure a better mating. The intakes under the engines were glued using Crazy Glue (gel)
With that the model was (finally!) ready for priming.
| COLORS & MARKINGS |
I used Vallejo black primer for the window frames followed by Vallejo grey primer. Except in the tail area and some windows there were almost no issues with the putty. Once these details were corrected I added the tail wheel.
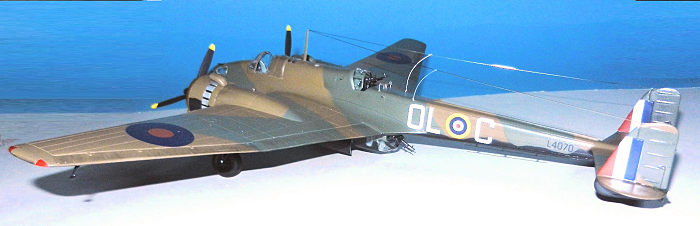
 I painted the top sides with Vallejo 893-095 and then
their RAF Dark Earth after masking the plane with some templates made with
photocopies of the cammo scheme and worms of BlueTac. I finally cut some wavy
templates for the top and bottom interface and the undersides were painted
Vallejo RAF Night.
I painted the top sides with Vallejo 893-095 and then
their RAF Dark Earth after masking the plane with some templates made with
photocopies of the cammo scheme and worms of BlueTac. I finally cut some wavy
templates for the top and bottom interface and the undersides were painted
Vallejo RAF Night.
Cooling flaps were painted with Vallejo Aluminum. The collector ring and exhaust were bushed with Copper (Testors) and then dry burshed with ModelMaster Acrylic rust. With sanded dry black pastels I dirtied the moveable surfaces. I proceeded to give the Hampden roughly 3 coats of Future. Everything was now ready for the decals.
As stated earlier these are from the Kits at War set and worked beautifully with Set and Sol solutions. No worries at all except for the fact that at first the ones placed on the tail are pretty stiff and took aprox 10 applications of Sol to make them bend and follow the border of attack. The other issue is that Admiral Foo Band is made up of 3 decals which makes the process a big cumbersome as you need to align them properly. After cleaning the excess of glue I sealed the decals with ModelMaster Semigloss varnish.
| FINAL CONSTRUCTION |
Final details were another massive undertaking. There are too many parts to be added if you want to improve the kit.
The blister for the top gunner/radio operator is missing the openings for the guns. These I cut out and then added the frame around the openings with plasticard bits. When I tried to install it in the open position it would not fit in place. The part that goes within the fuselage does not fit because the walls are narrower than the cover. This would end up squeezed and distorted if I tried to push it all the way as it should be. And I was trying so hard that I started to damage and bend the clear vacuum formed blister. So finally and reluctantly I cut out the front part of the cover along the middle frame and discarded it. The resulting part (the lower portion when closed) now fits very well in the open position.
The most important point is the lack of any
instructions or parts to glue the twin VGO machine guns in place. Thus I built
some supports for the bottom and top positions. With a little piece of wire
these machine guns were matched together. The bottom one was placed at the edge
of the bottom frame using Crazy Glue (not whitening because the fumes were
moving up away from the clear plastic). For the top one I installed
 the gunsight
from a photoetched set using some beading wire as the support. Then these guns
were placed on the top fuselage opening.
the gunsight
from a photoetched set using some beading wire as the support. Then these guns
were placed on the top fuselage opening.
I glued two more little pieces of beading wire to create the handles for the pilot on the windshield frame. These were placed with a photoetched rear mirror in the center. A head rest for the pilot was scratchbuilt with plasticard, pained brown and glued behind the seat.
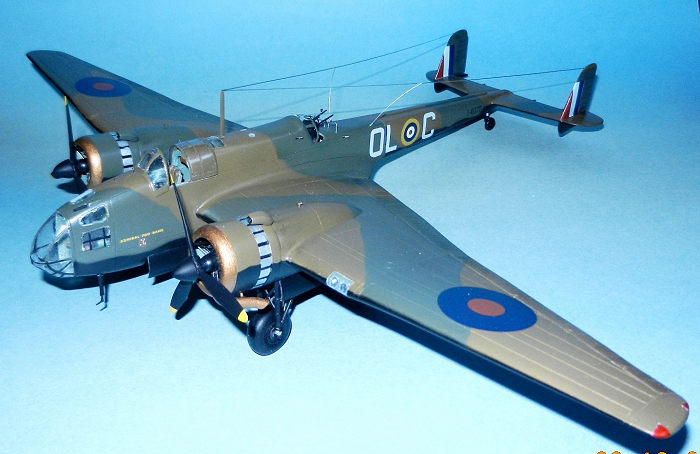
The gunsight for the pilot came from the same photoetched set. The pilot’s MG came for the spares box. The guides that prevent the gunner from shooting off the tail of the Hampden were made with a bit of white metal wire that came with the kit. I had to bend it to shape and then attach it along with the 3 supporting central legs. I did not install the white metal oval antenna on top of the fuselage because it is not shown in the drawing of Gibson’s plane on the cover of Harry Moyes’ Hampden File book. Position lights behind the tail came for pieces of clear plastic from the spares.
The 4 x 250 lbs had been previously been painted in yellow and now attached to the bomb bay using little supports I made. The doors had 4 supports that I scratchbuilt with thin plasticard and then painted them in interior green. The bomb bay doors were placed and the same with the landing gear doors.
 Two small air intakes for the engines are missing in
the kit and were made with plastic rod and installed after some tricky failures.
The top engine intakes were glued now. Same with the ailerons mass balance and
the pitot. The Venturi located on the right side of the front fuselage is
missing in the kit. I made one with the tip of 2 missiles that had the proper
diameter: it cut them into different lengths and glued them by their thinner
point. Using 2 small parts of bead wire the Venturi was attached to the
fuselage. The pilot hood was glued in place with the runners receiving some
aluminum paint.
Two small air intakes for the engines are missing in
the kit and were made with plastic rod and installed after some tricky failures.
The top engine intakes were glued now. Same with the ailerons mass balance and
the pitot. The Venturi located on the right side of the front fuselage is
missing in the kit. I made one with the tip of 2 missiles that had the proper
diameter: it cut them into different lengths and glued them by their thinner
point. Using 2 small parts of bead wire the Venturi was attached to the
fuselage. The pilot hood was glued in place with the runners receiving some
aluminum paint.
The two “actuators” for the top gunner blister were created with more plastic bits with the interior side painted in aluminum and the sides and outsides on the fuselage colours. The opening itself was created with tiny bits of black decals.
The long antenna running under the fuselage was made with stainless steel wire painted black and attached using 3 pieces of rectangular bits of plasticard. The antenna mast was glued in place and so the 2 little tubes (scratchbuilt) through which the antennas come out from the fuselage behind the gunner.
Two little T on top of the engines were made with more pieces from the spares and painted brown and green accordingly with the openings (back and front) in black. Having drilled open the holes in the front of engines and assembled the propellers these were installed.
The build was almost finished with two long pieces of 0.012” stainless wire running from the radio mast to the twin tails. All was done when I glued 2 pieces of bent clear plastic bead thread painted in aluminum running from the 2 littles tubes to the stainless wire.
| CONCLUSIONS |
Based on my past experiences and the kits that I still have in their boxes this Hampden has been the most complicated kit I have and will ever build. My challenges with the CA Blenheim, the Battle Axe Bloch 175 or the conversion of the Trumpeter Wellington using the Alley Cat set pale in comparison to the ones of the FM Hampden.
I am very satisfied with the final result and also glad that, from now on, all kits should be easier than this one. I also believe that all the hard work is a good tribute to Guy Gibson and his friends who started the war with tools that were not at the height of was required and gave it all in those dark first years of the war.
24 March 2020
Copyright ModelingMadness.com
If you would like your product reviewed fairly and fairly quickly, please contact the editor or see other details in the Note to Contributors.
Back to the Main Page Back to the Review Index Page Back to the Previews Index Page