
| KIT #: | 257 |
| PRICE: | CAD$25.00 |
| DECALS: | Two options |
| REVIEWER: | Pablo Calcaterra |
| NOTES: | Initial Release |
| HISTORY |
When France asked for an Armistice in June 1940 many pilots decided to continue the fight against the Germans. Having fled to the UK by different means they were organized under the leadership of Col. Felix Pijeaud who became the 1st Chief of Staff of the Free French Air Force under DeGaulle.
Having received second hand Hurricanes and Blenheims they formed GCI and GBI respectively. They were transferred to North Africa to fight there.
 In regards to the bombers they were formed in Chad as reserve
bombardment group (GRB1) under general de Larminat in November 1940. The Groupe
supported Colonel Lecrec’s troops and helped the capture of Kufra in March 1941.
In regards to the bombers they were formed in Chad as reserve
bombardment group (GRB1) under general de Larminat in November 1940. The Groupe
supported Colonel Lecrec’s troops and helped the capture of Kufra in March 1941.
When the attention of the Allies turned to Abyssinia the French carried out 130 missions between April and July 1941. After this they were transferred to Damascus and merged with GB2 thus forming the Groupe de Bombardement N1 Lorraine with two flights called Mets and Nancy.
When they were transferred to North Africa in November 1941 they helped to support the British over Libya flying close support missions against the Italians and newly arrived Germans. In the process they suffered heavy losses. Having lost Col Pijeaud in his first mission in December the Groupe continued to fight until January 1942 when having lost 1/3 of the flying personnel killed or injured they were sent to the Levant to rest.
| THE KIT |
This is the old Airfix kit first launched in 1968 and then reissued several times till the much superior new version was launched a few years ago.
Besides the rivets being as large as oranges (in scale) there are several issues with the kit: very poor fit of the clear nose parts, inaccurate decals (Lorraine cross should be blue instead of red), wrong serial number for the French plane, wrong nose turret (should be blister type), inaccurate bulkhead behind the pilot (should leave a passing space instead of being totally covered), empty landing gear wells. The kit has toylike features (like the landing gear that can be retracted or the machine gun that can be moved up or down)
 Why did I decide to go with this model instead of the
new version? Because as I was going thru a Blenheim fever phase and building the
new 1/48 Airfix Mk1 and converting a Sanger Mk1 into a Mk4 (more about these
later) I decided to properly build the same kit that my dad had purchased for me
when I was around 10 years old back in Argentina. It had to be this version (not
the re issued of later years…it had to be the one with the very nice painting
for the French attacking in North Africa).
Why did I decide to go with this model instead of the
new version? Because as I was going thru a Blenheim fever phase and building the
new 1/48 Airfix Mk1 and converting a Sanger Mk1 into a Mk4 (more about these
later) I decided to properly build the same kit that my dad had purchased for me
when I was around 10 years old back in Argentina. It had to be this version (not
the re issued of later years…it had to be the one with the very nice painting
for the French attacking in North Africa).
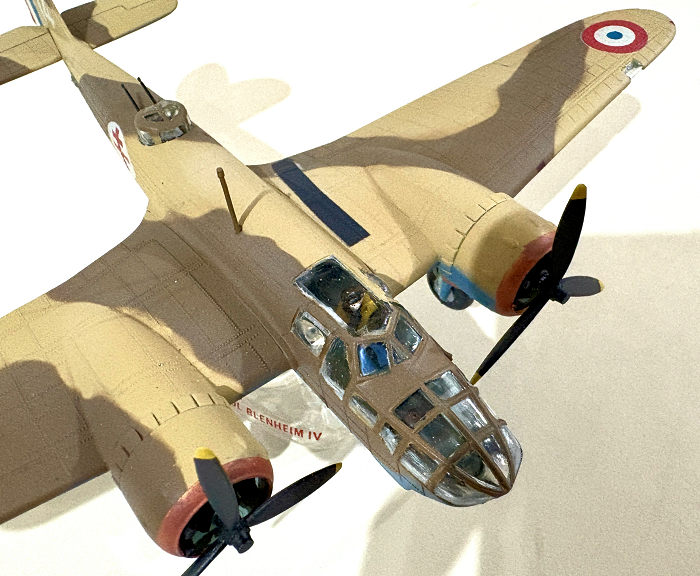
I always liked the scalloped nose of the Blenheim. When I saw the kit in a toystore in Buenos Aires going for 21,000 pesos I got immediately hooked. I bugged my dad for a week. When he finally yielded we went together to the store. Thanks to one of the typical Argentina inflation crisis the kit was now 29,000! Dad say no but I insisted. He finally relented. And that very same night I build it and painted it (so fast that I was handing the kit before the brush applied Humbrol colours had dried I left my fingerprints in some areas). Moreover I installed the gunpack of the British version and the nose turret of the French one (oh my!)
Anyways, this time I wanted to build it properly with all the skills and tools I had gathered during these more than 40 years. So here it is, a tribute to my dad’s great heart and the brave Free French.
| CONSTRUCTION |
I painted all the interior surfaces with Vallejo RAF interior Green. The very basic instrument panel was drybrushed black with some soon to be invisible details picked with drybrushed aluminum. I even painted a white square on the navigator table (a map). The entire (with partial limbs or missing legs) crew was carefully painted. I cut the round support for the twin guns in the turret off the gunner hands and shaped it square instead of round to be attached after the model was almost finished.
A bit of sanding and rescribing panels and rivets took place once the fuselage halves had been glued together.
 I tried to stay faithful to the kit and make the
landing gear move but I managed to get one leg glued in the down position (the
mechanism is pretty weak and moves around the supports when you are trying to
glue them in place…clearly a bit more of oversight and attention would have
delivered a successful set up on the now fixed leg…)
I tried to stay faithful to the kit and make the
landing gear move but I managed to get one leg glued in the down position (the
mechanism is pretty weak and moves around the supports when you are trying to
glue them in place…clearly a bit more of oversight and attention would have
delivered a successful set up on the now fixed leg…)
I closed then the wing halves and presented them to the fuselage. There was a gap under the wings and a bit of Tamiya putty took care of this. Tail horizontal tail planes came next.
I left the engine assembly for later because I had to paint the interior of the nacelles and mask them.
I really struggled to attach the clear parts for the nose. The main problem is that the sliding access hatch for the pilot sits LOWER than the fuselage itself. In hindsight I should have cut out this part and attach it at the right angle matching the surface of the fuselage but I didn’t. This left a 1 mm gap between the back of the hatch and the fuselage.
I painted the landing gear lights and glued the clear cover (that is almost ½ mm too short). Then the kit was ready for the paint sessions.
| COLORS & MARKINGS |
After masking the clear parts and filling the turret with wet tissue paper I primed the model with Vallejo Light Grey Primer.
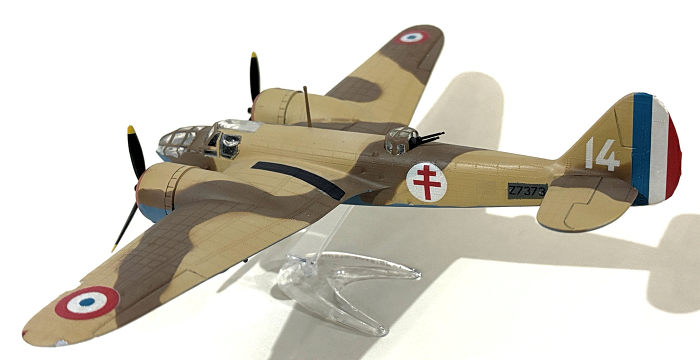
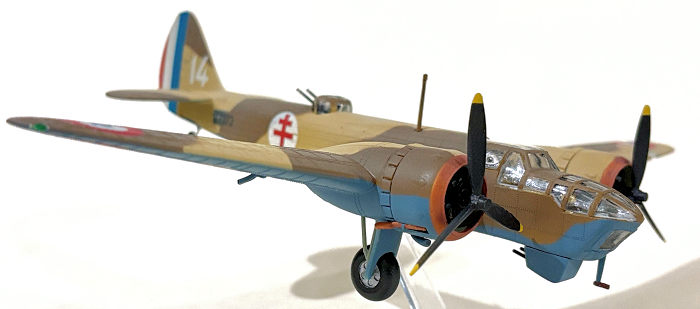
The top colours are Vallejo MidStone (mixed with 20% white) and Model Master RAF Dark Earth. For the undersides I used Vallejo RAF Mediterranean Blue. The collector rings were painted Bronze (mistake…they were aluminum and the orange colour is actually the tint that these develop due to the heat of the gasses but I learnt about this too late and besides the kit is more truthful to what Airfix was telling us to do). The serial numbers were left untouched in the original places and thus I had to paint a rectangle in RAF Dark Green for the decals to be placed later on.
 The engine was painted black along with the propellers
with yellow tips. I drew thin lines along the moveable surfaces with a sharp
pencil.
The engine was painted black along with the propellers
with yellow tips. I drew thin lines along the moveable surfaces with a sharp
pencil.
Then it was time to coat it with Quick Shine to apply the decals.
Those that came with this kit were quite yellowed. I used the ones from a 1978 edition that I had built for the Lindsell family (see my Lindsel Blenheim review). They reacted much better that I had imaged to Set and Sol and every rivet is visible under the decals.
The crew walkway was copied and downsized from the Airfix kit in 1/48 an printed on clear decal paper. I printed a rectangle with dark red and made the dope cover for the machine gun on the wing. A couple of tiny decal black rectangles became the spent cartridges holes.
As I said I wanted to build the kit as originally intended as possible and so, though I know the crosses should be blue and I could have printed them, I decided to use the red ones along with the “White 14” though this plane had the blister type nose turret instead of the FN54.
| FINAL CONSTRUCTION |
Unmasked the clear parts, made some retouches to clear parts where the paint had bled under the masks (using a wooden toothpick wet with Vallejo airbrush cleaner) and then I attached all the last parts like the wheels (painted in dark grey Vallejo primer), twin guns, antenna, cowlings and propellers.
Finally I used the clear support that this version comes with and to which I had attached the decal that reads Blenheim MkIV.
| CONCLUSIONS |
A very simple kit but that really looks like a long nosed Blenheim completely overshadowed by the new version but it is a trip to my childhood.
| REFERENCES |
5 January 2026
Copyright ModelingMadness.com. All rights reserved. No reproduction in part or in whole without express permission.
If you would like your product reviewed fairly and fairly quickly, please contact the editor or see other details in the Note to Contributors.