HK Models 1/32 Lancaster
| KIT #: | 01E010 |
| PRICE: | $380-400.00 |
| DECALS: | |
| REVIEWER: | Pablo Calcaterra |
| NOTES: | Kits World Decals 32136 |
| HISTORY |
No. 424 Squadron RCAF was formed at RAF Topcliffe, Norht Yorkshire on 15 October 1942, and flew Wellington MkIIIs. It was the 6th RCAF squadron formed overseas. Operations started on January 15 1943 and they were part of No 6 Group RCAF. After several missions over Germany 424 was transferred to North Africa as part of No 331 (RCAF) Medium Bomber Wing, still flying Wellingtons. Their new Mk Xs were better suited for this harsh environment. Operations started in June 1943 from Tunisia. From there they supported the invasion of Italy. The Wing left the theater in October 1943.
Back in Yorkshire 424 Sqn was deployed to RAF Skipton-on-Swale on 6 November 1943. They traded their Wellingtons for Halifax MKIII and they resumed their attacks against Germany.
 In May
1944, the City of Hamilton decided to officially adopt No. 424 Squadron and a
special committee of prominent citizens was set up. The new fund was called the
“Hamilton Tiger Squadron Fund”. Each month supplies of cigarettes, lifesavers,
gum, and chocolate bars were sent to the squadron through the Canadian Red
Cross. The Squadron was officially adopted by the City of Hamilton in September
1944 and received the nickname “Tiger” Squadron.
In May
1944, the City of Hamilton decided to officially adopt No. 424 Squadron and a
special committee of prominent citizens was set up. The new fund was called the
“Hamilton Tiger Squadron Fund”. Each month supplies of cigarettes, lifesavers,
gum, and chocolate bars were sent to the squadron through the Canadian Red
Cross. The Squadron was officially adopted by the City of Hamilton in September
1944 and received the nickname “Tiger” Squadron.
LAC Matthew C. Ferguson, ground crew who was born in Calgary, painted the new squadron badge which was the same art as the nose painting on the “A” Train. This nose art was loved by all squadron members and voted to become the new squadron badge. In October Ferguson’s 'Squadron Badge' was submitted to the Chester Herald of the Royal College of Arms and after a lot of modifications it was approved by King George VI in June 1945. The most important modification is that the original tiger (painted after the football team based in Hamilton, Ontario) was changed by the British to a dog and this created almost a revolt at the base. Anyways and till this date the unofficial badge for 424 is the one that Ferguson created (originally for a Wellington when they were based in North Africa)
In January 1945 424 received Lancasters MkI and III and continued their attacks on Germany till April 1945. When the war ended they helped to bring the POWs back to United Kingdom. and received 14 battle honours. They lost 52 planes and suffered 37 KIA and 236 MIA. Crews were awarded 1 DSO, 1 CGM (NCO's and Other Ranks), 1 Bar DFC, 49 DFCs (Officers & Warrant Officers), 11 DFMs (NCO's), and 1 MiD.
 The squadron
was disbanded in October 1945 and then reactivated in Canada in Mount Hope,
Ontario in April 1946 as a Light Bomber Squadron (Auxiliary). It was then
deactivated in 1964 and reactivated in 1968 becoming a Communications and
Transport squadron operating from CFB Trenton. It still serves with the Canadian
Armed Forces.
The squadron
was disbanded in October 1945 and then reactivated in Canada in Mount Hope,
Ontario in April 1946 as a Light Bomber Squadron (Auxiliary). It was then
deactivated in 1964 and reactivated in 1968 becoming a Communications and
Transport squadron operating from CFB Trenton. It still serves with the Canadian
Armed Forces.
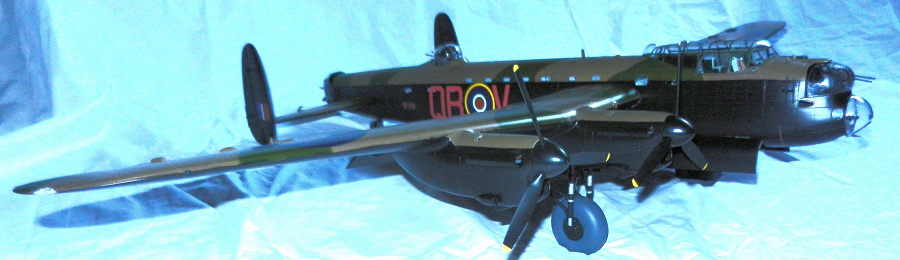
LAC Matthew C. Ferguson from Calgary was “Canada’s Greatest Nose Artist of WWII” and his talent was always in high demand. He painted his art on several of the Lancasters of the Squadron (besides Wellingtons). In total 31 British Lancaster aircraft were flown by Tiger Squadron. He also painted the first-ever and only known example of artwork on an aerial bomb. This 4000 pound "cookie" bomb was intended to celebrate the 2000th operation by No. 424 "Tiger" Squadron The bomb artwork shows a winged tiger breaking out of an Easter egg and this particular bomb was a special present for Hitler from the squadron. A photograph was taken and then the bomb was loaded into Lancaster RF-128 (QB-V) and dropped on 21 March 1945 on the oil refinery at Hemmingstedt, near Heide in Germany. The aircraft that dropped the cookie was known as “Victorious Virgin” and was flown by F/L J. F. Thomas and crew. The plane's nose artwork was modelled on an original 'November 1944' Alberto Varga pin-up in Esquire. This plane was struck Off Charge by R.A.F on 25 March 1948.
| THE KIT |
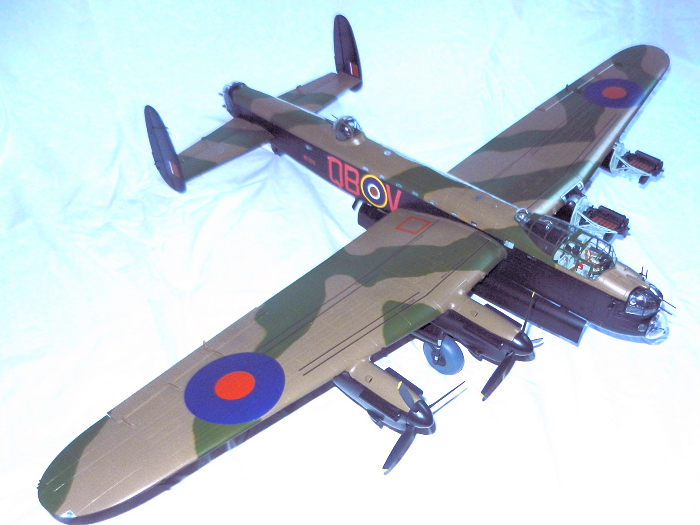
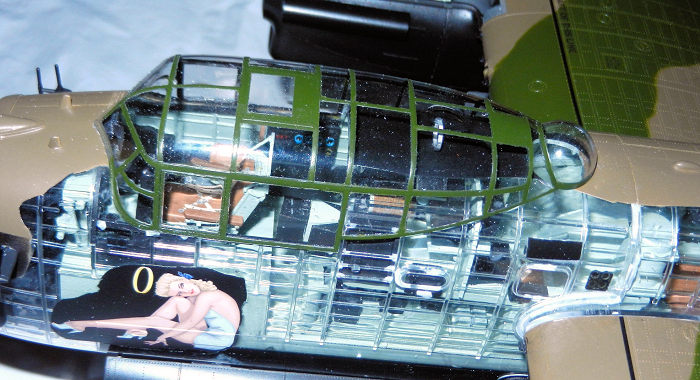
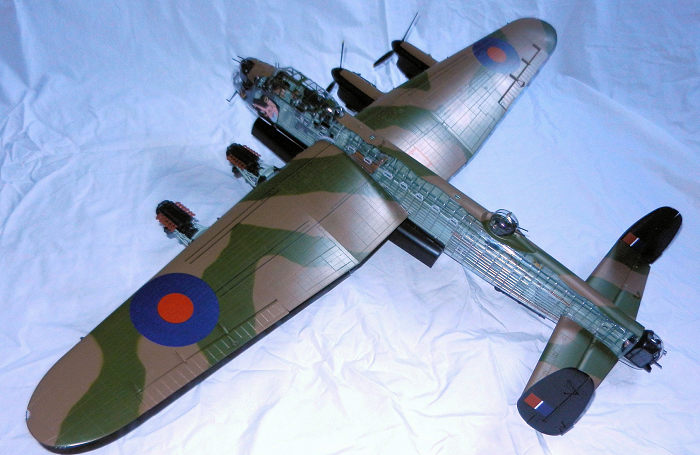
Well, the kit is impressive. It has 824 parts and when finished wingspan is 972 mm and length is 664mm. There are four clear sections for the fuselage (cockpit left and right, rest of the fuselage left and right). This gives you the opportunity to choose which section of the fuselage interior you want to display.
There are several parts that are in the kit that are not used for Victorious Virgin like the H2S radome.
The detail is crisp, not overdone. The only glaring mistake is that HK repeated the access panel for the dinghy on the left wing as well but that it is easily solved (a bit of sanding and rescribing panels and rivets). I thought it was going to take me 5 to 6 months to build this monster but I was proven wrong. Read on if you want.
| CONSTRUCTION |
This kit was purchased by my friend Mike Parry and he asked me to build it for him. We discussed which side of the fuselage to display and what Canadian plane to represent. A quick search on line showed that there are several options but the most attractive is Victorious Virgin so we went for it.
 This
was my first ever model in 1/32 and it was a real pleasure. Fit is perfect.
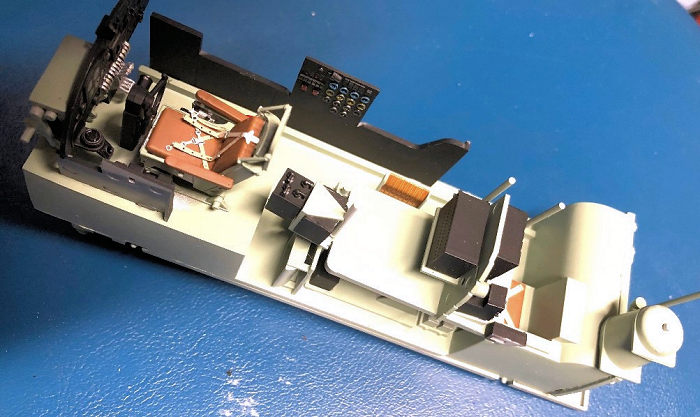
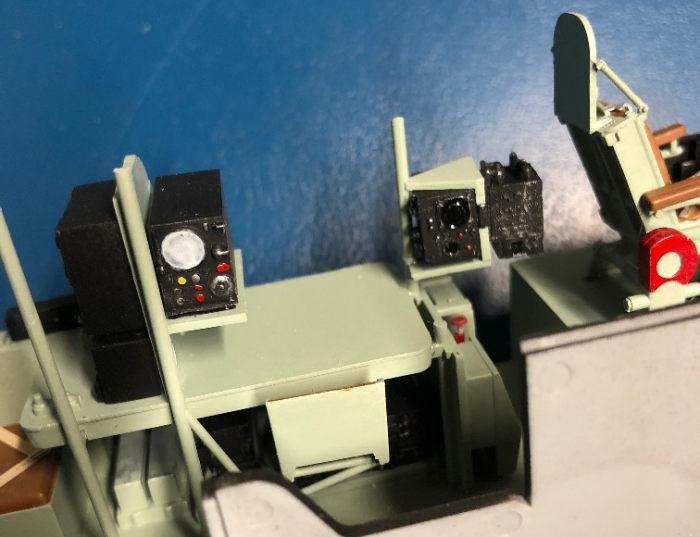
Parts fall together with just a bit of cleaning up required. The interior was
painted with Vallejo RAF Interior Green with the panels in Black. Photoetched
parts are supplied for the seat belts and harnesses. The parts are large enough
to allow me to paint the face of the dials with almost no mistakes. Some drops
of Future represent the glass on the dials.
This
was my first ever model in 1/32 and it was a real pleasure. Fit is perfect.
Parts fall together with just a bit of cleaning up required. The interior was
painted with Vallejo RAF Interior Green with the panels in Black. Photoetched
parts are supplied for the seat belts and harnesses. The parts are large enough
to allow me to paint the face of the dials with almost no mistakes. Some drops
of Future represent the glass on the dials.
Different boxes were glued on the nose and along the fuselage. The First Aids kit box I painted in white and then painted the Red Cross.
The turrets are easy to put together with seat belts for the gunners. They are made up of multiple parts and they are impressive.
 Ammo belts
were installed and the fuselage halves (having previously installed the windows)
were glued together with little pain. In my case I built the main fuselage with
the bomb bay and then snapped on each cockpit side one at a time. I had to fight
a bit with the very tight fit but nothing too dramatic.
Ammo belts
were installed and the fuselage halves (having previously installed the windows)
were glued together with little pain. In my case I built the main fuselage with
the bomb bay and then snapped on each cockpit side one at a time. I had to fight
a bit with the very tight fit but nothing too dramatic.
I used some putty for the union along the fuselage and then I left it aside for the painting sessions. The front turret was attached and masked (minus machine guns)
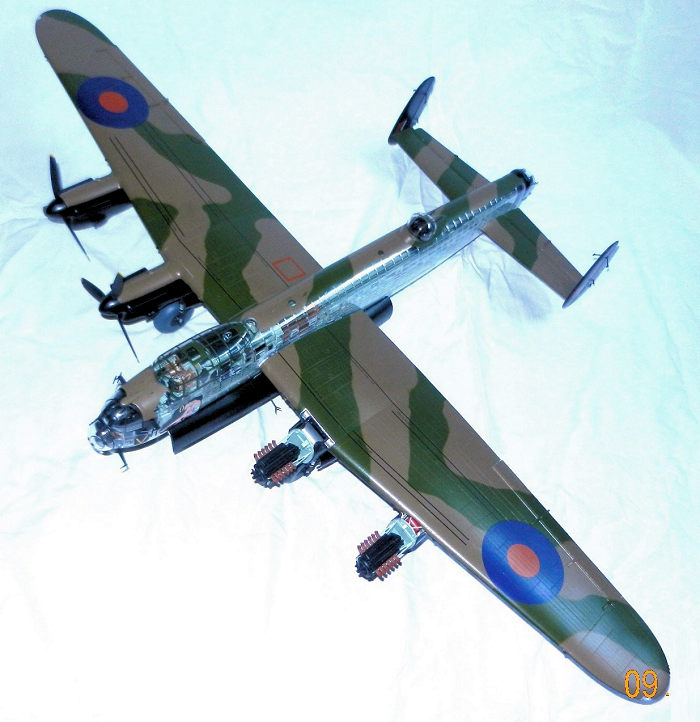
I then moved on to the engines. Four beautiful Merlin with the oil tanks, supports, etc. These engines are so detailed that I took me one week to build them. With Mike we decided to leave 2 completely opened and visible and the other two would only have the top panels unglued.
With
the engines ready I was able to put together the massive wings. Ailerons are
movable. I experienced no problems putting the wings together. I first did the
right one. The kit is designed in a way that the wings can be detached in case
of need (i.e. transportation). Once the wing was dry I tried to slide it onto
the locating structure on the wing root and it would not move past three
quarters. It turns out that I had glued the mating part that goes inside the
wing a bit too far in and therefore the
 guide was
creating too much friction. After a lot of struggles and realizing that it was
not going to fit properly I was forced to sand and remove some of the guides.
The wing now can be attached and removed but it is not a very firm union. With
this lesson learnt I took a different approach with the left wing. Once the wing
was assembled I did not glue the attaching point inside the wing immediately. I
placed it and then slid the wing onto the fuselage. Things worked perfect. So I
removed the wing, removed the attaching part from the wing, carefully added
glue, put the part inside the wing and then slid the wing onto the fuselage till
I achieve a perfect union. I left the wing to dry attached to the fuselage and
the following day I was able to slide it out (and back on) with no problem.
guide was
creating too much friction. After a lot of struggles and realizing that it was
not going to fit properly I was forced to sand and remove some of the guides.
The wing now can be attached and removed but it is not a very firm union. With
this lesson learnt I took a different approach with the left wing. Once the wing
was assembled I did not glue the attaching point inside the wing immediately. I
placed it and then slid the wing onto the fuselage. Things worked perfect. So I
removed the wing, removed the attaching part from the wing, carefully added
glue, put the part inside the wing and then slid the wing onto the fuselage till
I achieve a perfect union. I left the wing to dry attached to the fuselage and
the following day I was able to slide it out (and back on) with no problem.
The tail planes are a very tight fit but worked great. Vertical tail planes are complex in terms of number of parts but easy to put together. Rudder and elevators are movable.
Now that all the main components were ready I proceeded to paint the monster.
| COLORS & MARKINGS |
I used the colours from the Vallejo RAF multi paint box. I had left the protective clear film on the clear side of the fuselage and used masking tape to create a wave between the clear and painted areas. First the parts received a coat of Vallejo Premier (and I used a lot of it!)
I
then painted the fuselage in RAF Dark Earth, then Vallejo’s RAF Green (a bit too
bright for my liking) and finally Vallejo Gloss Black was used for the sides and
undersides. I had a lot of trouble making the
 components
fit inside my painting hood! I also tackled each one of the 3 components
independently (that means that I finished the painting of the fuselage, then
moved to one wing and then the other wing)
components
fit inside my painting hood! I also tackled each one of the 3 components
independently (that means that I finished the painting of the fuselage, then
moved to one wing and then the other wing)
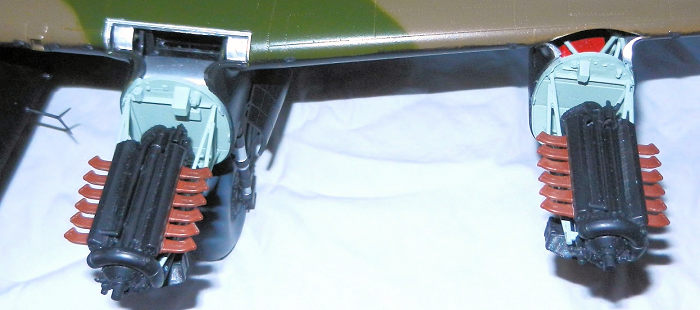
The bombs were painted in a darker green and I used a bit of aluminum to make some scratches here and there.
The plane was lightly covered in Future and was ready for the decals.
For the pin up I had left an exposed area on the self-adhering clear film and that I had painted in black to be used as background. It turned out that the “circle” was not long enough so before attaching the pin up I had to remove some of the clear film, mask again and enlarge the black area. Another round black area was also painted for the “V” on the nose.
Squadron letters, Cookie and pinup are from the Kits World set. Stencils came from the kit. They all reacted very well to Set and Sol and followed all the panels and rivets.
| FINAL CONSTRUCTION |
 A very nice
light coat of Vallejo Semi-gloss varnish sealed the decals and paint. Wheels
were painted in dark grey and attached. Turrets were installed (easy to remove
in case of need). Canopy fit perfect. Bombs were attached, bomb bay doors glued
open. Several small antennas and navigation aids were installed. The last part
was to slide the wings on and take the pictures.
A very nice
light coat of Vallejo Semi-gloss varnish sealed the decals and paint. Wheels
were painted in dark grey and attached. Turrets were installed (easy to remove
in case of need). Canopy fit perfect. Bombs were attached, bomb bay doors glued
open. Several small antennas and navigation aids were installed. The last part
was to slide the wings on and take the pictures.
Once I had taken the pictures for the article I disassembled the turrets, wings and carefully packed the plane in the box using soft packaging materials (i.e bubble wrap and the soft white film that is used in the packaging of electronics). A few months later I was able to drive to Mike’s home (a 500 km round trip!) and deliver his beautiful plane.
Of note is the fact that before the mission the plane only had a V but later on the letters “ictorious Virgin” were added. Not to waste the decal supplied by Kits World I created a nose wall using Evergreen that was large enough for the full text, marked the panels and created the rivets with the riveting wheel and painted it in Gloss Black. As the V had been used on the plane I used parts from yellow decals from the spares to make a new V and then added the missing text. Semi-gloss varnish sealed this part.
| CONCLUSIONS |
This was one of the best if not THE BEST kit I have EVER built. I finished it in only two months. Think about it. Almost 800 pieces put together in 2 months! That speaks a lot about the quality of the kit and the fit of the parts.
Extremely highly recommended ….if you have room for such a beast!
18 May 2021
Copyright ModelingMadness.com. All rights reserved. No reproduction without express permission.
Thank you again Mike for the opportunity to enjoy this kit!
If you would like your product reviewed fairly and fairly quickly, please contact the editor or see other details in the Note to Contributors.