Special Hobby 1/48 Albacore
| KIT: | |
| KIT #: | SH 48045 |
| PRICE: | £32 |
| DECALS: | Three options |
| REVIEWER: | Patrick Barratt |
| NOTES: |
| HISTORY |
By 1936 the Fleet air Arm (FAA) had issued a specification (S.41/36) for a replacement for its out-dated Swordfish fleet. Fairy, who had designed and built the Swordfish, seemed like the obvious choice to build its replacement and by 1938, they had two prototypes flying…and thus the Albacore was born.
Like the
Swordfish, the Albacore was a three-seat TSR
(torpedo/spotter/reconnaissance) bi-plane but differed in its construction with
a full metal monocoque fuselage while the wings, like
the Swordfish Mk1 were braced with wire and covered with fabric. It
 also had a
heated enclosed cabin and was nicknamed the "Applecore”; regarded as pleasant
to fly it was accepted into service by the FAA in March 1940.
also had a
heated enclosed cabin and was nicknamed the "Applecore”; regarded as pleasant
to fly it was accepted into service by the FAA in March 1940.
By 1942 there were 15 squadrons of Albacore operating mainly from shore bases in the UK and North Africa and although it had a successful two years on front line service, by the end of 1942 it was being replaced by the Fairy Barracuda and the Grumman Avenger. Strangely, its older sister the Swordfish was to continue in front line service well beyond its intended replacement the Albacore.
The Swordfish had been found to be more agile, particularly in the period just after torpedo release when violent evasive action was often the order of the day despite its ability to often attack below the elevation of most turreted ship borne guns.
800 albacores were built, many ended their careers in the RAF as coastal patrol aircraft although some went to the Royal Canadian Navy (RCN), and a few to the RCAF, eventually retiring as the RCAF’s last biplane in 1949.
| THE KIT |
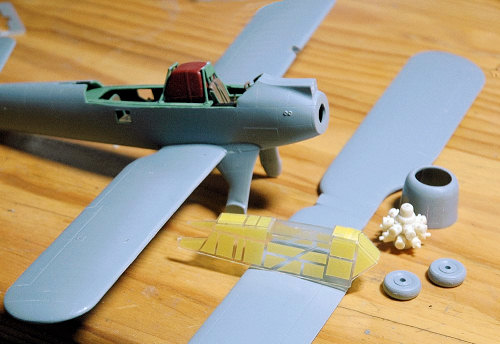
The Special Hobby, 1/48 scale Fairy Albacore is produced by MPM productions in the Czech Republic. It is an injection-moulded kit with resin parts as well as a useful photo etch sheet. I say useful because in my short experience as a model builder, I have found that a majority of photo etch parts are often not used and add very little to the finished model. Fortunately this is not the case here as a lot of the parts are external, like radio/radar aerials and internal parts like seat belts that are clearly visible through the two-piece injection moulded canopy. Resin parts are mostly engine cylinders and crankcase and go towards building up a reasonably detailed double row, radial Taurus engine. The main airframe is presented on four main spru’s comprising approx 100 parts. A comprehensive decal sheet is included that allows the builder to build one of three options , each with its own camouflage option
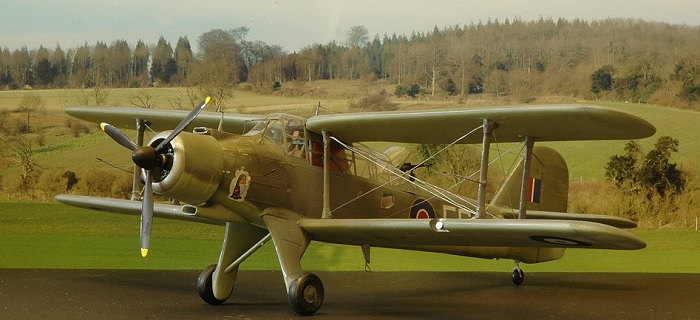
 1/ X9053/ 5C of 817
Sqn. ( also the box art)
1/ X9053/ 5C of 817
Sqn. ( also the box art)
2/ X8942/ 5B 0f 828 Sqn based in Hal Far, Malta
3/ L7114, An albacore damaged in a fight with an ME109 over the English Channel in 1940.
Panel lines are recessed and surface detail looks good, particularly the fabric covered wings.
The supplied instructions are a bit hit and miss, its not always clear exactly where parts should go. A good example is the etched metal torpedo aiming ring that is mounted on the nose ! or as I found out later, how the rear canopy should be mounted when open. The rear opening canopy should in fact have hinged at the elbow and slid back at 45’ partially under the main canopy!
| CONSTRUCTION |
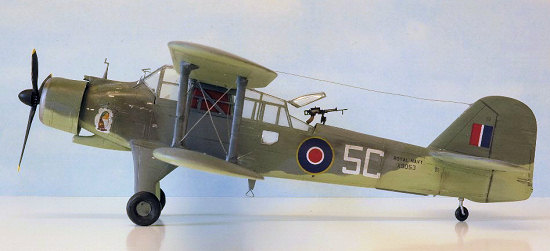
The first step in the construction sequence is the cockpit interior which is nicely detailed with a mixture of photo etch seat belts, instrument panels and various internal parts such as a map table and radio equip. Although the cockpit and observer/radio operator compartment is nicely detailed, time spent here adding extra detail would not be time wasted as the finished model has a large clear canopy that can be left open at the rear if you wish to have the machine gun in its “raised” ready to use position. The machine gun and its mount are nicely moulded in resin.
The various sub assemblies, cockpit, fuel tank, radio opps compartment, machine gun and its mounting are assembled into the right hand side of the fuselage giving the builder the opportunity to test fit the left hand side to the right to make sure everything fits nicely….and by in large, it does although slight trimming of the bulk head and floor may be necessary..
 A certain degree of
test fitting is inevitable if you want a successful build as this is a limited
run kit but, while not up to Tamiya Swordfish standards, a little time with a
sanding stick and patience when lining up parts( that have no locating pins)
will pay dividends in the end. A trick I use when gluing large parts like
fuselage halves together with no locating pins is to do it in several stages.
Apply a bead of glue from the cockpit rear, along the upper spine and round the
tail fin and line up the two halves and let them dry. Then do the same from tail
fin to wing root, wing root to nose and nose back to cockpit front. This gives
you a much better chance of ligning up top and bottom surfaces individually and
will reduce your sanding down later.
A certain degree of
test fitting is inevitable if you want a successful build as this is a limited
run kit but, while not up to Tamiya Swordfish standards, a little time with a
sanding stick and patience when lining up parts( that have no locating pins)
will pay dividends in the end. A trick I use when gluing large parts like
fuselage halves together with no locating pins is to do it in several stages.
Apply a bead of glue from the cockpit rear, along the upper spine and round the
tail fin and line up the two halves and let them dry. Then do the same from tail
fin to wing root, wing root to nose and nose back to cockpit front. This gives
you a much better chance of ligning up top and bottom surfaces individually and
will reduce your sanding down later.
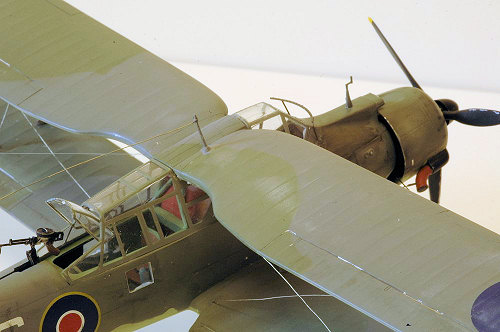
By normal biplane standards, this is probably the easiest wing assembly you will come across because of the original design where the upper wing is held in place by a frame work in the top of the canopy. This means that both upper and lower wings can be fitted before the interplane struts are fitted. The rest of the construction is straight forward comprising mainly of undercarriage, engine and tail plane fitment.
No ordinance is supplied with this kit which I find a little strange but a torpedo mount and bomb racks are included. The later are resin parts and in my kit, were so badly moulded I elected not to use them. Those of you who build FAA kits might consider that as the Westland ( as Fairey was to become) Wyvern never fired a torpedo in anger you could fit it too your Albacore instead using the Wyvern mountings ?
Finally a little filler around the wing root and undercarriage mountings will help you get a good finish around this complicated area of angles and joins.
| COLORS & MARKINGS |
First step is to mask the canopy….groan! Sorry but it has to be done and this
canopy is very prominent. Time spent here is time well spent. I used Tamiya
6mm masking tape and a very sharp Swan/Morton surgical scalpel. Try to keep
the framework as thin as you can. Manufacturers seem to pick out their canopy
frames on the thick side in my opinion.
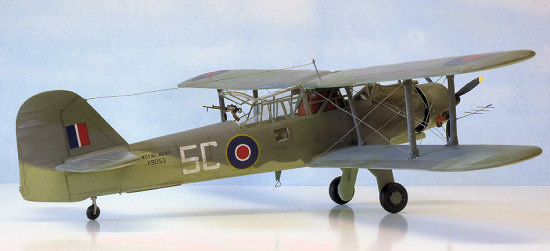
Painting is often the downfall of a project for those like me who are still finding their way. For this model I sprayed the basic colours prior to fitting the top wing using Tamiya sky on the under surfaces and a combination of Tamiya Ocean Grey and Tamiya RLM grey (Actually a sort of green) for the camouflage pattern.
Those of you who do not have an airbrush might consider using the Tamiya Ocean grey (AS10) and Tamiya RAF dark Green (AS9) as they are available in rattle cans and are a better option than brush painting. The AS range of colours are an eggshell finish and you can get away with not glossing before placing the decals if necessary. For this model I gave it a quick brush of Future (Johnson’s Klear in the UK) and seated the decals using Micro sol/set.
At this stage I gave it a wash with a dark enamel wash (which does not attack the Tamiya acrylic paints) to pick out the panel lines and then a bit of artistic flare using a Tamiya weathering pastel set (set B) to add soot ect around the engine exhaust and blow back around the engine cowling. I used a silver roller ball gel pen to pick out a few areas of wear along the odd panel line and prop blade and then gave the whole thing a coat of Humbrol Flat clear.
A word of warning! The instructions for the version that I built (X9053) show the areas that should be Sky as being Black. Use the box art as a colour guide for this version and you will be fine.
| CONCLUSIONS |
 This kit offers
the opportunity for the FAA fan to build an injection-moulded version of a Mk1
Albacore, something that has not been available up to now. That in its self is
enough to justify the £32 expense (about $60) to most modellers.
This kit offers
the opportunity for the FAA fan to build an injection-moulded version of a Mk1
Albacore, something that has not been available up to now. That in its self is
enough to justify the £32 expense (about $60) to most modellers.
This kit does not fall together like some of the Japanese offerings that “spoil us” but the average modeller should be able to come up with a presentable model and because of the wing mounts, it would make a good first Biplane.
The pros for this kit are many not least the fact that with a little patience it builds into a very nice model that will sit along side the Tamiya Swordfish and hold its head high. It is a limited run kit and so has the usual shortcomings but if seen as challenges, rather than failings of the kit, there are no real problems that cant be overcome with a little ingenuity.
The cons I suppose would be rigging. There is no diagram to show the rigging layout so you will have to use the box art and a little imagination. I used tinned copper wire for this kit but given my time again would probably go for .275mm dia fishing line if only because its so much easier to tension and glue
| REFERENCES |
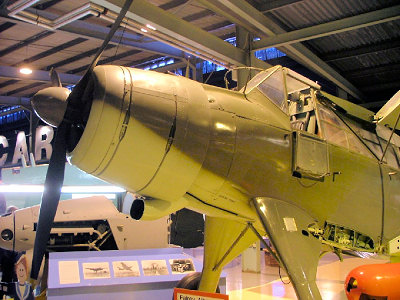 Personal photo’s
taken at the FAA museum at Yeovelton UK.
Personal photo’s
taken at the FAA museum at Yeovelton UK.
http://en.wikipedia.org/wiki/Fairey_Albacore
June 2007
Copyright ModelingMadness.com
If you would like your product reviewed fairly and fairly quickly, please contact the editor or see other details in the Note to Contributors.
2019