| KIT: | |
| KIT #: | ? |
| PRICE: | 7 Maltese lire |
| DECALS: | Two options |
| REVIEWER: | Carmel J Attard |
| NOTES: | Short run with etched metal and resin parts |
| HISTORY |
The Supermarine Seafire was the
development of the former Spitfire adopted for use on Navy aircraft carriers.
This incorporated changes like addition of a tail hook, attachment for carrier
use and later variants, folding wings. The Seafire was not the ideal carrier
fighter and especially landings were difficult but its performance overlooked
its disadvantaged. It had a fast rate of climb
 and very agile to make it a very
good fleet defence fighter although it had a short range. It was not until mid
1941 when 48 Spitfires VBs were allocated to the Royal Navy and modifications
were carried out by Vickers with the early version being successfully tested
aboard the HMS Illustrious in June 1942.
and very agile to make it a very
good fleet defence fighter although it had a short range. It was not until mid
1941 when 48 Spitfires VBs were allocated to the Royal Navy and modifications
were carried out by Vickers with the early version being successfully tested
aboard the HMS Illustrious in June 1942.
During 1943 another 372 Seafires IIc aircraft were produced by Westland and Cunliffe Qwen. The airframes and fuselage bulkheads and radio equipment bays being reinforced while the fuselage fitted with catapult spools. Eventually a deck handling and carrier operation was improved with the introduction of the Seafire Mk III. It had modifies wing main spar with hinges for manually folding outer sections that could swing upwards outside the wheel wells, the wing tips folding downwards.
The type c wing armament with two half-fed Hispano MkV cannons was retained and bomb carriers could be mounted below the wings and fuselage. The Seafire Mk III was powered by Merlin 55/55M engine turning a four bladed propeller and had six-ejector exhaust manifold on each side. Besides the Fleet Air Arm the Seafire IIIs also served with the Irish Air Corps and French Navy. On a number of occasions Seafires that happened to be on board Fleet carriers that called in the Grand Harbour often were put ashore at Hal-Far in Malta particular the later types. The Seafire Mk III had a maximum speed of 566 Km/Hr, had a service cealing of 10,309 M and a range of 1,176 Km.
| THE KIT |
Released
by Octopus in the Czech Republic, to a scale of 1/72 the Seafire comes as an
injection moulded kit in grey plastic with light tan resin detail parts and
contains two vacform cockpit canopies. This is a limited run scale model with
high quality recessed 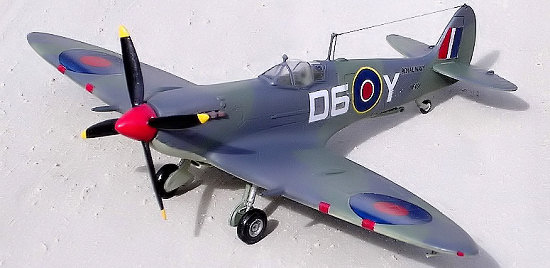 surface detail and an exceptionally detailed cockpit
interior built up from the resin parts supplied. The kit also contains a good
quality decal sheet. There is a choice of four decal options of Seafire MkIII,
which includes one with serial No NN212 of 887NAS, British Pacific fleet
embarked on board the carrier HMS Indefatigable. On the 15th of
August 19456 Sub/Lt G.J.Murphy shot down two Japanese A6M5 Zero fighters while
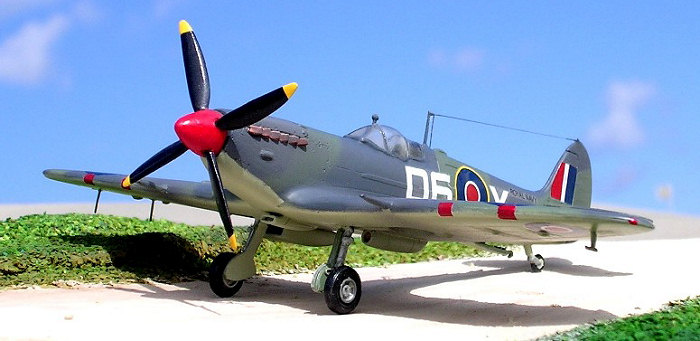
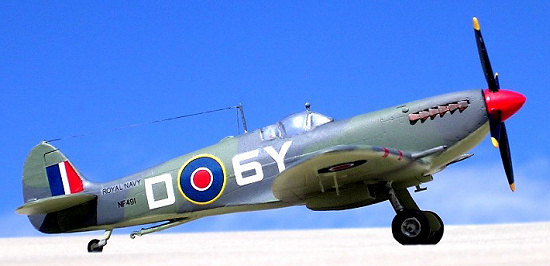
flying this Spitfire III. Next choice is for NF491 of the 809th
Squadron FA aboard the HMS Stalker during the time of winter 1944/45 in the Suez
Canal to Indian Ocean zone. There is another Seafire III of the 1st
Flotille of the French Navy as flown in October 1948 from the carrier
Arromanches during the conflict in Indochina. Final choice falls on PR171 of No
807 Naval Air Squadron, which operated early in 1945 from the aircraft carrier
HMS Hunter that formed part of the British East Indies Fleet. These are all in
the dark slate grey and extra dark sea grey disruptive camouflage on upper
surfaces and sky undersurfaces.
surface detail and an exceptionally detailed cockpit
interior built up from the resin parts supplied. The kit also contains a good
quality decal sheet. There is a choice of four decal options of Seafire MkIII,
which includes one with serial No NN212 of 887NAS, British Pacific fleet
embarked on board the carrier HMS Indefatigable. On the 15th of
August 19456 Sub/Lt G.J.Murphy shot down two Japanese A6M5 Zero fighters while
flying this Spitfire III. Next choice is for NF491 of the 809th
Squadron FA aboard the HMS Stalker during the time of winter 1944/45 in the Suez
Canal to Indian Ocean zone. There is another Seafire III of the 1st
Flotille of the French Navy as flown in October 1948 from the carrier
Arromanches during the conflict in Indochina. Final choice falls on PR171 of No
807 Naval Air Squadron, which operated early in 1945 from the aircraft carrier
HMS Hunter that formed part of the British East Indies Fleet. These are all in
the dark slate grey and extra dark sea grey disruptive camouflage on upper
surfaces and sky undersurfaces.
| CONSTRUCTION |
The
cockpit interior detail includes separate inner sidewalls that needs thinning
down as possibly necessary in order to leave space for the seat. There is an
instrument panel complete with gun sight, a detailed pilot seat with cast on
seat belts. An accurate control stick and rudder pedals, firewall and a true
scaled down rear bulk head and cockpit floor. The undercarriage legs contain
 detail; to an extent not normally found at this scale. This cockpit detail parts
all fit inside a vertical split fuselage. However like most resin detail parts
that I come across in kits, most of them need to be trimmed in order to fit
correctly. The nose firewall required filing from sides to fit across the
fuselage. Exhaust stack need careful removal of resin runner. I found that it is
best to leave part of the runner to avoid stack breaking, then file the sides of
resin part to allow insert of stacks into slot from inside the fuselage at an
early stage. The bulkhead at the back of the seat needs to be trimmed by 1 mm
from the sides and the cockpit floor has to be trimmed at the rear or it will
foul with the narrow fuselage lower. Having trimmed all the components
accordingly and dry fitting proves they are now in correct size that allow the
fuselage halves to close correctly, then construction starts with fitting all
the interior which is then painted cockpit green.
detail; to an extent not normally found at this scale. This cockpit detail parts
all fit inside a vertical split fuselage. However like most resin detail parts
that I come across in kits, most of them need to be trimmed in order to fit
correctly. The nose firewall required filing from sides to fit across the
fuselage. Exhaust stack need careful removal of resin runner. I found that it is
best to leave part of the runner to avoid stack breaking, then file the sides of
resin part to allow insert of stacks into slot from inside the fuselage at an
early stage. The bulkhead at the back of the seat needs to be trimmed by 1 mm
from the sides and the cockpit floor has to be trimmed at the rear or it will
foul with the narrow fuselage lower. Having trimmed all the components
accordingly and dry fitting proves they are now in correct size that allow the
fuselage halves to close correctly, then construction starts with fitting all
the interior which is then painted cockpit green.
The
tail planes are butt jointed in place next, followed by the wings. These consist
of a single whole span lower section with port and starboard upper surfaces. The
under wing radiator has a resin interior piece with front painted copper. This
fits under the starboard wing and the oil cooler under the port wing. (What
Carmel doesn't mention is that the lower wing is flat as a pancake.
 There is barely the hint of a gull in the lower wing so either you spend some quality time
with a file and filler putting one in or get another wing from some other kit.
How Pavla missed this rather obvious feature is beyond me. Ed)
There is barely the hint of a gull in the lower wing so either you spend some quality time
with a file and filler putting one in or get another wing from some other kit.
How Pavla missed this rather obvious feature is beyond me. Ed)
In view of the various schemes that come with this kit which also contain minor differences on the exterior, it is at this stage that you have to make up your mind which scheme you intend to use. There are two sizes of air intakes under the fuselage nose. There are also variations in the length of cannon barrels that are butt jointed on stubs on the wing leading edges. The undercarriage legs and detail tail wheel and arrestor hook were then fixed in place as were also the under wing aerials. Trimming the clear vacform canopy was now carefully done and gets it to fit using Kristal Kleer and allowed to dry. Following that a tiny drop of super glue was allowed to flow along the joining edge. Sealing the cockpit with Kristal Kleer or even white glue will seal it effectively and prevent it from clouding with fumes when superglue is applied in order to secure it strongly. The extra clear cockpit was saved to go onto some future Spitfire kit which will replace the injection moulded one that is more often having the plastic section on the thick side.
| COLORS & MARKINGS |
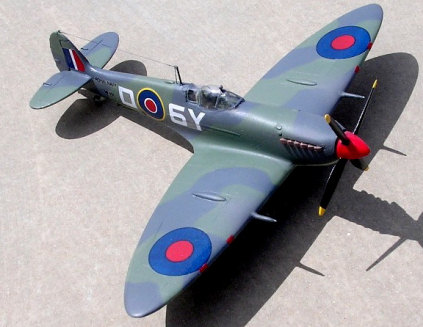
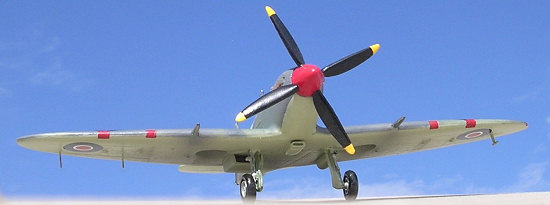 The
cockpit canopy was then covered with Maskol and the kit lower surfaces were
airbrushed in Sky Type S. When dry this was again given a very smooth sanding
and given another coat. After 6 hours drying the lower surfaces were masked
adequately and the upper surfaces were airbrushed in dark slate grey overall.
Finally the kit was given the disruptive extra dark sea grey camouflage to form
a complete temperate camouflage scheme. I have used Humbrol paint for the two
upper shades but I noticed that there was less contrast between the two colours
than if I have used the Compucolours brand of extra dark sea grey which I did in
previous occasions on FAA aircraft. But then on the other hand when you think of
it there are also colour varieties and variations even on the real full scale
aircraft arising not only from different brands of paints but also the extremes
of weathering on the aircraft surfaces which also effect paint colours
differently.
The
cockpit canopy was then covered with Maskol and the kit lower surfaces were
airbrushed in Sky Type S. When dry this was again given a very smooth sanding
and given another coat. After 6 hours drying the lower surfaces were masked
adequately and the upper surfaces were airbrushed in dark slate grey overall.
Finally the kit was given the disruptive extra dark sea grey camouflage to form
a complete temperate camouflage scheme. I have used Humbrol paint for the two
upper shades but I noticed that there was less contrast between the two colours
than if I have used the Compucolours brand of extra dark sea grey which I did in
previous occasions on FAA aircraft. But then on the other hand when you think of
it there are also colour varieties and variations even on the real full scale
aircraft arising not only from different brands of paints but also the extremes
of weathering on the aircraft surfaces which also effect paint colours
differently.
| CONCLUSIONS |
I enjoyed building the Seafire III. Understanding it is a limited run it with resin parts it justifies the little more extra time it needs to build and in the end it also merits the extra effort that results into a true scale FAA famous fighter, the Seafire Mk III.
November 2006
Copyright ModelingMadness.com. All rights reserved. No reproduction in any form without express permission from the editor.
If you would like your product reviewed fairly and quickly, please contact the editor or see other details in the Note to Contributors.