| KIT: | Airfix/Airmodel 1/72 Lysander P.12 |
| KIT #: | ? |
| PRICE: | $ |
| DECALS: | None with the conversion |
| REVIEWER: | Carmel J. Attard |
| NOTES: | Vacuform Conversion |
| HISTORY |
During 1940 in Britain there were
preparations for the defence of the country in the event a German invasion was
to take place. Among projected schemes put forward for the strafing of German
forces as they hit the beaches and for striking at supporting
 surface vessels
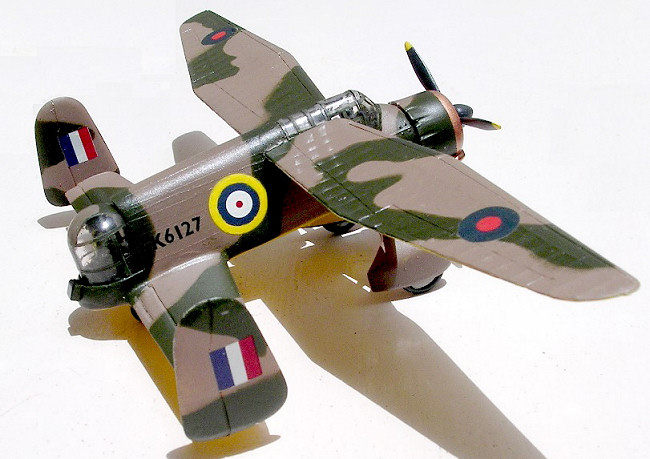
was that of the Westland P-12. The project incorporated a straight modification
of the Westland Lysander aircraft. The initial plan was to install two 20mm
cannons attached to the fixed undercarriage spats. However a further rethinking
led to the redesign of the rear fuselage, this being cut short and a tail turret
added, and the adaptation of a new mounted ‘tandem wing’ arrangement complete
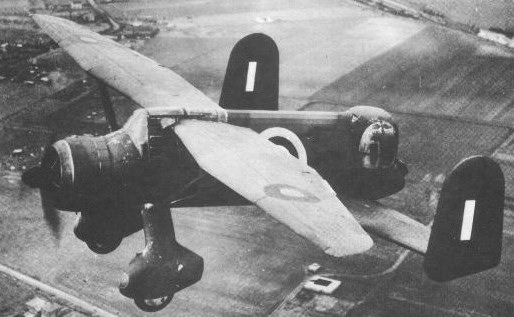
with endplate fins and rudders for longitudinal stability. When the P-12 first
flew on 27th July 1941 it was immediately shown to be highly
maneuverable.
surface vessels
was that of the Westland P-12. The project incorporated a straight modification
of the Westland Lysander aircraft. The initial plan was to install two 20mm
cannons attached to the fixed undercarriage spats. However a further rethinking
led to the redesign of the rear fuselage, this being cut short and a tail turret
added, and the adaptation of a new mounted ‘tandem wing’ arrangement complete
with endplate fins and rudders for longitudinal stability. When the P-12 first
flew on 27th July 1941 it was immediately shown to be highly
maneuverable.
The P-12 serial number K6172 was extensively modified to another standard form of strafing power against ships or ground troops. The fuselage was shortened by 4’9” to 25’9” and a tail mock-up intended to carry a 4gun, Wash and Thompson type, made of plywood and Perspex which was a generic heavy bomber tail unit, and a fuselage having a very light framework. The De Lenne type second wing, which had full span elevators and was fitted beneath the fuselage just in front of the turret. This increased the wing area from 260 Sq Ft to 392 Sq ft. The P-12 was powered by a Perseus XII engine and flown by the company’s test pilot Harold Penrose who found that it handled well.
Following the successful maiden
flight it was hoped that the design would develop into an effective night
fighter or at least gunnery trainer. Despite successful flight trials this
remained a o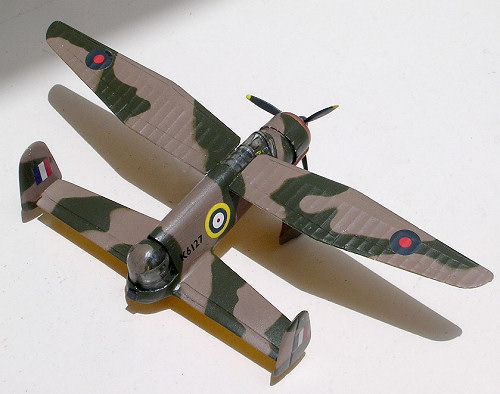 ne off experiment. The perceived German threat diminished and none
were ever ordered. K6127 was later used for communication tests and in the
Welkin programme before being broken up in 1944.
ne off experiment. The perceived German threat diminished and none
were ever ordered. K6127 was later used for communication tests and in the
Welkin programme before being broken up in 1944.
| THE KIT |
The 1/72 scale kit P-12 can be built using the vac-form conversion kit No 128 issued by Airmodel of Germany that is merged with any standard kit of the Westland Lysander. This is an interesting and simple modification, which will result into a completely new aircraft while retaining close resemblance to the Lysander. It is suggested in the instructions that the conversion be based on the Frog kit of the Lysander and is considered as a relatively easy one. The Frog/Novo kit of the Lysander may be long gone from circulation. I have therefore used instead the Airfix kit of the Lysander and found it to fit equally well to take the conversion and without any difficulty whatsoever. Having recently built the Pavla Lysander as well I also found that even with this kit it would work just as well for the conversion and the same can be said for the Matchbox kit.
| CONSTRUCTION |
 In brief the method for this
conversion using the Airfix Lysander parts is a follows. The assembly of the
fuselage, engine and main wing follows the kit instructions. There is a simple
but accurate three-view drawing of the Westland P-12 supplied with the Airmodel
offering. This is useful to refer to when it comes to mark the place to cut
across the Lysander fuselage that is shown in a line drawing on the Airmodel
instruction sheet. In other words the Airfix kit forward fuselage when merged
with the vacform kit conversion of the rear fuselage would bring an overall
fuselage length of 4.29 “. The parts from the Airfix kit, the seat, floor, coaming and instrument panel etc are first assembled and painted. as per kit
instruction. The fuselage is then marked and sectioned and the canopy is also
sectioned to conform to the new fuselage. I found it practical to treat the
vacform kit construction as a stage on its own and when the two sections are
complete these are butt joined together. The joining section should be very
closely matching and any disparity is made good by fairing with putty and this
will bring a smooth, continuous, complete fuselage.
In brief the method for this
conversion using the Airfix Lysander parts is a follows. The assembly of the
fuselage, engine and main wing follows the kit instructions. There is a simple
but accurate three-view drawing of the Westland P-12 supplied with the Airmodel
offering. This is useful to refer to when it comes to mark the place to cut
across the Lysander fuselage that is shown in a line drawing on the Airmodel
instruction sheet. In other words the Airfix kit forward fuselage when merged
with the vacform kit conversion of the rear fuselage would bring an overall
fuselage length of 4.29 “. The parts from the Airfix kit, the seat, floor, coaming and instrument panel etc are first assembled and painted. as per kit
instruction. The fuselage is then marked and sectioned and the canopy is also
sectioned to conform to the new fuselage. I found it practical to treat the
vacform kit construction as a stage on its own and when the two sections are
complete these are butt joined together. The joining section should be very
closely matching and any disparity is made good by fairing with putty and this
will bring a smooth, continuous, complete fuselage.
The vacform conversion is treated
as if a complete kit is being built and follows the normal procedure that is
standard to follow. This involves cutting the parts, which were premarked on the
periphery with a soft pencil. These are then scored around and broken away from
the backing sheet. The vacform parts comprise two aft wings and a mock turret
made of clear acetate, which is trimmed with a modeling knife. A seat was added
internally but no guns added since it was a mock turret and the aircraft was in
the development stage. 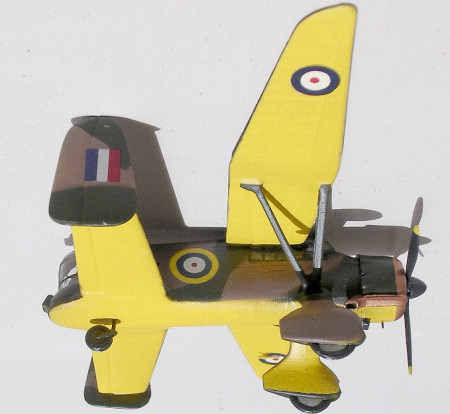
The white plastic vacform parts are sanded on a wet and dry paper to bring the trailing edges of the wings down to a relatively thin section compared to the leading edges. The aft fuselage two halves need to be sanded as little as possible as it is very close to the final width dimensions. When I checked the section after finishing the sanding I found that I had to add a wedge piece of plastic to the lower rear section at the center section in order to allow the acetate aft turret to fit inside the space at the rear of the fuselage. Ie the base of the turret needed more space to fit in the rear fuselage. The front bulkhead of the Airfix kit is retained but the rear one is not needed.
The interior of the parts is painted interior grey-green and the fuselage is assembled into one and allows it to dry thoroughly. Other details attended to were the opening of the exhaust manifold outlet and the whole kit parts assembled in a manner that the wings and rear winglets were carefully aligned. Several panel lines parallel to each other were scored along the fuselage to simulate the construction nature of the real aircraft. The aircraft also carried a sturdier tail wheel assembly than the one found on a Lysander, as it has to bear the weight of the heavy turret and a tail wheel identical to one carried by the Lancaster bomber was fitted.
| COLORS & MARKINGS |
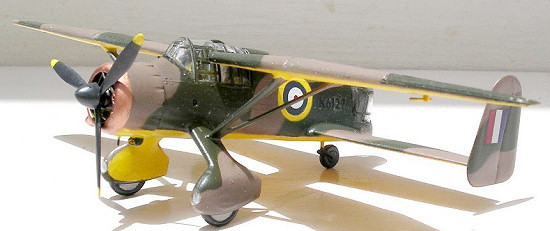 When the kit was strong enough to
handle, the framework of the canopy was carefully painted followed by masking.
The lower surfaces were then airbrushed in Identification yellow using Tamiya
paint and the upper fuselage and wings camouflaged in dark earth and dark green,
Tamiya paints again, in a merging pattern to conform with plan view that appears
on a past issue of Scale Aircraft Modeller dealing with the Lysander in
‘Aircraft in detail’ section. The aft turret already painted while detached was
then inserted and secured with a drop of white glue at the base. I had an old
ESCI decal sheet, which provided the correct size of roundels, only the yellow
on the fuselage roundel needed refresh with yellow paint applied by hand brush.
The serial number was sorted out using Model Decal lettering. A final coat of
floor polish liquid gave me the sheen before applying the decals. The kit was
then given a final semi matt coat using Humbrol coat varnish.
When the kit was strong enough to
handle, the framework of the canopy was carefully painted followed by masking.
The lower surfaces were then airbrushed in Identification yellow using Tamiya
paint and the upper fuselage and wings camouflaged in dark earth and dark green,
Tamiya paints again, in a merging pattern to conform with plan view that appears
on a past issue of Scale Aircraft Modeller dealing with the Lysander in
‘Aircraft in detail’ section. The aft turret already painted while detached was
then inserted and secured with a drop of white glue at the base. I had an old
ESCI decal sheet, which provided the correct size of roundels, only the yellow
on the fuselage roundel needed refresh with yellow paint applied by hand brush.
The serial number was sorted out using Model Decal lettering. A final coat of
floor polish liquid gave me the sheen before applying the decals. The kit was
then given a final semi matt coat using Humbrol coat varnish.
| CONCLUSIONS |
The completed kit placed next to a Lysander provided some good contrast if not eye-catching, a design that not many modelers seem to be aware of or that it ever existed during the past war. This kit conversion is recommended as a first attempt with vacform conversions building and is readily available via Mr. Matthias Simon of www.airmodel.de. who made he kit available to me for this conversion.
June 2006
If you would like your product reviewed fairly and quickly by a site that has over 300,000 visitors a month, please contact me or see other details in the Note to Contributors.