Heller 1/72 Caudron C.714
| KIT #: | 80218 |
| PRICE: | $3.00 |
| DECALS: | One option |
| REVIEWER: | Spiros Pendedekas |
| NOTES: |
| HISTORY |
The Caudron Renault C.710
series was one of the emerging types out of a French 1936 specification, calling
for a light fighter of wooden construction that could be built rapidly in large
numbers without upsetting the production of existing types, thus quickly raising
the number of much needed "modern" aircraft in French service.
The original C.710 model was an angular design, itself developed from an
earlier series of air racers. In order to house the relatively long 450 hp
Renault 12R-01 supercharged air-cooled inverted V-12 engine, the plane featured
an extremely long nose that set the cockpit far aft on the fuselage. The landing
gear was fixed and spatted and the vertical stabilizer was a WWII era semicircle
design. Armament consisted of two 20 mm Hispano-Suiza HS.9 cannons, each housed
in a small pod under each wing .
 Despite the
conservative design, the minuscule prototype initially showed a promising
potential, being able to reach a level speed of 292 mph during flight testing.
Further development continued with the C.711 and C.712 with more powerful
engines, while the C.713, which flew by the end of 1937, introduced retractable
landing gear and a more conventional triangular vertical stabilizer.
Despite the
conservative design, the minuscule prototype initially showed a promising
potential, being able to reach a level speed of 292 mph during flight testing.
Further development continued with the C.711 and C.712 with more powerful
engines, while the C.713, which flew by the end of 1937, introduced retractable
landing gear and a more conventional triangular vertical stabilizer.
The definitive C.714 Cyclone, in essence an improved C.713, first flew in April
1938, introducing a new wing airfoil profile and a strengthened fuselage, also
featuring four machine guns instead of two cannons in the wing gondolas. Its
latest 12R-03 version of the Renault engine was fitted with a new carburettor
that allowed it to operate in negative g.
The French Air Force immediately ordered 20 examples with a further 180
follow-along order, but, even as early as January 1940, where the first
production units were delivered, it became apparent that, though light in
response and with acceptable top speed, the plane seriously lacked in climb rate
and maneuverability. In desperate need for power, but with its wooden
construction not permitting a more powerful engine to be fitted, the type had no
other option but to be hastily withdrawn from active service next month!
Due to the disappointing performance, production order was reduced to 90, with
plans to divert 80 of them to Finland to fight in the Winter War, flown by
French pilots. The events in France, however, resulted in only six aircraft
being delivered in Finland. Those machines were assembled and tested by Finnish
pilots, where they were found severely limited and were not committed to combat
whatsoever. By the end of June, where France fell, the total number of delivered
units had been somewhere between 53 and 98.
Projected versions included the C.720 trainer, the C.760 fighter with a 750 hp
Isotta-Fraschini Delta engine, and the C.770 fighter with a 800 hp Renault
V-engine, none of which materialized. Luckily, one full C.714 airframe as well
as one additional fuselage were preserved in Finland. The fuselage was offered
back to the Musée de l'Air et de l'Espace where it is currently (as of 2022)
undergoing restoration.
 On
18 May 1940, 35 Caudrons were delivered to the I/145 "Groupe de Chasse Polonais",
stationed at the Mions airfield. After just 23 sorties, the expected adverse
opinion of the fighter was confirmed by the Polish frontline pilots who
expressed concerns not only regarding its lack of power, but also its general
inability to match contemporary German fighters. Next week’s order of French
Minister of War Guy La Chambre for all C.714s to be immediately withdrawn from
active service came as no surprise.
On
18 May 1940, 35 Caudrons were delivered to the I/145 "Groupe de Chasse Polonais",
stationed at the Mions airfield. After just 23 sorties, the expected adverse
opinion of the fighter was confirmed by the Polish frontline pilots who
expressed concerns not only regarding its lack of power, but also its general
inability to match contemporary German fighters. Next week’s order of French
Minister of War Guy La Chambre for all C.714s to be immediately withdrawn from
active service came as no surprise.
However the petite Caudron’s little star was about to flicker: having no other
aircraft available, the brave and potent Polish pilots ignored the withdrawal
order and continued to operate the plane! Despite flying a lesser fighter, they
managed to score 12 confirmed and 3 unconfirmed victories in three battles
between 8 and 11 June, with four Do 17s, five Bf 110s and even three Bf 109s
included among the aircraft shot down! Losses included 9 in the air and 9 more
on the ground. The type was also used by the Polish training squadron based in
Bron near Lyon, with the pilots managing to disperse several bombing raids. They
did not score any kills, but did not lose any aircraft either.
The C.714 was a classic example of an aircraft with a promising initial design
that ultimately failed to perform its specified role. At least, it was granted a
chance to show some credible potential at the hands of the brave and skillful
Polish pilots.
| THE KIT |
 This
is the venerable Heller kit that was first introduced in 1967 and has been
reboxed (also by other companies) many times ever since, the molds totally
unchanged. Definitely an old school petite kit featuring correct overall shape
but lacking in the key areas of the interior (none provided but a crude seat)
and the wheel bays (nonexistent), with its few parts calling for a simple,
uncomplex build. My copy was the 1993 edition, discovered (together with some
other Heller/Airfix leftover goodies) in a small town’s book/toy shop on my way
to vacation in summer 2004 at killer prices. Needless to say I bought them all…
This
is the venerable Heller kit that was first introduced in 1967 and has been
reboxed (also by other companies) many times ever since, the molds totally
unchanged. Definitely an old school petite kit featuring correct overall shape
but lacking in the key areas of the interior (none provided but a crude seat)
and the wheel bays (nonexistent), with its few parts calling for a simple,
uncomplex build. My copy was the 1993 edition, discovered (together with some
other Heller/Airfix leftover goodies) in a small town’s book/toy shop on my way
to vacation in summer 2004 at killer prices. Needless to say I bought them all…
The specific kit comes in the typical 90’s era Heller small top opening box with
an attractive box art of artist Serge Jamois, portraying a C.714 having
intercepted what looks like a Do-17 at the very distant background. It is your
classic old Heller kit with few parts, raised details and good molding. For a
more detailed description of its contents, together with a look at the
instructions, you may refer to the preview of this kit found at the MM archives.
Unashamedly confessing that I am heart and soul attracted to old Heller kits
(among others), I was trying through the years to find an excuse and build this
sweetie: well, the excuse came only after 18 years residing in my Shelf of Doom
(my kits storage area…), when I decided to build the petite fighter and send it
to a beloved French friend as a Christmas gift.
| CONSTRUCTION |
I started by gluing the fuselage
halves together, followed by the cowling top and the nose. Regarding the latter,
both front air inlets were drilled out for extra realism, with the main bigger
one receiving a piece of fine mesh at its rear end, as witnessed in a net found
cutaway (the lower smaller hole that represents the oil cooler inlet would
definitely end at some kind of radiator face, but it was too small so I did not
bother adding any). The delicate gunsight that is molded together with the
starboard fuselage half was carefully cut away, to be attached in final stages.
 Moving into
the nonexistent interior, I decided not to deal any further than inserting a
suitably cut styrene plate to represent the instrument panel, adding a scratch
built stick and thinning the kit supplied seat. In particular, I did not bother
adding the rear bulkhead and the distinctive rear view panels (a-la P-40 style),
something that I bitterly regretted, as the rear emptiness was too evident
through the extensive glazing and I had to add some suitable paneling at later
stages from just the cockpit opening, with the model decaled…
Moving into
the nonexistent interior, I decided not to deal any further than inserting a
suitably cut styrene plate to represent the instrument panel, adding a scratch
built stick and thinning the kit supplied seat. In particular, I did not bother
adding the rear bulkhead and the distinctive rear view panels (a-la P-40 style),
something that I bitterly regretted, as the rear emptiness was too evident
through the extensive glazing and I had to add some suitable paneling at later
stages from just the cockpit opening, with the model decaled…
Nevertheless, the bottom wing half was attached, followed by the upper halves
and the horizontal stabilizers. Fit needed some attention all around, with gaps
and mismatches arising in various areas, all initially treated with liquefied
styrene, followed by normal putty. Whereas the small size of the model deems the
gaps treating process a not too painstaking act, it has to be acknowledged that
these old Heller kits (among, possibly, similar others) should better be treated
more like limited run kits.
Opting for more realistic looks, I decided to open the twelve distinctive
exhaust openings that are represented as small protruding rectangles. Cutting
out tiny rectangular shapes was beyond my skills (and my patience), so I just
micro-drilled out those protrusions, merely opting for an “oval” look by moving
my micro drill horizontally. The result, though far from correct, looks
interesting from three feet or so…The gun openings at the wing gondolas and the
corresponding used shell ejector tubes were drilled out at this time, as well.
Taking the decision to create some sort of wheel bays, I managed to insert and
secure with glue a suitably cut styrene plate that doubled as cockpit floor
front section, followed by a smaller piece that played the role of left/right
bay separating panel. Some pieces of stretched sprue were applied to the inner
walling, to represent “ribbing”. After an overall fine sanding I took “mon-petit”
Caudron to the paint shop!
| COLORS & MARKINGS |
French WWII camos, apart from being
quite attractive, are also very particular, as, to my understanding, their
patterns varied, depending (to a degree, at least) on the specific painter’s
mood, with the many net available seasonal pics providing good justification
towards that direction. This is a modeler's blessing and a curse together,
since, on the one hand, many of us love “individuality” regarding our modeling
subjects, but, on the other hand, the only way to try achieving it is by having
handy solid pictorial evidence of “the specific machine at the specific time”.
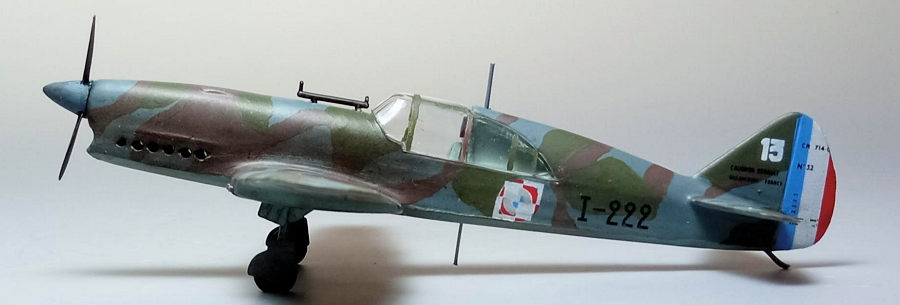
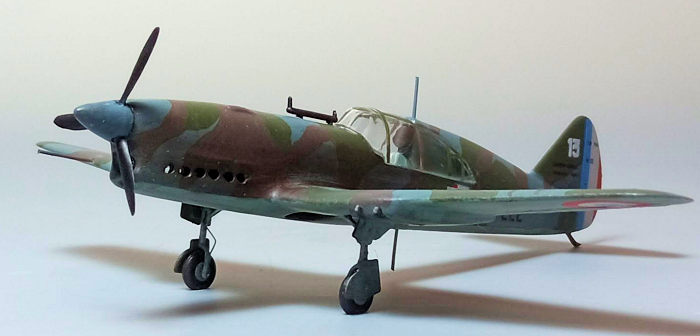
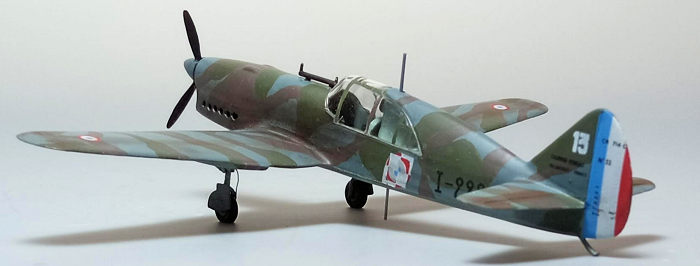
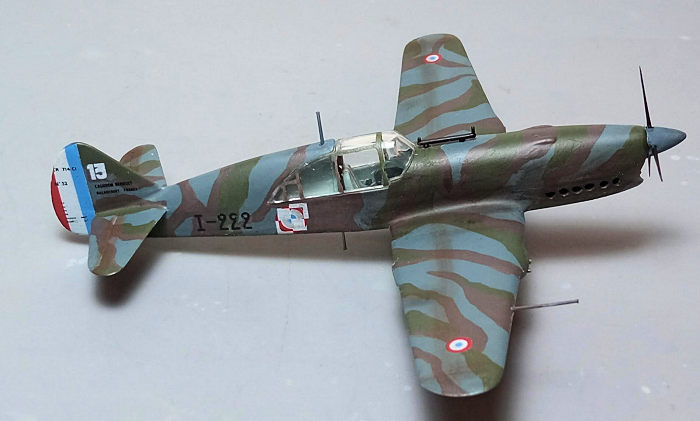 In order to
make my life simpler, I just trusted (and tried to follow, as the camo is
complex) Heller’s painting recommendations for this machine, representing #13
plane, belonging to I-143 Groupe de Chasse, as it stood in June 1940 when flown
by Polish pilots. The particular example featured light blue-gray undersides and
intermediate blue-gray topsides, with “gray-ish green” and “chocolate” shades
applied on top to a somehow “streaky” fashion. The fuselage insignia were really
interesting, as they were “modified French” roundels, having some white
judiciously applied over them, in order to resemble the Polish rectangular ones.
In order to
make my life simpler, I just trusted (and tried to follow, as the camo is
complex) Heller’s painting recommendations for this machine, representing #13
plane, belonging to I-143 Groupe de Chasse, as it stood in June 1940 when flown
by Polish pilots. The particular example featured light blue-gray undersides and
intermediate blue-gray topsides, with “gray-ish green” and “chocolate” shades
applied on top to a somehow “streaky” fashion. The fuselage insignia were really
interesting, as they were “modified French” roundels, having some white
judiciously applied over them, in order to resemble the Polish rectangular ones.
I figured it would be nice to take a trip down memory lane with this, so I went
for brush painting (few things can be more nostalgic, modeling wise, than brush
painting a Heller oldie with Humbrol enamels and a fine red sable Humbrol
brush!). I thus brush-painted the undersides with Hu175 Hellgrau (long
discontinued), which dried to a nice light blue gray shade, then masked it off
and continued by applying Hu144 Intermediate Blue at all topsides. Now, Hu144 is
a matt shade that dries dead matt when airbrushed, but it dried dead gloss upon
hand brushing: life is strange!
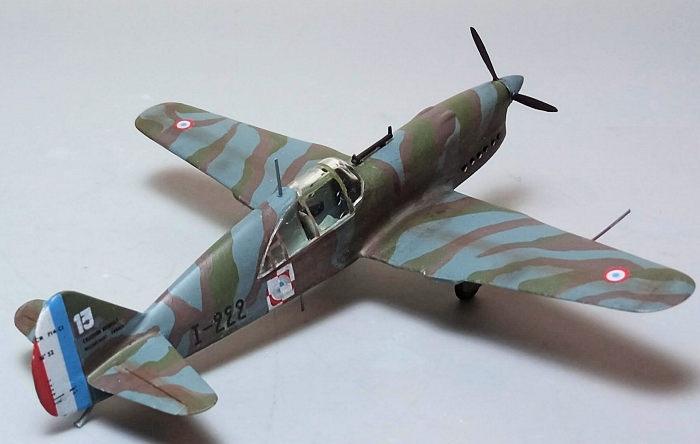
Continuing with the top camo, armed with a 000 brush and paint thinned to milk
consistency, I carefully applied chocolate and green streaks all over (for which
I used Hu98 and Hu86 respectively), trying to somehow follow the Heller painting
diagram on a trial and error basis. Upon feeling satisfied, I gave the whole
model a coat of Future, in order to prepare the petite Caudron for decaling.
I used the kit decals, which, to my satisfaction, not only were reasonably
registered (something not always granted with Heller and Airfix decals of the
era), but also behaved beautifully, easily detaching from their backing paper
and snuggling down to the surface details. A coat of Future sealed them.
| FINAL CONSTRUCTION |
Finalizing the cockpit, I fabricated a
control stick out of stretched sprue and attached it, then thinned down the
crude seat’s side panels to paper thickness and also attached it. Basic cockpit
and seat color was the same underside light blue-gray (a good number of sources
state a darker blue-gray shade), with instrument panel, stick grip and stick
boot done in black. The instrument panel received white, red and silver “pins”,
in order to represent its instrumentation, whereas the sidewalls had some black
rectangles painted on, to represent side boxes. The seat received seat belts
made from masking tape.
Though the above cockpit “beef-up” was far from accurate, it did exhibit a
degree of believable busyness when viewed through the thick and consequently
distorting canopy. It was only then that my hopes for an unnoticed aft empty
interior diminished, as the rear emptiness was too prominent even through the
thick glass (coming to think of it, the distorting canopy had nothing to distort
but emptiness…). Off to scratch building then!
The area behind the pilot's head had a similar configuration as in the P-40. By
consulting a net available cutaway, I decided to formulate a (crude, truth be
told) "rear vision" area, featuring an appropriately cut styrene plate, with two
suitably sized and equally appropriately cut leftover external tank pieces
attached to the plate’s rears. After some trimming I managed to have a
reasonably shaped part that I attached in position and painted it with the same
light blue-gray cockpit color. A small circular styrene piece painted dark brown
represented the pilot’s head cushion.
 As a side
note, please bear in mind that, should you wish to go for a such above job,
either the one piece canopy will have to have its (invisible when attached) rear
top portion carefully cut away (so it will be able to be inserted at later
stages in the now modified position), or you may attach the canopy at early
stages and add the scratch built rear view area parts from underneath, before
attaching the main wing.
As a side
note, please bear in mind that, should you wish to go for a such above job,
either the one piece canopy will have to have its (invisible when attached) rear
top portion carefully cut away (so it will be able to be inserted at later
stages in the now modified position), or you may attach the canopy at early
stages and add the scratch built rear view area parts from underneath, before
attaching the main wing.
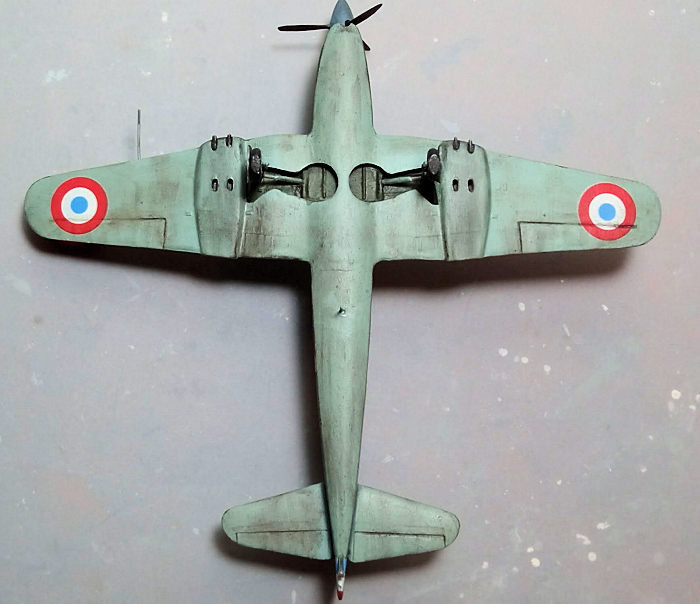
The delicate landing gear was attached, followed by the top gear doors, the main
wheels and the lower gear doors successively. Landing gear color, including the
wheel rims, was light blue gray. Brake lines were added from black stretched
sprue and the minuscule wheels were tad filed to look weighted. Oleos were
highlighted with silver by my fine silver pen. Bays and door innards were
painted the same topside gray-ish green, which was what more or less Heller
advised. Light or intermediate blue-gray are more commonly witnessed at those
areas and I believe my gray-ish green choice has little chances of being
correct, but I decided to go for it, in order to give the model some “specific”
looks.
The tiny wing guns were attached in position. They were painted burned metal,
together with the exhaust openings. The shell ejector tubes were drilled out at
this time, as well. Per my trend, I had removed the fuselage-molded tail skid at
early stages for not snapping it off. Also, per my trend, I lost it at some
point and had to fabricate one from stretched sprue…
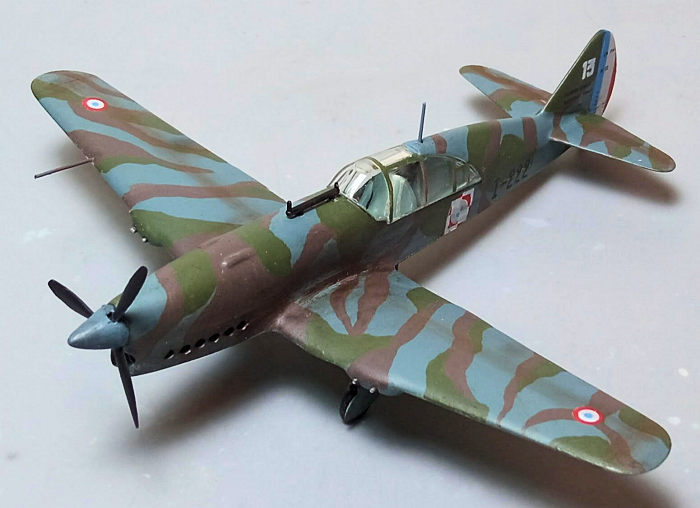
The very delicate prop had its spinner affixed and attached in position. It had
intermediate blue-gray sinner and black blades (C.714 props are an equal
mystical experience: blades were either aluminum or black, whereas spinners were
black or blue-gray, with camo streaks extending onto them on occasion, meaning
one had to rotate the spinner at the exact position, in order for the camo lines
to match …).
It was then time for weathering, which included some engine staining and general
dirtying, all done with dark brown and black dry pastels. Black wash was also
applied at the bays and some silver was dry brushed at the prop tips and the
seat “rubbing” areas, but nowhere else, since the Caudron was extensively made
of wood. A matt coat gave the bird its final finish.
The canopy had its rear top part carefully cut away (first by judicious
micro-drilling, to create a “cutting pattern”, followed by mini-sawing) in
order to be able to be inserted in position. After having its frames hand
painted, it was press-fitted in position, the gaps taken care of white glue. The
gunsight was painted black and attached. I could not spot any wingtip lights in
net pics, so I did not apply any. The two antenna masts and the pitot tube were
finally fabricated from stretched sprue and attached in position, before calling
the petite Caudron done!
| CONCLUSIONS |
As predicted in its preview, this kit
cannot indeed be more “Heller”: an oldie, depicting a French “esoteric” subject,
correct overall shape, sparse or soft or nonexistent details (the key areas
included), well molded with not too much flash, low parts count, adequate decals
and sufficient instructions that promise an uncomplex build.
Fit needed some attention but nothing too serious, just a bit more test fitting,
filling and sanding. The nonexistent cockpit, including the rear view area, is a
definite minus, its lack being amplified by the extensive glazing and the thick
but clear canopy with the equally nonexistent wheel bays not looking too good
either. Decals behaved well and added a lot to the final looks.
If you want a modern, detailed 1/72 C.714, the RS kit (first issued in 2012 and
reissued in 2019) is by all means the way to go, as it looks superb in the box
with plenty of details all around. Being an RS, it will typically require more
effort than your usual mainstream shake and bake kit, but the final result is
expected to be rewarding.
The Heller kit (together with its numerous reboxings) comes as a cheaper,
simpler (towards simplistic) alternative, offering a good external shape but
lacking in details. If you wish, you may add some means of cockpit and wheel
wells (a most probable scratch building action to a good extent, since, apart
from the very nice Falcon vacuform canopy and an instrument panel, I could not
spot any other aftermarket stuff). If you build it out of the box, an acceptable
model will emerge, but if you walk that extra mile, you may come up with a
superlative result, such as Tom Draper’s build found
at the MM archives.
So, If you have one or happen to come across one, go on and build it: a nice
representation of the petite little fighter will emerge, not occupying a serious
amount of space, but, nevertheless, being a head turner in your showcase to the
potential viewers who will most probably wonder what obscure type the model
represents.
Happy Modeling!
24 January 2023
Copyright ModelingMadness.com. All rights reserved. No reproduction in part or in whole without express permission.
If you would like your product reviewed fairly and fairly quickly, please contact the editor or see other details in the Note to Contributors.