Azur/FRROM 1/72 Bloch MB.210
| KIT #: | FR0056 |
| PRICE: | $ |
| DECALS: | Three options |
| REVIEWER: | Ryan Grosswiler |
| NOTES: | CMK Wheels, Special Hobby mask set |
| HISTORY |
French bombers of the 1930s remain legendary for their sheer ugliness; the Bloch 210 represented that technological half-step from that era of slab-sided contouring and exterior structural bracing to the clean, stressed-skin aluminum structures which would characterize the aircraft of the Next Big War. As such, like the Polikarpov I-16, it would symbolize a major military power caught awkwardly trying to modernize just a moment too late before the onslaught.
It started out okay, the aerodynamic model passing all its wind-tunnel studies and prototype entering flight test at the end of 1933. Though often described as a 'development' of the earlier high-wing MB.200, the new design in reality had little in common with the earlier aircraft except its simple no-contour construction with exterior longerons, popular at the time. Also, the initial customer was actually the French Navy which wanted a heavy torpedo bomber, and because that service had so little experience with land-based aircraft soon requested it be converted into a seaplane. The addition of two large floats obviously did nothing for its merely satisfactory performance, and soon the Navy lost interest (though, interestingly, the sole prototype would remain in its service as a hack until summer 1940).
 In the meantime,
the Armée
de l'Air had
gained interest in the design as it represented a leap forward in technology
over its sluggish bombers currently in service. Considerable changes were
made, the aircraft being slightly enlarged, retractable gear replacing the
prototype's fixed, trousered units, a bomb bay incorporated, and dihedral
increased. 80 were ordered, the Bloch 210 finally entering service in 1937.
The small production order was indicative that by this time it was
recognized to be an interim type, as by then the much more promising and
modern LeO 450 and Amiot 350 bombers were in advanced development. However,
in the meantime France attempted a sweeping nationalization of its
aeronautical industry, expecting this action to bring a 40% increase in
total aircraft production. Unfortunately it instead brought a massive drop
and considerable chaos, so the Bloch continued in production. 255 would
eventually be delivered with a further 35 to Republican Spain and 10 to
Romania.
In the meantime,
the Armée
de l'Air had
gained interest in the design as it represented a leap forward in technology
over its sluggish bombers currently in service. Considerable changes were
made, the aircraft being slightly enlarged, retractable gear replacing the
prototype's fixed, trousered units, a bomb bay incorporated, and dihedral
increased. 80 were ordered, the Bloch 210 finally entering service in 1937.
The small production order was indicative that by this time it was
recognized to be an interim type, as by then the much more promising and
modern LeO 450 and Amiot 350 bombers were in advanced development. However,
in the meantime France attempted a sweeping nationalization of its
aeronautical industry, expecting this action to bring a 40% increase in
total aircraft production. Unfortunately it instead brought a massive drop
and considerable chaos, so the Bloch continued in production. 255 would
eventually be delivered with a further 35 to Republican Spain and 10 to
Romania.
Following the failure of Bloch’s own MB. 130 to meet the role, the type remained in production until March of 1939. In the spring of 1940 it was frantically being replaced by the Amiot 354 and LeO 451 which were finally beginning to trickle off the production lines, but the process was only just starting by the time the Germans invaded in May. Four bomber groups still featured the Bloch 210 as frontline equipment
Among these were GB I/21 and II/21, who had only traded their old 200s for 210s during late summer 1939. On the evening of 17 May 1940, I/21 possessed six Amiot 354s and six Bloch 210s, while II/21 was still equipped entirely with the old Bloch. At twilight on the 18th, the first operational sorties were commenced and aircraft quickly turned around for a second time before morning.
 This
rhythm was maintained until the 28th, and achieved a remarkably low casualty
rate. Missions consisted of attacks against German communication nodes
and airfields on French soil, armed reconnaissance against enemy convoys,
and a few transport flights to resupply the battered British and French
troops at Dunkirk. By the end of May, both the weather and strategic
situation were worsening, and combat losses plus operational attrition were
gradually having a cumulative effect (remember, night/instrument flying was
a very new innovation at the time). Replacement aircraft and crews were
received, but both tended to be of sorry quality.
This
rhythm was maintained until the 28th, and achieved a remarkably low casualty
rate. Missions consisted of attacks against German communication nodes
and airfields on French soil, armed reconnaissance against enemy convoys,
and a few transport flights to resupply the battered British and French
troops at Dunkirk. By the end of May, both the weather and strategic
situation were worsening, and combat losses plus operational attrition were
gradually having a cumulative effect (remember, night/instrument flying was
a very new innovation at the time). Replacement aircraft and crews were
received, but both tended to be of sorry quality.
When the Blitzkrieg continued with the Wehrmacht breakout from Manche to Loan at the beginning of June, all MB.210 units were re-tasked to offensive reconnaissance missions to points across the collapsing front line, then concentrated once more for an evening attack against the German pontoon bridges built across the Somme near Perrone. Though flown once again at night and against concentrated flak and other defenses, the mission was achieved without losses. This would be the last gasp, however, and for the next ten days their mode of combat became one of piecemeal, harassment sorties, reactive in nature.
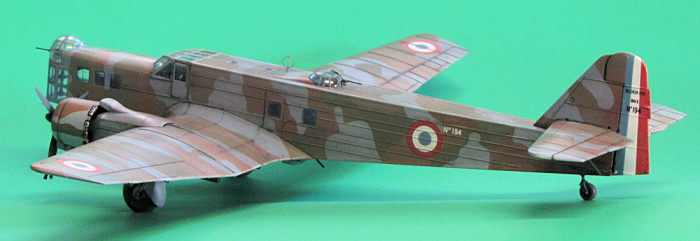
Despite its legacy of obsolescence, the Bloch 210 had in reality performed well under almost-impossible circumstances. In mid-June, both groups withdrew to France's possessions in North Africa, leaving their remaining Bloch 210s behind. Aircraft # L1-70 as depicted by my model was found wrecked and abandoned at La Ferté-Gaucher when the shooting stopped. The Germans seized about 37 operable aircraft, using some for secondary duties and passing the remainder to Bulgaria. The ten Romanian machines would see heavy action in the first months of Operation Barbarossa.
| THE KIT |
Since the late '60s we've had the Heller kit to fill in the blank on our shelf for this type. It's still a perfectly serviceable kit, so did we need this one? By all means, yes! But how do the two compare? What difference does six decades make? In short, detail.
Inevitably, Azur/FrRom's engineering is like Heller's, with a "flat-pack" -style fuselage breakdown. The root fairings are molded with the wings rather than the fuselage. Detail is far and away much more refined than that of the Heller offering, especially visible in such things as the wheels and engines, as to be expected. Clear parts are likewise crisp, beautifully clear, and distortion-free, though the new kit does not follow Heller's creative approach of incorporating the canopy frames into the exterior surfaces, as with the real thing.
 There's a complete
fuselage interior from the nose to the compartment aft of the bomb bay. The 210
featured a few different alterations to the top of its vertical stabilizer, and
the final form is depicted here in a separate 3D-printed resin part. A lovely
color instruction booklet, a little fret of photoetch bits, and a big decal
sheet for the three options provided (two in overall Verde Fonce with aluminum
cowls/nacelles for those with less time on their hands, the third in the
multicolored camouflage of the box art) round out the package. This kit as of
this writing is available in three separate releases, all varying not only in
decals/color schemes but different exhaust/cowling and vertical fin tips,
reflecting minor changes over the aircraft's production life. In this case the
exhausts are groups of individual stacks, injection molded—more on these later!
There's a complete
fuselage interior from the nose to the compartment aft of the bomb bay. The 210
featured a few different alterations to the top of its vertical stabilizer, and
the final form is depicted here in a separate 3D-printed resin part. A lovely
color instruction booklet, a little fret of photoetch bits, and a big decal
sheet for the three options provided (two in overall Verde Fonce with aluminum
cowls/nacelles for those with less time on their hands, the third in the
multicolored camouflage of the box art) round out the package. This kit as of
this writing is available in three separate releases, all varying not only in
decals/color schemes but different exhaust/cowling and vertical fin tips,
reflecting minor changes over the aircraft's production life. In this case the
exhausts are groups of individual stacks, injection molded—more on these later!
Despite the Bloch 210 frequently being brought up in the above-mentioned lamentations regarding the aesthetic qualities of French bombardment aircraft between the wars, I always thought this to be a snazzy-looking airplane, jaunty lines with just a dash of steampunk thrown in, so when it was offered to me verily I jumped at the opportunity.
| CONSTRUCTION |
After I received this kit I read Scott's review closely, and my project benefitted from his experience and report in three ways:
First, (in my only major deviation from the instructions) I started by skipping ahead to attach all the windows to the fuselage sides, bottom, and top (parts A1, A2, A4, and A5). These fit well and should make an audible 'pop' when they snap into place. I followed by running liquid cement into their joints with capillary action, checking visually for the color change with the flow. After these windows were allowed to cure 24 hours permanent attachment was verified by gently poking them individually with my index finger to ensure there wouldn't be any future 'escapees'! They were then masked on the inside.
 Secondly,
all the fuselage side and interior bulkhead parts had their mating edges
'prepped'. The sprues which flow into these edges were trimmed completely away,
and the very fine mold separation line which runs around all these parts was
eliminated with a few passes of a fine-grit sanding stick. Spend the cumulative
ten minutes doing this and fit becomes outstanding everywhere. These fuselage
components were assembled up through Step 3, which sees the floors and bulkheads
in place on the fuselage bottom. Then—immediately—with all these joints still
pliable, the fuselage sides and top were taped firmly (but not glued) into place
to this core structure to ensure it all set up accurately. There should be no
gaps. I did have to trim a bit (+/- 1mm) off the points at the extreme aft
points of the top and bottom (A4 and A5) surfaces. If yours doesn't fit check
your work to see what's holding things up.
Secondly,
all the fuselage side and interior bulkhead parts had their mating edges
'prepped'. The sprues which flow into these edges were trimmed completely away,
and the very fine mold separation line which runs around all these parts was
eliminated with a few passes of a fine-grit sanding stick. Spend the cumulative
ten minutes doing this and fit becomes outstanding everywhere. These fuselage
components were assembled up through Step 3, which sees the floors and bulkheads
in place on the fuselage bottom. Then—immediately—with all these joints still
pliable, the fuselage sides and top were taped firmly (but not glued) into place
to this core structure to ensure it all set up accurately. There should be no
gaps. I did have to trim a bit (+/- 1mm) off the points at the extreme aft
points of the top and bottom (A4 and A5) surfaces. If yours doesn't fit check
your work to see what's holding things up.
With this basic fuselage assembly set aside to cure, I got the attachment of the printed resin fin tip out of the way. The special part was detached from its foundation and the vertical stabilizer halves had their tops cut off following guidance in Azur's instructions. The resin part fits okay, but I was concerned it would look visibly retrofitted. To get it blended properly, I ended up doing quite a bit of filling and sanding, finishing by replacing the lost external rib detail with stretched sprue. If you don't want to go to all this work one of this kit's finishing options features the stock fin tip.
24 hours had passed, and the fuselage sides were pulled off for work on the insides. The instructions call for a "Blue-Grey" on all interior surfaces, so after completing assembly of the inside bits and adding some lead-foil seatbelts, I masked all mating edges of the fuselage pieces with 1mm Tamiya tape. The interior was then thoroughly shot in Testor's Flat Black enamel, followed by Flat Sky Blue lightly and from above. This is a technique borrowed from our brethren who model in 1/32 and above, a two-step process to force a highlighting effect and really make the interior features 'pop'. While you're at it, take the time to mask and paint the pilots' clear sidewall panel (F3 and F4) interiors while you're at it; these surfaces are very visible within the finished model...I even drew in some door frames on these with a pencil and small straightedge when the paint dried. Apart from the cockpit, the interior is really only visible in a shadowy sort of way.
Interior done, remaining assembly was totally straightforward. The semi-recessed turrets must be fitted before the fuselage is finally closed, something I never like, and I found it helpful to keep them rotatable for masking and painting. Likewise the main landing gear units, which I assembled into one side of the nacelle then temporarily taped the nacelles together so the landing gear components would cure accurately in place. These could then be painted without concern of glue smearing or other messiness.
 The
third way I incorporated the lessons from Scott's build was to strengthen the
guns. All the gun barrels were replaced with Albion Alloys tube. I also attached
the guns to the turret frames at a second point besides that very fragile pintle
mount. In 1/72, if you use a tiny rectangle of sheet styrene to bridge the gap
between the gun breech or magazine to the turret frame, you can use a similarly
tiny lick of dark gray paint to make this reinforcement inconspicuous. Both
these acts made the guns far more resistant against unwanted detachment.
The
third way I incorporated the lessons from Scott's build was to strengthen the
guns. All the gun barrels were replaced with Albion Alloys tube. I also attached
the guns to the turret frames at a second point besides that very fragile pintle
mount. In 1/72, if you use a tiny rectangle of sheet styrene to bridge the gap
between the gun breech or magazine to the turret frame, you can use a similarly
tiny lick of dark gray paint to make this reinforcement inconspicuous. Both
these acts made the guns far more resistant against unwanted detachment.
Powerplant improvements: The propellers feature a little 'nub' on the back of the hub (“Nub on the Hub”: not a bad name for a bar band) meant to correspond with a little hole in the engine crankshaft case—you're obviously supposed to glue the propellers in place when you're done with the model. As this arrangement invites breakage it was replaced with a bit of brass tube and a hole through the engine to form a proper shaft setup. Likewise, pushrods on the front of the engine are not provided and were represented with styrene rod. There were several exhaust arrangements implemented over the life of the Bloch 210, leading to one final bit of tedium I felt compelled to engage upon. This involves all those 28 exhaust stacks—they're molded 'solid', probably due to molding limitations. In 1/72, this is normal and usually not an issue. In this case, every single one of them faces outward, and given the loving detail lavished by Azur-FrRom on the rest of the kit the omission is glaringly obvious once you notice it.
I therefore drilled every single one of them out. This started with two holes drilled with a sharp hobby knife in each stack, which were then joined into a single oblong hole by a gentle back-and-forth motion with my hand drill, rotating the tool while gently moving it back and forth, being careful to not let the bit escape the expanding trough. The resulting opening was cleaned up with a little brush of liquid cement. I have a life and healthy relationships. I swear! *Looks around awkwardly for validation* Don't I?
I join Scott and strongly recommend the use of a masking set! Special Hobby's own was used in this case, which saved some hours of tedious work over no less than 98 separate panes. Before masking, I run a wash of gloss pure black around all the window perimeters, which makes for a cleaner joint line and better depth. I also used CMK's resin wheels. Besides being one piece and ready to paint, they offer a slightly better contour and more refined detail, though most folks will find the ones in the kit just fine.
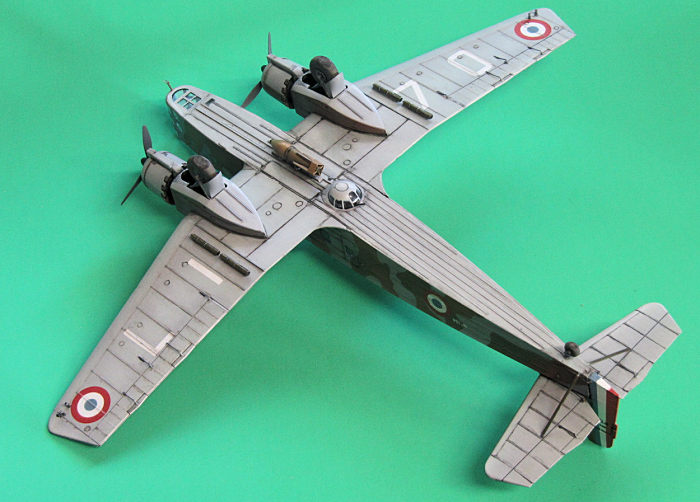
There are two external longerons missing aft of each wheel well (at least as depicted in the painting diagram), likely from molding limitations. As this leaves the surface rather blank, these were made up from fine Plastruct rod and cemented in place. Exterior control surface linkages are represented in photoetch. If you hate this medium for protruding detail as much as I do, try using J&B Weld for attachment instead of CA adhesives. This two-part epoxy gives you ample working time and can be blended into the surrounding surface with denatured alcohol and a fine-tipped brush. Once allowed to cure, the finished joint is much more durable—all linkages survived the painting and finishing process without a problem.
| COLORS & MARKINGS |
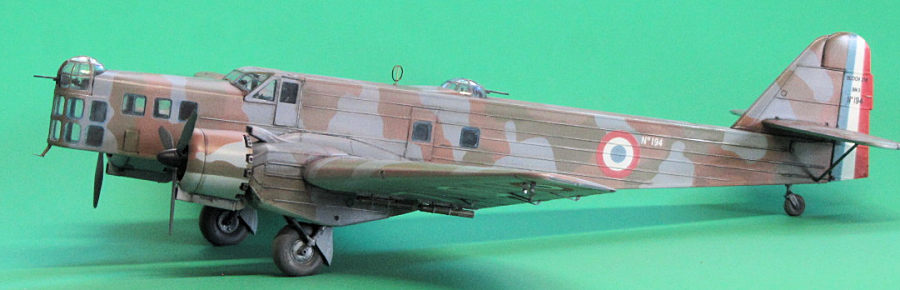
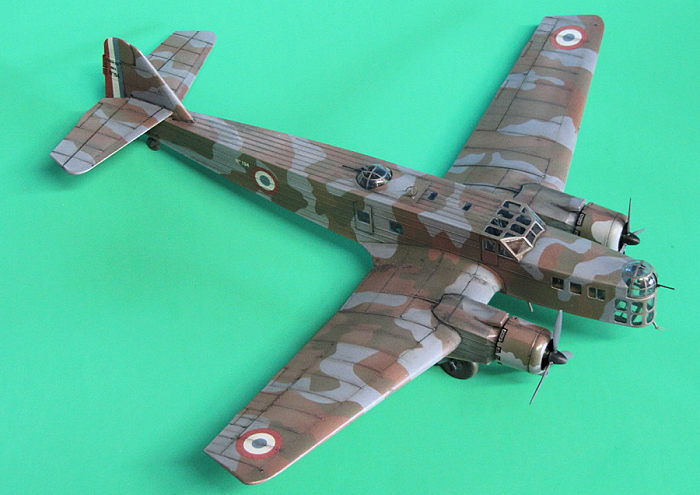
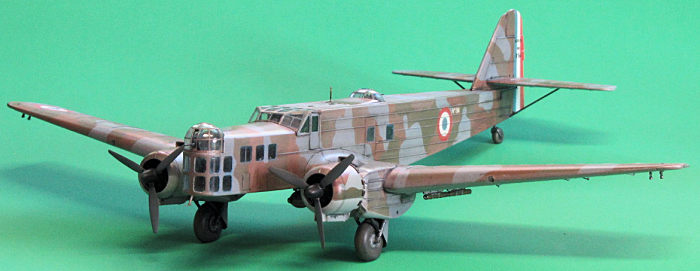
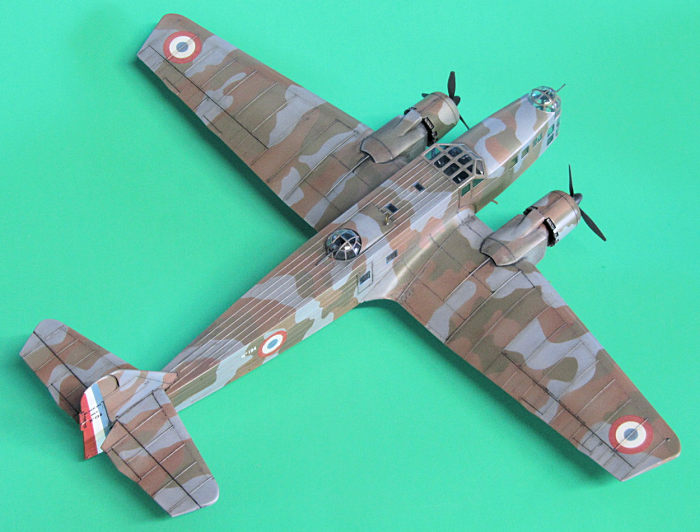
For contrast from Scott's build, and in defiance of all reason, the complex disruptive scheme of the moody box art was selected. I started by spraying the window frames the interior color, then an overall primer coat of Tamiya white primer straight from the can. Dark gray preshade followed, a technique I still find useful to emphasize the shadowy areas of the aircraft and surfaces which would receive a lot of staining. Then came the five colors which cover the exterior of the depicted airframe, all of it hard-edged (and appearing to be brush-painted) according to the half-dozen surviving photos of 210s painted this way.
 Pattern:
There's really no other way to do this than tedious, concentrated masking and
painting, which ultimately consumed 21 hours and 7 feet of Tamiya tape (I
counted both). The undersides were sprayed freehand first in ‘Gris
Bleu Clar’
(FS25189 or 26329,
lots of discrepancy between sources here). The underside was masked, then the
top side ‘Gris Bleu
Fonce’
(FS35164) was shot.
Both grays were based on MRP’s USN Intermediate Blue with a bit of Red,
lightened with white. Every element of the topside distemper was then cut
individually from Tamiya tape, all 149 of them. First the topside gray was
masked off, with each element sketched on to the tape, placed according to
Special Hobby's diagram, then the color sprayed before moving on to brown, then
finally the green. Plan to do this over a period of days, with lots of breaks!
Pattern:
There's really no other way to do this than tedious, concentrated masking and
painting, which ultimately consumed 21 hours and 7 feet of Tamiya tape (I
counted both). The undersides were sprayed freehand first in ‘Gris
Bleu Clar’
(FS25189 or 26329,
lots of discrepancy between sources here). The underside was masked, then the
top side ‘Gris Bleu
Fonce’
(FS35164) was shot.
Both grays were based on MRP’s USN Intermediate Blue with a bit of Red,
lightened with white. Every element of the topside distemper was then cut
individually from Tamiya tape, all 149 of them. First the topside gray was
masked off, with each element sketched on to the tape, placed according to
Special Hobby's diagram, then the color sprayed before moving on to brown, then
finally the green. Plan to do this over a period of days, with lots of breaks!
Hues and contrasts: WWII Armee de L'Air color references are not exactly easy to come by, so I dug into the subject a little bit. ‘Brun Chocolat’ (FS20117) and ‘Verde Fonce’ (FS34096) followed the grays. As if all this isn't enough of a challenge, the modeler must ensure that the patches have the correct contrast with surrounding colors. I did so by gently lifting some of the masking at each step without detaching it entirely and looking at the protected bits beneath under varying light.
Whew! All this work was locked under two coats of Gunze Gloss Clear. Decals responded well to both Micro Set and Micro Sol. They do have a peculiar characteristic of looking terribly wrinkly when first soaked and applied, but then sucking down and going flat over the next couple hours. Those on the rudder are applied one over the other; take the time to allow each to cure fully before the next one on top goes on.
As a final touch, I got the D/F loop together. This was a super fiddly procedure, especially to get it perfectly circular, and I ended up replacing the vertical element with a bit of teeny-diameter brass rod. I didn't like the awkward look of the bomb in the forward position, so it was left off for now. All this painting and finishing work held the project from completion for fully five weeks, but I think the finished work looks pretty cool.
| CONCLUSIONS |
This is a superb kit, other than my grousing about the not-hollow exhausts. The only 'up' the old Heller kit has on this one is the cockpit top windows being properly incorporated into the fuselage surface. Azur-FRROM's kit absolutely eclipses the earlier release in all other respects, as it should, being 2025 technology instead of 1965. As I state above, take the few minutes to clean up all those mating edges in the fuselage parts. Do this one thing and the kit becomes a joy to build. Opening up all those exhaust stacks to rest my soul (plus the complex camo of this release) were the two things which stretched out this project so long, and both can be avoided with other releases if these scare you. Hopefully the aftermarket industry takes note of those exhaust stacks and provides improvement there, but don't hold your breath.
Having built Heller's, I wasn't going to acquire this kit, but it won me over in the course of things and now I can't wait to see what French multi-engine subject this provider does next. I'll be first in line!
| REFERENCES |
In keeping with French aviation after the Great War and before 1950, there's not a whole lot out there and what there is you will find to be usually out of print and expensive. The MMP book is ridiculously so in North America at this writing but can be found for a more reasonable sum in Europe. If you're interested in the general subject it's well worth the price if you can find it for less than $60.
Jose Fernandez and Patrick Laureau. French Bombers of WWII. Stratus/MMP Books, Poland. 2019. ISBN 978-83-63678-59-3
Pelletier, Allain. French Bombers of World War II in action. Squadron-Signal, TX. 2003. ISBN 978-0897474580
Taylor, John. Combat Aircraft of the World. G.P. Putman, New York. 1969.
My thanks to Azur/FRROM (via the Editor) for the review sample.
1
Back to the Previews Index Page
Back to the Previews Index Page