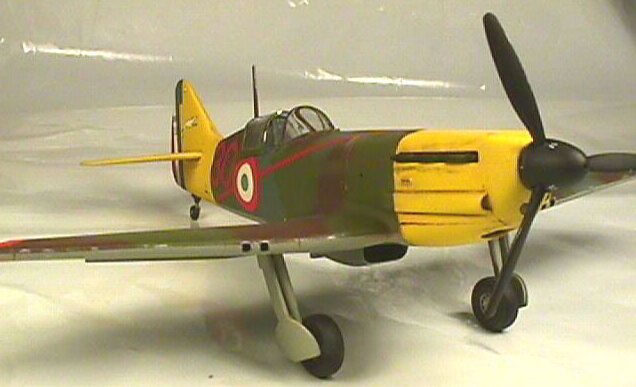
Tamiya 1/48 Dewoitine D.520
|
KIT # |
61048 |
|
PRICE: |
FF 165 |
|
DECALS: |
Three aircraft |
|
REVIEW : |
Tim Campbell |
|
NOTES: |
Aeromaster decals used |
|
HISTORY |
The Dewoitine D.520: "too little, too late".
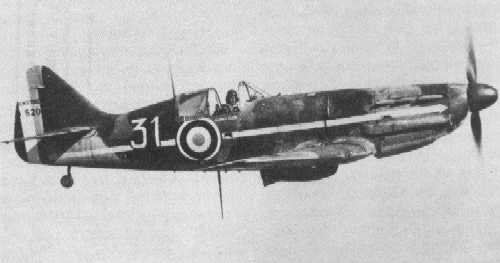
The D.520 began life in 1936 as Emile Dewoitine’s personal project to construct a fighter equivalent to the British Spitfire and Hurricane. The prototype flew in October 1938 – the engine overheated and the aircraft was not able to reach 520 km/h as hoped for. The design bureau went back to work on several modifications, notably repositioning the radiator under the fuselage. Further tests were conclusive: the D.520 was now able to reach 550 Km/h. Even if its performance was inferior to those of the Spitfire and Bf-109, it outclassed the latter in maneuverability.
 Between April
1939 and May 1940, 2200 D.520s had been ordered (120 destined for the Aeronavale).
The best fighter in the French inventory at the time of the German invasion, the
D 520 should have been more successful against the Luftwaffe, had it been more
widely available. However, due to catastrophically slow progress by an aviation
industry totally incapable of these production numbers, only 36 D.520s were in
service with GC (Groupe de Chasse) I/3, based at Cannes-Mandelieu when the
Germans launched their offensive.
Between April
1939 and May 1940, 2200 D.520s had been ordered (120 destined for the Aeronavale).
The best fighter in the French inventory at the time of the German invasion, the
D 520 should have been more successful against the Luftwaffe, had it been more
widely available. However, due to catastrophically slow progress by an aviation
industry totally incapable of these production numbers, only 36 D.520s were in
service with GC (Groupe de Chasse) I/3, based at Cannes-Mandelieu when the
Germans launched their offensive.
After the French campaign, they were requisitioned by the Vichy forces, fighting against British Hurricanes in 1942 in Syria, one of those being that of the writer Roald Dahl. The Vichy government subsequently put the D.520 back into production but in 1942 the Luftwaffe seized 411 aircraft, distributing them to Italy, Roumania and Bulgaria while retaining a number of them for training purposes. In 1944 Free French forces seized a number of them and put them back into service against the Germans in southern France.
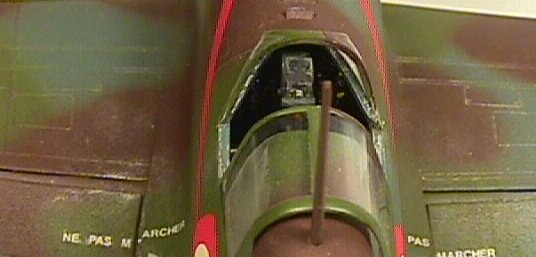
Powered by a Hispano-Suiza 12Y-45 V12 liquid cooled 920 hp engine, with a maximum speed of 329 mph (530 km/h), the D.520 was armed with one 20mm Hispano-Suiza HS404 cannon firing through the spinner and four 7.5mm MAC-34 M39 machine guns in the wings.
|
THE KIT |
Opening the box, you notice a surprisingly small number of parts (45) on the dark grey sprues. As usual, the kit has been well engineered, with fine panel line detail, intelligent breakdown and well-fitting parts. The transparencies (five parts) are crystal clear and poly caps are also provided so that you can easily remove the propellor. The cockpit detail is perfectly adequate for this price level. Call me easily satisfied if you like, but it’s a decent attempt for a kit offering, and there are aftermarket parts available from True Details and Hi-Tech if you feel the urge.
The instrument panel exhibits raised instrument outlines and a decal for the details themselves. You also have a choice of a different spinner for one of the decal options. Flaps may be up or down, and the radiator outlet flap may be open or closed.
The kit decals (printed by ScaleMaster) provide you with three different options: "Blue 2" of GC I/3, "White 6" of GC III/6, and an aircraft of GC II/18, painted in a German-type mottled finish.
|
CONSTRUCTION |
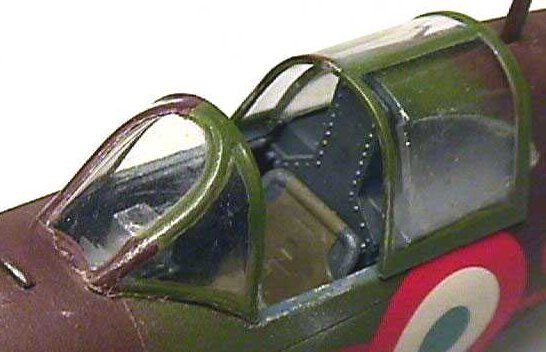
Starting with the cockpit, I sprayed the innards a dark bluish-grey (very technical, I know) before some detail painting. After a little drybrushing and a few scrapes with a silver pencil, it really didn’t look too bad (for a beginner). The fabric section of the seat was painted khaki before this was glued to the base.
 I should have
drilled out the corners of the seat to differentiate the tubular frame from the
canvas. I did not add any seatbelts as, at that time, I wasn’t aware of all
the photo-etch that had sprung up since my childhood. Eduard, of course, do a
D.520 detail set and WWII French belts are available from a couple of sources.
I should have
drilled out the corners of the seat to differentiate the tubular frame from the
canvas. I did not add any seatbelts as, at that time, I wasn’t aware of all
the photo-etch that had sprung up since my childhood. Eduard, of course, do a
D.520 detail set and WWII French belts are available from a couple of sources.
The instrument panel was painted black and then overcoated with Klir (Future) before application of the supplied decal. Once some MicroSol had been dabbed on a couple of times, this snuggled down very nicely and matched the raised detail exactly. I did muck up the very lower section of the instrument decal when trying to adjust it when still soft – it folded under itself and refused to come back out. However, a brief touch up with some white paint sorted that out and I can’t even tell where the problem was when I look at the kit now. The panel was then coated in matt varnish and a drop of Klir (Future) was put on each instrument face with a cocktail stick.
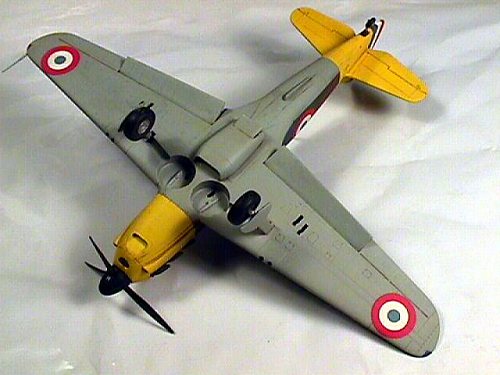
This model almost fell together – the fit is flawless except for one area. The junction of the underwing section and the rear fuselage needed careful gluing and some filler to blend things in properly. I then had to rescribe some lost detail. What a mess I made first time round! Anyway, with some more careful filling, sanding and scribing, I had a passable result.
The only other area I had a problem with was a visible seam in the nose area. Strangely, this seam appeared fine after priming, and only after I had finished the paint job did I notice a slight raised seam – you can see this in the cockpit photo. Disappointing, but I put it down to my relative inexperience and, perhaps, due to a little haste in wanting to complete the kit (big kid that I am). Tamiya suggest you add the exhausts quite early on in the sequence but I left these off until the end to simplify the painting process.
 Tamiya give
you the option of having the flaps down, which I decided to do. There are some
small tabs on the flaps to get the alignment correct and these just need to be
removed should you wish them in the "up" position. The radiator
fairing is not a flush fit and the mounting plates need to be thinned down a
little in order for this to sit right.
Tamiya give
you the option of having the flaps down, which I decided to do. There are some
small tabs on the flaps to get the alignment correct and these just need to be
removed should you wish them in the "up" position. The radiator
fairing is not a flush fit and the mounting plates need to be thinned down a
little in order for this to sit right.
The undercarriage needed some slight trimming and sanding as it was an incredibly tight fit, but this was only a couple of minutes work. The wing root join was a perfect fit, and construction was finished very quickly. The pitot on the port wing was replaced with one fashioned from stretched sprue, representing the shape better than the kit item.
|
PAINT & DECALS |
At the time, I had just visited the Paris model show with my uncle-in-law (a mad French custom hot-rod car modeller) who helped me select an airbrush - the Aztek 1000S. This is an entry-level single action using the same nozzles as the popular double-action A470. This is a not a bad brush for a beginner, and I found it easy to get started with – I didn’t want anything complicated at this stage.
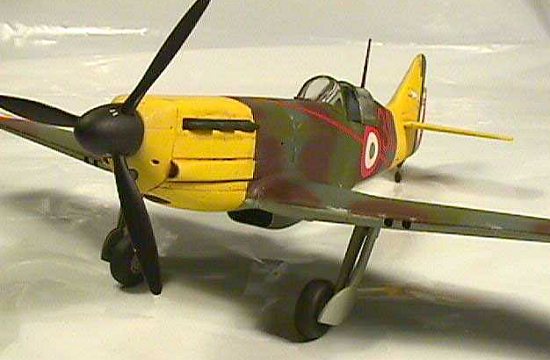
 I had picked
up some Aeromaster decals for this kit (48-095 Dewoitine Collection Part II) and
went for option three – an aircraft of GC II/3, 2nd Escadrille,
Vichy Air Force in Syria, July 1941. Flown by A/C Bouton, this had the standard
French camouflage of brown, green and blue-grey with light blue-grey undersides
and a black spinner. Oh yes, and a bright yellow nose and tail (which decided it
for me).
I had picked
up some Aeromaster decals for this kit (48-095 Dewoitine Collection Part II) and
went for option three – an aircraft of GC II/3, 2nd Escadrille,
Vichy Air Force in Syria, July 1941. Flown by A/C Bouton, this had the standard
French camouflage of brown, green and blue-grey with light blue-grey undersides
and a black spinner. Oh yes, and a bright yellow nose and tail (which decided it
for me).
Tamiya decals seem to get a regular slagging off, and I’ll have to add to that here as the colours on the kit-supplied decals are far too dark, with a very burgundy red to the roundels. They were very well printed, though, and I ended up using the tail markings from the kit as will be explained later.
All paints used for this model were Tamiya acrylics – some of these pots were fifteen years old and I didn’t have a single problem. I started with the yellow nose and tail which I sprayed with my shiny new airbrush. The paint was diluted with isopropyl alcohol although I was still at that foolhardy "experiment on the model and not on an old kit" stage and it should have been a lot thinner than it was.
Anyway, the yellow areas were masked off and I sprayed the undersides. To get the correct shade of light blue-grey, I went out and bought the closest shade from every available manufacturer, comparing each with an actual paint chip from an original D.520 airframe before deciding which one to go for. But I’m joking, of course – I actually followed the kit instructions and mixed according to the suggested ratios. I appreciate it may not be 100% correct but it looks pretty good to me.
 After masking
off the undersides, I went ahead and sprayed the main camouflage colours,
starting off with blue-grey. Again, all colours here were mixed according to
ratios given in the instructions, although I have to admit that it would be more
helpful if Tamiya were to give actual colour names or FS numbers.
After masking
off the undersides, I went ahead and sprayed the main camouflage colours,
starting off with blue-grey. Again, all colours here were mixed according to
ratios given in the instructions, although I have to admit that it would be more
helpful if Tamiya were to give actual colour names or FS numbers.
I lightly penciled on the boundaries for the green and brown areas and then airbrushed these freehand. Perhaps not the best decision when taking into consideration my lack of hours "in the seat" with the airbrush, but even looking at it now I’m happy with the result, although I admit there is too much overspray.
I guess the area of the flaps which would usually be hidden under the wing should be a different colour (blue-grey, perhaps) but I didn’t think of this at the time. The model was given a coat of Klir, applied with a wide, flat brush.
On to the decals, and my first confusing moment - I could not get the rudder tricolor to match up at all. I gave up in the end (I later discovered that the decals were designed for the LTD kit) and decided to spray the tail colours. So, after masking off almost the entire airframe (being wary of the enormous cock-up potential of overspray in this case) I sprayed the rudder white.
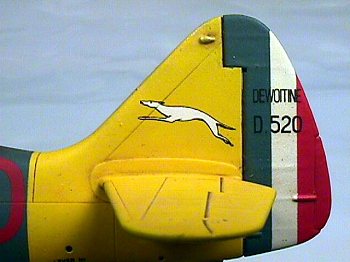 By lucky
chance, Tamiya 6mm masking tape was just right for the stripe widths, so it was
pressed into service. I didn't have any acrylic red, so made do with ModelMaster
gloss red enamel (which, again, I sprayed on far too thick). The blue shade I
mixed to match the Aeromaster decal colour, starting off with mid blue, adding
drops of grey and white to get as close as I could. Once all was dry, I slapped
on a thick coat of Klir to even out the surface (due to my insistence on
spraying thick paint).
By lucky
chance, Tamiya 6mm masking tape was just right for the stripe widths, so it was
pressed into service. I didn't have any acrylic red, so made do with ModelMaster
gloss red enamel (which, again, I sprayed on far too thick). The blue shade I
mixed to match the Aeromaster decal colour, starting off with mid blue, adding
drops of grey and white to get as close as I could. Once all was dry, I slapped
on a thick coat of Klir to even out the surface (due to my insistence on
spraying thick paint).
Luckily for me, this particular aircraft did not appear to have any serial on the tail, so I was able to grab the "Dewoitine D.520" decals from the kit sheet. While the Klir was still wet, I positioned the decals, and they sat down very nicely as the Klir dried.
The rest of the decals went on very well, snuggling down into panel lines with application of MicroSol.
After all the decals had dried, I wiped down the model with some damp kitchen roll to remove any leftover glue and decal setting solution. Once dry, it received a couple of light coats of Klir and then I started on weathering.
I didn’t want to do too much here and restricted things to a panel line wash with burnt umber oil paint, some pastel exhaust staining, and a few chips here and there with the odd touch of a silver pencil or very fine brush. I guess it’s passable but the silver "chipping" is badly done.
|
CONCLUSIONS |
 Tamiya’s
D.520 just happened to be what I chose to re-enter the hobby after a fourteen
year break. I have always liked the form of the French Spitfire and had good
memories of the Tamiya armour kits I used to buld as a boy. Also, it was my
first 1/48 kit, and my first use of an airbrush and aftermarket decals. I had
read the entire FAQ on r.m.s. and returned to the hobby like a man possessed!
Tamiya’s
D.520 just happened to be what I chose to re-enter the hobby after a fourteen
year break. I have always liked the form of the French Spitfire and had good
memories of the Tamiya armour kits I used to buld as a boy. Also, it was my
first 1/48 kit, and my first use of an airbrush and aftermarket decals. I had
read the entire FAQ on r.m.s. and returned to the hobby like a man possessed!
This is a great kit – well fitting and fun to make – especially if you choose one of the Vichy yellow-tailed (or yellow and red striped) machines. A thoroughly enjoyable build, and I can recommend it to anyone - especially beginners.
Finally, apologies for the awful white backgrounds – I must make up a decent backdrop!
|
REFERENCES |
I did not do any real research when building the kit, although the following website was very useful in giving me some background on the aircraft for this article: http://membres.tripod.fr/Sebnet/d520.html
Also, the following website has numerous links for the aircraft: http://dup.sly.free.fr/avions
A well regarded book on the type is available: "Le Dewoitine D.520". Written by Raymond Danel and Jean Cuny, it is published by Docavia in France.
Copyright ModelingMadness.com. All rights reserved.
If you would like your product reviewed fairly and fairly quickly , please contact the editor or see other details in the Note to Contributors.
Back to Reviews Page 2021