|
KIT: |
Airfix 1/72 Wirraway (conversion) |
|
KIT # |
? |
|
PRICE: |
$ |
|
DECALS: |
One option |
|
REVIEWER: |
Mark Fordam |
|
NOTES: |
Kit-bashed |
|
HISTORY |
The Wirraway (native Australian for 'Challenge') was the first product of the new, privately owned Commonwealth Aircraft Corporation (CAC), and was a licence-built derivative of the North American NA-16 (known variously as the 'Texan' or 'Harvard'). In appearance, the most obvious differences are the D-shaped rudder on the Wirraway, and variations to the intake below the cowling.
One NA-16-1A and one NA-16-2K (or NA-33) were imported as construction examples. These were serialled A20-1 and A20-2. Subsequent Wirraways were serialled A20-3 to A20-755 in an unbroken series.
 The
Wirraway differed from the U.S. trainer prototype in having an armed
capability, with provision for two fixed forward machine guns of rifle
calibre above the engine, and a flexible machine gun of similar calibre
in the rear cockpit. Light bomb racks could be fitted under the wings.
The
Wirraway differed from the U.S. trainer prototype in having an armed
capability, with provision for two fixed forward machine guns of rifle
calibre above the engine, and a flexible machine gun of similar calibre
in the rear cockpit. Light bomb racks could be fitted under the wings.
It was a sign of the straits the RAAF was in at the time that a general purpose trainer should be built with these provisions, due to a lack of funding for purpose-built fighters and bombers. 755 were built between 1939 and mid-1946. They were built as variants CA-1, CA-3, CA-5, CA-7, CA-8, CA-9, CA-10 and CA-16, but were basically very similar. The CA-10 was a dive bomber design, with dive brakes, improved wing and capacity for a heavier load.
They filled various roles in addition to that of trainer, from 'hack' to combat aircraft. They were Rabaul's main air defence in early 1942, when eight took on a Japanese raid of 100 aircraft, the results being disastrous for the defenders. A Wirraway did manage to down a Zero in December that year, near Gona.
The RAAF's last Wirraway flight was in December 1958 at Point Cook, Victoria. They were replaced by Winjeels.
History from googling Wirraway.
|
CONSTRUCTION |
Even though there is the MPM Wirraway available in 1/72nd scale now negating having to do this conversion I decided to attempt it for two reasons, first off I’m too much of a cheapskate to spend $ 33 US on a single engined aircraft and secondly a group of net modellers were having an Airfix build and as I have already built the Airfix Harvard a few times I thought it was a golden opportunity to practice my conversion skills on a moderately difficult conversion.
 As most
of you are aware the Wirraway shares it’s wings and tailplanes with the
CAC Boomerang which in turn used mostly components from the Harvard.
Armed with a set of 1/72nd scale plans and lots of photos I
started to attack the Airfix Harvard with razor saw and gusto. First
thing was to separate the wings along the ridge as the Wirraway has a
“straight” trailing edge were as the Harvard is raked forwards a few
degrees, once separated the trailing edge was aligned using a steel rule,
triangular shims were then cut and glued to the leading edge to fill the
gap up. While we are at it the wing tips needed lengthening by around 6
mm each side, I squared off the wingtips and added new tips from a
Airfix Ju 88 wings, liberal amounts of superglue was used to ensure a
strong bond and to fill some of the gaps. These were set aside to dry
before shaping the new wing tips.
As most
of you are aware the Wirraway shares it’s wings and tailplanes with the
CAC Boomerang which in turn used mostly components from the Harvard.
Armed with a set of 1/72nd scale plans and lots of photos I
started to attack the Airfix Harvard with razor saw and gusto. First
thing was to separate the wings along the ridge as the Wirraway has a
“straight” trailing edge were as the Harvard is raked forwards a few
degrees, once separated the trailing edge was aligned using a steel rule,
triangular shims were then cut and glued to the leading edge to fill the
gap up. While we are at it the wing tips needed lengthening by around 6
mm each side, I squared off the wingtips and added new tips from a
Airfix Ju 88 wings, liberal amounts of superglue was used to ensure a
strong bond and to fill some of the gaps. These were set aside to dry
before shaping the new wing tips.
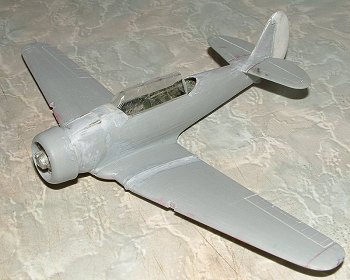
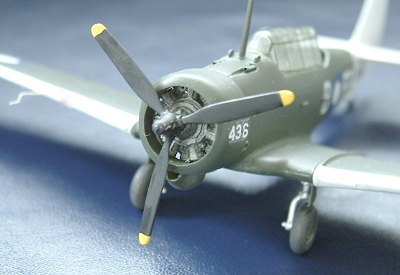
Moving onto the fuselage showed that a fair amount of modification is needed to change the Harvard nose into the Wirraways distinctive profile, unlike the Harvard the Wirraway was armed and the upper decking forward of the canopy was raised to accommodate the twin machine guns. The decking was built up using superglue and baking soda as a filler, one advantage of using this type of filler is 1, It’s cheap 2, It dries quickly and 3, it sands easily with a fine grain and can be drilled, dremeled and carved without cracking or flaking.
The Harvard cowling was used after first removing the dorky engine and thinning down the cowl flaps. The fuselage had a 1/24th scale car rim glued onto the end and flared in with superglue/baking soda to give the remodelled cowling somewhere to mount. A new engine was cast out of my hot glue/automotive filler combination and glued into the cowling.
 Moving
back to the wings now I tidied up the shims on the leading edges and
sanded the wing tips to the correct shape using the plans as a guide.
Once the wings were cleaned up the panel lines were re scribed using an
old airbrush needle and templates cut out of soda can aluminium.
Moving
back to the wings now I tidied up the shims on the leading edges and
sanded the wing tips to the correct shape using the plans as a guide.
Once the wings were cleaned up the panel lines were re scribed using an
old airbrush needle and templates cut out of soda can aluminium.
The Wirraway had the same rudder as the Boomerang so the Harvard one was cut off and a new one fashioned from thick plastic card and sanded to shape. The tailplanes, again from the Boomerang were reshaped using the original Harvard ones to the new correct shape.
The Harvard Cockpit which is almost non existent was given a couple of new seats, a floor out of plastic card and some sidewall detail using my home cast cockpit panels. The Harvard canopy tended to sit a bit higher than the Wirraway one so a sanded about 1 mm off the bottom of the canopy to drop the profile down to match photos of the Wirraway. The rear gunners position was cut out at the same time and a gun mount scratchbuilt out off soda cans.
With the major conversion work out of the way it was time to add the scratchbuilt guns out of brass tubing and tidy up the Harvard undercarriage and wheels. The final Wirraway bit that had eluded me because of it’s complex shape, the cowling air intake came from me mate Grant E in OZ who sent me a spare MPM one saving me a whole lot of grief trying to scratch build such a complex curvey shape.
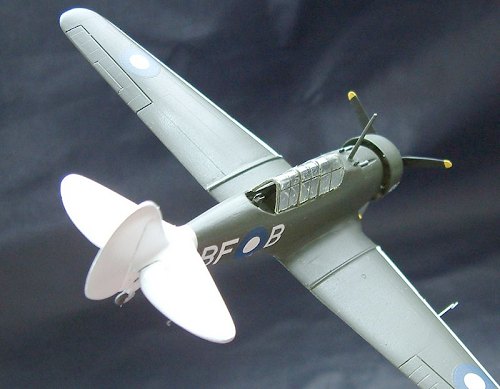
Finding a three bladed prop the correct diameter proved rather difficult as the only one I had was the one from my Boomerang, and I wasn’t keen on sacrificing that for this project. In the end I elected to cut down a Revell B17 prop and reshape the blades to the correct profile.
|
COLORS AND MARKINGS |
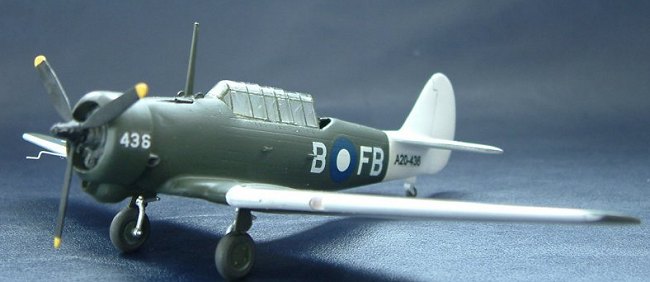
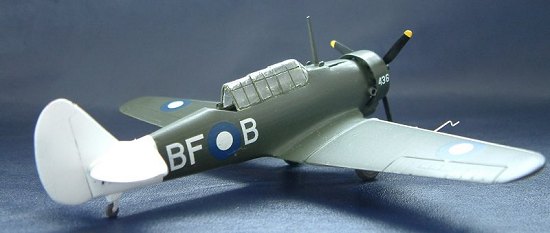
After
much research (um that’s what I tell the wife anyway) I decided to do my
Wirribanger as a restored warbird. This aircraft was painted in a
traditional RAAF WWII scheme of overall Foliage Green with a white
tail. First in the gun was the white, I used Tamyia White with one drop
of blue in it to stop yellowing in the future. After suitable drying time
the white was masked off and the Foliage Green was sprayed on , now I’m
not going to open up a big can of worms on what is the correct s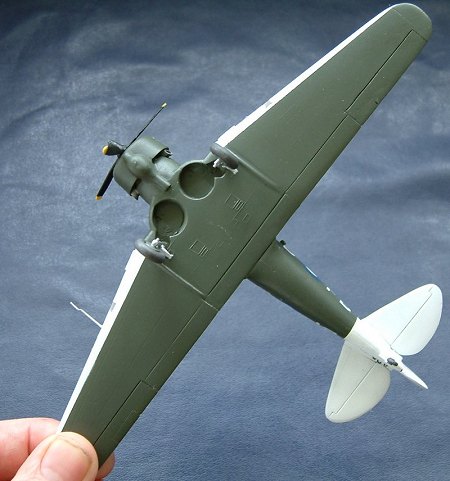 hade of
RAAF Foliage Green, I instead used Humbrol Matt Bronze Green as this
colour matched the photos of the restored Wirribanger I was modelling. It
seems too dark for the WWII RAAF green but matched the photos so I was
reasonably happy with the results.
hade of
RAAF Foliage Green, I instead used Humbrol Matt Bronze Green as this
colour matched the photos of the restored Wirribanger I was modelling. It
seems too dark for the WWII RAAF green but matched the photos so I was
reasonably happy with the results.
After the paint had dried a few days the plane was given a couple of coats of gloss varnish, over the last few weeks I have been experimenting with a gloss varnish spray can that I bought from a local chain store and the prognosis is good, the varnish doesn’t react with enamels and dries to a high gloss finish without orange peel.
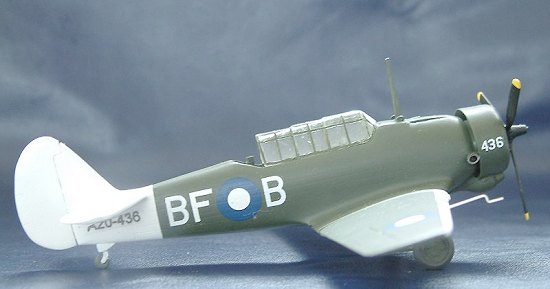
Which the surface prepped for decals the next headache was finding the correct markings for the warbird that I was modelling, the RAAF roundels were no problems as I had some spares left over from the Vengance, The serial number wasn’t too much of a problem as they were black and I could print those out on clear decal paper using a laser printer. The only problem was trying to find the white squadron codes, after looking through my ever diminishing decal stash I managed to find two “B’s” the same size and two “B’s” ½ mm smaller, but no “F’s” at all, not to worry I thought I can make up the “F” using white decal strips cut to the correct length. Once the decals were on and dry a coat of future was added the seal them in and a finial coat of Mattkote was sprayed over the plane to tone down the gloss shine. The real aircraft has a high gloss finish to help with cleaning and maintenance but on a 1/72nd scale model that small gloss makes it look like a toy.
The radio aerial that I put on using stretched sprue lasted about 15 minutes into the club meeting that I took the Wirraway along to and I haven’t bothered to replace it yet.
|
CONCLUSIONS |
 Why
did I do this? When I could have bought the MPM kit and had an easier
build and probably be more accurate as well, Well I suppose it boils down
to one word, cheapskate err no that’s not the word I was going to use
FUN, Fun was the word I meant to use, I had a ball doing this conversion,
I have always said that the day modelling becomes stressful or “not fun”
is the day I give it all away and go play golf or tennis.
Why
did I do this? When I could have bought the MPM kit and had an easier
build and probably be more accurate as well, Well I suppose it boils down
to one word, cheapskate err no that’s not the word I was going to use
FUN, Fun was the word I meant to use, I had a ball doing this conversion,
I have always said that the day modelling becomes stressful or “not fun”
is the day I give it all away and go play golf or tennis.
These old Airfix kits are great for people wanting to practice on their scratchbuilding/conversion skills as they are cheap and the plastic is so thick you don’t have to worry about sanding through something by being too heavy handed, perfect for building up the confidence to chop and channel that Tamigawa masterpiece.
|
REFERENCES |
 Google
CAC Wirraway
Google
CAC Wirraway
Pacific Wings Downunder for restored Wirraway BF*F
If you would like your product reviewed fairly and quickly by a site that has nearly 250,000 visitors a month, please contact me or see other details in the Note to Contributors.