MPM 1/72 Fokker D.XXI 'Dutch Defender'
| KIT #: | 72517 |
| PRICE: | £10.69 (about $17) |
| DECALS: | Four options |
| REVIEWER: | Sander Roubos |
| NOTES: |
Injection molded with a single resin part |
| HISTORY |
The
D-XXI was one the last of a long line of fighter aircraft developed by the Dutch
aircraft manufacturer Fokker. Originally built to a specification for the
ML-KNIL (
 The
plane was constructed of metal tubing, covered with metal and linen, similar to
the Hawker Hurricane. The wings were covered with wood. Power was provided by a
The
plane was constructed of metal tubing, covered with metal and linen, similar to
the Hawker Hurricane. The wings were covered with wood. Power was provided by a
The Dutch Fokkers fought valiantly during the short war in the west. While the
German planes were numerically superior, in a one-to-one fight the D-XXI could
use its manoeuvrability to counter the disadvantage in power and speed.
Unfortunately, the overwhelming numbers and rapid advance of the German forces
necessitated
No
completely original Fokker D-XXI remains; the
| THE KIT |
MPM has released a
whole host of D-XXIs in recent years. Most of them have been Finnish variants,
but luckily for builders of Dutch planes they have also released the ‘Dutch
Defender’ version. A number of brands have released D-XXIs in 1/72 over the
years, but they are all rendered obsolete by this MPM model. It’s a very nice
kit indeed. It has finely engraved panel lines and while they are not as subtle
as Tamigawa products, they are better than your average limited run kit. The
fabric structure of the rear
 fuselage is convincingly rendered. An injected
canopy is included, which is very clear. As the sprues share some parts with
other versions of the D-XXI, you will be left with some spares. The kit has one
resin part, the propeller hub. The blades are molded in plastic. Why this was
done I don’t know, it’s a simple enough assembly and just creates extra work.
Give me a single part prop any day.
fuselage is convincingly rendered. An injected
canopy is included, which is very clear. As the sprues share some parts with
other versions of the D-XXI, you will be left with some spares. The kit has one
resin part, the propeller hub. The blades are molded in plastic. Why this was
done I don’t know, it’s a simple enough assembly and just creates extra work.
Give me a single part prop any day.
The instructions are clearly written with colors called out in Humbrol codes, but I did deviate from the construction steps in some cases to make painting easier. The color schemes are quite comprehensive and include four versions of the LVA; both peacetime and wartime schemes are included. This is very nice, but unfortunately the decal sheet itself is terrible. Where to start? The colors are wrong. Both the orange and the blue are too light in tone. Furthermore, the roundels are out of register (a common issue with Dutch roundels). It doesn’t end there: The black borders around the triangles are too narrow. The serials are all different fonts (only the 212 serial looks right to me). All in all, this decal sheet is simply not usable. Although I thought I had replacements available, this didn’t turn out to be such a simple issue to resolve – more on that later.
| CONSTRUCTION |
As on most kits,
it all starts with the cockpit. Detail is rather nice with some sidewall detail,
separate rudder pedals and a very nicely rendered instrument panel. Only
seatbelts are needed; I settled for painting them on. Note that MPM indicates
the cockpit color to be interior green; this should be light grey. Fit of the
cockpit section in the fuselage was a bit dodgy but nothing a sharp knife and
some sanding couldn’t fix. The fuselage then went together without a hitch. Very
little filler is needed to clean up the seam. Fitting the three-piece wing was
painless as well. With some careful fitting and sanding, no filler is needed to
get the lower wing to fit with the fuselage. The upper wings fit nicely as well,
as do the stabilizers. I decided to leave off the clear landing lights until the
end of the build, but I did test fit them. A bit of work with the hobby knife is
needed to clean up the area in the front wing
 for them.
The engine
requires some planning ahead, and I deviated from the instructions here. It
consists of four parts, which are all best painted separately and glued together
towards the end of construction. You have the engine itself, the cowling, the
cowling ring and the exhaust. I decided to glue the engine to the fuselage as
indicated in the instructions, as it would provide me with something to hold the
plane during the extensive airbrush job ahead. The remaining parts I left off
for now, but I did test fit the cowling. It is held in place by the engine, and
it’s a tight fit, so I had to sand the top of some of the cylinders to get it
right. I then took it off again to be painted separately, along with the cowling
ring and the exhaust.
The rudder is a
separate piece (use the right one, there’s two in the kit), and I left this off
as well to make painting and decaling easier. The wheel covers go together well,
but I did not put the wheels in between the cover halves as it would be hard to
paint them later. I cut off the small plastic pins to hold them in place and I
found was quite easy to push in the wheels later. The completed landing gear is
not a very good fit as the tabs that go in the recesses on the lower wing are in
the way. I cut them off and got the gluing surface to fit after some sanding.
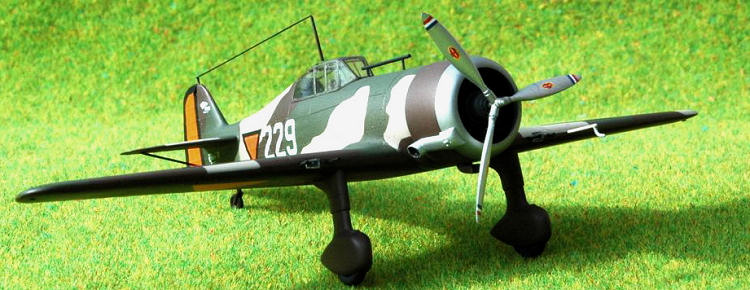
I spent a quite hour on masking the canopy with a combination of very thin tape and maskol, but I forgot to properly test fit the canopy to the fuselage… mistake, as it leaves a gap at the front where it meets the fuselage. Ah well… no kit is perfect.
| COLORS & MARKINGS |
White Ensign
produces a range of enamels specifically tailored for Dutch aircraft in the
pre-war years. They are slightly different in tone from the Humbrol codes listed
in the instructions. Although I have the White Ensign paint, I prefer to use
water-based acrylics from Gunze, as I’m a novice with the airbrush and I have
the best results with them so far. I was able to find three colors in Gunze’s
range which come very close to the White Ensign colors, and I’ve used these
(H321, H406 and H420). Purists may cringe at this, but to my eyes it still looks
pretty good.
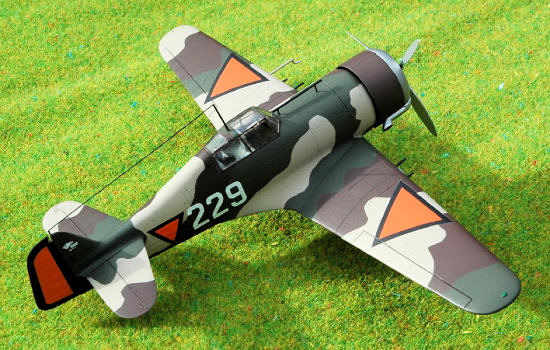
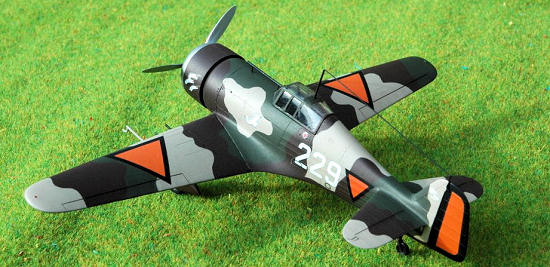
 This is the most
complex pattern I’ve airbrushed since I started using it, and masking it was a
pain for me. I used strips of Tamiya tape which I taped to the general area of
the demarcation and traced the boundary with a pencil. I then stuck the tape
to a pane of glass and cut the section of the pattern with a new hobby knife.
Lots of tape, lots of airbrush sessions and some touch up work were required.
I’m quite happy with the final result, although the demarcation is a bit ragged
in places. Next up was spraying the cowling (H406) and the cowling ring and
exhaust (Revell Silver with a bit of black mixed in), and gluing them together.
The rudder was sprayed black. Everything was then given two light coats of
Future in preparation for the decals.
This is the most
complex pattern I’ve airbrushed since I started using it, and masking it was a
pain for me. I used strips of Tamiya tape which I taped to the general area of
the demarcation and traced the boundary with a pencil. I then stuck the tape
to a pane of glass and cut the section of the pattern with a new hobby knife.
Lots of tape, lots of airbrush sessions and some touch up work were required.
I’m quite happy with the final result, although the demarcation is a bit ragged
in places. Next up was spraying the cowling (H406) and the cowling ring and
exhaust (Revell Silver with a bit of black mixed in), and gluing them together.
The rudder was sprayed black. Everything was then given two light coats of
Future in preparation for the decals.
As I wasn’t going
to use the kit decals, I needed some replacements. After comparing many
different sets with orange triangles in my stash, I finally found the triangles
meant for the DH-85 in the Dutch Decal set 72068 to be best match. These were
quite thin and easy to apply. I used serials and other markings from the DD
72030 set. These all went on fine, but the decals on the fuselage required a
number of applications of setting fluid. This is partly due to the
fabric-structure of the fuselage, but also because the older Dutch Decals tend
to be quite thick (the newer sets, like 72068, are much thinner).
After decaling, I
painted the engine black and dark grey and gave it a light drybrush with
aluminum. I installed the cowling, and gave the model a coat of about 50%
| FINAL CONSTRUCTION |
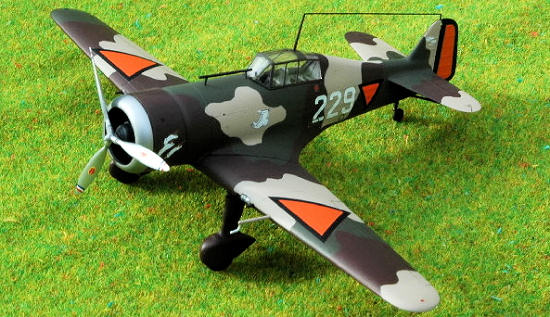
 The propeller
blades and hub went together with some superglue. I then sprayed the prop in
Revell Silver. The red-white-blue decals for the tips required some touch up
with a very fine brush. I also used some red followed by green to paint on the
wing tip lights. The wheels were painted Gunze tire black and pushed in place
inside the wheel covers – no glue needed. I pushed the landing lights in place,
no glue needed here either. The machine guns I made from stretched sprue (I
threw away the kit parts as they are too crude) and painted them dark metallic.
The pitot went on, the antennae on the canopy roof and tail and the gun sight. I
also reinstated the broken off tail wheel to its rightful place. Finally, I made
the antenna cable from stretched sprue and painted it black. I finished the kit
by spraying some more matt finish over these final parts.
The propeller
blades and hub went together with some superglue. I then sprayed the prop in
Revell Silver. The red-white-blue decals for the tips required some touch up
with a very fine brush. I also used some red followed by green to paint on the
wing tip lights. The wheels were painted Gunze tire black and pushed in place
inside the wheel covers – no glue needed. I pushed the landing lights in place,
no glue needed here either. The machine guns I made from stretched sprue (I
threw away the kit parts as they are too crude) and painted them dark metallic.
The pitot went on, the antennae on the canopy roof and tail and the gun sight. I
also reinstated the broken off tail wheel to its rightful place. Finally, I made
the antenna cable from stretched sprue and painted it black. I finished the kit
by spraying some more matt finish over these final parts.
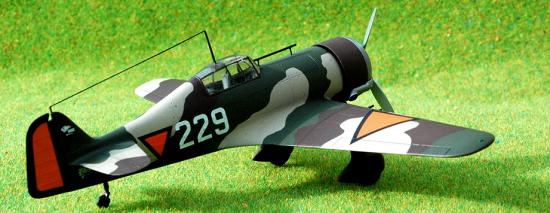
| CONCLUSIONS |
I really enjoyed
this built and I learned quite a lot from it. It was rather time-consuming due
to my lack of skill in masking and using the airbrush, but I’m happy with the
result. The MPM kit is by far the best out there in this scale and it builds
into an interesting subject; the Dutch camouflage makes it a colorful addition
to any collection. I’m getting another one!
| REFERENCES |
March 2011
If you would like your product reviewed fairly and quickly, please
contact
me or see other details in the
Note to
Contributors.