PM 1/72 Fokker D.21
|
KIT #: |
201 |
|
PRICE: |
$15.00 or so |
|
DECALS: |
Two options |
|
REVIEWER: |
Spiros Pendedekas |
|
NOTES: |
|
The origins of the D.XXI can be traced back to the end of 1934, when Fokker
submitted design proposals to the Nederlandse Luchtvaartafdeling (Dutch Army
Aviation Group) for a low-wing monoplane fighter that would feature an
entirely enclosed cockpit. Envisaging a Rolls-Royce Kestrel IV inline V12 as
a power plant, projections of the aircraft's performance included a maximum
speed of 420 km/h at an altitude of 4,350 meters, a range of 888 km, and an
altitude ceiling of 10,000 meters. The planned armament included
rifle-caliber machine guns or 20mm cannons, which were to be embedded into
the wings and fuselage.
 With the
contract for a single evaluation machine signed soon after the design
submission, the prototype was ready roughly a year later. Designated FD-322
and instead powered by a radial Bristol Mercury VI-S engine, driving a
three-blade, two-pitch propeller, it performed its maiden flight at Welschap
Airfield, Eindhoven, on 27 March 1936. Awkwardly, while the performance was
promising, the prospects for series production looked doubtful, not because
of the machine itself, but due to a controversial high level change in Dutch
defense policy which practically unfavored pure fighter aircraft, leaning
more towards bombers and trainers, among others.
With the
contract for a single evaluation machine signed soon after the design
submission, the prototype was ready roughly a year later. Designated FD-322
and instead powered by a radial Bristol Mercury VI-S engine, driving a
three-blade, two-pitch propeller, it performed its maiden flight at Welschap
Airfield, Eindhoven, on 27 March 1936. Awkwardly, while the performance was
promising, the prospects for series production looked doubtful, not because
of the machine itself, but due to a controversial high level change in Dutch
defense policy which practically unfavored pure fighter aircraft, leaning
more towards bombers and trainers, among others.
Nevertheless, the potential that the prototype exhibited and the prospect of
foreign sales after interest expressed by the Finnish Air Force and others
(ultimately the Finnish Air Force became the primary user of the type),
seemed, together with possibly other factors, to favor the little Fokker and
an approval (with the follow-on funding) for a limited expansion of the
Luchtvaartafdeling that was given by the Dutch government resulted in an
order for 36 D.XXIs.
The machine itself was a well designed fixed undercarriage low-wing
monoplane of a mixed construction, including welded steel tubing, fabric,
wood and aluminum, more or less following the standard Fokker design
practices of the period. Cockpit was fully enclosed and the main armament
consisted of two pairs of 7.92mm machine guns, one pair housed within the
wings and the other pair within the forward fuselage and shooting through
the propeller blades.
 The
first of the 36 Luchtvaartafdeling D.XXI conducted its first flight on 20
July 1938, with the final aircraft delivered on 8 September 1939. Upon
entering service, the type represented a significant leap forward for the
Dutch Army Aviation Group, whose fighter force had until that time consisted
of aging biplanes with open cockpits. The new Fokker quickly proved to be an
extremely sturdy aircraft, being capable of attaining a speed of 700 km/h in
a dive!
The
first of the 36 Luchtvaartafdeling D.XXI conducted its first flight on 20
July 1938, with the final aircraft delivered on 8 September 1939. Upon
entering service, the type represented a significant leap forward for the
Dutch Army Aviation Group, whose fighter force had until that time consisted
of aging biplanes with open cockpits. The new Fokker quickly proved to be an
extremely sturdy aircraft, being capable of attaining a speed of 700 km/h in
a dive!
During the short lasting Dutch/German conflict where the numerically
superior Nazi Germany invaded The Netherlands, the 28 machines that whereby
that time operational gave a good account of themselves, escorting Fokker
T.V bombers, intercepting and shooting down Ju 52 transports, escorting
friendly units and flying in the search-and-destroy role. On 14 May, when
the news of the Dutch capitulation reached Buiksloot airfield, the 8
remaining D.XXIs that had resorted there were destroyed together with the
airfield, to prevent their use by the Germans. Some machines are reported to
have been captured during and after 15 May, but their later fates are
unknown.
Whereas the numerical superiority of the Luftwaffe finally led to the
destruction of most D.XXIs during the short campaign, the slower and lightly
armed but more maneuverable Fokker managed not only to hold its own to a
good degree against its main opponent, the Bf 109, but also to follow the
Stuka into its dive, something that few fighters could do. Of the 38
victories scored by the Nederlandse Luchtvaartafdeling against the
Luftwaffe, 16 of those went to the brave Fokker D.XXI pilots.
PM came in 1990 (as Pioneer back then) with their simple yet neat 1/72 D.XXI
kit, regularly reissuing it ever since (interestingly, even under Matchbox
brand in 1995). The subject kit is the 2020 edition and for a more in depth
look at its contents you may read its preview found
in the MM archives.
The actual kit was a gift from my good Dutch friend John vd
Biggelaar, handed to me upon visiting him in The Netherlands last summer.
Upon returning home, I wasted no time and started it!
The lack of any interior detail but a floor and a rudimentary seat is the
kit’s main shortfall. True, the one piece thick canopy hides a respectable
amount of the said emptiness, but, still, the canopy’s extensive glazing and
relatively clear plastic, allow the rest to be seen, especially the upper c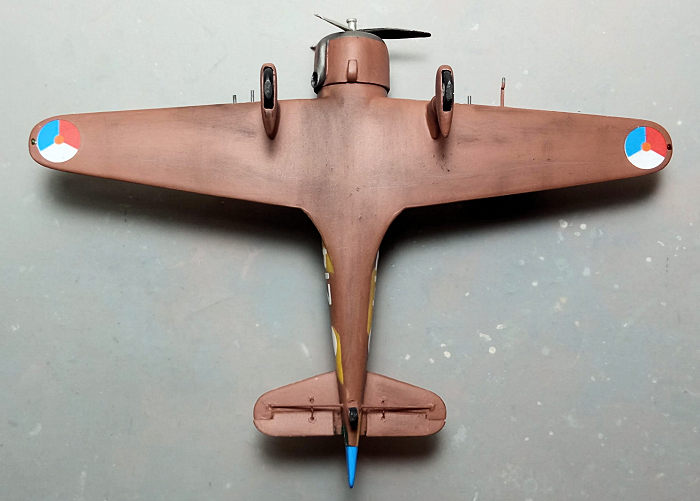 ockpit
portion, where the lack of the distinctive headrest supported by four mini
rods, with the radio aft of it being clearly evident (and not forgetting
that the sidewalls were actually tubular framings). Off to scratch building
then!
ockpit
portion, where the lack of the distinctive headrest supported by four mini
rods, with the radio aft of it being clearly evident (and not forgetting
that the sidewalls were actually tubular framings). Off to scratch building
then!
I first attached the supplied cockpit floor to the port fuselage, then
fabricated a simplified instrument panel and an aft-headrest flat panel from
styrene sheet and attached them where they would normally be found. The
headrest was represented by a small styrene plate, supported by four mini
rods made from stretched sprue and a small box-shaped styrene piece was
glued aft of the headrest, to represent the radio, the whole configuration
was consulted by net available pics and diagrams and also by the 1/48
Special Hobby very nice kit instructions.
Stretched sprue, bent to shape, was used to recreate the control stick,
while the seat itself was thinned down to look less crude and received side
supports from stretched sprue and seat belts made from masking tape.
Finally, the tubular sidewall construction was represented also by pieces of
stretched sprue, accordingly attached to the fuselage sides. This concluded
cockpit construction.
Basic interior color was Hu128 Compass Gray, instrument panel, stick grip
and radio were black and the headrest was painted ”leather”. Blobs of
silver, white and red were applied to the instrument panel to vaguely
represent instrumentation, hoping that its toy-ish looks will be hidden
under the thick canopy.
With the cockpit somehow looking busy I joined the fuselage halves, followed
by assembling and attaching the wings, the two piece wheel spats and the
horizontal stabilizers, the latter having the elevators carefully separated
with my hobby knife and attached “drooped” for extra realism. This concluded
basic construction. Overall fit needed its attention here and there,
especially at the spat/wing joints, but nothing too serious. Bigger gaps
were initially treated with liquefied styrene, followed by “normal” putty
and sanding at the complete model.
 The
one piece cowling had its bottom air intake attached, the latter having its
bland face drilled out for realistic looks. I was ready to temporarily
attach the cowling to the airframe and go painting, when I noticed that the
distinctive exhaust that was attached to the lower starboard side of the
cowling (for the Mercury powered D.XXIs) was not supplied by the kit. This
was fabricated by a suitably thick styrene rod, moderately heated and bent
to shape, then having its one end sanded to exhibit a smooth curvature and
its other end hollowed.
The
one piece cowling had its bottom air intake attached, the latter having its
bland face drilled out for realistic looks. I was ready to temporarily
attach the cowling to the airframe and go painting, when I noticed that the
distinctive exhaust that was attached to the lower starboard side of the
cowling (for the Mercury powered D.XXIs) was not supplied by the kit. This
was fabricated by a suitably thick styrene rod, moderately heated and bent
to shape, then having its one end sanded to exhibit a smooth curvature and
its other end hollowed.
Deeming the result passable, the exhaust was attached to the cowling, with
its front joint, where the exhaust tube is supposed to enter the cowling
collector ring, filled and sanded smooth. With the exhaust issue solved, I
temporarily affixed the cowling in position and took the petite fighter to
the paint shop!
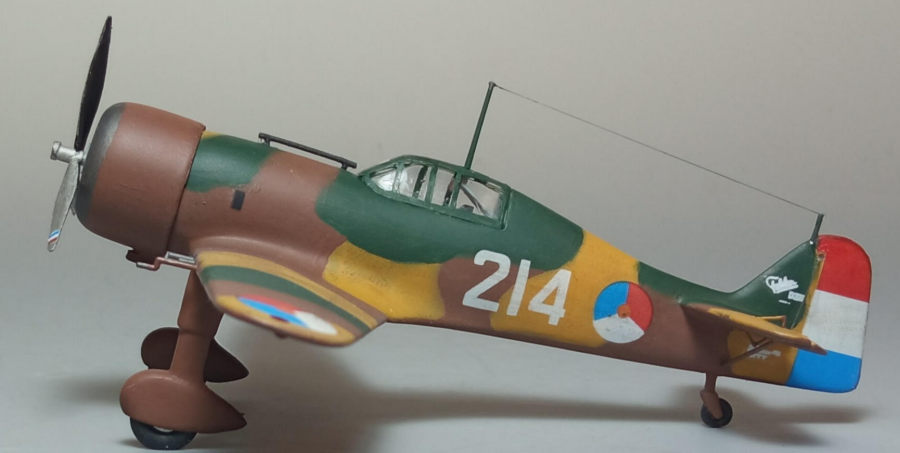
Dutch D.XXIs upon the German invasion featured a distinctive all around
reddish brown color with dark green and beige/sand patches applied at the
topsides. By doing some net research, it came out that there is a degree of
questioning on the actual shades.
 With no
accuracy claims whatsoever, I went with my own shades’ interpretation for
the brown, beige/sand and dark green: I first gave the complete model a coat
of Hu113 Rust, which dried to some sort of reddish brown shade, then, with
my airbrush at “fine” settings and low air pressure, I freehanded the two
other shades, using Hu63 Sand and MM IJN Green respectively. I went into a
couple of airbrushing loops, in order to correct/tighten the demarcation
lines, followed by carefully brushing tiny amounts of thinned paint close to
the lines themselves. Deeming the result passable, I gave the bird a coat of
Future to prepare it for decaling.
With no
accuracy claims whatsoever, I went with my own shades’ interpretation for
the brown, beige/sand and dark green: I first gave the complete model a coat
of Hu113 Rust, which dried to some sort of reddish brown shade, then, with
my airbrush at “fine” settings and low air pressure, I freehanded the two
other shades, using Hu63 Sand and MM IJN Green respectively. I went into a
couple of airbrushing loops, in order to correct/tighten the demarcation
lines, followed by carefully brushing tiny amounts of thinned paint close to
the lines themselves. Deeming the result passable, I gave the bird a coat of
Future to prepare it for decaling.
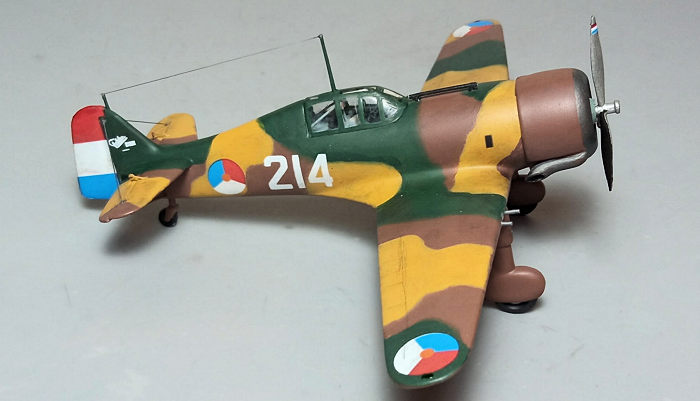
I used the kit decals, in order to represent #214 machine, as it stood prior
to the German invasion. The quite well registered decals behaved
excellently, easily detaching from their backing paper and adhering
positively to the model surfaces, with the whites nicely opaque and
exhibiting no silvering at all. A coat of Future sealed them.
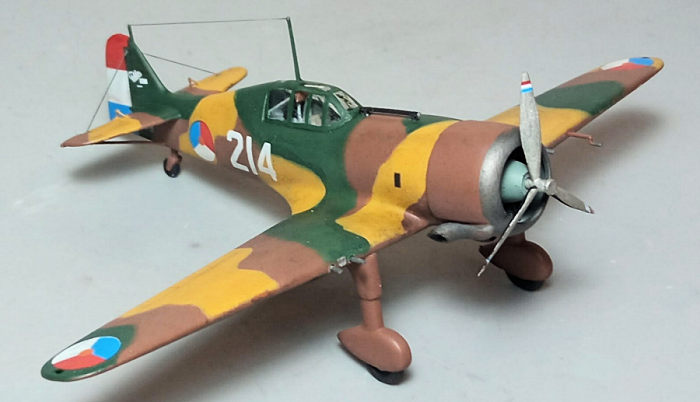
The prominent Bristol Mercury engine was very simplified, so I decided to at
least replicate with stretched sprue the 6 rods that are located in front of
the cylinders, essentially forming three triangular shaped supports. The
engine was then attached to the cowling, with the complete sub assembly
attached to the main model. The engine block was painted black, then heavily
dry brushed with silver, whereas the crankcase and the cowling innards were
painted Hu140 Compass Gray. Finally, the exhaust, together with the
distinctive exhaust collector ring (essentially the cowling lip) were
painted Testors Burned Metal.
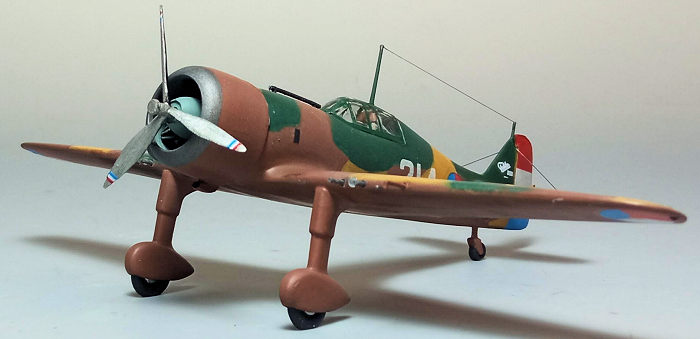 The two
main wheels were filed to look weighted. In order to attach them, I cut off
a triangular shaped part from the invisible part of each wheel (the part
that is hidden by the spats) with the top of the triangular cut reaching the
hub center. That way it was easy to apply some glu at the wheel centers and
slip-fit them in the assembled spats at these end stages. The tail wheel was
also attached, with its strut reduced in length, as the tail would otherwise
rest unnaturally high. All wheels had black tires with “steel” rims, with
the tail wheel strut painted underside color.
The two
main wheels were filed to look weighted. In order to attach them, I cut off
a triangular shaped part from the invisible part of each wheel (the part
that is hidden by the spats) with the top of the triangular cut reaching the
hub center. That way it was easy to apply some glu at the wheel centers and
slip-fit them in the assembled spats at these end stages. The tail wheel was
also attached, with its strut reduced in length, as the tail would otherwise
rest unnaturally high. All wheels had black tires with “steel” rims, with
the tail wheel strut painted underside color.
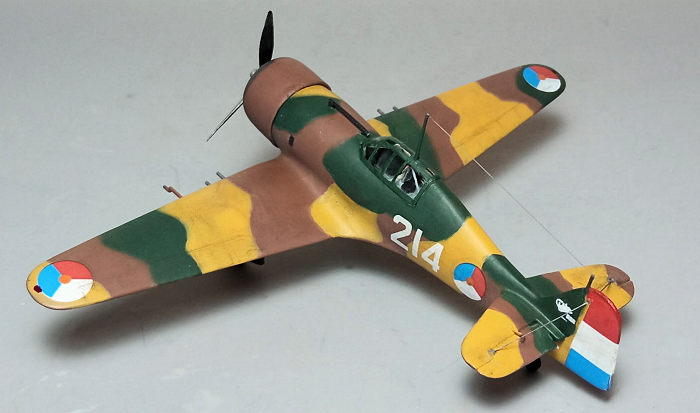
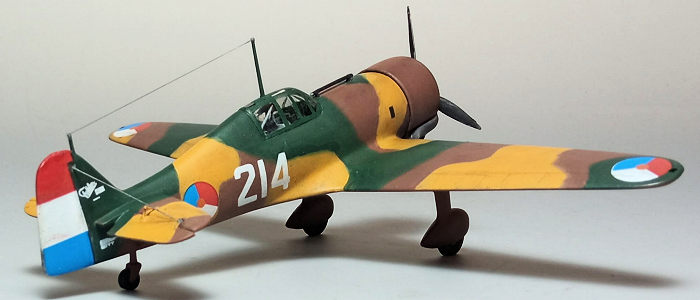
The underside tail plane bracing struts were fabricated from stretched sprue
and attached, then painted the same brown camo color. I decided I could not
live without replicating the pairs of elevator actuating rods, so I
fabricated them also from stretched sprue pieces and painted them per the
surrounding camo pattern. Stretched sprue was finally used to replicate the
wing guns, which were painted Testors Burned Metal and attached. The
distinctive pitot was attached at this time, as well, its body painted camo
brown and its tip Testors Burned Metal.
Onto weathering, which was done using dark brown and black dry pastels at
all places where dirt, grime or engine soot would reside. Since practically
all exterior surfaces were wood or fabric, no chipping was performed
whatsoever, with a matt coat giving the bird its final finish.
 The
simplified prop hub was somehow busied up by adding a small circular disk at
its end, to simulate the pitch control mechanism’s cover. The complete prop
was painted “steel”, whereas its blade’s rear faces were painted black.
After adding the red/white/blue tip decals, the prop was attached in
position.
The
simplified prop hub was somehow busied up by adding a small circular disk at
its end, to simulate the pitch control mechanism’s cover. The complete prop
was painted “steel”, whereas its blade’s rear faces were painted black.
After adding the red/white/blue tip decals, the prop was attached in
position.
The canopy had its well defined frames hand painted and attached in place,
with fit being satisfactory and the gaps treated with white glue. The aiming
sight was painted black and attached at the front. The two antenna masts
were fabricated from stretched sprue and attached on the canopy and fin
respectively, with thin stretched sprue run between them to replicate the
antenna wire. Stretched sprue was also used to replicate the fin/tailplane
bracing wires.
The wing leading edge landing lamps were replicated by painting the area
with my fine tip silver pen. Tiny blobs of red and green clear paint were
pinned to the corresponding positions to represent the wingtip lights,
before calling the petite Fokker fighter done!
THis is a neat, simple kit of the important Dutch fighter. General shape
looks correct, molding is acceptable as is the parts fit, construction is
straightforward, canopy, though thick, is well molded and relatively clear
and decals are great. On the other hand, the interior is nonexistent (hidden
to a degree by the thick canopy) and the distinctive for the Dutch D.XXIs
exhaust tube is not provided, having to be scratch built (I could not locate
any aftermarket offerings). Out of the box a neat model can emerge, whereas
with some scratch building you can come up with a really nice
representation.
As of 2023, the other 1/72 D.XXI options are the long discontinued and
almost identical in layout FROG, the very nice but limited run MPM/SH
multimedia kits and the excellent looking full resin Kora offering. All
above offerings are not easy to find nowadays, with prices for the MPM/SH
and, especially, the Kora, being quite high.
The PM kit, regularly reissued, easy to find and very sensibly priced,
represents a good, unpretentious offering that can yield a very nice result.
Happy Modeling!
Spiros Pendedekas
12 September 2023
Copyright ModelingMadness.com. All rights reserved. No
reproduction in part or in whole without express permssion from the editor.
If you would like your product reviewed fairly and fairly quickly, please
contact
the editor or see other details in the
Note to
Contributors.
Back to the Main Page
Back to the Review
Index Page
Back to the Previews Index Page