Frog
and PM 1/72 Fokker D.XXI
|
KIT #: |
(Frog)
F.223, (Air Lines) 3902, (PM) PM-201 |
|
PRICE: |
Frog and Air Lines: About $3.00. PM:
$4.00 to $8.00 |
|
DECALS: |
One option each? |
|
REVIEWER: |
Brian
R. Baker |
|
NOTES: |
PM Kit is currently available.
Frog kit is available at swap meets. Old kits, but can be built
in several variants. |
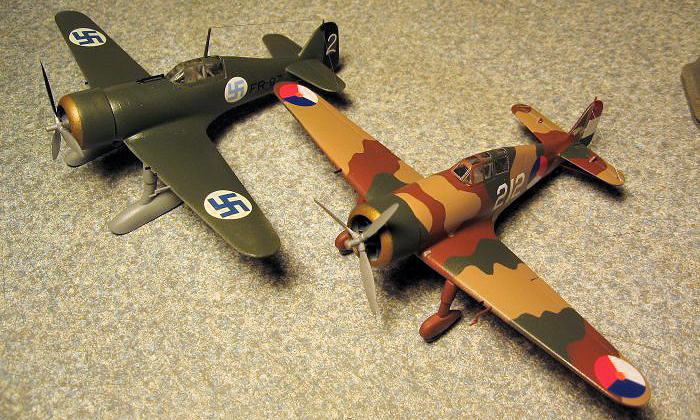
The
Fokker D.XXI was one of those classic fighters of World War II that, had other
circumstances prevailed, might have been better known.
It was originally envisioned as the
Dutch
East Indies
Air Force standard fighter, but it wound up being the primary fighter in the
defense of the
Netherlands
against the Luftwaffe in 1940. A
small number were exported to
Denmark,
and the type was being manufactured by the Spanish Republicans at the end of the
Civil War, although only one example is thought to have been completed.
The Finnish Air Force was the largest user of the type, and after the
initial Dutch-produced examples were delivered, more were produced by the
Finnish
State
Aircraft Factory. This article will
briefly outline the variations in the production models, and the steps required
to accurately model these in 1/72 scale using the two currently available kits,
the original British Frog issue and the currently available Turkish Pioneer/PM
kit. Each kit has its advantages and disadvantages, but both can be made into
acceptable models with a little effort and a creative vocabulary.
Developmental History
 The
original prototype D.XXI appeared in 1936 powered by a Bristol Mercury radial
engine. The plane was equipped with
a smooth cowling, with no protruding rocker arm covers.
Two scoops were located underneath and immediately behind the cowling.
No guns or gunsight were fitted, and there was no pitot tube on the wing.
There was no radio mast or antenna.
The aircraft was painted a dark green overall, with tail stripes on the rudder
and the number “FD-322” in white on the fuselage sides immediately behind the
tri-color roundel, which had the traditional orange center.
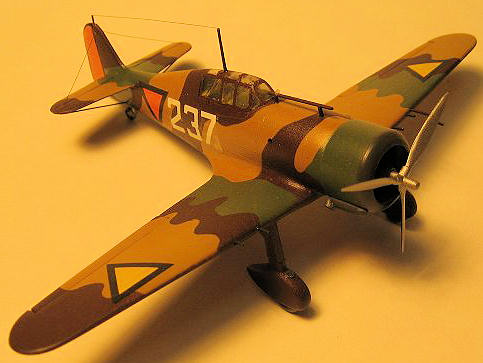
The
first production models for the Dutch Army Air Force were nearly identical to
the prototype, with only detail differences.
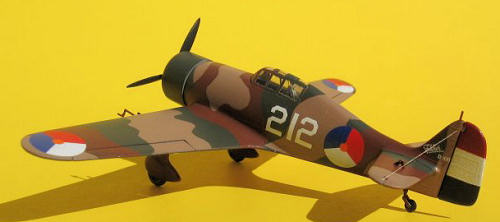
They were originally delivered in a light tan, dark green, and dark brown
camouflage on top, and dark brown underneath. Large white numbers appeared ahead
of the national markings on the fuselage, and a white “Fokker” logo was painted
on the vertical stabilizer. Only one
scoop appeared underneath the cowling.
Radio masts were not on the airplanes at first, but eventually they were
fitted as radios became available.
A pitot tube appeared on the left wing. A long telescopic gunsight was fitted
ahead of the windshield, and two guns were installed in each wing, with landing
lights fitting flush between the guns.
A few airplanes had only two guns in the wings, with two in the fuselage
firing through the propeller arc.
The horizontal stabilizers were braced by a solid strut underneath, and a flying
wire above. External hinges
appeared on upper surface of the horizontal stabilizers only on the Dutch
aircraft, as they don’t show in photos of any other D.XXI’s.
A total of 36 was produced, with the last being delivered
in 1939. In October, 1939,
the markings were changed, with the roundels being replaced by large orange
triangles outlined in black. The
rudders were entirely orange, with black outlines.
These markings were used until most of the Dutch aircraft were destroyed
during the German invasion. At least one airworthy D.XXI survived and was flight
tested by the Luftwaffe. It flew in original Dutch camouflage with Luftwaffe
markings.
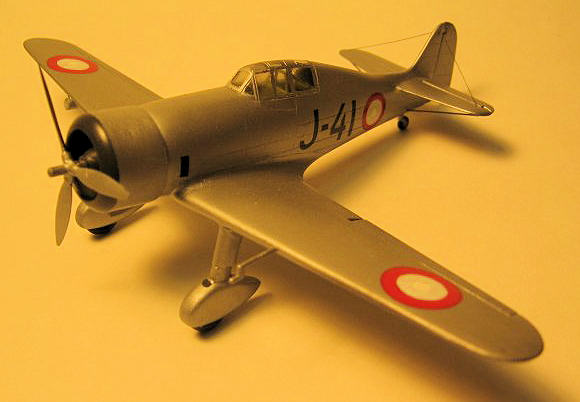 The
Danish export versions were similar to the Dutch models with a few changes.
Only one scoop was located under the cowling.
The first two aircraft were apparently delivered in overall silver with
no armament or gunsights. The
landing light was in a small fairing on the right wing, and small “bumps” on the
cowling covered the protruding rocker arm covers on the engine.
The elevator hinges were no longer
there. Eight aircraft were built under
license in Denmark, and some of these were fitted with two
20 mm. Madsen cannons in fairings under
the wings outboard of the landing gear.
The Danish production models were
camouflaged in an irregular pattern of light brown and medium green over pale
blue undersurfaces, and had typical Danish red and white roundels, and it can be
assumed that the original Dutch built examples were later
painted to this standard.
These airplanes
were apparently captured intact by
the Germans, although their subsequent use is unknown.
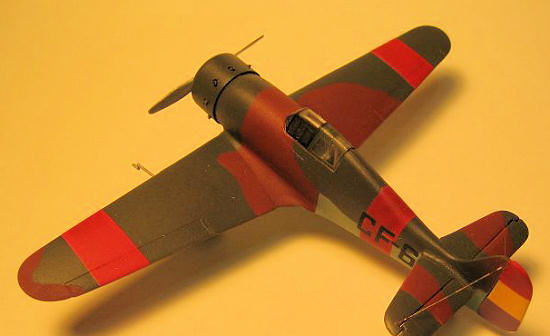
The
Spanish Republicans began manufacturing the D.XXI in Spain during the latter
stages of the Spanish Civil War, and it is believed that only one aircraft was
completed before the plant was overrun by Franco’s Nationalists.
This plane used a Russian
M-25 engine, the type used on the Polikarpov fighters, and also featured a
Messier undercarriage. No photos of
the plane are known to exist, although a color drawings exists on the Wings
Palette website. Apparently, only
the prototype survived, but its ultimate fate is unknown.
 The
major user of the Fokker D.XXI was the Finnish
Air Force, which received 7 Dutch-produced D.XXI’s after 1937.
Later, 93 were produced by
the Finnish State Aircraft Factory at Tampere. The Dutch models were virtually
identical to the Dutch production models except for the following changes.
A small venturi tube appears on the left side of the fuselage about even
with the main spar. Landing lights were included, similar to those used on the
Danish versions. Navigation lights
were in small fairings on the wingtips, with small handles immediately behind
them for ground handling. No guns or gunsights were fitted, but these were later
added by the Finns. Two scoops are
located under the fuselage, and a pitot tube is located on the wing leading edge
just outboard of the left landing gear.
Some aircraft were flown with Finnish designed skis, which used most of
the normal landing gear struts. A
shorter but slightly thicker gunsight was located in the position ahead of the
cockpit on some aircraft, but later, some of these were replaced by German Revi
sights.
Finnish
production models also involved a few changes.
A small glass panel was installed behind the cockpit canopy, and this is
hard to detect on most photos. A radio mast protruded from the top of the
cockpit, with a small post on the top of the vertical stabilizer mounting the
other end of the LF aerial.
All
Finnish models had a “V” strut bracing the horizontal stabilizers.
Original Dutch-produced aircraft were delivered in a brown camouflage
over silver undersides, but these were soon repainted in a single dark green
camouflage with light blue undersides similar to RLM 65.
Later, irregular patterns of black were added, forming the familiar black
and green over light blue usually associated with the Finnish aircraft. Yellow
theater markings were added once the German invasion began in 1941, and the
results were some very colorful airplanes.
The Profile publication shows a drawing of a snow camouflaged D.XXI on
skis, but I find it significant that there is no photo or reference to a
snow-camouflaged D.XXI in the Finnish book, leading me to assume that the planes
carried the black and green colors all year around, even when they were operated
on skis.
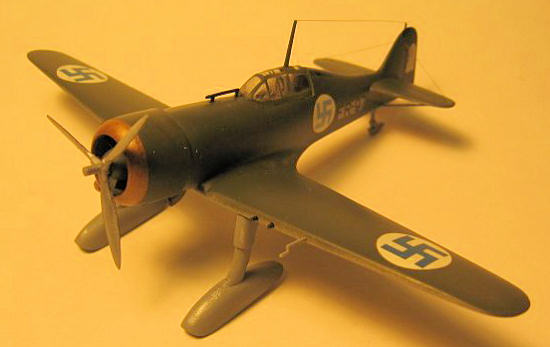 When the
supply of British Bristol Mercury engines began to run short,
some aircraft were manufactured or rebuilt using 80
1,050 hp. Pratt and Whitney R-1535 radial engines that had been obtained
from Sweden in 1940. This
represented a power increase from the 760 hp. Mercury engines, and resulted in a
few changes in the airframes. The most obvious is the canopy, which was extended
back almost to the leading edge of the vertical stabilizer, adding four frames
to the structure. Another change
was the rudder, which was enlarged due to the power increase. These new rudders
had balances ahead of the hinges at the top of the unit.
However, some Mercury powered examples
also had this new rudder, so check your photos for this detail.
The cowling was approximately the same length, but due to the smaller
frontal area of the Wasp engine, it was slightly narrower.
Of course, the American engine turned in an opposite direction to the
British, so a new prop had to be used, and slight changes in the aerodynamic
settings of the tail surfaces had to be made, but these would not be visible in
photos. The scoop under the
fuselage was entirely different. The same skis were used, and markings remained
essentially the same.
One
experimental prototype, powered by a Wasp engine, was built and flown using a
retractable landing gear similar to that used on the Fiat G.50, and this
involved considerable redesign to the wing center section.
Only one was completed, and it was later reconverted back to original
configuration, but there are plenty of drawings and photos available for this
aircraft. Another five examples
were produced in 1944 using 920 hp. Bristol Pegasus X engines, but I have not
seen photos of this variant, which must have look very much like the Wasp
powered aircraft except for opposite propeller rotation.
After
the Finns were compelled to agree to an armistice with the Russians in 1944, the
D.XXI’s were used alongside their
Bf-109G’s to drive the remaining German forces from the country,
and soon after, the D.XXI was no longer
used as a fighter. Postwar, the D.XXI’s soldiered on until 1949, and the last
were not disposed of until 1952. These were mainly Mercury and Wasp-powered
types, and aside from the removal of the yellow theater markings, the small blue
and white roundel replaced the original Finnish swastikas, which of course,
pre-dated the German use of the symbol by many years.
Some of these aircraft carried small cylindrical air filters under the
cowlings, and most had the wheel pants removed, exposing the wheels. The D.XXI’s
service life extended through almost 15 years, and it is believed that at least
two survive. In addition, at least one North American Harvard Mk. IV has been
modified to look like a D.XXI for movie purposes, and this will make a most
interesting subject for a model.
The Frog
D.XXI Kit
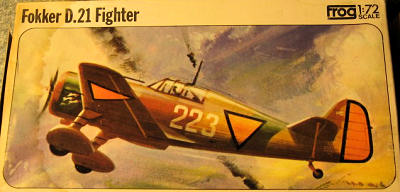 Frog
first issued their D.XXI kit in the 1960’s, and for many years, this was the
only kit available of this type. Featuring the typical detached control
surfaces, the pilot seat was the standard “all purpose Frog seat” mounted on a
stub in the cockpit. There was no instrument panel or any other cockpit detail.
The propeller is accurately shaped, and the Bristol Mercury engine is
adequate. The cowling has no rocker
arm covers, so it is correct only for the Dutch built variant. There is no
exhaust stack, which should be located on the lower right side of the cowling.
The landing gear is too short, and incorrectly shaped, but the wheel
pants can be corrected by judicious sanding down.
There is no provision for the rear window panel.
Also, although the canopy is accurate, the rollover pylon behind the
pilot’s seat is shown as lines on the canopy glass, whereas the structure is
actually inside of the cockpit. The
elevator hinges on the Dutch model are missing, and the gunsight is only for the
Dutch version. The radio mast must
be scratchbuilt. The rudder shape
is not entirely correct, especially in the upper hinge line. The tailwheel
appears to be a little small, but it is useable.
The
Pioneer/PM Kit
At first,
this kit looks to be infinitely superior to the old Frog kit, but after building
these side-by-side, I’m not so sure.
The outline is reasonably accurate, although I have the impression that
the rudder is just a bit too short in chord.
All control surfaces are molded into the airframe, and these are marked
by thin raised panel lines, making them all but invisible once the paint is on.
This is NOT a copy of the Frog kit, although the kits do have a few parts
that are almost interchangeable.
The engine looks like the Frog engine, but it is slightly bigger, as is the
cowling. The prop, however, is
slightly undersized, and has no hub, just blades protruding from the crankshaft.
I replaced mine with a Frog unit. As on the Frog, there is no exhaust stack, so
this has to be scratchbuilt. There is a floor and pilot seat, but no other
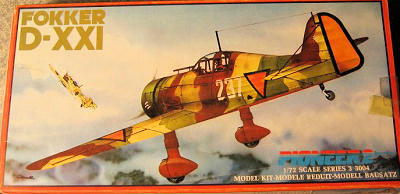 cockpit detail. The interior is a
little rough, with casting marks in the cockpit area that should be trimmed off.
The molding of the wings leaves something to be desired, and these need
trimming down to achieve the correct shape.
The fuselage has some rough areas, especially ahead of the windshield,
and there are some sink marks behind the cockpit.
The fit of the wings and tail unit to the fuselage is not as good as that
of the Frog, and some filling will be required to correct this. The rudder
appears to be a little small, and the hinge line at the top doesn’t look right,
but I didn’t bother to correct this minor detail.
One good
feature of this kit is the landing gear, as the wheel pants and skis and both
provided. Both are accurate, and
the extras can be used to correct the Frog kit. However, the skis, especially on
the bottom, need some filler, as they don’t line up completely.
They do, however, attain the proper angle for when the airplane is
sitting on the ground. If you are going to model the airplane in flight, you’ll
have to cut the skis off and reposition them.
Check photos for proper angles.
There is, of course, no rear cockpit bracing, and this needs to be
scratchbuilt from plastic rod. Use
a small section of flat strip for the top, as this is correct. Also, be careful
in attaching the wings, as they will want to assume too great a dihedral angle.
Frog Kit:
Assembly
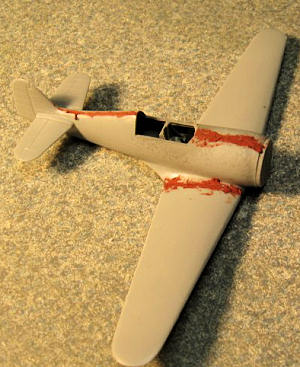
is fairly simple. Once the cockpit
is detailed and joined, the seams need to be filled in, and there is
considerable work in the belly section, as this is one of the old kits that had
the slot for a stand.
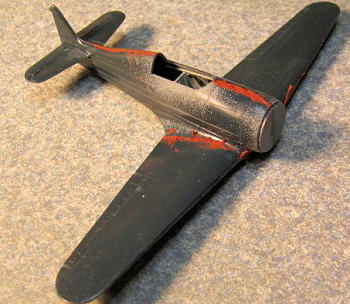 Basic fit
is very good, and the wings line up at the correct dihedral angle.
The tailplane lines up easily, and the control
surfaces can be mounted securely before painting.
If you’re doing the Dutch version, it would be wise to paint
the rudder before installing it, as it
requires tricolor stripes or the typical orange rudder markings used in 1940.
The landing gear needs to be reworked, with new struts and reshaped wheel
pants. The Frog kit doesn’t include the skis, so if you want to do that version,
you’ll need the PM kit or some scratchbuilding skills.
The engine needs some detailing, but it fits into the cowling snugly.
The prop can be attached to the engine before the cowling is attached to
the fuselage. Be sure to
scratchbuild the exhaust stack, as this is not included in either kit.
A piece of round sprue works fine here if you heat one end and bend it
before trimming it off. Also, check the tailplane bracing struts.
Some airplanes had only one strut, while others had two.
The kit provides a single strut only, so this may need to be added.
Check photos for the plane you are modeling.
In general,
 the Dutch planes had one strut, while the Finnish built
examples had the “vee’ struts. This goes for the Pioneer kit also.
The
canopy fit is very good, and you can actually see some of the cockpit detail
inside. Be sure to add the correct
gunsight. Also, add elevator hinges
on the Dutch version. Painting is
no problem, and there are a lot of color schemes to choose from.
Just be sure to check photos first, as there are a lot of detail
differences.
PM/Pioneer
D.XXI
Once the cockpit is detailed to your satisfaction, the canopy can be
attached. This canopy is almost
opaque, and not much can be seen inside. I suppose that smoothing it down with
toothpaste, a very mild abrasive, might help, but I didn’t bother.
Again, there is no provision for the rear window panel, so this needs to
be added using glass or a decal of some kind.
All
in all, this makes up into a pretty nice little model of the Fokker D.XXI, but
it is quite a bit of work to get things right.
You’ll need a lot of putty and some spare parts,
but I was satisfied with the results.
The landing gear is probably the best feature as compared with the Frog
kit, especially since both the ski and wheel gear are included, and the extras
can be used on a Frog kit, saving some work.
Converting
Either Kit to the P.W. R-1535 Wasp Powered Version
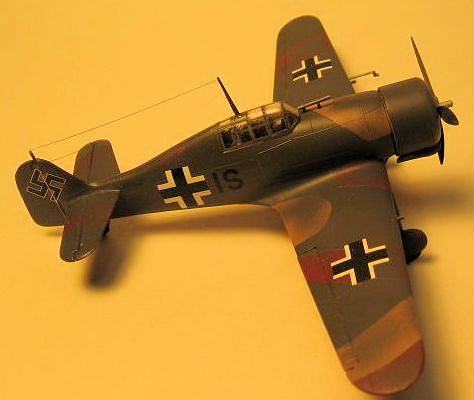 This
conversion makes up into the last production model, done in Finland because of a
shortage of Bristol Mercury engines later in the war.
The main changes are, of course, the engine and propeller, along with the
enlarged rudder and extended canopy.
The retractable gear prototype was built from this model also, making a
large variety of conversions possible from this model.
The
engine and cowling require replacement, and an ideal unit is the extra cowling
from an old Hasegawa A6M2 Zero kit.
Three cowlings and two engines are provided in this kit, and the earlier A6M2
cowling is ideal. Be sure to
replace the prop also, as it rotates in the opposite direction as compared with
the British engine. The rudder has
to be scratchbuilt, and has a small balance protruding forward from the top.
Also, this model had “vee” struts bracing the horizontal stabilizers, so
these also need to be built from plastic rod.
The
canopy provides the major problem with this conversion. I made a vacuform mold
and made several canopies, using a wooden form and adding the bracing with thin
strips of masking tape. I cut down
the rear fuselage aft of the cockpit so that the canopy would fit, and
superglued it in place. It is not a
difficult conversion, but it can be a little tricky to get everything to fit
right.
These are
both pretty decent little kits, and can be made into acceptable models with a
little work. If a newer kit is
available, it will probably be much more expensive, so don’t throw away or trade
off the old ones. They still make
up into nice models, and the price is right.
 There
isn’t a lot of material available on the D.XXI, but some useful sources include
the old Profile Publication No. 63 from the sixties and a number of ‘Fighters of
the world” books, which contain
some basic information. The
Squadron “Finnish Air Force” paperback has some good color information.
The best source, although it is published only in Finnish, is the
paperback by Keskinen, Stenman, and
Niska, “Fokker DXXI”, which contains a wealth of photos and drawings, including
some color. Even with the language
difficulties for English readers, there is enough useful information to make
this worth getting, even though it is dated 1977.
The photos and drawings are outstanding.
Brian
R. BakerMarch 2011
If you would like your product reviewed fairly and quickly, please
contact
me or see other details in the
Note to
Contributors.
Back to the Main Page
Back to the Review
Index Page


 The
original prototype D.XXI appeared in 1936 powered by a Bristol Mercury radial
engine. The plane was equipped with
a smooth cowling, with no protruding rocker arm covers.
Two scoops were located underneath and immediately behind the cowling.
No guns or gunsight were fitted, and there was no pitot tube on the wing.
There was no radio mast or antenna.
The aircraft was painted a dark green overall, with tail stripes on the rudder
and the number “FD-322” in white on the fuselage sides immediately behind the
tri-color roundel, which had the traditional orange center.
The
original prototype D.XXI appeared in 1936 powered by a Bristol Mercury radial
engine. The plane was equipped with
a smooth cowling, with no protruding rocker arm covers.
Two scoops were located underneath and immediately behind the cowling.
No guns or gunsight were fitted, and there was no pitot tube on the wing.
There was no radio mast or antenna.
The aircraft was painted a dark green overall, with tail stripes on the rudder
and the number “FD-322” in white on the fuselage sides immediately behind the
tri-color roundel, which had the traditional orange center.

 When the
supply of British Bristol Mercury engines began to run short,
some aircraft were manufactured or rebuilt using 80
1,050 hp. Pratt and Whitney R-1535 radial engines that had been obtained
from Sweden in 1940. This
represented a power increase from the 760 hp. Mercury engines, and resulted in a
few changes in the airframes. The most obvious is the canopy, which was extended
back almost to the leading edge of the vertical stabilizer, adding four frames
to the structure. Another change
was the rudder, which was enlarged due to the power increase. These new rudders
had balances ahead of the hinges at the top of the unit.
However, some Mercury powered examples
also had this new rudder, so check your photos for this detail.
The cowling was approximately the same length, but due to the smaller
frontal area of the Wasp engine, it was slightly narrower.
Of course, the American engine turned in an opposite direction to the
British, so a new prop had to be used, and slight changes in the aerodynamic
settings of the tail surfaces had to be made, but these would not be visible in
photos. The scoop under the
fuselage was entirely different. The same skis were used, and markings remained
essentially the same.
  Frog
first issued their D.XXI kit in the 1960’s, and for many years, this was the
only kit available of this type. Featuring the typical detached control
surfaces, the pilot seat was the standard “all purpose Frog seat” mounted on a
stub in the cockpit. There was no instrument panel or any other cockpit detail.
The propeller is accurately shaped, and the Bristol Mercury engine is
adequate. The cowling has no rocker
arm covers, so it is correct only for the Dutch built variant. There is no
exhaust stack, which should be located on the lower right side of the cowling.
The landing gear is too short, and incorrectly shaped, but the wheel
pants can be corrected by judicious sanding down.
There is no provision for the rear window panel.
Also, although the canopy is accurate, the rollover pylon behind the
pilot’s seat is shown as lines on the canopy glass, whereas the structure is
actually inside of the cockpit. The
elevator hinges on the Dutch model are missing, and the gunsight is only for the
Dutch version. The radio mast must
be scratchbuilt. The rudder shape
is not entirely correct, especially in the upper hinge line. The tailwheel
appears to be a little small, but it is useable.
 cockpit detail. The interior is a
little rough, with casting marks in the cockpit area that should be trimmed off.
The molding of the wings leaves something to be desired, and these need
trimming down to achieve the correct shape.
The fuselage has some rough areas, especially ahead of the windshield,
and there are some sink marks behind the cockpit.
The fit of the wings and tail unit to the fuselage is not as good as that
of the Frog, and some filling will be required to correct this. The rudder
appears to be a little small, and the hinge line at the top doesn’t look right,
but I didn’t bother to correct this minor detail.
 Basic fit
is very good, and the wings line up at the correct dihedral angle.
The tailplane lines up easily, and the control
surfaces can be mounted securely before painting.
If you’re doing the Dutch version, it would be wise to paint
the rudder before installing it, as it
requires tricolor stripes or the typical orange rudder markings used in 1940.
The landing gear needs to be reworked, with new struts and reshaped wheel
pants. The Frog kit doesn’t include the skis, so if you want to do that version,
you’ll need the PM kit or some scratchbuilding skills.
The engine needs some detailing, but it fits into the cowling snugly.
The prop can be attached to the engine before the cowling is attached to
the fuselage. Be sure to
scratchbuild the exhaust stack, as this is not included in either kit.
A piece of round sprue works fine here if you heat one end and bend it
before trimming it off. Also, check the tailplane bracing struts.
Some airplanes had only one strut, while others had two.
The kit provides a single strut only, so this may need to be added.
Check photos for the plane you are modeling.
In general,


 There
isn’t a lot of material available on the D.XXI, but some useful sources include
the old Profile Publication No. 63 from the sixties and a number of ‘Fighters of
the world” books, which contain
some basic information. The
Squadron “Finnish Air Force” paperback has some good color information.
The best source, although it is published only in Finnish, is the
paperback by Keskinen, Stenman, and
Niska, “Fokker DXXI”, which contains a wealth of photos and drawings, including
some color. Even with the language
difficulties for English readers, there is enough useful information to make
this worth getting, even though it is dated 1977.
The photos and drawings are outstanding.