|
KIT: |
ICM 1/48 MiG-3 |
|
KIT # |
48051 |
|
PRICE: |
$14.95 |
|
DECALS: |
See Review |
|
REVIEW & |
|
|
NOTES: |
|

|
THE KIT |
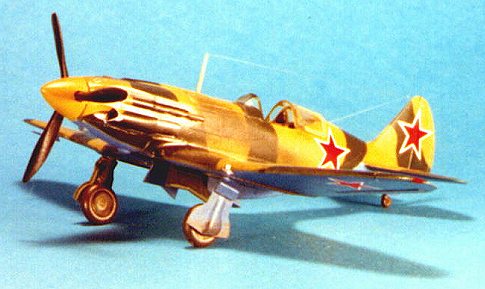
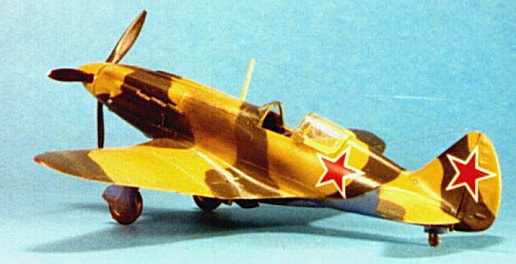
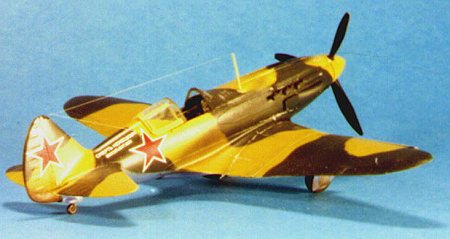
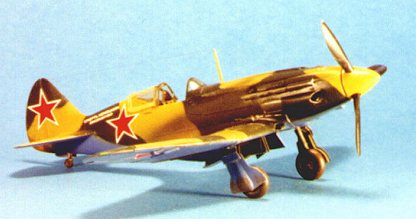
ICM's 1/48 MiG-3 is the third 1/48 injection-molded kit of this interesting Russian warplane to make it to the hobby shop shelves, the first being Classic Airframes' kit some two years ago and earlier in 1999, one by AA. Interestingly, there are two major sub-types of MiG-3, and each of these portrays one, the C-A kit being the early, shorter version, while the ICM kit is the later version, which is a bit longer.
|
CONSTRUCTION |
 Having built two of these models, I discovered there is an easy way and a
hard way to do this project.
I - The Hard Way:
The hard way is to attempt to install the AM-35 engine, and then put the cowling parts over it. Either the engine is a bit over-size, or the airframe is a bit small. Whatever, the result is a lot of puttying and sanding, with consequent loss of surface detail, to no good end. Having built the first one that way, I
determined to do the second one the easy way.
II - The Easy Way:
The easy way to build this model is to create two major sub-assemblies, the fuselage, and the wing. I assembled the fuselage halves and glued on the cowling pieces, and installed the exhausts for the engine, and set it aside to dry. By carefully fitting this little jigsaw together, I had gotten everything to fit without using putty at that point.
I then assembled the cockpit, having painted it beforehand, and set it aside to dry.
The wing comes in thirteen separate pieces, including the fairings for the wing-to-fuselage joint. After sanding down the ailerons to get rid of the too-heavy fabric effect, I carefully assembled this jigsaw puzzle, and set it aside to dry.
Next day, I installed the cockpit in the fuselage, which was very easy, sliding it in through the opening where the wing will ultimately attach.
I then fitted the wing into position, and then glued it in sections, being sure to get the join line tight and fitting right before moving to the next section. This resulted in a wing-fuselage joint that was strong and needed no putty.
Once everything had set up, I sanded all seams smooth and installed the windscreen and aft canopy. The airplane was ready to paint.
|
PAINT & DECALS |
 ICM provides markings for ten different MiG-3s, five in winter camouflage and
five in summer camouflage. Since I built this, it has come to light that in all
likelihood the "summer" airplanes are the early version MiG-3 that is
represented by the Classic Airframes kit, while the "winter"
airplanes, coming as
they do at the end of the MiG-3's production run, are the later version which this model represents. No mind, I had already done the winter airplane the "hard way." There are photos of MiG-3s in summer 1942 - the airplane did not leave front-line operations until the end of 1942 - so it is entirely possible that one of the "winter" late production versions was later repainted.
Following the scheme shown in the ICM markings guide, I made my color choices after reading about the MiG at the V-VS Modeler's Resource Page, a website I strongly recommend for anyone who is going to create models of Soviet aircraft from World War II. (The URL is: http://www.oz.net/~xopowo/VVS/vvs.htm)
I mixed the tan color using some Gunze-Sanyo "Middle Stone" with Tamiya "Flat Yellow," and made the dark green by applying a little Gunze-Sanyo RLM70 "Black Green" to some flat black. The camouflage pattern was freehanded with the airbrush, the way it was done at the factories in Russia.
 Quite frankly, the decals are the one real failing of this kit, with the red
stars not being fully opaque, as well as being oversized. Fortunately, I have a
large selection of decals down in the decal dungeon, so I was able to replace
these with red starts from an Aeromaster Yak sheet. There are two Aeromaster
sheets for the MiG-3, 48-313 and 48-314. which I have seen and would have used
had I had either at hand. I recommend them to you for this kit.
Once everything had snugged down, I shot the model with Future, then applied exhaust stains with Tamiya "smoke." I then toned things down with my "semi-gloss" Future, which is Future mixed 60-40 with Tamiya Flat Base.
|
CONCLUSIONS |
This MiG-3 is the best kit so far that ICM has released. On the basis of this kit, I am definitely looking forward to what they do with the Spitfire VII, VIII and IX this coming year.