Zvezda 1/48 Yak-9D
| KIT #: | 4815 |
| PRICE: | ~$25.00 |
| DECALS: | Two options |
| REVIEWER: | Tom Cleaver |
| NOTES: |
| HISTORY |
The Yakovlev Yak-9 was a development of the robust and successful Yak-7B fighter, which was based in turn on the tandem-seat advanced trainer known as the Yak-7UTI. The Yak-9 entered production in 1942 and began arriving in Soviet fighter regiments in late 1942. It played a major role in retaking air superiority from the new Focke-Wulf Fw 190 and Messerschmitt Bf 109G fighters during the Battle of Kursk in the summer of 1943.
The Yak-9 had a cut down rear fuselage with unobscured rear view. It was the first Yak fighter to have lighter metal structure that allowed for an increased fuel load and armament over previous models built only of wood. It was highly maneuverable at high speeds at low and medium altitudes and was also easy to control, qualities that allowed it to be the most produced Soviet fighter of World War II.
The Yak-9 series was produced in different variants including the Yak-9T with a 37 mm cannon and the "large-caliber" Yak-9K with a 45 mm cannon, which was used for antitank operations; the fighter-bomber Yak-9B with an internal bomb bay behind cockpit capable of carrying up 880 lb of bombs; the long-range Yak-9D and the Yak-9DD with additional wing fuel tanks to escort bombers over Eastern Europe; and the Yak-9U with a more powerful engine and improved aerodynamics. The Yak-9 remained in production from 1942 to 1948, with 16,769 built, of which 14,579 were built during the war.
 At low
altitude, the Yak-9 was more maneuverable than the Bf 109. A series of
improvements in performance and armament did not degrade the handling
characteristics. Soviet pilots regarded the Yak-9's performance as being
comparable to the Bf 109G and Fw 190A-3/A-4. After the Battle of Smolensk, in
the second half of 1943, the famed Free French Normandie-Niémen unit became a
Groupe and was equipped with the Yak-9. Of 2,550 Yak-9s manufactured up the end
of 1943, only 383 were lost in combat.
At low
altitude, the Yak-9 was more maneuverable than the Bf 109. A series of
improvements in performance and armament did not degrade the handling
characteristics. Soviet pilots regarded the Yak-9's performance as being
comparable to the Bf 109G and Fw 190A-3/A-4. After the Battle of Smolensk, in
the second half of 1943, the famed Free French Normandie-Niémen unit became a
Groupe and was equipped with the Yak-9. Of 2,550 Yak-9s manufactured up the end
of 1943, only 383 were lost in combat.
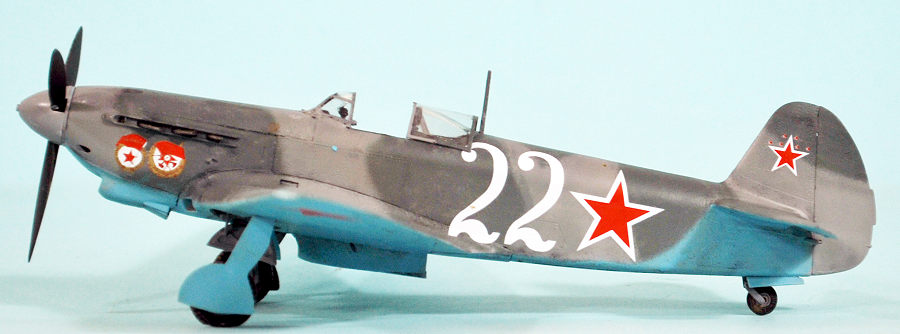
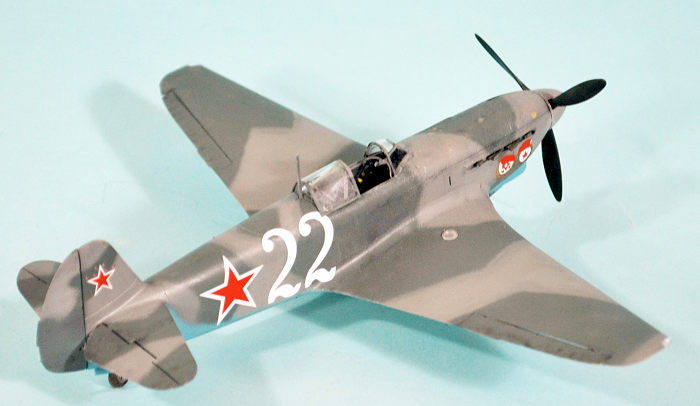
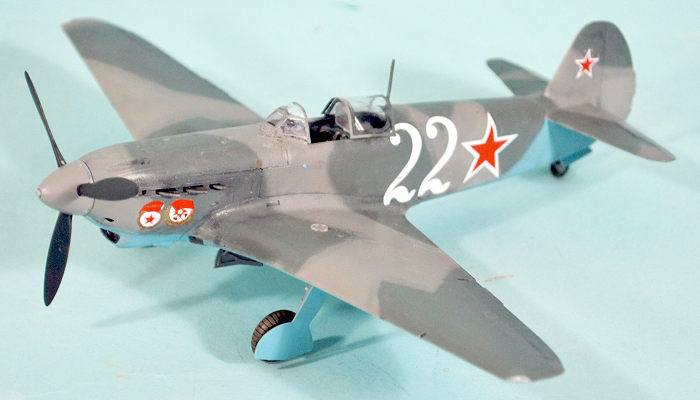
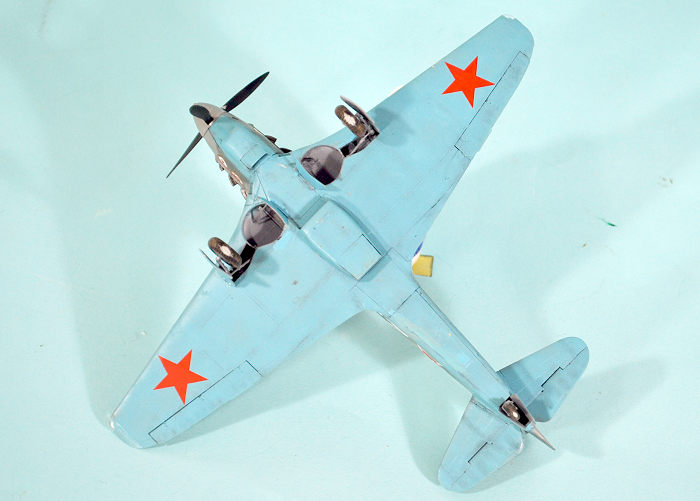
The Yak-9D had the fuel capacity increased from 120 to 170 US gallons, giving a maximum range of 870 miles, but its combat usefulness at full range was limited by a lack of radio navigation equipment. Most were used as short-range fighters with fuel carried only in the inner wing tanks. Armament was one 20 mm ShVAK cannon with 120 rounds and one 12.7 mm UBS machine gun with 240 rounds The powerplant was a Klimov VK-105 V-12 liquid-cooled piston engine, providing 1,350 hp. Maximum speed was 385 mph at 19,400 feet. The Yak-9D was produced between March 1943 and June 1946, with a production total of 3,058 aircraft. The well-known for being photographed Yak-9D #22 was flown by Lieutenant Michael Grib, who was credited with 17 victories in more than 400 missions was awarded Hero of Soviet Union in 1945.
| THE KIT |
The plastic kit industry has not served the aircraft of the Red Air Force in World War II that well. Most of the available kits are limited-run and not the best quality. Yak fighters were the first products of the ICM company beginning in the 1990s. These are quite primitive kits by modern standards. A more modern series of kits were released by Modelsvit starting 5 years ago - these include the Yak-9D, Yak-9DD, Yak-9T and Yak09K. They represent a vast increase in quality compared to previous kits but are still limited-run kits.
 Zvezda
began producing high-quality, accurate kits of Soviet aircraft with the release
of the La-5FN and then the LA-5, followed by a Yak-3 and a Pe-2. These are the
best kits of the airplanes they represent. This new Yak-9D was released last
year by Zvezda, unfortunately right into the middle of The Bad Year of 2022.
There are supposed to be further versions, but this has been put on hold due to
current world events. However, this kit is as much an improvement on the
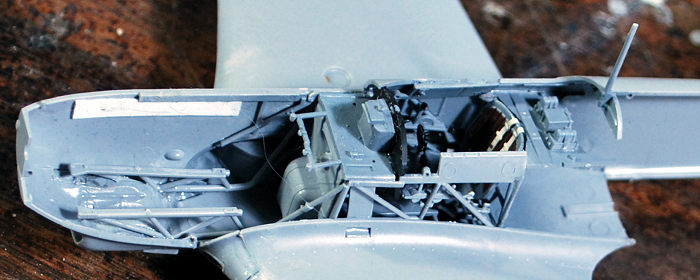
Modelsvit Yaks as they were on their predecessors. Surface detail and interior
detail are Eduard-level quality. A very complete engine is provided, which can
be displayed with the cowling off; this would be an excellent beginning for an
interesting diorama. Decals are included for two aircraft and are of good
quality.
Zvezda
began producing high-quality, accurate kits of Soviet aircraft with the release
of the La-5FN and then the LA-5, followed by a Yak-3 and a Pe-2. These are the
best kits of the airplanes they represent. This new Yak-9D was released last
year by Zvezda, unfortunately right into the middle of The Bad Year of 2022.
There are supposed to be further versions, but this has been put on hold due to
current world events. However, this kit is as much an improvement on the
Modelsvit Yaks as they were on their predecessors. Surface detail and interior
detail are Eduard-level quality. A very complete engine is provided, which can
be displayed with the cowling off; this would be an excellent beginning for an
interesting diorama. Decals are included for two aircraft and are of good
quality.
Currently, Zvezda kits are available from dealers in Latvia, Lithuania and Poland. The final price of a kit including shipping, is around $40-$45. For those concerned about dealing with a company based in “that country,” Vlad Szulc has assured me the guys at Zvezda are “OK.”
I see there are several new decal sheets for the Yak-9 available. I spotted two at The Plastic Model Store, where your purchase goes to contribute support to the Ukrainian Army as they fight for all of us who believe in democracy and freedom.
| CONSTRUCTION |
Let me say right off: this is a very demanding kit with regard to construction. The parts are very precise in their fit, and you MUST get the fit right at each point or you will not be able to get things right in the steps that follow. Ham-handedness will get you sent to bed without supper. This kit is so fiddly that the guys at Eduard would wonder if it was too fiddly. If that’s not your “thing” in a kit, then this is not a project you would want to get involved with.
 The kit
assembles from the inside out, as do the Lavochkins. You need to study each
step, and test fit until you have things right before committing any glue. I
prepainted everything in the cockpit before assembly. I used the “Look”
instrument panel, which really looks good, and the used the photoetch seatbelts
that come with it.
The kit
assembles from the inside out, as do the Lavochkins. You need to study each
step, and test fit until you have things right before committing any glue. I
prepainted everything in the cockpit before assembly. I used the “Look”
instrument panel, which really looks good, and the used the photoetch seatbelts
that come with it.
The wing has a very knife edge trailing edge, which it gets by having the whole trailing edge on the upper wing part. You need to scrape down the interior of the lower rear inner wing area, so you can get a precise fit with the upper and lower wings, because that seam goes through the very nice petite surface detailing that outlines the flaps. If you get this right, all you will have to do is scrape off the squeezed-out glue.
When you attach the upper wing part, start with this area. Get the fitto the lower wing part nice and tight at the fuselage join, then apply glue and squeeze it tight. Make certain that the wing tip joint on the lower side is nice and tight and apply glue. Then go to the inner area of the leading edge and get things squeezed together tight around the leading edge intakes. Apply glue. Finish off by gluing the leading edge and squueze it tight. If you have done this right, you will need no filler. If you need filler, pull it apart and do it over because there isn’t any “recovery” from incorrect assembly. Attach the wing tips and push them in to get a solid contact, then apply glue.
 You
then attack the right fuselage half. Get it aligned with the wing and the nose,
then glue all the interior area of the cockpit that it touches, then glue the
fuselage to the wing and the lower nose cowling. Hold it in position until the
glue sets up, because it will slip out of position easily. Do not use a
fast-acting glue, because you have a lot of “after gluing” adjustments to make.
Let this side set up solidly, and assembling the other side will be easier, but
follow the same process. While things can still be adjusted, attachthe upper
cowling. Start by getting the forward placement pegs properly positioned, then
push everything hard so that the rear of the part aligns with the fuselage,
thebn glue it onand make sure all the edges align properly. Hold it in position
till it sets up.
You
then attack the right fuselage half. Get it aligned with the wing and the nose,
then glue all the interior area of the cockpit that it touches, then glue the
fuselage to the wing and the lower nose cowling. Hold it in position until the
glue sets up, because it will slip out of position easily. Do not use a
fast-acting glue, because you have a lot of “after gluing” adjustments to make.
Let this side set up solidly, and assembling the other side will be easier, but
follow the same process. While things can still be adjusted, attachthe upper
cowling. Start by getting the forward placement pegs properly positioned, then
push everything hard so that the rear of the part aligns with the fuselage,
thebn glue it onand make sure all the edges align properly. Hold it in position
till it sets up.
Be sure to attach the tail wheel leg to the lower rear fuselage part and that it is set up before you attach this part to the model. Be very certain everything is tucked in along the edges before applying glue, and then squeeze the fuselage till things set up. Assembling the horizontal stabilizers will come as a relief because they are done in the normal manner.
| COLORS & MARKINGS |
I followed the pinting diagram included in the kit, using my Tamiya mixes for the Soviet camouflage colors. I then applied a coat of clear glsss.
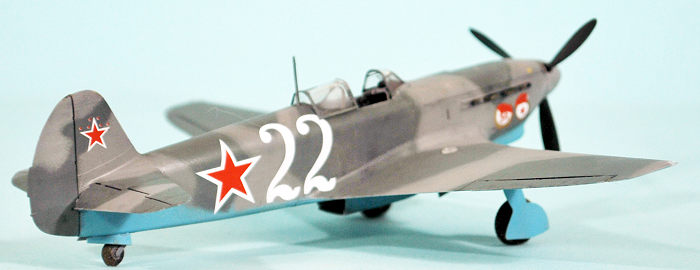 The kit
decals are nice, but according to photos of this Yak-9, the national insignia
decals are wrong because they have an outer red border. I had the old Aeromastet
sheet 48-096 “fighting Yakovlevs,” which has this airplane as an option, and
used those decals. The national insignia is correct on this sheet.
The kit
decals are nice, but according to photos of this Yak-9, the national insignia
decals are wrong because they have an outer red border. I had the old Aeromastet
sheet 48-096 “fighting Yakovlevs,” which has this airplane as an option, and
used those decals. The national insignia is correct on this sheet.
I attached the main gear and used the Brassin wheels, which have much finer detail than the kit’s plastic wheels, though those can be made to look fine with some “mud” on them. I drybrushed mud on these wheels before attaching them. I atacherd the exhausts, for which I used the hollow 3D printed Brassin set.
I applied a light coat of clear satin to replicate the heavy coat of wax applied to Soviet fighters, then attached the canopy in the open position. I used a vacuform sliding section because the plastic parts are just slightly too thick for the “open option” to sit completely correcty.
| CONCLUSIONS |
This Zvezda kit is the best Yak-9 in 1/48 scale. I hope things can change to the point where they can release the rest of these. In the meantime, the kit is available on-line. It is very fiddly, but worth the effort. I’m sure I will do another. Recommended for experienced modelers.
16 February 2023
Review kit courtesy of all you book-buyers.
Copyright ModelingMadness.com. All rights reserved. No reproduction in part or in whole without express permission.
If you would like your product reviewed fairly and fairly quickly, please contact the editor or see other details in the Note to Contributors.