| KIT #: | 60324 |
| PRICE: | 11,800 yen (about $100) at HLJ |
| DECALS: | Three options |
| REVIEWER: | Tom Cleaver |
| NOTES: |
Eagle Cals 32-151 used. |

| HISTORY |
After an early crash allowed
changes in the weapons system during the rebuild, the requirement for carrying
air-dropped bombs in the wings was dropped, while the 4-gun armament was changed
to 6 weapons, three in each wing.
This meant the fuel tanks had to be
moved from the wing, while remaining on the center of gravity. This resulted in
the relocation of the cockpit aft to increase fuel in the fuselage tank.
This severely restricted the pilot's view during the all‑important
maneuver of landing aboard a carrier, with the airplane gaining the names “Old
Hosenose” and “Ensign Eliminator”.
When that was coupled with overly‑stiff landing gear that had a propensity to
bounce when landed aboard by less than an expert pilot, the Navy decided that as
good as the airplane was, it was too much of a handful for the average
wartime‑trained Navy fighter pilot to safely and consistently operate from the
restricted deck of an aircraft carrier and substituted the Grumman Hellcat for
the Corsair aboard ship.
Interestingly enough,
 the British
took the airplane aboard carriers without the later fixes without difficulty,
and VF-17 was able to solve all the problems noted by the time they deployed to
the Pacific in September 1943. One
has to wonder just what was going on in the cool intelligences at BuAer.
Fortunately for history, the
U.S. Marines ‑ who have traditionally been given the equipment the Navy didn't
care to use ‑ received the Corsair beginning in late 1942, just in time to
rewrite history in the Solomons battles that became the graveyard of the
Imperial Japanese Naval Air Force.
On February 12, 1943, the green
shape of Guadalcanal became visible on the distant ocean horizon as seventeen
F4U-1s of VMF-124 droned through the Pacific sky with their PBY-5 navigation
escort. While the island had been
declared “secure” a week earlier, the position of American forces in the
Solomons was far from secure. They
held only Guadalcanal, while the Japanese controlled the rest and had built a
series of air bases on several of the islands extending up “The Slot” to
Bougainville, 300 miles distant.
The Japanese Navy fliers were still a force to be reckoned with, with many
experienced fliers among their ranks.
It could be said that at this point, in February 1943, the campaign in
the Solomons was just getting started for the long haul.
Among the pilots of the Corsairs
was Warrant Officer Kenneth A.
Walsh. At 26, he was one of the
oldest and most-experienced pilots in the squadron, having joined the Marines at
age 17 in 1933 where he was first trained as a mechanic, then given the
opportunity to learn to fly through the Naval Aviation Pilot program for
enlisted personnel, pinning on his Wings of Gold nearly six years earlier in
April, 1937. As he later recalled,
“When we deployed to the Pacific, we had only averaged 20 hours in the F4U.
We completed one gunnery hop, one altitude hop and one night flight, then
we went. They needed us bad, and we
would learn everything else by experience.”
 The
Corsairs landed at Fighter Two on Guadalcanal, with the pilots expecting to be
given the opportunity to learn the lay of the land before going on operations.
Instead, they were told they were scheduled for a mission in an hour,
escorting a PBY to pick up two downed fliers rescued by the Coastwatchers at
Kolombangara, 200 miles north, who were now awaiting rescue at Sand Fly Bay on
Vella Lavella. The two pilots were
1st Lt. Jefferson
DeBlanc of VMF-112 and SSgt James Feliton of VMF-121.
DeBlanc had been shot down two weeks earlier in a wild dogfight in which
he had shot down five enemy divebombers attempting to hit Guadalcanal, for which
he would later be awarded the Medal of Honor.
Walsh flew that mission and later recalled, “During that mission we were
only 50 miles from a large Zero base.
I hesitate to think what might have happened had they known we were
coming up. Our pilots were so
inexperienced and we were at low altitude.
We could have lost most, if not all, of them, but we lucked out and
didn't meet anybody.”
There was no time to get
acclimated. The next day, VMF-124
escorted B-24s up The Slot to bomb Japanese shipping at Bougainville.
Walsh led the fourth section
with the callsign “13.” He happened
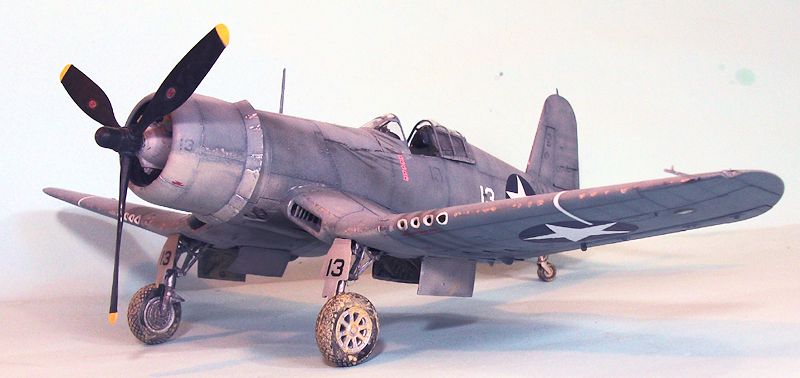
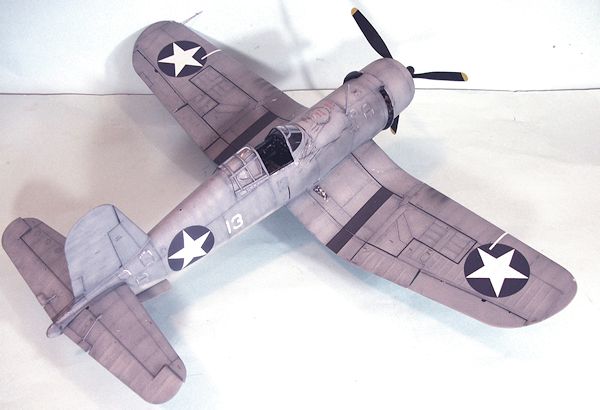
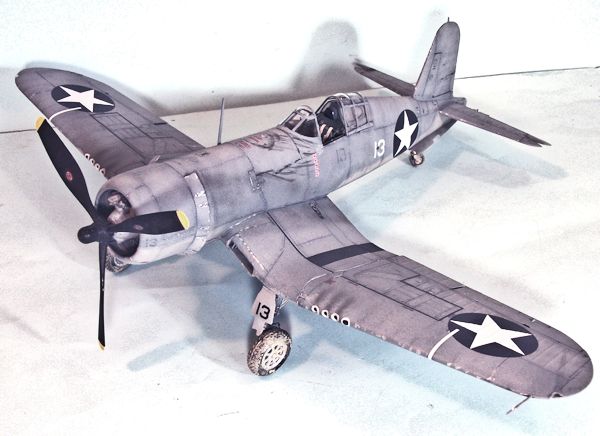
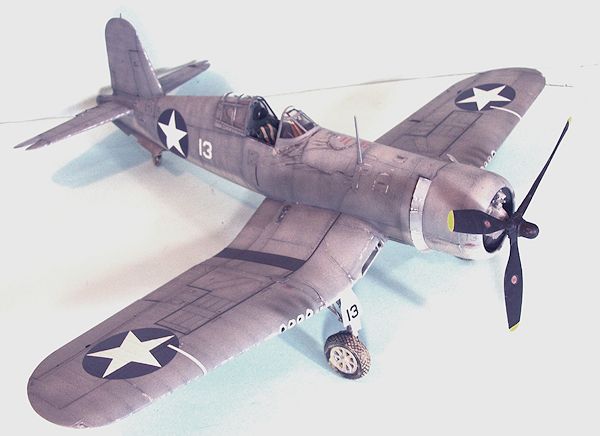
to be in F4U-1 BuNo 02350, numbered “13" in black below the cockpit.
Though no one had a regularly-assigned airplane, this would be the
Corsair Walsh would fly the most during his first tour on Guadalcanal during
late February and March, since most other pilots were superstitious about the
number. Again, there was no combat
an everyone returned safely.
The next day, February 14,
VMF-124 got into the war for real, learning first-hand just how tough an
opponent they faced. Again, it was
a bomber escort mission to Bougainville, this time to bomb the Japanese airfield
at Kahili. “The Zeros were waiting
when we arrived. We lost our first
two pilots that
 day, along
with two B-24s, four P-38s and two P-40s.
We got three Zeros, one the result of a head-on collision with one of our
F4Us.” This first introduction to
combat was known ever after in the squadron as “The St. Valentine's Day
Massacre.”
Over the next month, the pilots
of VMF-124 literally “wrote the book” on how to survive and thrive in combat
with the Zero. They learned
altitude was crucial, and they learned to use their plane's best performance to
advantage. The Corsair could dive
and zoom better than anything else in-theater.
It had a good high-speed roll (which would be made even better in
subsequent Corsairs by fitting balance tabs to the ailerons).
They learned never to let their airspeed drop below 250 mph when flying
against the Zero. Right at the end
of VMF-124's first tour, Walsh demonstrated he had learned the lessons by
shooting down three Zeros in a wild fight south of Bougainville on April 1, 1943
when he turned back to help the P-38s that had relieved him on patrol south of
Bougainville, which had been attacked by 20 Zeros.
VMF-213 arrived to take over
VMF-124's Corsairs and ground personnel at the same time.
The pilots left for six weeks' R&R in Sydney.
Returning to battle on May 13
with an escort mission to Kahili, Walsh downed two more Zeros to become the
first Corsair ace. By this time,
BuNo 02350 had been around long enough (90 days) to be called “old and worn
out,” but Walsh had one of the squadron mechanics put five Japanese flag
stickers on it and posed in the cockpit for photographers, preserving 02350
forever as “Ken Walsh's Corsair.”
In the course of two more tours
in the Solomons, Walsh eventually ran his score to 20, including 17 Zero
fighters and three Val divebombers.
On August 15, 1943, during the invasion of Vella Lavella, he led his section
into a Japanese formation that out-numbered them 6:1.
Walsh shot down two Vals and a Zero, with his Corsair taking severe hits.
During an escort mission on August 30, he suffered engine failure
 enroute,
landed at Munda and grabbed another airplane, then took off to catch up with the
squadron. Over Kahili, he found 50
Zeros forming up and attacked them single-handedly.
He managed to shoot down four before being hit so badly that he had to
make a dead-stick landing in the Slot near Vella Lavella; he was later awarded
the Medal of Honor for these two missions.
Looking back on his Solomons
combat career, Walsh recalled, “I shot down 17 Zeros and lost five airplanes as
the result of combat. I was shot
down three times, I crashed one that ploughed into the line back at base and
wiped out another F4U. I was shot
up at least a dozen times. The
times that I really got into trouble came about due to the Zero I didn't see,
and conversely, I'm sure that most of the kills I got, they didn't see me.”
By the time the Japanese removed their carrier squadrons from Rabaul on January 25, 1944, the Corsairs had completed the destruction of trained aircrew that had begun at Midway. After the losses in the Solomons and Rabaul, the Japanese Navy was a shadow of its former self. This fact should be taken into consideration when one compares the combat record of the Corsair and the Hellcat and their overall contribution to victory in the Pacific: the majority of Corsair victories - those before February 1944 - were against an enemy that was still a “worthy opponent,” while the majority of Hellcat victories - which came after February 1944 - were against an enemy that, in the overwhelming majority of combats, lacked training and experience.
| THE KIT |
The subject of rumors and “edjumacated”
guesses ever since the Tamiya Spitfires came out, the early F4U-1 was a logical
choice since Tamiya has “owned” the subject in 1/48 and 1/72 for the past 18
years since the 1/48 F4U-1 was released in 1995.
Given the popularity of the aircraft and the ease of minor modifications
to the basic kit allowing later release of the F4U-1A and F4U-1D, it was a solid
commercial decision.
The kit features a detailed
R-2800 engine that can be displayed with the cowling open, the option of having
the wings spread or folded and the flaps raised or dropped, and the landing gear
extended or retracted.
That said, there are a few
things about the kit that surprised me, given that it came from Tamiya.
 1.
The engine is nothing to write home about.
It's very definitely not “super-detailed,” and lacks most of the detail
one finds in the R-2800s Trumpeter released in their Corsairs, Thunderbolts,
Hellcats and Bearcats. Perhaps most
importantly, it's not the right engine for an F4U-1, but rather for an F4U-1D.
This is most notable in the shape of the magnetos. Interestingly,
Trumpeter provides the different magnetos as part of their R-2800 package.
2.
In a first for a Tamiya kit, the decal sheet is wrong, at least as
regards “Spirit of ‘76.” The one
good photo available of this airplane very clearly shows the red-surround
insignia. Not only that but
Tamiya's instruction sheet shows this too.
However, the red surround is nowhere to be found on the decal sheet.
Any modeler who wants to do this airplane can do so with the Eagle Cals
sheet 32-151, but it's surprising that Tamiya would do this.
3.
The ailerons are for later-version Corsairs.
The F4U-1 did not have aileron balance tabs.
It's easy to fill these in, but again it's surprising that a Tamiya “uberkit”
would miss this.
For those for whom “too much” is
not enough, here is a list of things the Serious Corsair Modeler will want to
consider doing for the kit, from a list posted at The Most Serious Hobby Page In
The World:
Rivets: The kit wing and
fuselage are covered with tiny indentions meant to replicate rivets. The Vought
drawings call out the use of surfacer for the wing outer panels front "D"
section and the entire center section for smooth surfaces. The fuselage has many
spot welded assemblies. Same for fuselage, vertical and horizontal stabilizers.
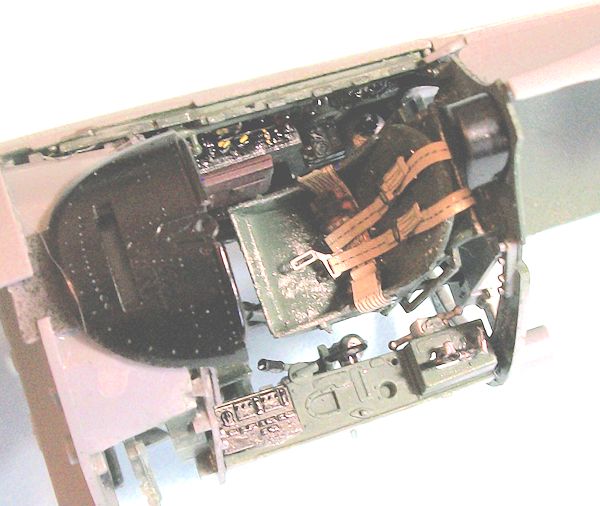 Cockpit:
Missing the landing gear emergency extension CO2 bottle. Left side next
to seat. The kit provides the fuel tank vapor CO2 dilution bottle.
Missing flap control upper left in front of part D21.
Not all F4U‑1 had the padded head rest parts B21 & B22.
Pilots seat installation has early frame seat- seat assembly was changed
to later "raised cabin" type at BuNo. 17492, 17494 and subsequent according to
parts list. Missing chart board
installation under instrument panel.
Add auxiliary gunsight on instrument cowling left of illuminated gunsight.
Check battery and cockpit heater installation. Check seat and shoulder belt
installation. Check radio receiver switch panel installation on right side. Bomb
control missing, left side next to seat.
Many cockpit placards to add.
Consider adding oxygen hose and mask. Consider adding raft pack,
parachute, seat cushion and straps to seat bottom.
Add details to inside of sliding canopy section.
Fuselage:
Turtledeck part E8 is for early aircraft. Turtledeck was changed at 325th
Vought made. Use M3 for later aircraft and all FG‑1 and F3A‑1. Tail wheel doors
parts E14 & E15 are for later versions. The tail wheel doors had ribs instead of
stamped sheet stiffeners. Missing chain operator and linkage for tail wheel
doors. Kit provides some, parts F9 through F11.
Check tail wheel assembly. There were at least three different types of
tail wheels used and different yokes.
Dashpot for arresting hook and spring assisted tail wheel strut missing.
Turtledeck vision tunnel windows had three rods supporting the leading edge. Add
the rods if canopy open. Can probably omit if closed canopy.
If late version without vision tunnel, make new armor plate and modify
turtle deck with the well behind the armor plate.
Engine and cowling:
Kit provides dead cowl flaps, part G3. Not all F4U‑1 had this
installation. Other choices, top three cowl flaps battened down or replaced top
three with a sheet metal pan. If cowl flaps open, add detail to inside of cowl
flaps depending on whether individually hydraulically operated (all‑around cowl
flaps) or modified for cable operation. Like Vector (?) 1/48 resin set. Detail
inside of nose cowl, part G8, crude. Consider replacing with ribs. Like Vector
(?) 1/48 resi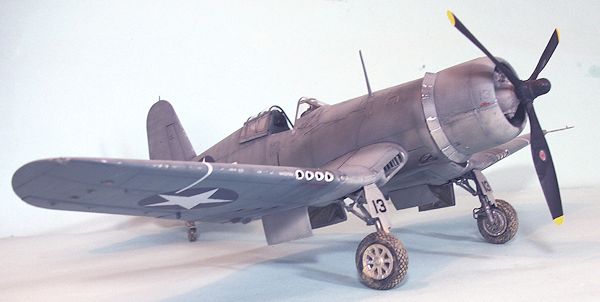 n
set. Barracuda resin for engine
details. Kit provides engine upper
baffles, parts K13 and K16. Missing the other baffles for the cylinders. All
kits with R‑2800 miss this. Add inter‑cylinder oil lines for lower cylinders.
See R‑2800 manual for other lines visible from front. Add spark plug wiring.
I'm sure if you do all that
you'll have a stunner of a model.
For me, as I read the list, I kept thinking of “John Clark's rule” (Those who
have read a Tom Clancy novel will remember this): “Good enough is good enough,
and perfect is a PITA.”
For me, the kit is “good
enough,” and where it's going for permanent display, no one will be looking at
any of that. Your mileage may vary.
I did, however, get rid of the aileron balance tabs.
A lot of complaints at a certain scale modeling internet forum have been made about the kit's use of rubber wheels, since it's “well-known fact” that rubber tires are death to a model. For once and for all, the truth is that there was only ever one kit that had problems with rubber tires: the F7F series released 20 years ago by AMT. There was some sort of chemical reaction between the rubber tires and the plastic hubs, that resulted in them melting. This has not been a problem with kits since. I have Trumpeter kits that are ten years old with rubber tires and there has been no problem with them. I have used the rubber tires on all the Tamiya Spitfire releases and their Mustang. No problem. I am sure, however, that facts will never get in the way of “common knowledge” in the scale modeling hobby, at least in certain places. Were it not for “uninformed comment,” 95 percent of modelers who post on internet forums would be mute.
| CONSTRUCTION |
The one Big Secret to a
successful project with this kit is READ AND FOLLOW THE FREAKING INSTRUCTIONS!!!
I realize this is a radical, perhaps subversive act for many modelers to
undertake, but just like with the Wingnut Wings kits with their solid
instructions, following the way Tamiya has laid this kit out will resolve all
your problems.
Another item: while many
modelers I know who are working on the kit have reported no problems with the
engine, the instructions there as regards getting everything aligned properly in
construction are just
 vague
enough that it is very definitely not that hard to end up attaching the front
and rear cylinder banks “one cylinder over”, resulting in having to pull it
apart and start over (ask me how I know).
There is a simple solution to this that will insure everything is
assembled correctly here, and that is to assemble everything from back to front:
attach the exhausts to the firewall, attach the circular exhaust section to the
firewall, then attach the rear engine bank.
Attach the exhaust pipes between banks, then attach the front bank.
Then attach the front of the engine with the magnetos, and all will be
exactly aligned.
Another point about the engine:
since it's not that much of a super-detailed whoopy-do, plan to close the
cowling (particularly since those parts stay in position about as well as the
cowlings on the Spitfires and Mustangs do) and just concentrate on the front of
the engine, you can't see anything else anyway.
And now on to building the
model.
This kit requires that you
carefully clean up each part and remove all bits of sprue attachment, since the
fit of this kit is overall as tight and precise as that of the new “Yamato” kit.
If you don't do this, you'll have fit problems throughout the model.
Make certain all sub-assemblies are tightly attached in the proper
position. “Close enough” doesn't
work for this kit.
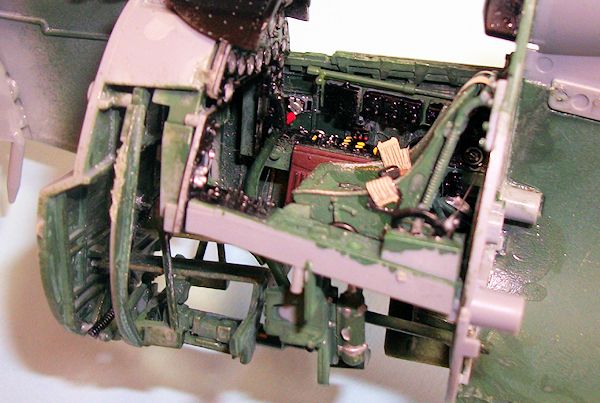
I mixed up Tamiya paints per the
instructions for the interior cockpit color.
The result is a sort of a dark bronze green.
Everything I have read recently about the F4U-1 cockpit says the cockpit
is Dull Dark Green, which is supported by photos of the Lake Michigan F4U-1.
A better choice here would be to use Tamiya “Black Green” and not mix
anything.
I think Tamiya's instructions
for the “Salmon” color are wrong, since the result is too pink, as compared with
photos of the Lake Michigan F4U-1.
I added in some Tamiya Orange, and got a color that was close
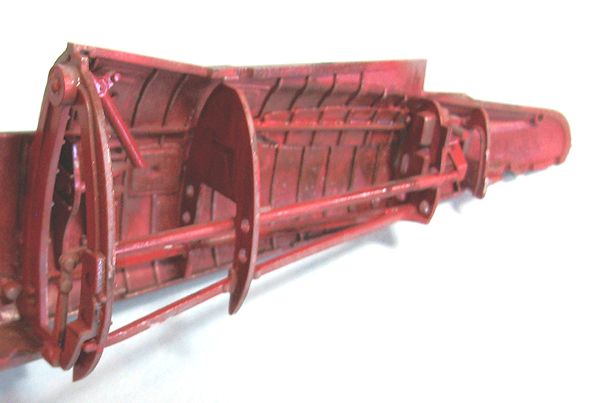 enough to
the color photos. Also, since this
color has become known, many modelers have painted the wheel wells this color.
I did so here, but then saw photos of the Lake Michigan F4U-1 that
confirm the wheel well is the same as the surrounding lower color.
However, the front section of the wheel well is Salmon, as is the spar.
I repainted accordingly.
When assembling the cockpit
interior, it is important to look at the assembly sequence, because there are a
parts that fit over other parts and they must be attached in the correct
sequence or things will not come together.
With regard to the wing
assembly, be absolutely certain to get the upper surface tightly attached to the
outer bulkhead of the landing gear well.
This is particularly important if you are doing the wings-spread option,
since if that is not nice and tight you will not get smooth mating to the outer
wing.
Also, for the wings-spread
option, do not put any of the parts shown attached inside the folding area.
You can't see them and they will get in the way of a good tight fit.
While this spar assembly is far stronger than that of the 1/48 kit, it is
still a good idea to put some Evergreen strip inside the wing, particularly the
area aft of the spar to the flaps.
This will provide extra “grabbing area” for the glue and insure a solid fit.
I was glad to see that, for
once, the flaps-down option wasn't the only one that worked (as is the case with
the 1/48 kits). In the Corsair,
it's in the Pilot's Notes to raise the flaps immediately on touchdown because
they are liable to foreign object damage on the airstrip, and they blank the
prop blast that is important in steering on the ground.
I originally liked the flaps-down option back when Tamiya first came out
with it, but after looking at the many, many photos of Corsairs with the flaps
up and the few with flaps down, I went with technical accuracy and raised the
flaps.
The only place I found any fit
problem was along the centerline seam of the lower rear fuselage.
There was a big seam gap there that took both plastic putty and
cyanoacrylate glue to make it disappear.
I didn't have to use any filler anywhere else on the model.
Once the model was assembled, it
presented a very solid structure.
| COLORS & MARKINGS |

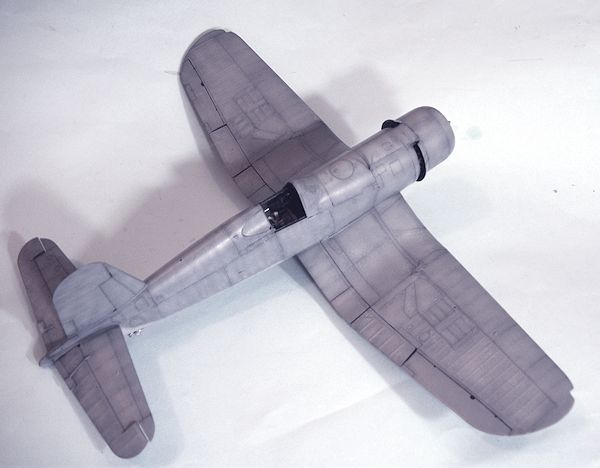
I started by applying flat black
to the airframe along panel lines, and also filling in the areas between spars
in the fabric-covered areas.
I followed that by applying the
lower color, for which I used Xtracrylix “Aircraft Grey.”
The key to doing a worn paint job is to apply thin coats of paint.
I thinned the paint 50-50 and then added in retardant, and built up coats
till I had coverage of the pre-shading while still letting it through.
The upper surface was done with Xtracrylix “Dark Bluegrey,” also thinned
50-50. I did not go for a solid
first coat here, but “enough to cover” then went over various areas with the
lower light grey color mixed in to get the sun-fading.
For the upper surfaces most exposed to the sun, I added in some white.
When I was finished, I thinned the last shade to 75:25 thinner:paint, and
went over the whole upper surface, laying on the final color lightly so that you
can “look into” the paint when dry and see the other colors below.
I also applied these lighter coats between rivet lines, so that the
underlying structure would be noticeable.
 I used the
kit decals for the wingwalks and stenciling, and Eagle Cals decals from 32-151
for national insignia and markings.
Walsh's Corsair was originally marked with black number 13 on the cowling and
below the cockpit, which were over-painted, though they were visible beneath the
paint. There were, fortunately,
enough black “13" decals on the kit sheet and the Eagle Cals sheet to do this.
I applied extensive exhaust
stains on the lower fuselage, using Tamiya NATO Black, Dark Grey and Hull Red.
The oil stains aft of the cowling on the fuselage and upper wing were
done with thinned Tamiya Semi-Gloss Black, as were the stains aft of the guns.
VMF-124's ground crews painted “extra” gun ports on the wings to scare
the enemy, and photos show BuNo 02350 with “eight” guns.
| CONCLUSIONS |
As far as individual airplanes
belonging to a specific pilot was concerned, while a man might be assigned an
airplane, and while his fighting score might be maintained on that airplane by
its crew, the reality was that pilots flew whatever airplane was "in service" at
the time the mission was scheduled to take off.
 Maintenance
in the field on the island airfields was limited to what was necessary to allow
the airplane to fly and fight.
Paint faded rapidly under the
hot tropic sun, while the "sandblast effect" of operating from a crushed‑coral
or dirt runway did nothing to improve the appearance of the fighters, not to
mention the "dings" that happened as crewmen climbed over the airplane to
service it; exhaust stains and gunfire stains were not washed off at the
conclusion of a mission, while the fact that the gas tank leaked meant that the
airplane's painted surface became even more corroded from the effects of
high‑octane gasoline on it. The
result, as can be seen by even the quickest perusal of contemporary photos of
Corsairs in the Solomons is that creating an accurate representation of one of
these airplanes is one of the few times when "weathering" a model that "too much
is not enough" is the rule to follow, rather than the more usual "less is more."
Definitely the most detailed and
accurate Corsair kit yet released in any scale.
However, the “misses” with the engine and the ailerons result in an “A-“
rather than “A” grade. For those
who love the Corsair, the kit can result in an excellent model, and for those
who want to correct all the little details, the result can be an outstanding
model. Highly recommended.
August 2013
Review kit courtesy of HobbyLink Japan. Get yours at the link.
If you would like your product reviewed fairly and quickly, please contact the editor or see other details in the Note to Contributors.