H-K
Models 1/32 B-17G Flying Fortress
|
KIT #: |
01E04 |
|
PRICE: |
$298.00 SRP |
|
DECALS: |
One option |
|
REVIEWER: |
Tom Cleaver |
|
NOTES: |
New tool kit |
Anyone who
doesn’t know about the Boeing B-17 will be unlikely to be interested in this
kit.
Boeing’s “Flying Fortress” is likely the most-recognizeable American
airplane from the Second World War, the nearly-mythological symbol of American
determination to overcome against all odds.
While the British
Lancaster could carry a far larger bomb load than the relatively paltry 4,000
pounds the B-17 carried, and the B-24 Liberator could carry a larger bomb load
further, the B-17
 reigned
supreme in the European Theater of Operations because it could fly higher and
was tougher to shoot down than either of its heavy bomber competitors. (It
also got the most press. Ed)
reigned
supreme in the European Theater of Operations because it could fly higher and
was tougher to shoot down than either of its heavy bomber competitors. (It
also got the most press. Ed)
First appearing
in 1934 as Boeing’s answer to a U.S. Army Air Corps proposal for what was
supposed to be a standard twin-engine bomber, the B-17 was as revolutionary as
the previous B-9.
And at the outset just as successful, when the Air Corps
decided to buy the Douglas B-18, a military development of that company’s DC-3
airliner, on the grounds that more could be acquired for the same price, Boeing
and the Air Corps visionaries who saw the B-17 as the answer to their desire for
a strategic bomber persisted in the development of the airplane.
Just in time for America’s direct involvement in the
war, the B-17E - the first of the series deserving of the name “Flying Fortress”
appeared.
By early 1943, Boeing, Douglas-Long Beach and Lockheed-Vega were
producing the B-17F, followed that summer by the definitive B-17G.
The B-17 is forever immortalized as the bomber that
broke the back of Hitler’s Germany.
 Modelers had been joking for years that someone should
bring out a 1/32 B-17.
Over the past summer, H-K Models did just that,
releasing what is essentially a B-17G-80-BO and later series Flying Fortress.
Modelers had been joking for years that someone should
bring out a 1/32 B-17.
Over the past summer, H-K Models did just that,
releasing what is essentially a B-17G-80-BO and later series Flying Fortress.
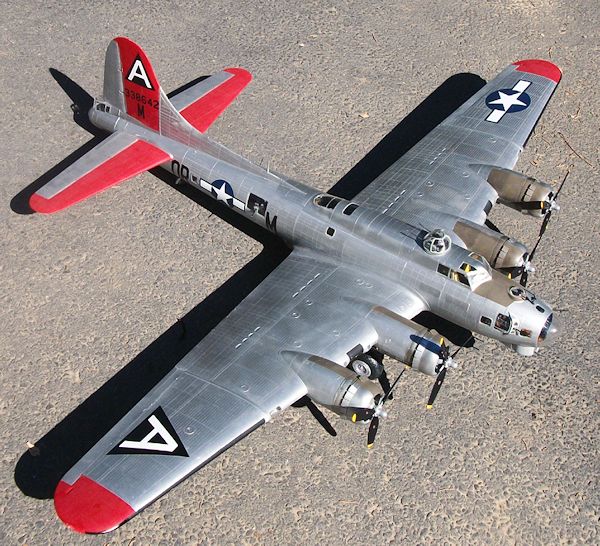
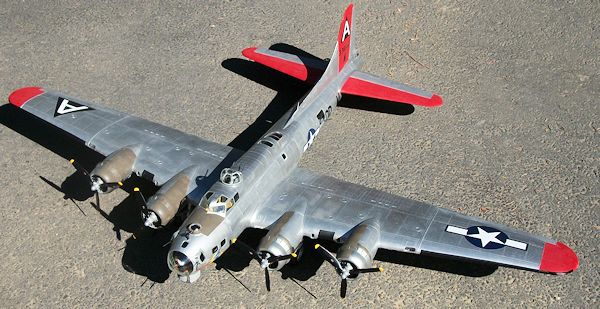
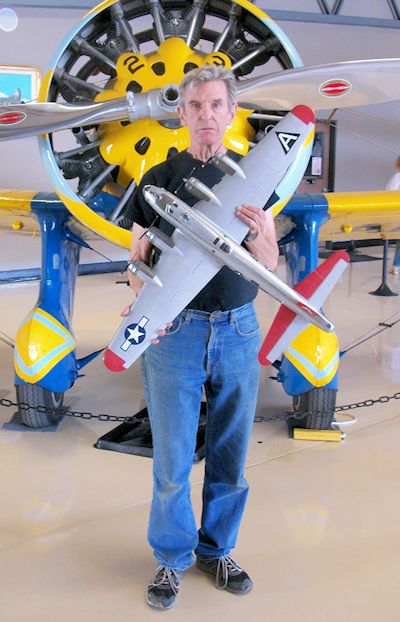
The model has nearly 400 parts and when complete has a
40-inch wingspan, making it the largest plastic airplane model ever released.
For further information, take a look at the
test shot preview.
Though the model looks intimidating in the box, it is
really not that much more difficult a project than the 1/48 Monogram kit.
The main thing a modeler needs to proceed is a work area
large enough to allow assembly and movement of the model.
Before proceeding further, I want to say that as nice as
all the photoetch detail sets are that Eduard is releasing, the truth is they
are a waste of time, given that once the fuselage is assembled, one cannot see
more detail than the bombardier’s pedestal in the nose and the seats in the
pilot’s 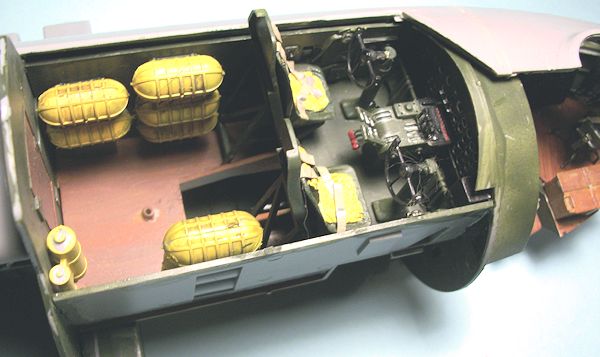 cockpit.
Rather than spend close to $100 on these sets, my advice
is save that money to spend on another model.
The various decal sheets that have been released are,
however, of great value to anyone who wishes to make something different than
the airplane provided in the kit decals.
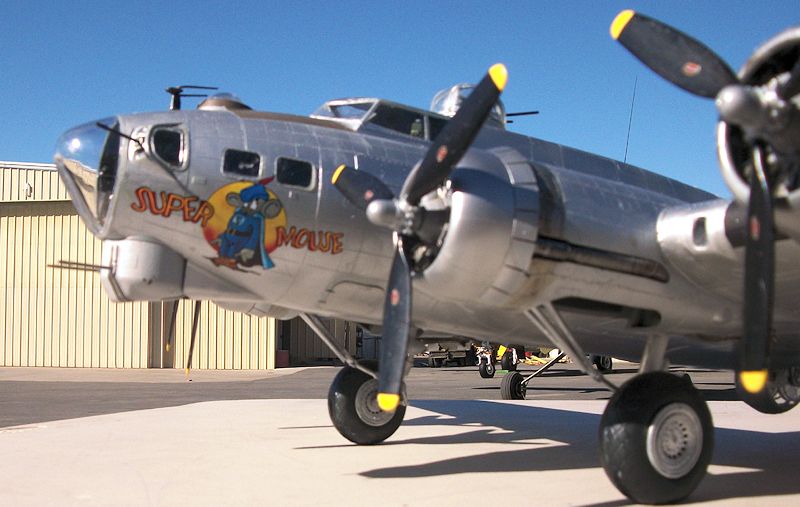
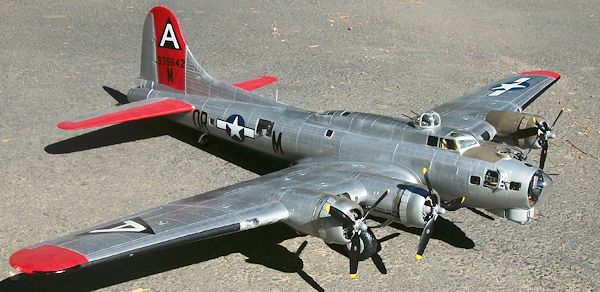
I used the excellent sheet from Zotz Decals to make
B-17G-90-BO 43-38642 “Super Mouse” of the 323rd
Bomb Squadron of the 91st Bomb
Group.
cockpit.
Rather than spend close to $100 on these sets, my advice
is save that money to spend on another model.
The various decal sheets that have been released are,
however, of great value to anyone who wishes to make something different than
the airplane provided in the kit decals.
I used the excellent sheet from Zotz Decals to make
B-17G-90-BO 43-38642 “Super Mouse” of the 323rd
Bomb Squadron of the 91st Bomb
Group.
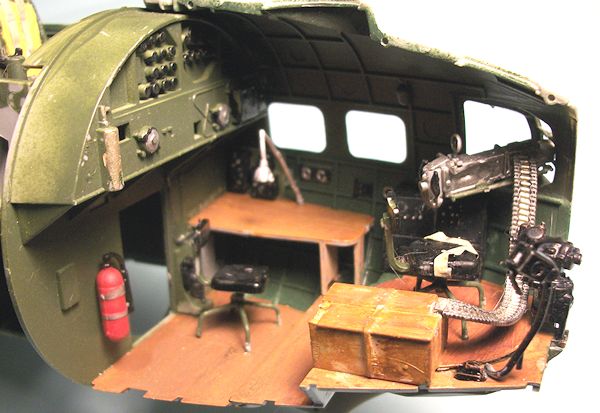
I spent about 10 days doing detail painting of the
fuselage interior, which was mostly time misspent, since it is not possible to
see all the nice wooden floors I did in the nose compartment, the cockpit, the
radio room and the rear fuselage, other than the aforementioned bombardier’s
pedestal.
Photos of those areas before the fuselage was closed up are
included here for historical coverage.
In fact, one need not paint any of the interior aft of
the radio compartment, since virtually nothing is visible other than the machine
guns in the staggered waist windows.
Painting the
 rest
of the interior needs no more attention to detail than would be given to the
1/48 Monogram kit.
rest
of the interior needs no more attention to detail than would be given to the
1/48 Monogram kit.
The instruction sheet can be confusing, since many of
the detailed construction diagrams are very small.
I needed my Optivisor just to look them through.
I believe that originally H-K was going to include a DVD
of instructions, which would have allowed a modeler to magnify whatever was
needed.
Once detail painting was over, I assembled the engines
and inserted them in their cowlings.
I then proceeded to assemble the wings and horizontal
stabilizer.
One thing to note is to be certain to get the exact fit with
everything, because the assembly is very precise.
Do not leave any little sprue nibs on the parts.
I found a little difficulty getting the main gear wells
into proper position - be sure they are as far forward as you can get them,
there will be a “click” when it gets into the proper position.
I closed up the flaps, since I’ve never seen a B-17
sitting on the ground with the flaps down.
I glued the forward nose parts and the rear gun position
parts to the separate fuselages before further assembly, to insure I got a good
tight fit of the parts to minimize seams.
The instructions call for assembling the full main
fuselage, the nose and the tail separately, then bringing them together.
Bob Swaddling followed this with his model and reports
he had no seam problems but I still think my method insures better fit.
Looking back, I would also attach the windows at this
point, so they can be worked on from both sides to get them firmly into position
without any gaps or seams.
 All the interior parts fit without problem.
In restrospect, I would sand the various bulkheads to
take them down just a bit, and would make their edges really smooth.
Doing this will pay dividends when it comes time to
squeeze the right fuselage half over the left half with the interior glued in
position.
All the interior parts fit without problem.
In restrospect, I would sand the various bulkheads to
take them down just a bit, and would make their edges really smooth.
Doing this will pay dividends when it comes time to
squeeze the right fuselage half over the left half with the interior glued in
position.
When I did glue the fuselage halves together, I really
had to squeeze to get things to meet on the center line.
I glued down the centerline inch by inch, wrapping the
fuselage tightly with strong rubber bands as I proceeded.
Even doing this, there was a noticeable centerline seam
that required cyanoacrylate glue and a few applications of Mr.
Surfacer to get rid of.
This is where I think sanding down the bulkheads would
improve the fit.
The cabin roof also has a seam all the way around, which I needed
to use putty to cover.
After sanding everything smooth with varying fine
sanding sticks, I then polished out the fuselage before rescribing panel lines
and replacing lost rivet lines with my pounce wheel.
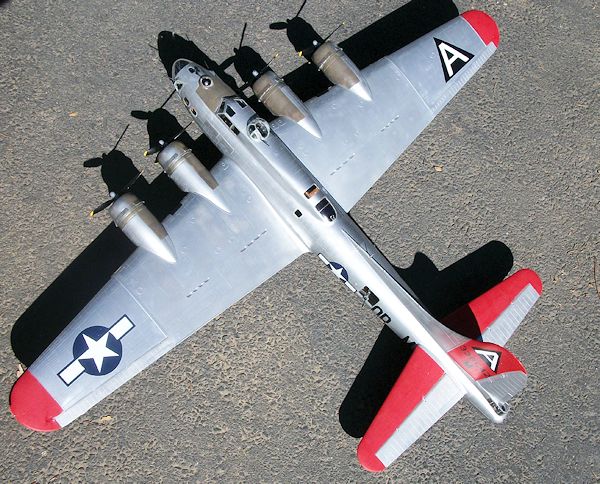
I closed up the bomb bay on this model because its
eventual destination was display at Planes of Fame Air Museum, where it would
not be seen from the bottom, though having the doors open would have been an
invitation to eventual damage as the model is moved over the years.
 Those eagle-eyed viewers will also notice that the cheek
machine guns were misplaced.
They should go to the bottom opening, not the middle.
By the time I realized this mistake the fuselage was
assembled, and I did not choose to try and pull the guns out through all the
other glued-in detail to move them around.
Those eagle-eyed viewers will also notice that the cheek
machine guns were misplaced.
They should go to the bottom opening, not the middle.
By the time I realized this mistake the fuselage was
assembled, and I did not choose to try and pull the guns out through all the
other glued-in detail to move them around.
Many modelers have stated they intend to keep the wings
and horizontal stabilizers unattached to the fuselage, so that the model can be
stored when not displayed.
Indeed, these parts can be fitted to the fuselage
without glue, but the problem is there are gaps along the attachments.
I ended up gluing this model together solidly, filling
the seams along the attachment areas, sanding smooth and polishing, then
rescribing lost detail.
Once the model was fully assembled, I found I could hang
it on the wall by its tail with .010 flexible wire, and keep it away from
trouble when not working on it.
Once the wings and tail were attached, and the clear
parts in position, it was time to paint the model.
A modeler can do this B-17G in any scheme they want, so
long as it is unpainted aluminum.
None of the late-series B-17s were painted in
camouflage.
I opted to use Alclad on this, and I discovered that there is
something about the plastic that inhibits full curing of the paint for an
extended period, a problem I never had with these Alclad paints before.
I strongly recommend you give this model a good coat of
grey primer before proceeding to paint it.
For one thing, it will allow you to insure you have
gotten rid of those seams in the fuselage and in the wing-fuselage joints.
After masking all
the clear parts, I painted the anti-glare panels with Tamiya Khaki, which gives
a good approximation of how late war Olive Drab faded under high-altitude UV
light.
I
 painted
the fabric control surfaces with Tamiya Flat Aluminum, and the vertical fin,
horizontal stabilizer and wingtips with Tamiya Flat Red.
All this was then masked off and I proceeded to apply
the Alclad.
painted
the fabric control surfaces with Tamiya Flat Aluminum, and the vertical fin,
horizontal stabilizer and wingtips with Tamiya Flat Red.
All this was then masked off and I proceeded to apply
the Alclad.
The outer wings
of so-called “NMF” B-17s were actually painted with Aluminum lacquer, since the
sub-contractors persisted in delivering them in OD/Grey long after the painting
instructions had changed.
I used Alclad White Aluminum for this, and then applied
a coat of Model Master Metalizer Sealer.
Doing this also then gave me two fairly substantial
areas to hold on to while painting the rest.
I painted the area of the engine mounts immediately
behind the cowlings with Tamiya Titanium silver, a dark color, and masked them.
The wings and fuselage were painted in large areas of
either Alclad Aluminum or Dural Aluminum.
Then I “blotched” each area with the other color, to get
the “blotchy” look I have seen with unpainted aluminum given long exposure to
sunlight.
The turbo
exhausts were painted Tamiya Bronze, then drybrushed with Tamiya Copper, to get
the burnished heated look shown in color photos.
I unmasked the model, and applied Xtracylix gloss to
the red area of the vertical fin, for decaling later.
 I
then attached the engines to the mounts and glued them in position.
I also attached the Scale Aircraft Conversions metal
landing gear, which I highly recommend.
The model is not that heavy, but the metal gear insures
no problems.
I
then attached the engines to the mounts and glued them in position.
I also attached the Scale Aircraft Conversions metal
landing gear, which I highly recommend.
The model is not that heavy, but the metal gear insures
no problems.
The Zotz decals
went on without difficulty, snuggling down into the delicate surface detail with
a couple coats of Solvaset. I then washed the model to get the decal residue
off.
I used SuperScale’s “Flat Black” decal sheet to make the deicer boots on
the wings.
I then fitted the
upper turret and the ball turret in position and glued them so they don’t move.
The final thing
was to attach the propellers and the gun barrels.
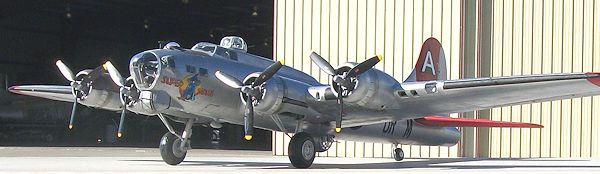
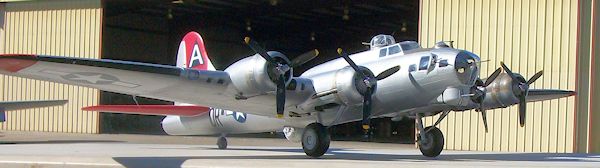
 The model is a stunner built right out of the box.
There is sufficient detail provided by the kit that
aftermarket details are not needed, particularly since they will not be seen.
I did make seat pads for the pilot and co-pilot seats
from putty, and they are visible.
For as big as it is, it is surprisingly light.
I recommend hanging it on the wall by its tail for
displayl.
Hanging it from the ceiling will only result in it eventually
being the biggest dust-catcher in your house.
The model is a stunner built right out of the box.
There is sufficient detail provided by the kit that
aftermarket details are not needed, particularly since they will not be seen.
I did make seat pads for the pilot and co-pilot seats
from putty, and they are visible.
For as big as it is, it is surprisingly light.
I recommend hanging it on the wall by its tail for
displayl.
Hanging it from the ceiling will only result in it eventually
being the biggest dust-catcher in your house.
The model is an
easy project for any moderately-experienced modeler willing to take their time
in assembly.
Highly
recommended.
Tom Cleaver
November 2013
Thanks to Neil Yan at
H-K Models for providing the test shot.
Thanks to Eli Raphael at
Zotz Decals for
the review sheet.
Thanks to Ross McMillan at
Scale Aircraft
Conversions for the metal landing gear.
If you would like your product reviewed fairly and fairly quickly, please
contact the editor or see other details in the
Note to
Contributors.
Back to the Main Page
Back to the Review Index Page