Eduard 1/48 P-51D Mustang
| KIT #: | 11134 |
| PRICE: | $49.95 SRP |
| DECALS: | Six options |
| REVIEWER: | Tom Cleaver |
| NOTES: | Barracuda Studios Decals BC48011 “P-51D Mustangs Part 1" |
| HISTORY |
I grew up with several childhood heroes, who I met through books. They were all people who achieved against the odds. I didn’t realize at the time I was picking role models, because “achieving against the odds” was - unknown at that time - my life path. I was fortunate in my adult life to meet each of my childhood heroes. One of whom I got to know as a friend.
My first “movie job” involved working as the junior assistant to the
unit publicist on the movie “The Right Stuff.” Much of the job turned out to be
working as Chuck Yeager’s “go-fer.” I thought it was the best job possible.
Chuck liked having an employee who knew who he was, and who was knowledgeable
enough about aviation that we could have conversations. I got the job because he
was also the subject of the first “celebrity interview” I ever did - which
lasted so long that, to my everlasting embarrassment - I ran out of questions. I
later learned from the guy who hired me as his assistant, that no one else had
ever done that, because Chuck had a deal with him to give a “secret sign” when
he was bored by the questioner, for the
 publicist to end the interview. The
result of that was an article that appeared in “Retired Officer” back in 1984,
for which I received a compliment from another “childhood inspiration” I later
met, General Robert L. Scott, Jr., who told me “That was the best article on a
fighter pilot I ever read.” It still ranks as the Best Compliment Ever for my
writing career.
publicist to end the interview. The
result of that was an article that appeared in “Retired Officer” back in 1984,
for which I received a compliment from another “childhood inspiration” I later
met, General Robert L. Scott, Jr., who told me “That was the best article on a
fighter pilot I ever read.” It still ranks as the Best Compliment Ever for my
writing career.
So, when the news came last Monday that Chuck Yeager had departed the pattern and finally “flown west,” I felt sadness for the loss and relief for him - his final years were spent in private due to Alzheimers, a disease I wouldn’t wish on the Worst Person Ever. But I’m sure Bob Hoover met him there at Pancho’s Heavenly Happy Bottom Riding Club, and that it’s permanent happy hour there.
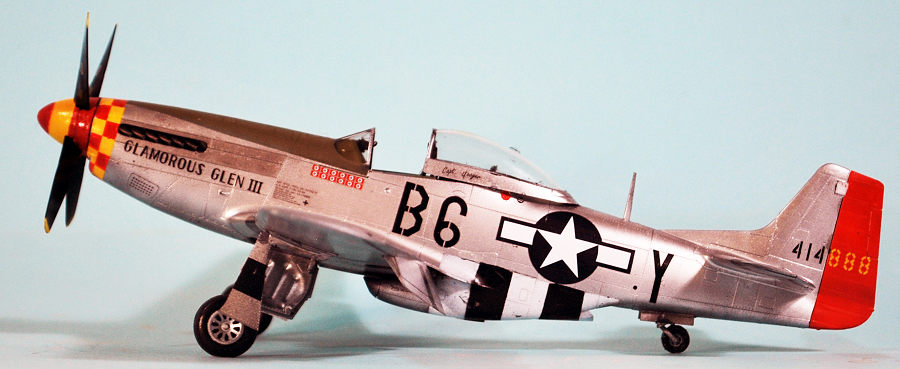
Looking through the stash, I came across my copy of Roy Sutherland’s Barracuda Studios decal sheet “P-51 Mustangs Part 1", which has decals to do a “fictional airplane that can be revised to do an interesting airplane.” (That’s because of She Who Will Not Be Named Here, who has copyrighted “all things Yeager.” Roy has a very humorous way of dealing with the humorless.) I also have stash of Eduard P-51Ds. It was a match made in heaven.
And so, here’s to my childhood hero. A flawed hero, as are we all, but a hero who achieved much - against the odds. If you’re looking for unflawed perfect heroes, you’ve come to the wrong universe.
| THE KIT |
I’ve said it before, I’ll say it again here: Eduard’s P-51D Mustang is the best kit in 1/48 of this famous airplane. As someone who has been around real P-51s for going on 50 years now, the resulting model built from this kit looks as much like the real thing as a plastic model can. Yes, it’s “fiddly,” and you need to pay attention to get the most out of what’s there. It’s not for the hamfisted, but if you commit the revolutionary act of following the instruction, you’ll be happy with the result.
| CONSTRUCTION |
 The first thing I did was detail paint all the parts I could while they
were still on the sprues. I also took the time to construct the photoetch
instrument panel and position the other photoetch details on the various parts.
The first thing I did was detail paint all the parts I could while they
were still on the sprues. I also took the time to construct the photoetch
instrument panel and position the other photoetch details on the various parts.
Take care in assembly, and know that the kit is designed to very precise tolerances. Cut off all sprue nubs and be certain all surfaces to be glued are completely smooth. If you do this, everything goes together easily and you won’t be using any putty or other filler. If you have to use putty or filler, you did something wrong.
I started with the wing. I assembled the wheel well, attached it in position, then assembled the wings.
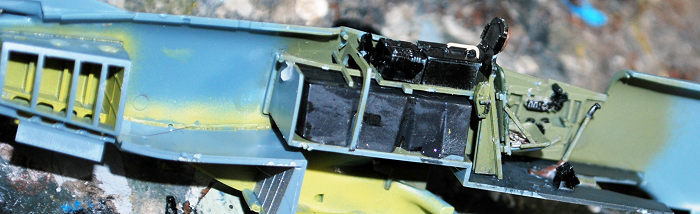
I assembled the cockpit, then attached I in position in the fuselage,
then assembled and attached the radiator ex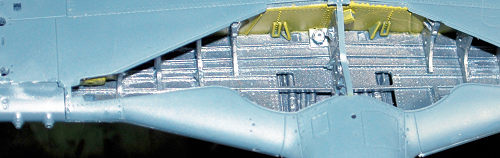 haust assembly and the tailwheel
well. I also got the correct dorsal fin (the one that has no curve in its upper
line) and glued it in position to that fuselage half. I then glued the fuselage
halves together and rubber-banded it to set up.
haust assembly and the tailwheel
well. I also got the correct dorsal fin (the one that has no curve in its upper
line) and glued it in position to that fuselage half. I then glued the fuselage
halves together and rubber-banded it to set up.
The wing and fuselage sub-assembly take a bit of fiddling to be sure they’re positioned correctly, and reward one with a satisfying “click” when they finally fit together.
I then assembled the flaps and attached them, as well as the ailerons. I attached the horizontal stabilizers and then positioned the elevators with a slight “droop.”
After setting up overnight, the model was ready to paint.
| COLORS & MARKINGS |
I decided not to fill the panel lines in the wing, but to paint it in
such a way to mimic the aluminum lacquer over the puttied wing. I used Tamiya
Flat Aluminum XF-16 thinned 50-50 and misted onto the wing. When that was dry, I
masked off with low tack drafting tape, then I painted the ID stripe area wwith
Tamiya Gloss
 White X-2, then masked off that white area and applied Tamiya
Semi-Gloss Black X-18 thinned 50-50 and misted on.
White X-2, then masked off that white area and applied Tamiya
Semi-Gloss Black X-18 thinned 50-50 and misted on.
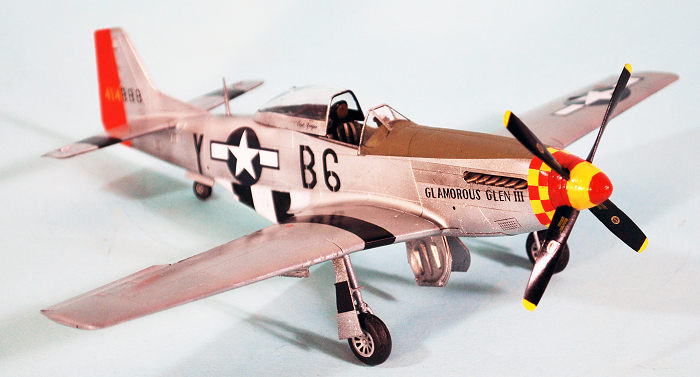
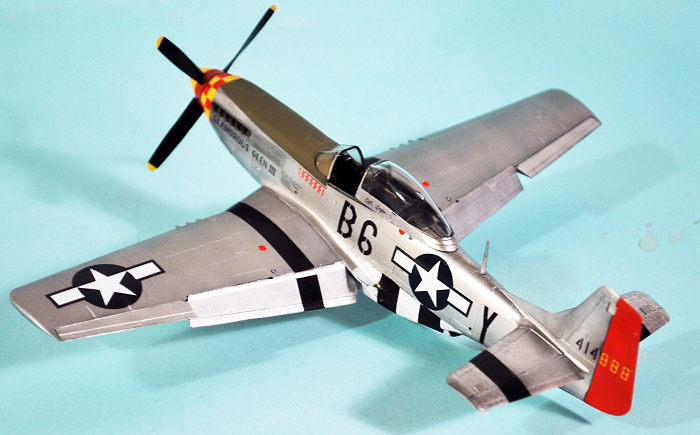
When that was dry, I masked off the wing and horizontal stab ID stripes (drafting tape cut in 11/32″ strips, 15 scale inches, roughly), then applied the Vallejo metallics. I painted the area of the fuel tanks on the lower wing with Vallejo Dull Aluminum, painted the rest of the model with Vallejo Aluminum, then masked off the area around the exhaust stacks and painted that with Vallejo Duraluminum. I painted the rudder white, then red, then attached it.
A note on this airplane and Bud Anderson’s “Old Crow”: Both were
originally delivered in NMF from the factory, then – like the rest of the 357th
FG in the summer of 1944 – given an overall camouflage of RAF Dark Green and RAF
Medium Sea Grey. That fall, a lot of the camouflage paint came off the Mustangs
in the 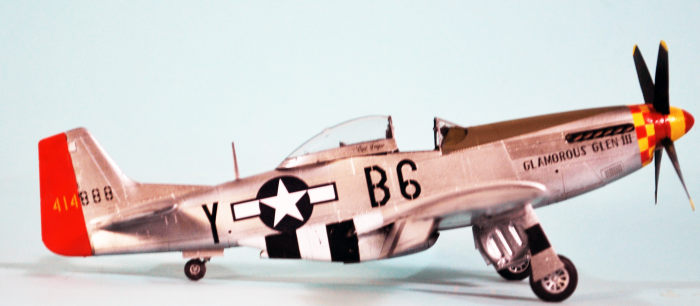 group; some airplanes left the upper surfaces camouflaged, some - like
these two - removed all of it. I once asked Bud Anderson about this and he said
that when the paint was removed, they did not stencil the airplanes; “our ground
crews knew where everything went.” So, if you do a 357th airplane with that
history (check photos), you don’t need to do more than the fueling and grounding
points. However, if you do an airplane delivered later, that wasn’t repainted at
the unit (such as Kit Carson’s P-51K), then the stencils are there. Again,
research is 75% of a model.
group; some airplanes left the upper surfaces camouflaged, some - like
these two - removed all of it. I once asked Bud Anderson about this and he said
that when the paint was removed, they did not stencil the airplanes; “our ground
crews knew where everything went.” So, if you do a 357th airplane with that
history (check photos), you don’t need to do more than the fueling and grounding
points. However, if you do an airplane delivered later, that wasn’t repainted at
the unit (such as Kit Carson’s P-51K), then the stencils are there. Again,
research is 75% of a model.
The decals went down without problem under a coat of Micro-Set. The name is done in multiple parts to avoid the malign glare of She Who Will Not Be Named Here, so you have to piece it together, which presented no problems.
I assembled and attached the landing gear, unmasked the canopy and positioned it open, attached the exhausts and the prop, and called the project finished.
| CONCLUSIONS |
I don’t know, perhaps it was the subject matter and the reason for doing it, but there were no problems encountered throughout, and I am personally happy with the result. You really cannot go wrong with an Eduard P-51D. Bring on the F-6D! (on its way as I write)
18 December 2020
Copyright ModelingMadness.com
Review kit and decals courtesy of my wallet.
If you would like your product reviewed fairly and fairly quickly, please contact the editor or see other details in the Note to Contributors.
Back to the Main Page Back to the Review Index Page Back to the Previews Index Page