| KIT #: | 82101 |
| PRICE: | $49.99 |
| DECALS: | Six options |
| REVIEWER: | Tom Cleaver |
| NOTES: | Profipack. Cutting Edge Decals 48198 “Mustang Mania Pt. 1" |
| HISTORY |
Among the criticisms leveled by pilots against the P-51B Mustang was the limited visibility from the cockpit with the “coffin lid” canopy, and the tendency for the guns to jam due to their placement at an angle inside the wing, forcing the ammo belt to turn at a sharp angle. The development of the bulged “Malcolm Hood” in the UK and the adoption of electrically-powered rollers to aid the gun feed went a fair distance to solve these problems, but North American had already been looking at improvements for their fighter in 1943, before it entered combat in Europe that December.
The development of a sliding “bubble” canopy by Hawkers for the Typhoon
fighter demonstrated what plastic molding was now capable of. North American
designed a similar canopy and took a P-51B off the line to modify and test by
cutting down the rear fuselage and fitting the canopy. The new canopy vastly
improved pilot visibility in all respects. North American also decided to
improve the armament, adding an additional gun in each wing for a total of six
.50-caliber machine guns, each with 300 rpg, and mounting them vertically to
solve the feed problem. The result was a fighter that was sufficiently heavier
than the P-51B that pilots would
 compare handling of the two as a “sports car”
(the B) to a pickup truck (the D). Nevertheless, the improved visibility and the
increased armament were widely accepted. The P-51D-5NA began production at North
American in Los Angeles in late April 1944, and the first of these arrived in
England and Italy in late May, in time to take part in the invasion of Europe
and the oil campaign against Ploesti that summer. Further use of the new fighter
revealed that the directional instability that had been noted in the earlier
version, which had been solved with the addition of a dorsal fin attached to the
vertical fin to increase side area was also needed with the new sub-type.
compare handling of the two as a “sports car”
(the B) to a pickup truck (the D). Nevertheless, the improved visibility and the
increased armament were widely accepted. The P-51D-5NA began production at North
American in Los Angeles in late April 1944, and the first of these arrived in
England and Italy in late May, in time to take part in the invasion of Europe
and the oil campaign against Ploesti that summer. Further use of the new fighter
revealed that the directional instability that had been noted in the earlier
version, which had been solved with the addition of a dorsal fin attached to the
vertical fin to increase side area was also needed with the new sub-type.
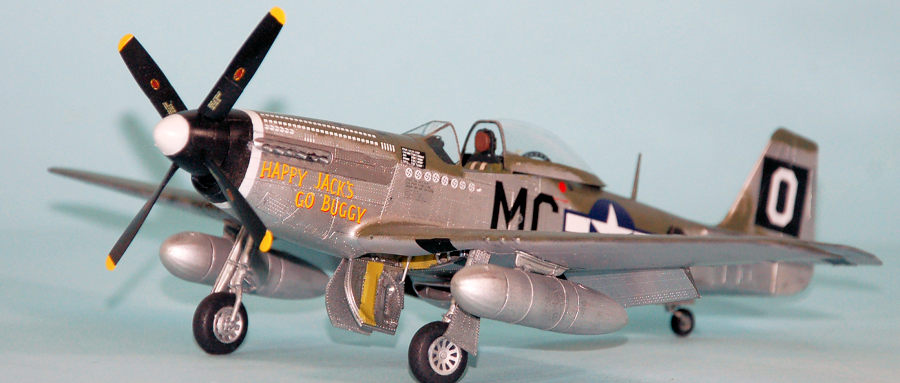
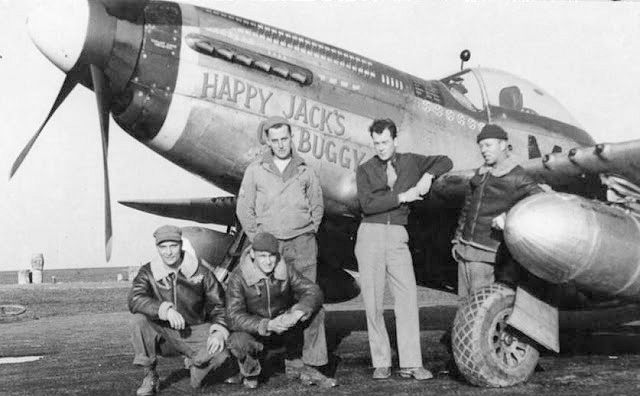
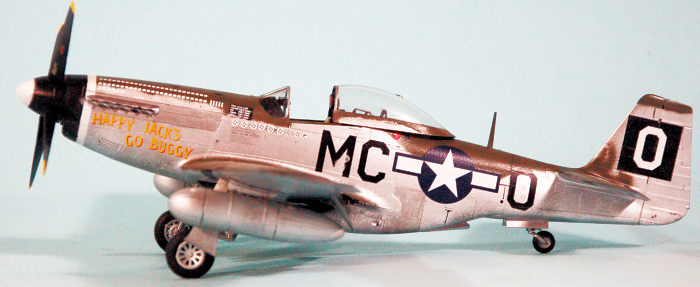
“Happy Jack’s Go-Buggy”:
Returning to the United States from North Africa in June 1943, Captain Jack Ilfrey was assigned as an instructor pilot for the P-38 at Santa Anna Army Airfield in southern California. In March 1944, he received orders to the 20th Fighter Group in England, to take command of the 79th Fighter Squadron. Arriving in April, he began combat operations in May and by the end of the month had been victoious over two Bf-109s, one of which went down as the result of a mid-air collision with his P-38, which he was able to nurse home despite having about three feet of his right wing crumpled in the collision.
 In early July, Ilfrey was shot down over Normandy. He managed to make
contact with a French farming family who hid him until late July, when he was
able to make his way to the Allied lines, diguised as “Jacques Robert,
Cultivateur” who had been made deaf in a bombing raid and was thus unable to
hear anyone and respond. He returned to Kingscliffe Airdrome in early August,
just in time to get up to Scotland and retrieve his gear before it was returned
to his family following his “death in action.”
In early July, Ilfrey was shot down over Normandy. He managed to make
contact with a French farming family who hid him until late July, when he was
able to make his way to the Allied lines, diguised as “Jacques Robert,
Cultivateur” who had been made deaf in a bombing raid and was thus unable to
hear anyone and respond. He returned to Kingscliffe Airdrome in early August,
just in time to get up to Scotland and retrieve his gear before it was returned
to his family following his “death in action.”
The 20th FG was in the middle of converting from the P-38 to the P-51D. Ilfrey returned to command of the 79th FS and had his new P-51D-5 given the name “Happy Jack’s Go-Buggy,” the name his P-38 had carried. That fall, he was promoted to Deputy Group Commander and remained with the group until early 1945, when he completed his tour and returned to the United States.
| THE KIT |
This new Mustang kit from Eduard is the first in 1/48 to be produced as the early P-51D-5 without the dorsal fin. This sub-type has previously appeared in 1/32 from Dragon, Tamiya and Revell, but prior to this release could only by made in 1/48 by using a resin tail conversion or doing some relatively minor surgery of the available kits to remove the dorsal fin and re-shape the rear fuselage.
The kit contains decals for six markings, including two different looks for George Preddy’s famous “Cripes A’ Mighty 3rd”.
 Eduard has definitely raised the bar very high for P-51Ds in 1/48 scale.
The surface detail is stunning, even more petite than what was done in the
recent Tempest V release. Many modelers have complained about the addition of
rivets, since the P-51D is well-known for being flush-riveted throughout. I can
only say as someone who has been around Mustangs since 1972 that this surface
detail is not excessive - with the sun at the right angle on a Mustang, it is
possible from a distance of 6-8 feet to see the rivets, as they are on this
model. It turns out that, once the model has a coat of paint on it, the rivets
in the surface detail are only visible from about a foot away, and under good
light.
Eduard has definitely raised the bar very high for P-51Ds in 1/48 scale.
The surface detail is stunning, even more petite than what was done in the
recent Tempest V release. Many modelers have complained about the addition of
rivets, since the P-51D is well-known for being flush-riveted throughout. I can
only say as someone who has been around Mustangs since 1972 that this surface
detail is not excessive - with the sun at the right angle on a Mustang, it is
possible from a distance of 6-8 feet to see the rivets, as they are on this
model. It turns out that, once the model has a coat of paint on it, the rivets
in the surface detail are only visible from about a foot away, and under good
light.
In the cockpit, there are parts for the early and late main instrument panel, and the three different side panels associated with the three major production changes in the cockpit. The early and late seats are also there. The photo-etch panel provided is strictly for the airplane up through to the D-15.
| CONSTRUCTION |
As with all the recent Eduard releases, this kit demands you bring as much modeling excellence to the project as it does. All parts fit very precisely, and any sloppiness in cleaning up all sprue nubs, or hamfistedness in assembly, will lead to multiple problems down the line. Take care in preparation of parts, take care in assembly, commit to the revolutionary act of following the instructions, and the result will be one of the best models you have ever created. If you do it right, you won’t be using any filler anywhere (other than on the wings if you so choose).
 Construction begins with the cockpit. I painted all the parts on the
sprue before further assembly, following the kit instructions regarding colors.
There are a myriad of small parts, so take care in separating them from the
sprue lest you feed the carpet monster or they fly off into the Department of
Lost. Fortunately, my new government-supplied eyeballs (with 20/20 vision
restored) allowed me to put the optivisor aside, but if you have one (and
haven’t had the lens-correction operation) you’re probably going to need it to
get everything done. The result is a very good looking cockpit. I don’t think
the resin guys are going to beat this. I used the photo-etch instrument panel
and most of the other bits (other than those way too small to make out, and
there’s quite a few of them for the more determined modeler), as well as the
very nice seat belts. Since I was doing an updated P-51D-5 that was still around
in March 1945, I used the K-14 gyro gunsight.
Construction begins with the cockpit. I painted all the parts on the
sprue before further assembly, following the kit instructions regarding colors.
There are a myriad of small parts, so take care in separating them from the
sprue lest you feed the carpet monster or they fly off into the Department of
Lost. Fortunately, my new government-supplied eyeballs (with 20/20 vision
restored) allowed me to put the optivisor aside, but if you have one (and
haven’t had the lens-correction operation) you’re probably going to need it to
get everything done. The result is a very good looking cockpit. I don’t think
the resin guys are going to beat this. I used the photo-etch instrument panel
and most of the other bits (other than those way too small to make out, and
there’s quite a few of them for the more determined modeler), as well as the
very nice seat belts. Since I was doing an updated P-51D-5 that was still around
in March 1945, I used the K-14 gyro gunsight.
I followed the instructions for attaching all the other fuselage interior parts, and when it came time to bring the fuselage halves together, all was well. I only needed a light scrape down of the centerline to get rid of minor glue build-up.
 As I noted, the wheel well includes 13 parts. Since I was doing an early
P-51D, I painted the main spar yellow zinc-chromate and the rest of the parts
with Vallejo White Aluminum to simulate aluminum lacquer. Once it was all
assembled, I brushed some Tamiya smoke over everything to simulate oil and dirt
and to “pop out” detail.
As I noted, the wheel well includes 13 parts. Since I was doing an early
P-51D, I painted the main spar yellow zinc-chromate and the rest of the parts
with Vallejo White Aluminum to simulate aluminum lacquer. Once it was all
assembled, I brushed some Tamiya smoke over everything to simulate oil and dirt
and to “pop out” detail.
The wing came together without difficulty.. I particularly liked the separate section for the machine guns, which obviated having to clean up a seam through them. For this kit, I did not fill the panel lines in the wing, since that had not proven to be so important given the effort required when I did the previous Eduard kit. The fact this wing would be painted with camouflage paint also helped that decision.
Attaching the wing and fuselage sub-assemblies presented no problems, and I finished off with attaching the horizontal stabs and the radiator exhausts.
| COLORS & MARKINGS |
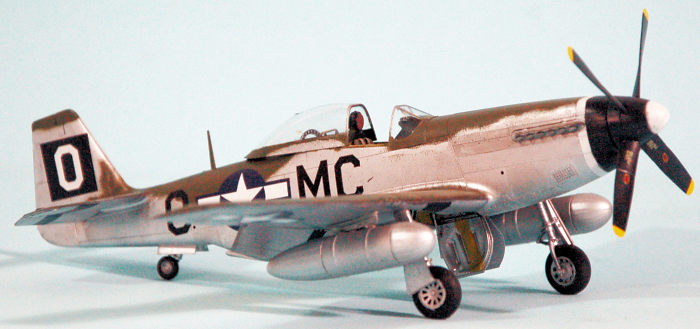
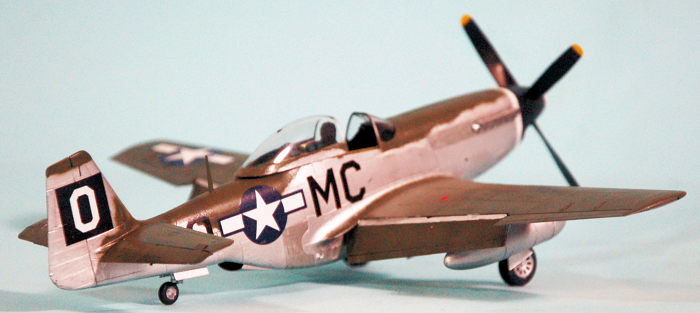
I first painted the white parts of the early nose marking for the 20th FG and masked those off. I painted the model overall with Tamiya X-18 “Semi-gloss Black” as a primer for the Vallejo metallic paints. I then masked off the nose markings and first painted the lower wing with Vallejo “Dull Aluminum” to simulate the lacquer-painted wings, then painted the rest of the model with Vallejo “Aluminum.” I painted several panels with “Duraluminum” and a mixture of the two aluminums for a different shade, and painted the elevators and the rudder with “White Aluminum” to simulate the aluminum dope over the fabric surfaces. These different bits were done by brush-painting, since Vallejo paints dry without brush marks.
I then painted the upper camouflage, using Tamiya XF-83 “RAF Dark
Green,” since RAF paints were used by the 8th AF in England for field-applied
 camouflage. I “sun faded” this color by adding in a “Violet” mixture to simulate
high-altitude “UV sun fading” as was found in the ETO.
camouflage. I “sun faded” this color by adding in a “Violet” mixture to simulate
high-altitude “UV sun fading” as was found in the ETO.
I used some black decal stripes from the decal dungeon for the ID markings under the wings and horizontal stabilizer. I used Fundekals US National Insignia since they are just that bit more right in dimensions and color than the national marking decals in the kit sheet. I used the decals from the Cutting Edge 48148 P-51D sheet. These are the markings for “Happy Jack’s Go Buggy” when he was CO of the 79th squadron. The later ID marking of “MC-I” was applied when he became deputy group commander, and are only appropriate with the later “piano keyboard” group marking. Beware of this difference, since the Kit’s World decal sheet for this airplane gets the two confused - they followed the markings on the “Happy Jack’s Go-Buggy” contemporary warbird, which is wrong. The Cutting Edge sheet notes that it was produced with input from Ilfrey, who provided photos confirming these markings.
I unmasked the canopy and posed it open. I attached the landing gear and the 108-gallon paper drop tanks.
| CONCLUSIONS |
The Eduard P-51D series are the best P-51Ds available in 1/48 scale. They are accurate and look good. Any modeler with some experience who commits to follow the instructions and take care with the precise assembly required is guaranteed a model they can call “the best in my collection.” Highly recommended!
14 November 2019
Review kit courtesy of my wallet.
If you would like your product reviewed fairly and fairly quickly, please contact the editor or see other details in the Note to Contributors.
Back to the Main Page Back to the Review Index Page Back to the Previews Index Page