| KIT #: | 4817 |
| PRICE: | $48.00 |
| DECALS: | Four options |
| REVIEWER: | Tom Cleaver |
| NOTES: | Short run |
| HISTORY |
The original Allison-powered Mustang was a lightweight fighter with excellent handling capability. Pilots I know who have had the opportunity to fly these early Mustangs and compare them with the later Merlin-powered P-51B and P-51D uniformly agree that the early Mustang flies better. With the addition of more armor, more armament and more fuel - even with a more powerful engine - the Mustang gave a much heavier feel, which did affect its maneuverability. Pilots who flew the Allison Mustang say the P-51D “flies like a truck.”
North American was aware of this during the aircraft’s original wartime development, and put considerable effort into trying to come up with a lightweight Mustang that gave the maneuverability of the earlier models with the altitude performance and range of the later models. The XP-51F and XP-51G were the result. Using the same Merlin V-1650-7 engine as the P-51D, the loaded weight of the airplane was reduced to 9,060 pounds - as compared to a loaded weight of 10,100 pounds for the P-51D. This was accomplished through simplification of the structure, the deletion of some equipment, and the use of new materials such as plastics, while aerodynamics were improved with a longer bubble canopy. The net result was a savings of 1,100 pounds and a top speed of 466 mph. The XP-51G was fitted with the Merlin 145 engine and achieved a top of 472 mph.
Development of the lightweight Mustang resulted in the P-51H, which
entered production towards the end of 1944. Powered by a Packard-Merlin V-1650-9
delivering a maximum 2,218 horsepower (as opposed to the maximum 1,695
horsepower of the P-51D), the maximum range of 1,000 miles on internal fuel
could be extended to 1,500 miles with two 110-gallon drop tanks. The P-51H had a
shorter “bubble” canopy than the XP-51F/G, and a full 6-gun armament, with the
result that the overload weight of 10,500 pounds was only a few hundred less
than the P-51D. Nevertheless, it was the fastest production P-51, with a top
speed of 487 mph.
 1,445 P-51Hs were ordered in January 1945, but the end of the
war in August brought production to a halt with a total of 555 aircraft.
1,445 P-51Hs were ordered in January 1945, but the end of the
war in August brought production to a halt with a total of 555 aircraft.
The P-51H equipped a few regular USAAF units in the immediate postwar years, including the Mustang-phobic 56th Fighter Group on their arrival back at Selfridge Field, before it along with the P-47N, equipped the postwar Air National Guard when jets replaced propeller-driven fighters in the U.S. Air Force. The V-1650-9 Merlin - which was close to being a “race” engine similar to the bored-out engines that power P-51Ds in air races to this day was as temperamental as those engines; the result was that units equipped with the P-51H seldom experienced more than 50% availability. This more than anything else was responsible for the P-51H not being called to active duty during the Korean War.
By the 1970s, only two P-51Hs were left in flyable condition. One of these was owned by Mike Coutches of Oakland, California, and was regularly flown at west coast air shows. The other was eventually purchased by Bill and Don Whittington, the two biggest morons to ever participate in warbird and air racing aviation. Their continued existence is the best argument against inherited wealth I know of, and is proof there is no connection whatsoever between the brain and the billfold. Together, these incompetents were responsible in the late 1970s and early 1980s for more otherwise-avoidable losses of warbirds and unlimited racers than the rest of the community combined, and in each case the fault for the loss could be laid to obvious pilot error. In 1981, I watched Bill Whittington blow the engine of their P-51H and then, through failure to trade airspeed for altitude that would have given him time and distance to make the field for a deadstick landing, instead landed the airplane too fast wheels-up in the desert, turning it into and immediate scrap heap. In the 1980s, the two idiots did time in the sneezer for organizing a drug-running air force for the Colombians.
| THE KIT |
 In 1999, Classic Airframes released a P-51H that was one of the more
difficult kits from a company famous for “difficult kits.” It took doing two for
me to get one that looked like the prototype. The other was released by HiPM, a
company whose products were it finally resulted in them going out of business.
The only thing I can recall of that kit was that it vaguely resembled a P-51H,
and was one of the few plastic kits I have ever built that not only was thrown
against a wall but was stomped into its component atoms.
In 1999, Classic Airframes released a P-51H that was one of the more
difficult kits from a company famous for “difficult kits.” It took doing two for
me to get one that looked like the prototype. The other was released by HiPM, a
company whose products were it finally resulted in them going out of business.
The only thing I can recall of that kit was that it vaguely resembled a P-51H,
and was one of the few plastic kits I have ever built that not only was thrown
against a wall but was stomped into its component atoms.
Thus, when word came late this past summer that Modelsvit, a Ukrainian producer of high-quality short-run kits, was going to do the P-51H, and the announcement was soon followed by the release of CAD drawings that demonstrated they were getting it right, I an many other modelers got very interested.
When Scott Zuieback told me he was expecting the kit sometime in December, I told him to hold one for me. The day he e-mailed me that it had arrived, I hot-footed it over to the warehouse in Van Nuys and grabbed it.
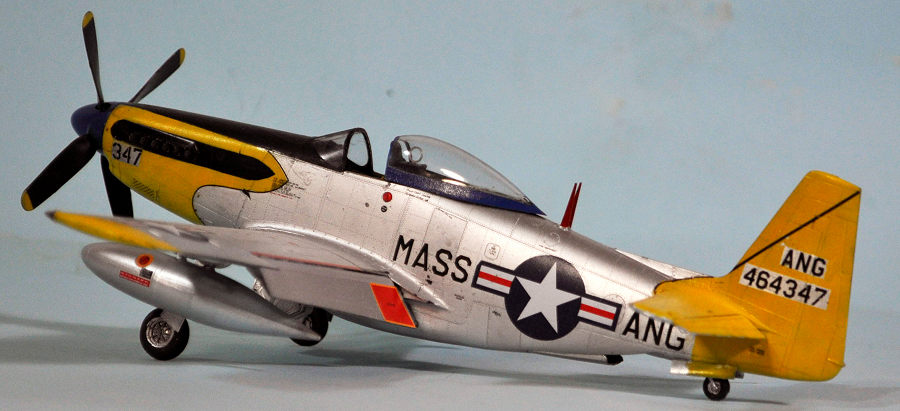
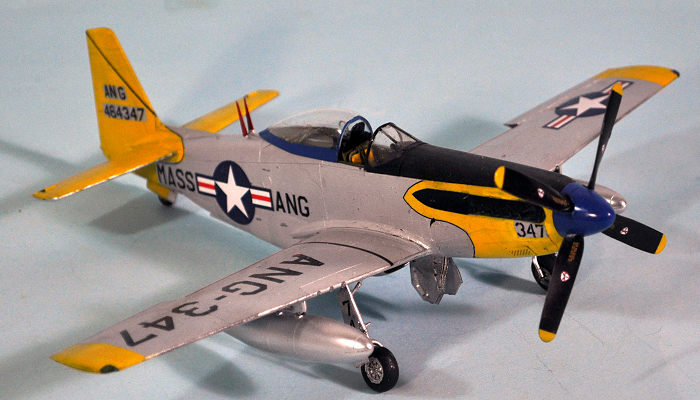
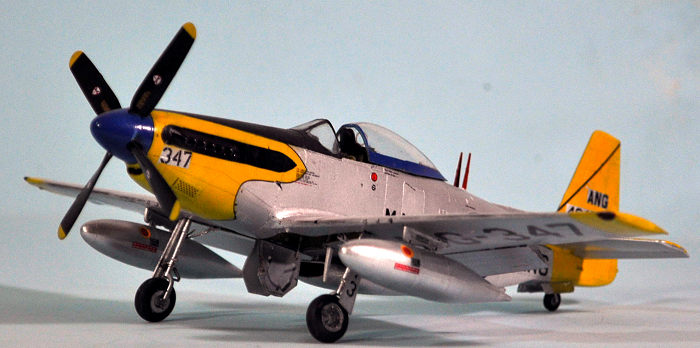
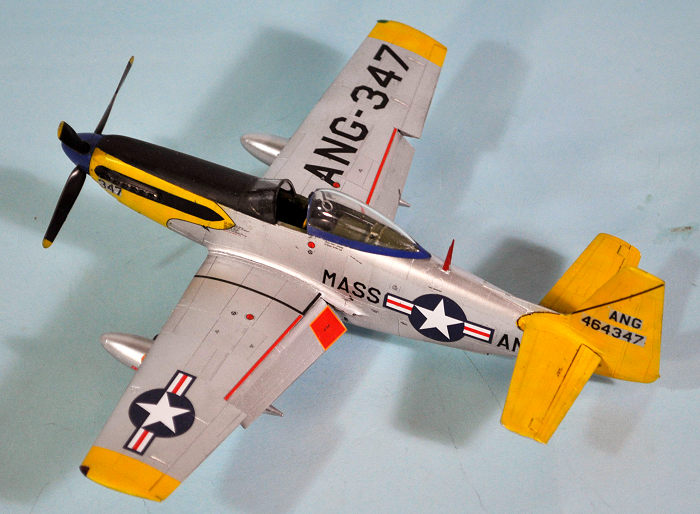
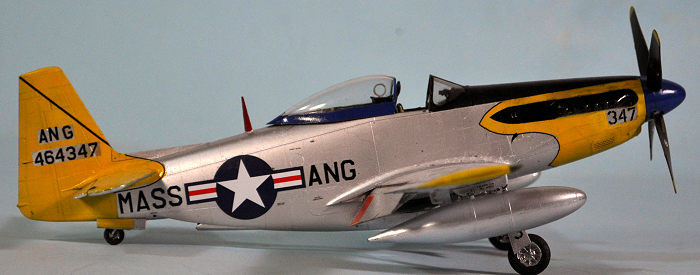
When I got home and opened the box, it was obvious our prayers had been answered. The kit parts had delicate surface detail that demonstrated Modelsvit had paid attention to what Eduard did with their P-51D. The rest of the parts looked good. I liked the decal options: P-51H’s from the Massachusetts, New Hampshire and Texas Air National Guard with colorful markings.
There was no holding back. I dived right in.
| CONSTRUCTION |
 The most important thing I learned is this: this is a high-end LIMITED
RUN KIT. It does look like the Eduard kit when assembled in terms of nice
detail, but if you think it’s the Eduard kit while working on it, you will be
sorely disappointed and unsuccessful. Remember the rule: test fit three times
before gluing once. If you do, and take care in assembly, you too can have a
model that has minimum filler on it - I only had to apply some CA glue to the
centerline seam in the radiator scoop.
The most important thing I learned is this: this is a high-end LIMITED
RUN KIT. It does look like the Eduard kit when assembled in terms of nice
detail, but if you think it’s the Eduard kit while working on it, you will be
sorely disappointed and unsuccessful. Remember the rule: test fit three times
before gluing once. If you do, and take care in assembly, you too can have a
model that has minimum filler on it - I only had to apply some CA glue to the
centerline seam in the radiator scoop.
When assembling the cockpit, the major sub-assembly, I first attached all the small parts to the larger parts (sidewalls and floor), then painted everything still on the sprue. Modelsvit wants you to then assemble the cockpit completely and glue it to a fuselage half. Having done some test-fitting and having realized this was not a mainstream injection-molded kit, I opted to attach the left sidewall to that fuselage half, then attach the forward and rear bulkheads and the floor. This decision was rewarded with my ability to sand down and reshape the parts to fit into the fuselage properly, which they would not have done following the kit instructions. I also found that as designed, the seat and armor backing will sit too low. I attached the seat to the armor backing and then attached that little sub-assembly to the rear bulkhead about 1/16 inch higher than the attachment points would have it. This put it right, according to photos. I then attached the right sidewall to that fuselage half. Everything came together with perfect fit.
I’ll note that another modeler followed the kit instructions about the cockpit assembly and had no trouble with fit inside the fuselage. Given the short-run nature of the kit and the fact it isn’t made with steel molds, it’s not impossible to have small differences between the same parts, sufficient to get two different results. I do think that my way, which is no more time consuming than what the instructions call for, is guaranteed regardless to have a good fit for the outcome.
The other major sub-assembly is the wing. I assembled the gear well. When I went to attach the upper wing part, I found the walls of the gear well were a bit high. I sanded them down till the upper wing part fit as it should, only a little sanding down was needed, but getting the wing sub-assembly to fit properly will lead to you being able to attach it to the fuselage without filler at the upper wing-fuselage joint. I discovered there were gaps at the upper rear of the fuselage-wing joint, and at the forward wing-fuselage joint on the bottom. These were taken care of with 10-mil sheet styrene, glued in position and then trimmed to shape. I did not need any filler for this.
I found when I went to attach the flaps and ailerons that I should not have glued the upper and lower wing parts together along the rear edge, because the gaps are necessary for the fit of the ailerons and flaps. I was able to cut them apart, and then the flaps and ailerons fitted very nicely – again: test fit three times before gluing once.
 The horizontal stabilizers fit well – be sure to check alignment to be
certain they are level. The elevators as designed fit in the neutral position. I
scraped their leading edge to the angle i wanted and attached them in a
“drooped” position.
The horizontal stabilizers fit well – be sure to check alignment to be
certain they are level. The elevators as designed fit in the neutral position. I
scraped their leading edge to the angle i wanted and attached them in a
“drooped” position.
The antennas are butt-fitted and that’s not good. I dug out a little bit at their attachment points to give them a little “snuggle space” and glued them in. Be careful, they’re going to be easy to knock off whatever you do.
The canopy needed test fitting and I had to sand down the windshield at its forward edge to get proper fit. I also trimmed down the instrument panel coaming and thinned the interior of the windscreen at the forward edge so it would fit properly. Test fit three times before gluing once. To position the canopy in the open position, you need to sand down the rear deck to the point you can see light through it, and be sure it is positioned at the top edge of the canopy frame. You also need to thin down the lower edge of the canopy - leave about 1/16 at the front alone for looks, then thin down the rest all the way around for a knife edge. If you sand down the little “ridge” along the centerline right aft of the ccockpit, the canopy will then fit in the proper position, with the rear end just touching the top of the fuselage. Test fit three times before gluing once.
If you have a Classic Airframes kit, using the vacuformed canopy would be a good idea to get good fit. The Falcon Models “Mustang Collection” of various vacuformed canopies also has a P-51H canopy (it also has F-82 canopies which will be valuable with the coming Modelsvit F-82 model later this year).
| COLORS & MARKINGS |
 I gave the model an overall coat of Tamiya X-1 “Gloss Black” in
preparation for applying the Vallejo acrylic metal paint. The kit would have you
paint the NMF finish, then use the masks provided to apply the color areas. With
the fragility of Vallejo (I ONLY mask over it with very low-tack drafting tape,
which never pulls up paint), it was apparent that even the masks the kit
provided could pull up paint, not to mention the additional tape needed to cover
areas and prevent overspray.
I gave the model an overall coat of Tamiya X-1 “Gloss Black” in
preparation for applying the Vallejo acrylic metal paint. The kit would have you
paint the NMF finish, then use the masks provided to apply the color areas. With
the fragility of Vallejo (I ONLY mask over it with very low-tack drafting tape,
which never pulls up paint), it was apparent that even the masks the kit
provided could pull up paint, not to mention the additional tape needed to cover
areas and prevent overspray.
So, I decided to make “reverse masks” so I could paint the color first, then mask it, then do the metal finish. Naturally, never wanting to take the easy path, I wanted to do the Massachusetts ANG option, which involved some complicated masking either way.
First, after applying the gloss black, I then airbrushed X-2 Gloss White (because it gives a smoother finished surface) to the areas of the model that would be painted yellow – the nose, the tail and the wingtips. I then created a mask over the black area for the anti-glare panel and the area of the exhausts. I did a “forward” piece, an “aft” piece and then some straight tape to get the exhaust area covered. When the white was dry, I shot a mixture of X-7 Red and X-8 Lemon Yellow (going for “Insignia Yellow)) over the white areas and let it dry.
I took the kit mask and put it on a sheet of paper, then traced it out, then cut it out with scissors. I then used a roll of 3/4 inch Tamiya tape, cutting a strip, then tracing around the paper masking guide, cutting it out and applying that outline mask to the yellow area, then using more Tamiya tape to completely cover the yellow. Lots of effort, but a guarantee no metal paint would pull up.
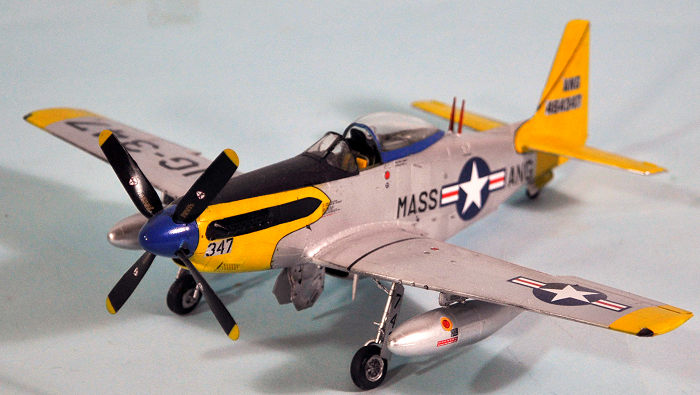 The model then got an overall coat of Vallejo Aluminum. The nice thing
with Vallejo metal paints is, once you have an overall coat on, you can brush
paint different panels with different shades, and it dries without brush marks.
Using the color photo here of a P-51H as a guide, I brush-painted several panels
with White Aluminum. One major point: from photos, it seems clear that the P-51H
did not have a puttied wing. The spinner and the sliding canopy were painted
with Tamiya X-4 Gloss Blue, since this airplane was part of the squadron’s Blue
Flight. The twin antennas were painted with Tamiya X-7 Gloss Red.
The model then got an overall coat of Vallejo Aluminum. The nice thing
with Vallejo metal paints is, once you have an overall coat on, you can brush
paint different panels with different shades, and it dries without brush marks.
Using the color photo here of a P-51H as a guide, I brush-painted several panels
with White Aluminum. One major point: from photos, it seems clear that the P-51H
did not have a puttied wing. The spinner and the sliding canopy were painted
with Tamiya X-4 Gloss Blue, since this airplane was part of the squadron’s Blue
Flight. The twin antennas were painted with Tamiya X-7 Gloss Red.
Lots of effort masking for quick painting, but the model really “comes alive” when you apply the metal paint. You can see the beautiful petite surface detail, and when you remove the masking tape and look at what you have, you can say “Yes, this is going to sit right next to an Eduard P-51D and look just great.”
The decals are very thin, so take care and be sure the surface you’re applying them to is wet, because they will settle down immediately if it isn’t. They snuggled into the surface detail with an application of Solvaset.
I assembled and attached the main gear legs. These are designed to fit with the proper forward slant of the gear legs when they are positioned properly. I then attached the prop and the canopy in he open position.
| CONCLUSIONS |
Once finished, if you’ve taken your time with assembly and painting, you can sit this model next to an Eduard P-51D and people would think the two kits came from the same place. Just remember that they didn’t, and that you’re dealing with a limited run kit, no matter how high-end it is, and all will be well.
This is one of the nicest kits I’ve done in 2019, and for me it is tied with the AMG Hart/Demon and the Airfix Spitfire XIV for 2019 Kit Of The Year.
Recommended for those with experience in assembling limited-run kits. Take care and you will have a great model to add to your Mustang collection. I understand Caracal is planning a sheet with other options.
January 9 2020
Copyright ModelingMadness.com
Review Kit Courtesy of My Wallet
If you would like your product reviewed fairly and quickly, please contact the editor or see other details in the Note to Contributors.