Miniart 1/48 P-47D-25 Thunderbolt
| KIT #: | 48009 |
| PRICE: | $59.00 |
| DECALS: | Two options |
| REVIEWER: | Tom Cleaver |
| NOTES: |
| HISTORY |
The P-47D-25RE Thunderbolt went into production in the spring of 1944, following experimentation with a new frull-vision “bubble” canopy in 1943 with the YP-47K, following Hawker’s development of such a canopy for the Typhoon. It began appearing in England in May 1944, where it gained the nickname “Super-Bolt.”
Lt. Colonel Wiliam B. “Bill” Bailey:
Bill Bailey joined the Air Corps in 1940, and won his wings in 1941. In the fall of 1942, after promotion to 1st Lieutenant, he was among the 25 officers who were initially assigned to the 353rd Fighter Group when it was formed in September 1942. He was made squadron commander of the 352nd Fighter Squadron. Following training on the P-47B Thunderbolt over the winter of 1942-43, the 353rd was assigned to VIII Fighter Command. Arriving in England in late May 1943, they finally received new aircraft in early July when early-production P-47D Thunderbolts began arriving in England and were declared ready for operations on August 2, 1943, flying their first mission as a group on August 7. B
 The 353rd was
the first VIII Figher Command group to fly a ground attack mission against
Luftwaffe airfields in February 1944, when group commander Lt. Colonel Glenn
Duncan led a strafing mission with 16 P-47s from all three squadrons against
Gilze-Rijn airfield in Holland on February 24, 1944. In March, Duncan formed
“Bill’s Buzz Boys,” an inter-group formation of a flight each from the 353rd,
355th, 356th, and 361st Fighter Groups, with the intention of developing and
testing ground attack strategies to be used by VIII Fighter Command now that the
Luftwaffe was no longer opposing bombing attacks following the enormous losses
of veteran pilots in Big Week and the three Berlin missions of March 6,8,9,
1944.
The 353rd was
the first VIII Figher Command group to fly a ground attack mission against
Luftwaffe airfields in February 1944, when group commander Lt. Colonel Glenn
Duncan led a strafing mission with 16 P-47s from all three squadrons against
Gilze-Rijn airfield in Holland on February 24, 1944. In March, Duncan formed
“Bill’s Buzz Boys,” an inter-group formation of a flight each from the 353rd,
355th, 356th, and 361st Fighter Groups, with the intention of developing and
testing ground attack strategies to be used by VIII Fighter Command now that the
Luftwaffe was no longer opposing bombing attacks following the enormous losses
of veteran pilots in Big Week and the three Berlin missions of March 6,8,9,
1944.
Bill Bailey was by this time the senior squadron commander in the group, with the 350th and 351st squadrons having both lost their original commanders in combat, and he took a leading role in working on the project. “Bill’s Buzz Boys” were disbanded in mid-April, having field tested ground attack strategies. Between then and D-Day, the 353rd became the leading ground attack group in VIII Fighter Command. Bailey, having completed his tour at the end of April, took a 30 day leave before returning on a second tour just before D-Day, at which time he was promoted to Lt. Colonel.
The group was heavily committed to the Battle of Normandy following the invasion, along with the other P-47-equipped VIII Fighter Command groups. On July 7, 1944, group commander Glenn Duncan was shot down on a ground attack mission in western Germany. That afternoon, he was replaced as group commander by Lt. Colonel Ben Rimerman, the Group XO Flying, and Bill Bailey left the 352nd squadron to become Deputy Group Commander, a position he held until October 1945 when the group was deactivated for return to the United States and disbandment.
| THE KIT |
 The MiniArt
P-47D-25RE was announced this past Spring and began drawing interest when CAD
drawings were released that showed they intended a kit far more detailed than
the Tamiya P-47s. There are two kits that have now been released, the “Basic
Kit” that is reviewed here, and an “advanced” kit that includes a fully-detailed
engine and accessories section and full gunbays and ammo compartments in the
wings. The kit has petite surface detail similar in quality to the Eduard P-51D
series of kits. Decals are provided for the P-47D-25re flown by Lt. Colonel Dave
Schilling in the 56th Fighter Group and a p-47d-25RE of the 78th Fighter Group’s
84th Squadron, both from the period following D-Day in the summer of 1944.
The MiniArt
P-47D-25RE was announced this past Spring and began drawing interest when CAD
drawings were released that showed they intended a kit far more detailed than
the Tamiya P-47s. There are two kits that have now been released, the “Basic
Kit” that is reviewed here, and an “advanced” kit that includes a fully-detailed
engine and accessories section and full gunbays and ammo compartments in the
wings. The kit has petite surface detail similar in quality to the Eduard P-51D
series of kits. Decals are provided for the P-47D-25re flown by Lt. Colonel Dave
Schilling in the 56th Fighter Group and a p-47d-25RE of the 78th Fighter Group’s
84th Squadron, both from the period following D-Day in the summer of 1944.
The decals are the only place where the kit “falls down” since MiniArt - like many others - didn’t get the memo on the size and geometry of US National Insignia. Also, the checkerboard decal for the 78th FG airplane is incorrect, with checkered squares overlapping the panels of the cowling (78th FG P-47s had their checkers applied with the cowling removed from the airplane). Fortunately the plethora of P-47D decals that have been created over the past 30+ years can be found at eBay dealers, should a modeler not have their own stash.
| CONSTRUCTION |
Like all
other modern kits designed with CAD, parts fit is very precise, and a modeler
must be certain all mating surfaces are “as clean as a hound’s tooth” to avoid
cascading fit problems in construction. The kit
 is
detailed with lots more pieces than the Tamiya kit has, and a modeler is
well-advised to take the revolutionary act of reading and following the
instructions; they are not “somebody’s opinion.”
is
detailed with lots more pieces than the Tamiya kit has, and a modeler is
well-advised to take the revolutionary act of reading and following the
instructions; they are not “somebody’s opinion.”
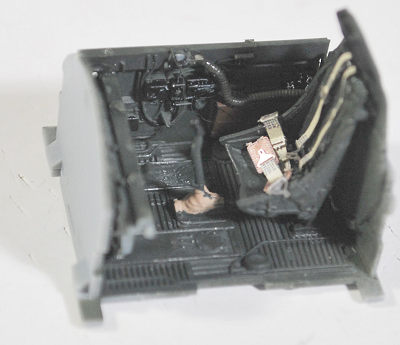
Construction starts with the cockpit, which is much more detailed than the Tamiya kit. I painted the main parts with Tamiya Dark Green (RLM-70) a good replacement for Dull Dark Green, then painted all the other small parts before assembling them. I departed from a fully OOB build by using Eduard seatbelts. Once the cockpit was assembled, I installed it in the right fuselage half and proceeded to assemble the other detail parts for the fuselage, then glued the two halves together. Fit is so tight that all I had to do to lose the centerline seam was a light scrapedown, followed by rescribing rivet detail across the seam with my pounce wheel.
The gear well in each wing is made up of individual pieces. I painted these Yellow Zinc Chromate. Unlike the Tamiya kit, the gun barrel assembly is attached at this point before further assembly. Several of the Psychic Kit Reviewers over at The World’s Most Wonderful Modeling Site, who are able to suss out all the failings of a new kit without ever having to open an actual kit and assemble it, have declared these gun barrels are unacceptable because they are not “horizontal to the ground” in the wing as they should be; however, when I finished the assembly of the wings, the gun barrels were magically in the proper position.
All the
control surfaces are separate, and the flaps cannot be dropped; this is actually
the proper way they should be. Several pilots in the 78th group who I
interviewed for my books told me that the fine for not
 raising flaps
immediately after touchdown was 10 Pounds - $70 out of a 2nd Lieutenant’s pay at
the time of $250; as one said, “you only forgot once.”
raising flaps
immediately after touchdown was 10 Pounds - $70 out of a 2nd Lieutenant’s pay at
the time of $250; as one said, “you only forgot once.”
The wings do not have carry-through spars like the Tamiya kit, but the extended spar on each side will help align them properly and the part design won’t allow a close fit without the wing being properly aligned. If you are going to have the underwing pylon and the rocket tubes, be sure to open the alignment holes before gluing the wing halves together.
The R-2800 engine in the kit is the best I have seen as an injection-molded plastic part. There is more detail in the engine and the assembly of the cowling than in any earlier kit. For this kit, one only uses the two piston rings and the front parts of the engine, leaving the very complete exhaust system on the sprue since that is for the “advanced” kit. I had no problem assembling the engine cowling accurately, following the kit instructions as to the sequence of attachment.
| COLORS & MARKINGS |
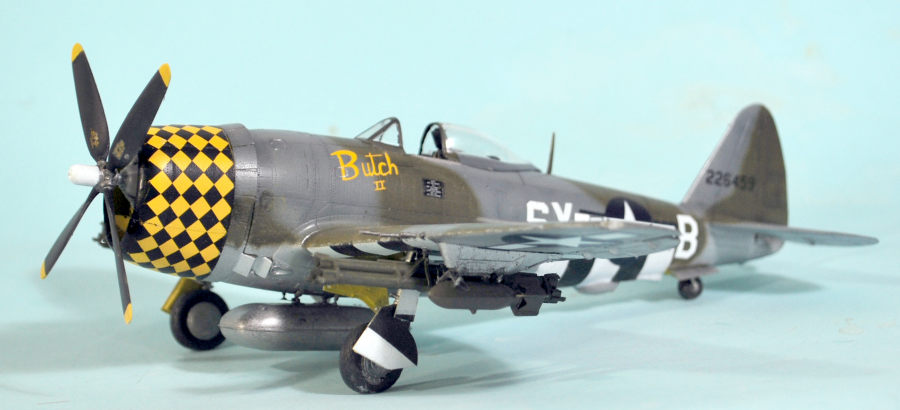
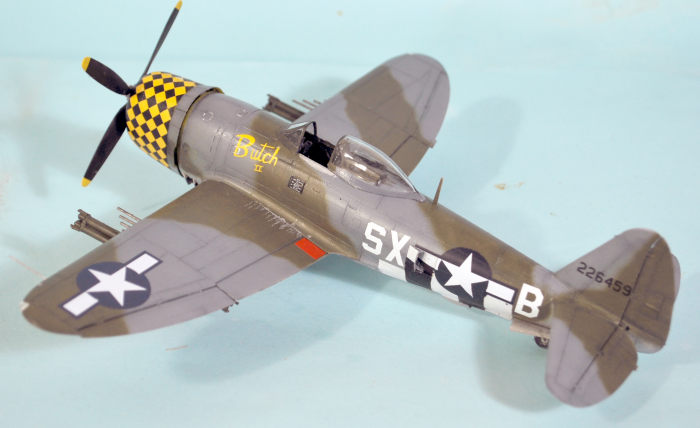
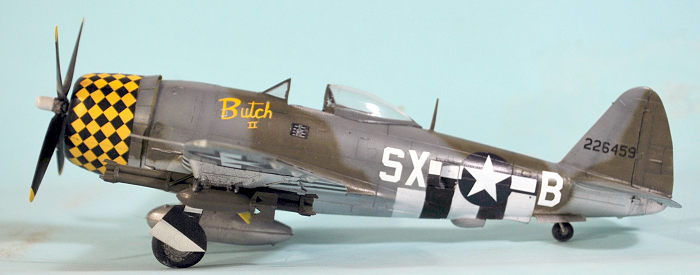
I had decided to do Lt. Colonel Bill Bailey’s P-47d-25RE, “butch II,” from the Aeromaster sheet 48163 “Best Seller Thunderbolts” which has the cowling diamonds fitted for the Tamiya kit (which means they fit this kit).
I painted
the cowling yellow and masked that off, then painted the white D-Day stripes and
masked them off. I then painted the lower surfaces overall with Tamiy Semi-Gloss
Black as primer for the Vgallejo Aluminum, and pre-shaded the upper surfaces
along panel lines. I masked off the D-Day stripes completely, then painted the N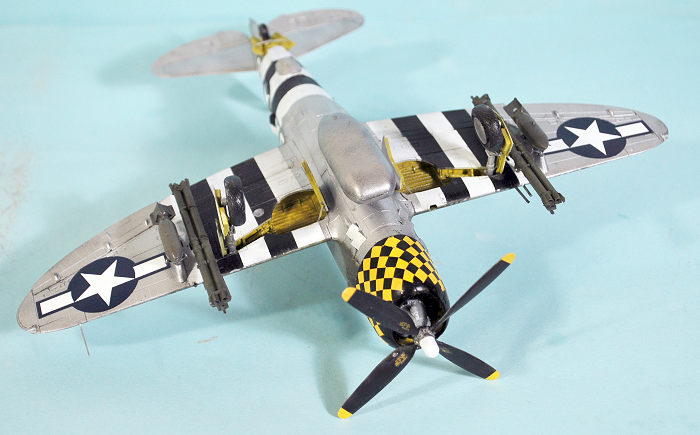 MF
lower surfaces, using Vallejo “Aluminum.” the upper surface camouflage was done
with Tamiya RAF colors Ocean Grey and Dark Green, applied freehand and
referencing the painting diagram and the photo of “Butch II” I found on the
Internet.
MF
lower surfaces, using Vallejo “Aluminum.” the upper surface camouflage was done
with Tamiya RAF colors Ocean Grey and Dark Green, applied freehand and
referencing the painting diagram and the photo of “Butch II” I found on the
Internet.
I had some separation on one part of the diamond decals, which necessitated using part of the decal from another Aeromaster sheet and fitting the two to overlap correctly. Referencing the photo, I filled in the yellow area immediately around the front of the cowling with Tamiya Flat Black. The rest of the decals went on without problem after I left them to soak to the point where they started to slide off the backing, and they went down without problem under a coat of solvaset. I used Fundekals National Insignia for the underwing markings.
MiniArt provides every kind of bomb used by the Thunderbolt and the most detail-accurate rocket tubes of any kit. I armed this with the rocket tubes the group began using in mid-June 1944, and two 500-lb bombs/
I then attached the landing gear and the prop and unmasked the canopy and attached it in the open position.
| CONCLUSIONS |
 This is the
best kit available of the bubbletop P-47 in 1/48 scale. It outdoes the Tamiya
kit the way the Eduard P-51D outdoes the Tamiya Mustang. That doesn’t make the
Tamiya kits obsolete, but if you are a serious P-47 fan, this is the better kit.
It is only $5 more expensive in MSRP than the contemporary MSRP for the Tamiya
kit, and there are bargains to be found on the internet. I am already planning
what markings I will use on the next one (Thundercals decals to do “No Guts No
Glory”).
This is the
best kit available of the bubbletop P-47 in 1/48 scale. It outdoes the Tamiya
kit the way the Eduard P-51D outdoes the Tamiya Mustang. That doesn’t make the
Tamiya kits obsolete, but if you are a serious P-47 fan, this is the better kit.
It is only $5 more expensive in MSRP than the contemporary MSRP for the Tamiya
kit, and there are bargains to be found on the internet. I am already planning
what markings I will use on the next one (Thundercals decals to do “No Guts No
Glory”).
Recommended for any modeler willing to follow the instructions to get an excellent model.
28 November 2023
Review kit courtesy of you book buyers.
Copyright ModelingMadness.com. All rights reserved.
No reproduction in part or in whole without express permission.
If you would like your product reviewed fairly and fairly quickly, please
contact
the editor
or see other details in the
Note to
Contributors.