GWH 1/48 P-61 Black Widow
|
KIT #: |
L4802 |
|
PRICE: |
5,525 yen from
www.hlj.com
|
|
DECALS: |
Three Options |
|
REVIEWER: |
Tom Cleaver |
|
NOTES: |
Terry Dean
nose weight and turret, Scale Aircraft Conversions metal landing gear,
Zotz Decals, True Details correction set for cowlings and props |
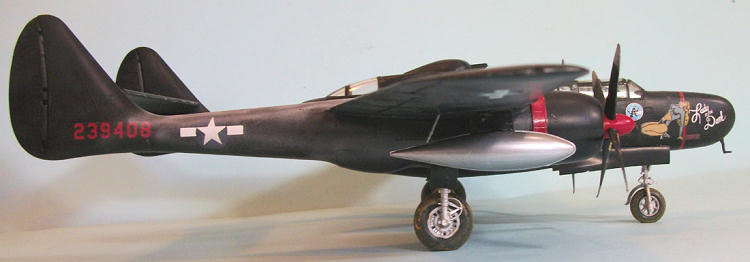
The Northrop P-61 Black Widow is the only
designed-for-the-purpose night fighter to ever see operational service.
Yes, the He-219 was produced as a night fighter only,
but that airplane began life as a project to create an advanced twin engine
Zerstoerer successor to the Bf-110.
The Northrop P-61 was always and forever intended as a
radar-equipped night fighter from the first time the Army Air Forces approached
Northrop with the idea in 1940, following provision of all information
on radar-equipped night fighters being provided to the USAAC by the RAF.
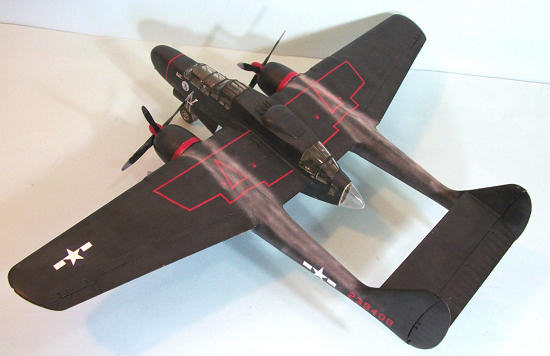 By the time the P-61 appeared in service in 1944, there
was little call for its services, since the Axis air forces were by then mere
shadows of their former selves.
When the airplane first appeared in the ETO, it was
rejected in favor of the USAAF night fighter squadrons being equipped with
advanced Mosquito night fighters.
A fly-off was demanded by the P-61 crews, and amazingly
enough the P-61 was “superior” to the Mosquito.
The USAAF always thought that the British had “cooked
the books” in the fly-off, since they wanted to keep Mosquito night fighter
production for themselves.
Over
Northwestern Europe,
the P-61s went after German night attack aircraft, with their primary victims
being Ju-88s and Ju-87s, with several Ju-52 aircraft on night resupply missions
being shot down.
In the
Mediterranean,
there was no night air opposition by the time the P-61 replaced
Bristol
Beaufighter VI night fighters.
In the Pacific, P-61s defended the airfields in the
Marianas,
at
Iwo Jima
and at
Okinawa.
The airplane suffered the ignominy of being replaced by
Marine F6F Hellcat night fighters in the
Philippines
in the aftermath of the 1944 invasion, with the Hellcats being demonstrated
superior to the P-61s.
One of the more interesting stories about the P-61
involves the P-61B “Lady in the Dark,” operated by the 548th
NFS
from
Iwo Jima
from April 1945 to the end of the war. On the night of
August 14, 1945,
“Lady in the Dark” was flown by a different crew from that regularly assigned.
Vectoed onto a bogie inbound at low altitude, the P-61B
scored a victory when the Japanese fighter hit the water and exploded without a
single round being fired.
Officially, the war in the Pacific ended at
midnight,
but the possibility of night kamikaze attacks against American airfields
remained and the P‑61s were kept on alert.
On the first night of “peace” in the Pacific since
Pearl Harbor,
Captain Lee Kendall took off at 1910 for a routine patrol. 45 minutes later,
Iwo Jima
ground control reported a bogey approaching the P‑61 at an altitude of 4,500
feet. Contact was quickly established, with
Kendall's
radar observer picking up “window” several times, meaning the intruder was using
defensive tactics as he got closer to
Iwo Jima.
As “Lady in the Dark” closed, the intruder demonstrated awareness of the
presence of the night fighter by making hard turns in an effort to shake any
pursuit.
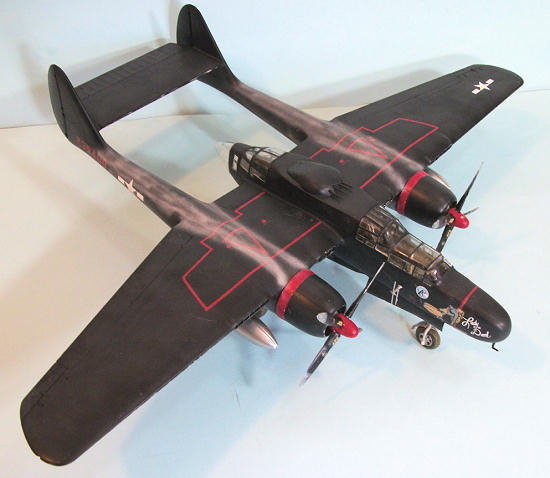 As
Kendall
recalled years later to an interviewer: "Getting close enough for a positive
identification proved to be difficult. He was taking violent evasive action and
dropping window, which was bundles of tinsel‑like strips of aluminum foil
designed to confuse our radar. This guy knew we were behind him but I have no
idea how he knew. My R/O, Lieutenant Scheerer, was talking me in closer to about
800 feet when all of a sudden the left side pilot's window popped open and the
rush of air drowned out the communications with him. Down this low at such a
high speed and not being able to understand my observer was very unhealthy.”
"I had to back off, secure the window and then get back
in touch with him. In the meantime, I lost contact with the bogey, but quickly
picked him up again and was able to close on his tail again despite his
defensive moves. I had one eye on my target and one eye on my altimeter.
Suddenly, the window popped open again and once again I closed it, and as I
picked him up for a third time the same thing happened again! Regardless, I went
after him for a fourth time and control gave me permission to shoot him down
even though we didn't have a positive identification."
Kendall’s R/O locked on, but a few seconds later the
bogey completely disappeared off the scope and no more window was detected.
According to witnesses on the ground, the intruder, a Nakajima Ki.44 “Tojo”,
crashed and the debris was scattered over a wide area. This was not listed as an
official victory since the war was officially over, but the fact remains that
“Lady in the Dark” scored the final two aerial victories of World War II without
firing its guns.
For what’s in the box,
look
here.
Once this kit was released, there was quite a bit of
criticism of the propellers, cowlings and engines not being accurate. Among
several aftermarket resin companies, True Details released a set which includes
a different front section for the R-2800s with the magnetos, separate spinners
and propeller blades, and corrected engine cowlings.
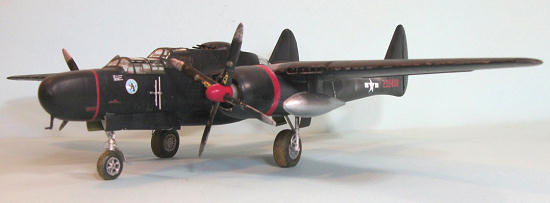 I am informed by Lion Roar, the company that produces
this kit, that all those items were corrected and replaced in their later
release of this kit following the initial release.
Photos I have seen of the engine and cowling do show the
corrections.
The prop is still in one piece with spinner and blades, but the
shape of the blades has been improved.
They also included the clear nose part for the P-61A
which had been provided in early review kits but not in production kits. The
problem for a modeler is figuring out if the kit they have purchased is one of
the initial release with the inaccurate parts.
The old kit is L4802 while the new corrected kit is
L4806.
An additional inaccuracy is that the nose gear leg is
too short, which results in a nose-down “sit” which is inaccurate.
I worked with Ross McDonald of Scale Aircraft
Conversions and Terry Dean to create a master gear leg of the proper length,
which is now available in all Scale Aircraft Conversions P-61 sets; modelers who
bought the set before this change was made can obtain the correct part from SAC.
Zotz Decals has released another of their excellent
sheets, with decals for several P-61A and P-61B Black Widows, including “Lady in
the Dark.” The sheet is very accurate, and is the only one to include the
markings information for “Lady in the Dark” in her later markings with red
spinner and cowling flaps.
Eli even went so far as to discover that pilot Lee
Kendall changed his name from Sol Colomon to Kendall in 1962.
For standard construction information, I refer you to
Scott Van Aken’s excellent
full-build review.
I will discuss corrections and additions to that process
here.
Since my kit had arrived with the P-61B nose rather than
the P-61A nose, I decided I would make a P-61B.
My first thought was to use the turret from the old
Monogram kit, but “Mr. P=61", Terry Dean, informed me that most of the P-61Bs
that saw combat used a barbette rather than a turret (since the four-gun turrets
were in high demand for B-29s).
Terry makes a resin barbette, which I decided to use
along with his nose w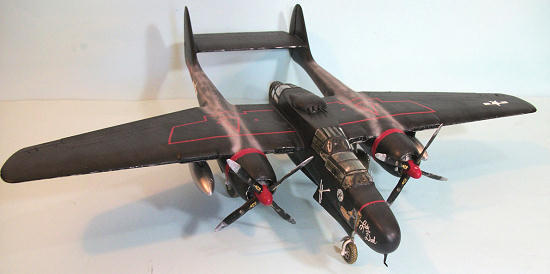 eights,
which are crucial if one wants to have a nost-sitter model with a minimum of
hassle.
Terry was also generous enough to send along the Zotz decals for “Lady
in the Dark.”
One thing that is unchanged whether one has an
early-release or a late-release kit is that the position of the pilot’s
instrument panel and the seat and controls is wrong.
Also, the control yoke is too big.
One needs to move the instrument panel 1/8 inch to the
rear (even with the coaming), while moving the seat and control yoke 1/8 inch
forward.
As to the yoke, if you have the old Monogram kit, the pilot’s control
yoke is the right size.
Additionally, the gunner and radar operators positions
do not have the gun control; again, these can be sourced from the old Monogram
kit.
(Editor's note: The kit Tom used did not come with a turret. This and the
controls are in the second boxing.)
Also, if you are doing a P-61B, remember to cut the main
gear doors along the engraved line, so the rear panels can be closed.
Since I had the old Monogram kit available, I decided I
would do some sub-assemblies of that kit and compare them with this new kit.
Throughout, the new kit fits better, and requires little
if any putty or surfacer to fill seams, and there are no gaps when attaching
wings to fuselage nacelle, or engine booms to wings, which there are with the
Monogram kit.
Whether this ease of assembly is worth a price that is 3 times as
much as a new-release Monogram kit (by Revell) is up to the individual modeler
to decide.
I have to say here that I cannot recommend the True
Details correction set at all.
I don’t know who designs these sets now, but it would be
nice if at some point in the process a test shot was used on a kit to see if it
works before the set is released.
Sadly, nothing here really works.
 The really big problem is the engine nacelles.
For some ungodly reason, the mold plugs are in the front
of the nacelle.
A modeler has to cut them off, then take a Dremel and ream out
the remainder, without wrecking the front of the cowling.
If you have this set, and you have the old Monogram kit,
I recommend you completely cut off the front ring of the resin cowling and
replace it with the front ring of the Monogram kit.
The engine front parts aren’t much better.
One has to drill out the spinner to attach it, and there
is no indication of where to do this.
This is topped off by the fact that the propeller blades
are difficult to use since the attachment pegs are so short there is almost no
attachment to the spinner, which means the blades are likely to pop off at the
slightest touch once the propeller is completed (ask me how I know).
Overall, this True Details set is of little use.
For those who worry about these corrections, I would
recommend the correction set from Mike West’s Lone Star Models or the set from
Modelshack that Scott reviewed.
These sets are logically designed, and come from
producers who insure that their stuff works before they release it.
Additionally, for those who decide to close up the
canopies for the pilot and gunner, you will have to carefully test fit and
modify the parts to get a good fit.
As is frequently the case with opened canopies and
dropped flaps, the kits are not designed to have the canopies closed or the
flaps raised.
I also used the Monogram part for the pilot’s overhead hatch,
since it is correct without the centerline division of the clear panels.
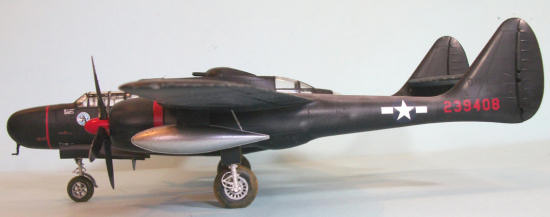
 Fortunately, I was able to find a color photo of “Lady
in the Dark” taken toward the end of her time on Okinawa, which shows an
airplane that has been sun-faded in the tropics, with the paint further
distressed due to the airplane being operated on an island covered with volcanic
ash.
I gave the model an overall coat of Tamiya “Flat Black,”
then went over the panels with Tamiya “NATO Black,” then added in some light
grey to the “NATO Black” and went over the upper areas to simulate sun fading.
I then gave the model a coat of Future.
The Zotz decals went on without problem as usual.
The decals are opaque, which is important when applying
them over a dark surface like this.
I applied Xtracrylix “Clear Satin” varnish over the
model, then followed that up with light coats of Xtracrylix “Clear Flat”
varnish on the upper surfaces, particularly on the horizontal surfaces, to
simulate sun-fading.
I then “dinged” the airplane, particularly taking
off the paint of the ends of the prop blades which had been “sand blasted”
with every takeoff from Iwo Jima.
I finished by applying Tamiya “Sky Grey” for the
exhaust staining.
The SAC landing gear was attached and the radar antennas
and gear doors attached.
In comparison with the old Monogram kit, I have to rate
this new kit a disappointment on all grounds other than fit.
The Monogram kit has notorious fit problems, and this
kit has none.
I did not use any surfacer or putty to fill seams or gaps since
there were none.
 This kit sells at discount at HLJ for US$69.00.
The new Revell-Monogram release of the P-61 goes for
$22.95; adding in the Modelshack correction set for $19.00, the SAC landing gear
for $16.95 and the Zotz decals for around $24 (they’re out of print but still
available), with Terry Dean’s weights and barbette coming to about $15, the
total price for getting a corrected P-61 model using the old kit comes to $80,
and the new kit still needs some of
these correction sets.
Yes, some modeling skill will be required to putty over
the gaps and seams and sand them smooth and then rescribe detail, but it’s
nothing most readers of this site haven’t done before.
While I rate the kit a disappointment, those who have it
and are not super-concerned with overall accuracy will be rewarded with a nice
model, as Scott’s OOB review demonstrated.
For those willing to put in the effort and expense to
correct the kit, you’ll have something nice too.
Tom Cleaver
June 2012
Review kit courtesy
of HLJ. Order yours at:
http://www.hlj.com/product/LORL4806
Correction
sets courtesy Scale Aircraft Conversions, True Details and Terry Dean.
If you would like your product reviewed fairly and fairly quickly, please contact the editor
or see other details in the
Note to
Contributors.
Back to the Main Page
Back to the Review Index Page


 eights,
which are crucial if one wants to have a nost-sitter model with a minimum of
hassle.
Terry was also generous enough to send along the Zotz decals for “Lady
in the Dark.”
 The really big problem is the engine nacelles.
For some ungodly reason, the mold plugs are in the front
of the nacelle.
A modeler has to cut them off, then take a Dremel and ream out
the remainder, without wrecking the front of the cowling.
If you have this set, and you have the old Monogram kit,
I recommend you completely cut off the front ring of the resin cowling and
replace it with the front ring of the Monogram kit.
 Fortunately, I was able to find a color photo of “Lady
in the Dark” taken toward the end of her time on Okinawa, which shows an
airplane that has been sun-faded in the tropics, with the paint further
distressed due to the airplane being operated on an island covered with volcanic
ash.