| KIT #: | 2256 |
| PRICE: | $99.95 MSRP |
| DECALS: | Two options |
| REVIEWER: | Tom Cleaver |
| NOTES: | Used Kits At War Decals “Dutchies in de FAA” |
Trumpeter 1/32 F6F-3 Hellcat
| KIT #: | 2256 |
| PRICE: | $99.95 MSRP |
| DECALS: | Two options |
| REVIEWER: | Tom Cleaver |
| NOTES: | Used Kits At War Decals “Dutchies in de FAA” |
| HISTORY |
The F6F‑3/5 Hellcat is the most successful naval fighter series ever
built. With pilots of moderate
training levels, the airplane could more than hold its own against its
opponents, while it was tractable enough that the same moderately‑trained pilot
could bring a damaged one back and get aboard his carrier, a point of no small
importance in naval warfare. It is
the only fighter of the Second World War to remain essentially unchanged in
basic design from its introduction to service to its post‑war withdrawal, with
the main difference between the two production variants being engine power.
The Hellcat was already in preliminary design stages well before the
outbreak of the Pacific War, and first flew about the time of the  improve
its ability as a fleet defense fighter.
They were fortunate that the airframe was amenable to initial change from
the underpowered R‑2600 to the far‑superior R‑2800, the finest radial piston
engine ever built. With this engine, the airplane had sufficient power to outfly
its opposition.
improve
its ability as a fleet defense fighter.
They were fortunate that the airframe was amenable to initial change from
the underpowered R‑2600 to the far‑superior R‑2800, the finest radial piston
engine ever built. With this engine, the airplane had sufficient power to outfly
its opposition.
The Hellcat in the Royal
Navy:
The Royal Navy’s Fleet Air Arm - which only achieved independence from
the Royal Air Force in 1938 - entered the war woefully underequipped with
capable combat aircraft that are at all competitive with their opponents.
The Fleet Air Arm was at least a generation behind the
The Hellcat first entered combat with the FAA in December 1943, when 800
and 804 Squadrons flew from HMS Emperor on a series of anti-shipping
strikes off the Norwegian coast.
Hellcats again entered combat on
On 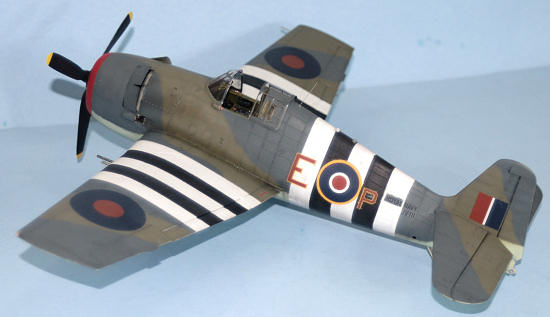 sharing a second He-115 with 804 squadron CO LCDR Stanley Orr to become the
first FAA pilot to make “ace” while flying the Hellcat.
Unfortunately, Ritchie was lost in an operational accident 10 days later.
These were the only Hellcat air combat victories in the European Theater.
sharing a second He-115 with 804 squadron CO LCDR Stanley Orr to become the
first FAA pilot to make “ace” while flying the Hellcat.
Unfortunately, Ritchie was lost in an operational accident 10 days later.
These were the only Hellcat air combat victories in the European Theater.
800 and 804 Squadrons participated in the final Hellcat combat operation
in the European Theater, that being air support for Operation Dragoon,
the Allied landings in the south of
Like their American counterparts, British carrier pilots preferred the
Hellcat over the Corsair due to its superior handling when landing aboard a
carrier.
Dutchies in the FAA:
Following the conquest of the Netherlands by Germany and the Netherlands
East Indies by Japan, Dutch flyers served with distinction in the Fleet Air Arm
throughout the Second World War.
One of these flyers was C.A.M. “Charlie” Poublon, who flew with 800 Squadron.
Born in 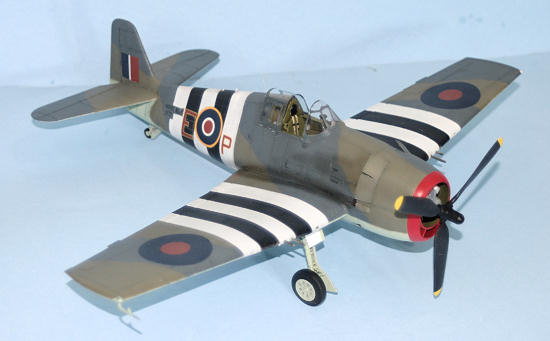 States
While with 800 Squadron, Poublon took part in the invasion of
Continuing with 800 Squadron, Poublon took part in further operations
that fall over
| THE KIT |
This F6F-3 Hellcat is the second of four kits released by Trumpeter - the
others are the previously-released F5F-5N, an F6F-5 and an F6F-3E. The only
other 1/32 Hellcat is the Hasegawa kit first released in the late 1970s.
These kits effectively makes that kit obsolete on any point other than
price.
The kit provides superb detail, with fully-detailed engine, accessories,
and radio gear within the fuselage that can be seen if a modeler chooses to
“open up” the model. The gunbays are fully detailed and the main gear wells have
the most detailws of any Hellcat in any scale.
The cowling is the right shape with the definite “chin” that other
manufacturers have missed.
 Trumpeter has continued their policy with US Navy aircraft of providing a
model that can be built with its wings folded.
Unlike either the F4F Wildcat or the TBF Avenger kits, however, Trumpeter
has come up with a design for this kit that provides parts that will allow the
wing to have sufficient strength either folded or spread to stay in its correct
position and not be fragile. The
system chosen is somewhat similar to that used by Tamiya for their Corsair and
Swordfish, with spars that go deep into the separate wing areas to provide
sufficient strength.
Trumpeter has continued their policy with US Navy aircraft of providing a
model that can be built with its wings folded.
Unlike either the F4F Wildcat or the TBF Avenger kits, however, Trumpeter
has come up with a design for this kit that provides parts that will allow the
wing to have sufficient strength either folded or spread to stay in its correct
position and not be fragile. The
system chosen is somewhat similar to that used by Tamiya for their Corsair and
Swordfish, with spars that go deep into the separate wing areas to provide
sufficient strength.
The kit provides decals for two F6F-3s, one of which is “The Minsi,” the
first Hellcat flown by Commander David McCampbell, the
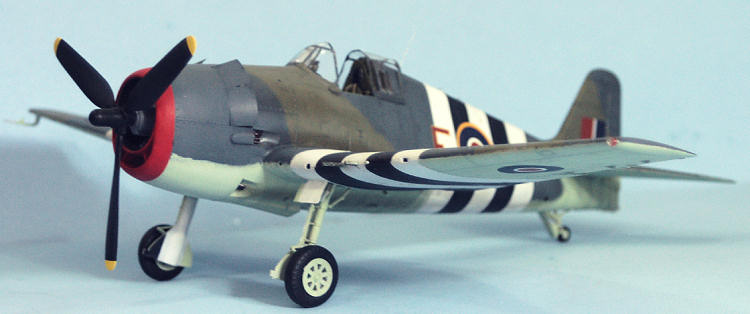
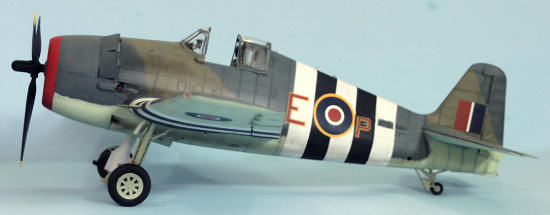
I chose to use the decals for a Hellcat I of 800 Squadron, Fleet Air Arm,
that are provided by Kits At War Decals in their “Dutchies in de FAA” release.
These are excellent decals, and come with a booklet that gives full
markings and painting diagrams for four Hellcats and two Corsairs flown by
members of the Royal
| CONSTRUCTION |
My inspiration to build this kit came from a recent visit to Planes of
Fame Air Museum just after New Year’s, to watch the flight of the F6F-3 they
have that is painted as an FAA Hellcat of 800 Squadron. 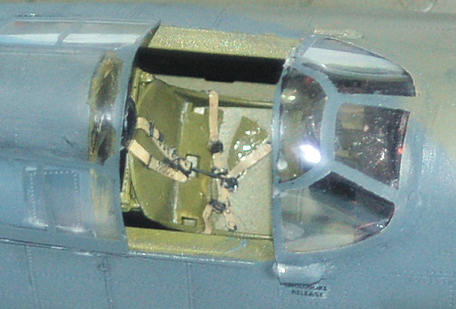
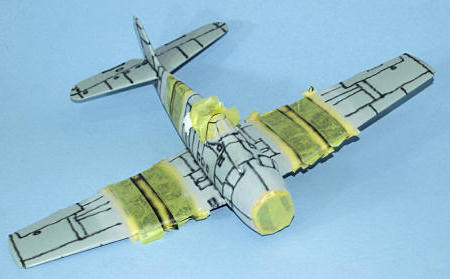
There is a problem with the Trumpeter Hellcat series. Whether this is a
“deal breaker” is for the modeler to decide, but here it is: somehow, Trumpeter
got the cross section of the fuselage around the cockpit and for about one-third
of the distance from the cockpit to the vertical fin wrong. It is too fat, too
wide, and the result is that in this area of upper fuselage just aft of the
cockpit the sides of the fuselage curve outwards in a way that is very
“un-Hellcat-like.” In side profile
the model looks all right, but in head-on profile, the cross section is
completely wrong, as it is not the flat-sided upper fuselage associated with the
Hellcat. This makes it look “squat”
in a way the Hellcat just doesn’t do.
I have reviewed every photo I have of Hellcats, including some photos I
have taken of the two Hellcats out at Chino, and from the 4 o’clock or 8 o’clock
positions, this “fatness” that can be so clearly seen in the model from those
angles is nowhere to be seen on the real thing.
Fortunately, it turns out this is not “unfixably wrong,” as such a
mistake usually is with a kit.
As I did with the F6F-5N kit, I simply bent and re-shaped the fuselage in
the “bulged” area. This is possible
since the plastic is soft. I then
sanded the sides of the rear cockpit bulkheads so they have “straight” sides;
these need to be “test fitted” to the fuselage after re-shaping them.
 In the earlier kit, I used the kit canopy and windscreen, which had to be
heated and re-shaped, which is always a problem with clear plastic.
Even after doing that, I was unhappy with the overall shape of these
parts, since they still seemed too fat and too squat.
This time, I used the Squadron vacuform canopy, which is actually made
for the Hasegawa kit. There was a
fit problem with the windshield, where I had to fill in the attachment areas of
the fuselage with putty, and then putty the base of the new windscreen when I
attached it, but the end result is a canopy that has the correct look for a
Hellcat.
In the earlier kit, I used the kit canopy and windscreen, which had to be
heated and re-shaped, which is always a problem with clear plastic.
Even after doing that, I was unhappy with the overall shape of these
parts, since they still seemed too fat and too squat.
This time, I used the Squadron vacuform canopy, which is actually made
for the Hasegawa kit. There was a
fit problem with the windshield, where I had to fill in the attachment areas of
the fuselage with putty, and then putty the base of the new windscreen when I
attached it, but the end result is a canopy that has the correct look for a
Hellcat.
For this kit, I also used the Eduard photoetch cockpit detail set, for
the instrument panel and other details in the cockpit.
I used an Eduard photoetched RAF seatbelt set instead of the
From photos, I was able to determine that the FAA flew their Hellcats
without the centerline drop tank most of the time, so I did not use the kit
tank. I filled in the attachment
holes in the lower fuselage, as well as those in the lower wings for the unused
rockets, with Evergreen rod. I also noted that the FAA did not use HF radios and
therefore removed the antenna masts from the fuselage and vertical fin.
I replaced that with a whip antenna made from wire, placed where the
fuselage mast would go.
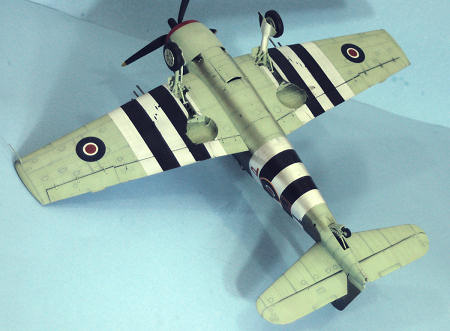
| COLORS & MARKINGS |
Painting:
I think the scheme for 800 Squadron Hellcat Is with the distinctive D-Day
stripes is one of the most interesting for a Hellcat.
I first applied Tamiya Flat White to the areas of the stripes, and to the
nose. I painted the nose ring with
Gunze-Sangyo
 “Red
Madder” and masked that off, then masked off the white stripes and painted the
black stripes for the D-Day markings. I used Xtracrylix Extra-Dark Sea Grey,
Dark Slate Grey and Sky for the camouflage, applied freehand following the
painting diagram in the decal instructions.
“Red
Madder” and masked that off, then masked off the white stripes and painted the
black stripes for the D-Day markings. I used Xtracrylix Extra-Dark Sea Grey,
Dark Slate Grey and Sky for the camouflage, applied freehand following the
painting diagram in the decal instructions.
Decals:
As is often the problem when applying decals over colors as distinct as
black and white next to each other, the fuselage insignia needed a white
backing. I should have done this
when masking off and painting, and only discovered that the decals lacked the
opacity to work here without help when the decals were wet; I quickly took a
sheet of white decal, cut circles of the correct size and applied them, then
applied the insignia. The yellow
backing for the code letters also let the background colors through, though this
was not such a problem since the red letters went over the yellow backing.
Other than this, the decals went on easily and settled in with repeated
applications of Micro-Sol. I used
the kit decals for the stencils.
| FINAL CONSTRUCTION |
I gave the model a coat of Xtracrylix Flat Varnish, then applied exhaust
stains with Tamiya “Smoke.” I
fitted the rear windows to the cockpit, unmasked the windshield and canopy, and
attached the canopy in the open position. I attached the landing gear and the
prop.
| CONCLUSIONS |
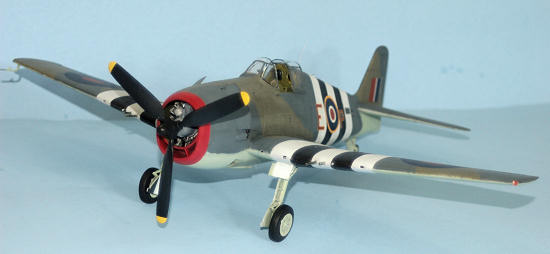 Admittedly, Trumpeter screwed the pooch with the design of the kit
fuselage. As pointed out above and demonstrated in photos here, this is a
problem that can be dealt with without a lot of pain and agony with the
application of “some modeling skill required.”
If you do these simple fixes, the final model looks much better than the
old Hasegawa kit. I like the
distinctive markings of 800 Squadron, and this model looks very nice sitting
next to my Trumpeter FM-1 Wildcat V of 805 Squadron in similar markings.
Admittedly, Trumpeter screwed the pooch with the design of the kit
fuselage. As pointed out above and demonstrated in photos here, this is a
problem that can be dealt with without a lot of pain and agony with the
application of “some modeling skill required.”
If you do these simple fixes, the final model looks much better than the
old Hasegawa kit. I like the
distinctive markings of 800 Squadron, and this model looks very nice sitting
next to my Trumpeter FM-1 Wildcat V of 805 Squadron in similar markings.
Thanks to Stevens International for the review kit and Kits At War for the decals.
January 2010
If you would like your product reviewed fairly and quickly, please contact me or see other details in the Note to Contributors.