| KIT: | Hasegawa 1/48 P-400 Airacobra |
| KIT #: | 09092 (Jt 92) |
| PRICE: | 2400 yen from www.hlj.com |
| DECALS: | Three options |
| REVIEWER: | Tom Cleaver |
| NOTES: | New mold |
| HISTORY |
Often derided as the least of the fighters with which the USAAF went to war, the airplane the RAF rejected and only the Russians loved, the Bell P-39 "Airacobra" has mostly gotten a bad rap for events beyond its control, all stemming from the completely-idiotic decision by the Army Air Corps to remove the supercharger that originally equipped the prototype when it developed problems; this dropped the P-39's overall performance and crippled it at altitudes over 10,000 feet. When this was followed up by sending the airplane into combat with under-trained pilots in 1942 against the pilots of the Imperial Japanese Navy - at the time perhaps the best pilots in the world man for man - and forcing it to fight at altitudes at which it could not perform... well, no wonder it got a bad reputation.
On
the other hand, the Russians - who used the airplane for combat below 10,000
feet where its performance wasn't crippled - couldn't get their hands on enough
Airacobras; the airplane was flown by several of their leading aces, including
second-ranked Alexsandr Pokryshkin, who scored the majority of his victories in
Airacobras. In North Africa, where the airplane was used within its performance
envelope, it won a respectable reputation as a low-level tactical aircraft. No
less a judge of aeronautical horseflesh than Chuck Yeager called the P-39 "my
favorite for all-around flying so long as you didn't take it over ten thousand
 feet; other than that it
handled beautifully."
feet; other than that it
handled beautifully."
The P-39 prototype first flew April 6, 1939. It demonstrated a climb to 20,000 feet in five minutes, and a top speed approaching 400 m.p.h. which was admittedly achieved by an airplane lacking armor, weapons, ammo, and other operational equipment - after Bell’s advertising campaign about its speed, pilots were quite disappointed with the operational airplane they flew. The heavy armament of one 37mm cannon, two .50 cal. machine guns two .30 cal. machine guns was made possible by the radical design step of mounting the Allison engine on the aircraft's center of gravity, behind the pilot, powering the propeller through an extension shaft. This also allowed the airplane to become the first fighter with a tricycle landing gear, which made it easier to handle on the ground than the conventional taildraggers.
Unfortunately, the Army Air Corps at the time was singularly unimaginative in deciding on the use of the airplane. With an official national policy of isolationism in 1939, it was not expected that the United States would face an enemy with an effective fighter force; this meant that U.S. fighters would not need a high-altitude capability since they would be strafing invaders on the beaches. Thus, both the P-39 and P-40 were crippled at birth by the removal of the supercharging systems each prototype was originally equipped with. Only the P-38 escaped this fate since it was to be a bomber interceptor, and even the USAAC expected enemy bombers to come over at high altitude.
The British Purchasing Commission ordered the airplane as the Airacobra I, based on the P-39D configuration which was the first version produced in any numbers for the Air Force. This airplane differed from the American version by the substitution of a Hispano 20mm cannon for the Oldsmobile 37mm weapon that equipped the P-39D. By the time the Airacobras arrived in England in July 1941, air combat was regularly taking place at altitudes well over 10,000 feet; 601 Squadron found the airplane lacking in capability for ETO conditions, and the 212 Airacobras already delivered under the RAF order were sent on to the Russians, who fell in love with them for their heavy armament and good handling.
The
remaining 179 aircraft on the British order were comandeered by the USAAF after
Pearl Harbor and designated P-400 Airacobras, to distinguish them from the
regular P-39s. These airplanes were sent on to the Southwest Pacific, where
they entered combat over New Guinea with the 35th and 8th Fighter Groups in
March and April 1942, and later with the 67th Fighter
 Group at Guadalcanal. The P-400
was completely outclassed by the A6M2 Model 21 Zero-sen by which it was opposed;
coupling that with the fact the IJN opponents were among the best fighter pilots
in the world made flying P-400s out of Twelve Mile 'Drome very difficult
indeed. Edwards Park - later Curator of the Smithsonian Institution - was one
of those pilots; his book "No, No, Nanette" provides an excellent account of
these events.
Group at Guadalcanal. The P-400
was completely outclassed by the A6M2 Model 21 Zero-sen by which it was opposed;
coupling that with the fact the IJN opponents were among the best fighter pilots
in the world made flying P-400s out of Twelve Mile 'Drome very difficult
indeed. Edwards Park - later Curator of the Smithsonian Institution - was one
of those pilots; his book "No, No, Nanette" provides an excellent account of
these events.
When the 67th Fighter Group received their airplanes on Samoa, they arrived without instruction manuals, maintenance tools, or assembly equipment. Not only that, but they were P-400s,P-39Ds, and P-39Fs, all of which differed from each other in small but important ways. The entire group, pilots and ground crews and support personnel, were turned to on the task of finding a way to create airplanes from what was in the crates. By God and by guess, they managed to create 36 flyable Airacobras in approximately 60 days. When the airplanes arrived at Guadalcanal, they were so outclassed that they were often sent off to fly around a distant island away from trouble when the Japanese mounted raids. They were found to be excellent ground support airplanes, however, which restored their reputation somewhat.
As more capable fighters came along, the P-39s were replaced as fighters. In New Guinea they were used in the tactical reconnaissance role throughout the fighting on the island until the summer of 1944, with oblique cameras mounted in the radio compartment in the rear fuselage.
| THE KIT |
When
the Hasegawa Airacobras were announced earlier this year, many questioned why
the company had decided to do this airplane, since Eduard had released good kits
of it already, and even the old Monogram kit originally released in 1969 was
still very acceptable. 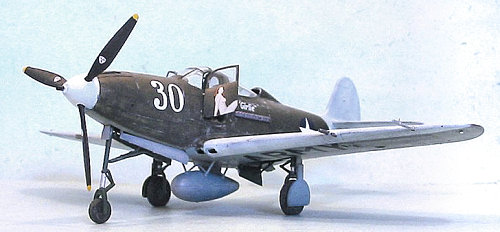
One look in the box of this kit reveals that Hasegawa has created a kit that is superior to the existing kits. Instead of the raised detail of the Monogram kit, it has fine recessed detail. Unlike the Eduard kit, which has an overly-thick trailing edge on the wing, the new Hasegawa kit has knifeblade trailing edges. Some modelers have suggested the rudder might not be the correct shape, but whatever dimensional imperfections may exist there are minor.
Both Eduard and Monogram have done nice cockpits in their kits, but in both cases resin replacements are superior. This kit from Hasegawa has a cockpit that is much better detailed than either of the others, needing only photoetched seat belts to add sufficient detail.
As is common with Hasegawa, the kit is obviously going to be released in future versions, since the main airframe - which doesn’t change from sub-type to sub-type - is already “plumbed” with locating holes for the underwing gondolas of the P-39Q, and differing shell ejection ports in the wing. Unlike the Eduard kit, which provided all the parts for all the different sub-types at once, this kit lacks the different exhausts of other sub-types, or the underwing gondolas and 4-blade prop of the P-39Q, since the company obviously wants modelers to buy the other releases as they come out.
Decals are provided for three different P-400s from the 67th FG on Guadalcanal and the 35th FG in New Guinea, all of which have seen the light of day in other releases and in aftermarket decals. These decals are the “new” Hasegawa decals with real white in the decal rather than the previous ivory white.
| CONSTRUCTION |
The kit is extremely well-designed and really does “fall together.” After the detail parts are pre-painted, the entire assembly can be accomplished in a matter of a few hours, and no problems are presented as regards fit.
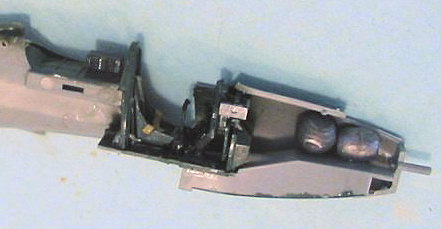 I pre-painted the detail
parts, these being the cockpit, gear wells, landing gear and gear doors, which
are all done in “Bell Green.” Having seen the P-39 restorations at Yanks Air
Museum and Fighter Rebuilders in Chino, I can assure you that this color is US
Medium Green - nothing special or out of the ordinary, other than it being a
different color from interior green which was used by most other
manufacturers. You can use any available Medium Green you want for this. In
my case, I used Xtracrylix Medium Green.
I pre-painted the detail
parts, these being the cockpit, gear wells, landing gear and gear doors, which
are all done in “Bell Green.” Having seen the P-39 restorations at Yanks Air
Museum and Fighter Rebuilders in Chino, I can assure you that this color is US
Medium Green - nothing special or out of the ordinary, other than it being a
different color from interior green which was used by most other
manufacturers. You can use any available Medium Green you want for this. In
my case, I used Xtracrylix Medium Green.
When all this was dry, I applied the very nice instrument panel decals to their parts. While that was setting up, I made seat belts from lead foil and put them on the seat.
I
assembled the wing with no problems, and then the fuselage. The on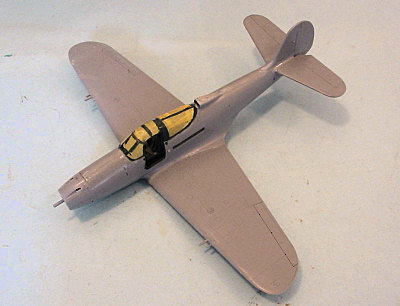 ly
place I used any Mr. Surfacer was on the fuselage to be sure I got rid of the
centerline seam.
ly
place I used any Mr. Surfacer was on the fuselage to be sure I got rid of the
centerline seam.
One problem with this kit is that it does not have weight provided, like the Eduard kit does. I thought I had put enough fish weights in the nose to insure nose-sitting, but as it turned out this was not the case. In the end, I had to put a small weight in the nose of the drop tank to get a nose sit, and the model will tail-sit at a moment’s notice. The solution here is to put what you think is enough weight in the nose and then put in a bit more. Due to the fact the gear is all the right length, model sits tail-low, so it does need more weight than you think it will.
One very nice touch is that the doors are molded in clear
plastic. All you have to do is mask both sides of the window, and then paint the doors without any problem of fitting a clear part in later. Additionally, these doors fit well enough that it is easy to assemble them closed if you want. Both the Eduard and Monogram kits are really designed for the doors to be open, and require additional fiddling to get proper fit if you want to close them. The canopy fits easily during construction.
| COLORS & MARKINGS |
Painting:
It was at about the time I finished assembling the model that I spilled the remaining contents of a bottle of Tenax onto the kit decals. While that part of the sheet that included the stencils was saved, the end with the individual markings was ruined. Fortunately for me, I had enough aftermarket decals to find something to replace these.
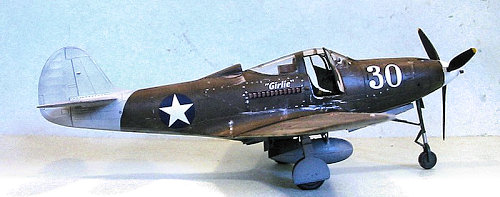
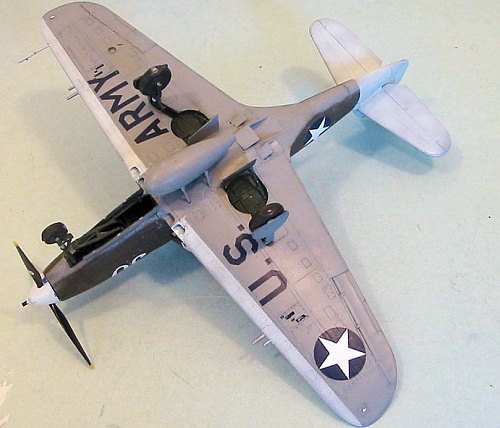
 At any rate, this airplane
had been given the SWPA identification markings of white wing leading edges and
white tail surfaces. After “pre-shading” the model, I painted these areas with
Tamiya Flat White and masked them off.
At any rate, this airplane
had been given the SWPA identification markings of white wing leading edges and
white tail surfaces. After “pre-shading” the model, I painted these areas with
Tamiya Flat White and masked them off.
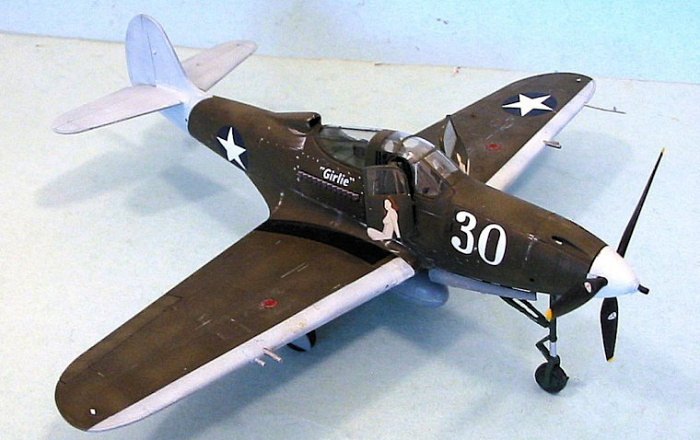
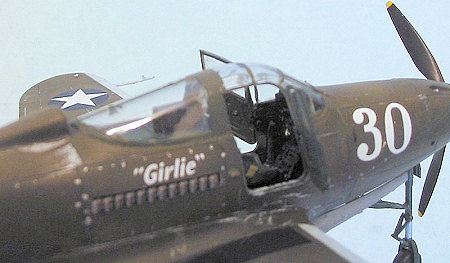
I used Xtracrylix “Olive Drab” and “Faded Olive Drab” for the upper surfaces after painting the lower surfaces with Xtracrylix “Neutral Grey.” The “Faded Olive Drab” was mixed in to the regular color to simulate sun-fading.
When everything was dry, I gave the model an overall coat of
Xtracrylix Gloss Varnish.
Decals:
I ended up doing “Girlie,” from the 110th Tactical Reconnaissance Squadron in New Guinea, circa the Spring of 1943,from the Cutting Edge sheet “P-39 Airacobra #4,” CED 48146. The decals say the airplane was a P-39D, but in fact no P-39Ds served there by then; it might have been a P-39F, since that sub-type used the same exhausts as the P-39D and exhausts are about the only visual difference between Airacobra subtypes. A P-39N uses the same exhausts as the P-400, so I decided that was the sub-type this would be. The decals went on without problem, and I used the saved stencil decals from the kit sheet.
| FINAL CONSTRUCTION |
The model was given two coats of Xtracrylix Flat Varnish, and then the landing gear and prop was attached, the canopy and doors were unmasked and the doors were posed open.
| CONCLUSIONS |
 The Hasegawa Airacobra
makes into a nice model without any of the extra effort needed with either the
Monogram or Eduard kits (like sanding down the inner wing halves of the Eduard
kit to thin the wing trailing edge). The kit presents the delicatness of P-39
series very well. It is so well-designed that it is a “fall together” kit that
presents no problems during assembly, and could be a “two weekend project” for
those whose time is limited - one weekend for assembly and detail painting, one
weekend for overall painting and decals. The entire model took me about 12
hours to assemble, paint and finish. It is the kind of kit where the result
will make an average modeler look good and a good modeler look great.
The Hasegawa Airacobra
makes into a nice model without any of the extra effort needed with either the
Monogram or Eduard kits (like sanding down the inner wing halves of the Eduard
kit to thin the wing trailing edge). The kit presents the delicatness of P-39
series very well. It is so well-designed that it is a “fall together” kit that
presents no problems during assembly, and could be a “two weekend project” for
those whose time is limited - one weekend for assembly and detail painting, one
weekend for overall painting and decals. The entire model took me about 12
hours to assemble, paint and finish. It is the kind of kit where the result
will make an average modeler look good and a good modeler look great.
Thanks to HobbyLink Japan for the review copy. Get yours at www.hlj.com
November 2006
If you would like your product reviewed fairly and quickly by a site that has over 325,000 visitors a month, please contact me or see other details in the Note to Contributors.