PCM 1/32 Hurricane I (Battle of Britain)
| KIT #: | 32013 |
| PRICE: | $69.95 MSRP |
| DECALS: | Six options |
| REVIEWER: | Tom Cleaver |
| NOTES: | Smart Kit |
| HISTORY |
The Hawker
Hurricane was the first modern monoplane fighter to equip the RAF, and
was one of only three RAF aircraft to operate in first-line service from
the first day of the Second World War to the last. (The other two being
the Spitfire and the Swordfish)
Though the Spitfire gained the glory in the 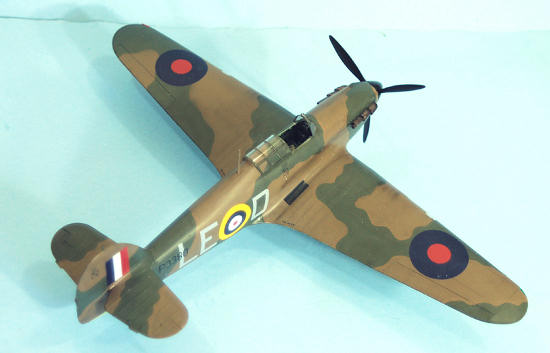 quickly
repaired and returned to service, which was the RAF “secret” that really
won the Battle of Britain; fully 60 percent of the Hurricanes shot down
over England that summer were repaired and returned to operational use
during the battle - a fact that Goering's Luftwaffe missed as they
confidently predicted that on September 15, 1940, there would be no RAF
fighters over London.
It was a scandal when reports came out that
production Hurricane I's could barely make 305 mph at 10,000 feet - the
height at which most combat occurred - and that the airplane could not
be flown over 20,000 feet, the altitude from which the Messerschmitts
dove out of the sun on their targets.
quickly
repaired and returned to service, which was the RAF “secret” that really
won the Battle of Britain; fully 60 percent of the Hurricanes shot down
over England that summer were repaired and returned to operational use
during the battle - a fact that Goering's Luftwaffe missed as they
confidently predicted that on September 15, 1940, there would be no RAF
fighters over London.
It was a scandal when reports came out that
production Hurricane I's could barely make 305 mph at 10,000 feet - the
height at which most combat occurred - and that the airplane could not
be flown over 20,000 feet, the altitude from which the Messerschmitts
dove out of the sun on their targets.
Outclassed or not, the Hurricane I was there when it was needed,
in numbers sufficient to change the outcome of a battle nearly everyone
expected
Douglas
Bader:
There is likely no pilot who flew in the
In 1981, the
year before his fatal heart attack, his niece Virginia Bader - who ran
an aviation art gallery in Long Beach back then - gave a forum with
Bader, his acolyte Johnny Johnson, and Robert R. Stanford-Tuck.
Who could resist the opportunity of
 meeting
them, even at an entry price of $50 per person?
And there I discovered that what one could call
the darker side of Douglas Bader was the dominant side, as he went out
of his way to antagonize people who had come there to praise him.
I had the opportunity to speak personally with
Stanford-Tuck, whose comment in response to my comment about Bader was
“That’s
meeting
them, even at an entry price of $50 per person?
And there I discovered that what one could call
the darker side of Douglas Bader was the dominant side, as he went out
of his way to antagonize people who had come there to praise him.
I had the opportunity to speak personally with
Stanford-Tuck, whose comment in response to my comment about Bader was
“That’s
And yet,
despite all that, Bader is remembered by those who flew with him as a
man who could inspire them to achieve feats they would not have thought
themselves capable of, even as he managed to permanently antagonize many
of them in the process.
One can look at the names of the pilots who flew
with him in 242 Squadron, and in the famous “Tangmere
Wing,” and find
many who went on to great achievement as a result of what they had
learned from him.
This is nowhere more obvious than in the career
of British ace-of-aces Johnny Johnson, who made it clear in his
autobiography “Wing Leader” that he pretty much owed everything he later
achieved in the war to what he learned from his close relationship with
Bader at the outset of his career.
There is now
a second biography of Bader, “Bader’s War: Have A Go At Everything,” by
the superb British war historian S.P. Mackenzie, that reveals why and
how Douglas Bader became the man he was.
It is often
said that if one wants to understand the man, they need to understand
the child he was.
This is certainly true with Bader, whose
childhood can only be called “harsh and unhappy.” In such a forge would
be created the uncompromising character of iron will and determination
that would carry him through life.
Born
February 21, 1910, Bader spent his first two years living with relatives
on the Isle of Man while his parents returned to India.
Reunited with them, he discovered his mother had
never wanted him; she always took the side of his older brother, who
delighted in tormenting Douglas, once shooting him in the shoulder with
an air gun.
The family returned to England in 1914 and in
1915, his father went off to war, the last Douglas ever saw of him,
since he died of wounds two years later.
Raised by an ineffectual Yorkshire clergyman as
a step-father, Bader became an aggressive fighter in response to his
brother’s treatment.
Once, at St. Edward’s, his public school in
Oxford, he got into a fight with future film star Laurence Olivier, who
beat him up after being bowled out by Bader in a cricket match.
By the time
he graduated, his central elements were obvious to all: the urge to
compete and win at all costs, the desire to lead, a blustery
self-confidence hiding his loneliness, and an undying need to prove
himself
He had not
planned to join the RAF, and did so more out a lack of other
opportunities and interests than anything else, though he discovered he
had a knack for it once he was in.
In November 1931 came the event that would
define his life, when a group of pilots at a local aero club chided him
about the performance of his Bristol Bulldog fighter.
He tried to perform an aerobatic roll on
takeoff, at an altitude of less than 20 feet.
Misjudging height and speed, he dug a wingtip
and cartwheeled into a terrible crash.
Only the
early arrival of a rescuer prevented Bader bleeding to death right then.
His luck held when he arrived in the hospital
just in time to be treated by one of the best surgeons in England, who
had been about to go home for the day.
Bader lost his right leg above the knee that day
and his left below the knee the next.
Sedated for weeks, his first memory after the
crash was hearing a Nursing Sister outside his hospital door say to
another, “Be quiet, there’s a boy dying in there.”
 In
those days, there was nothing remotely like the kind of technology and
treatment for amputees that exists today, but Bader applied himself like
no one else, and within a year he had regained the ability to move, or
lurch, if not to actually walk.
Mackenzie calls this recovery, “an unparalleled
triumph of determination and willpower over physical adversity”.
In
those days, there was nothing remotely like the kind of technology and
treatment for amputees that exists today, but Bader applied himself like
no one else, and within a year he had regained the ability to move, or
lurch, if not to actually walk.
Mackenzie calls this recovery, “an unparalleled
triumph of determination and willpower over physical adversity”.
By 1933,
Bader was back in the cockpit and had proven conclusively he could fly.
RAF regulations were unbending and he was
refused reinstatement. For the next five years he was relentless in
pursuing his return, declaring he would never take no for an answer.
“By God, I’ll sit on their doorsteps until I get
in,” he vowed.
With the Munich Crisis at hand in 1938, the Air
Ministry finally decided to ignore the regulations. “Getting back into
the RAF was a masterpiece of persistence,” Bader wrote.
Returning as
a Pilot Officer when his contemporaries were Squadron Leaders, Bader
quickly made up for lost time.
Assigned to 222 Squadron, based at Duxford and
commanded by his old friend, Squadron Leader "Tubby" Mermagen, and
mounted on Spitfires, Bader first tasted combat while on patrol near
Dunkirk on June 1, 1940, when he shot down a Bf-109E.
Claiming a total of five kills on this mission,
he was given final credit for another Bf-110 damaged.
On the basis of his performance over Dunkirk,.
Bader was posted to command 242 Squadron RAF, based at RAF Coltishall,
on June 28, 1940.
242 was the only Canadian unit in England, and
had suffered heavy casualties in France.
Initially, many thought the assignment of a
“cripple” as their squadron leader was the final insult.
Bader lurched out to a Hurricane, climbed in,
and gave a bravura low altitude airshow performance, which ended all
doubts of his ability. “People fell in behind him because he had the
personality to run things,” was how Johnny Johnson described him after
first meeting Bader at Duxford that September in the midst of an
invasion scare where Bader was the only one looking forward to the
event.
Under his leadership, 242 was declared operational on
July 9, 1940.
Flying limited combat during the difficult
period of the Battle of Britain in July and August from Duxford, Bader
still managed to score victories and to create such a good record that
the squadron was assigned to Duxford on August 30.
Throughout
the Battle of Britain, Bader thoroughly disagreed with the tactics
advocated by Air Chief Marshal Hugh Dowding, OC Fighter Command, and
used by Air Vice Marshal Keith Park, OC 11 Group, the “front line” unit
facing the Luftwaffe.
In this, Bader was joined by many of the
“traditionalists” of the RAF, men such as Air Vice Marshal Sholto
Douglas, who believed the RAF should engage the Luftwaffe in an all-out
battle.
Dowding
disagreed.
For him, “victory” would come with the end of
“invasion season,” the time of year when the weather would prevent a
cross-Channel invasion by the Wehrmacht for at least another year.
It was Dowding’s purpose to not loose too much
of Fighter Command - pilots or airplanes - in any given combat, in order
to keep “bleeding” the Luftwaffe and denying them the air superiority
that was essential to the success of any invasion.
For Dowding and Park, this meant holding on
until the end of September, when winter came to the English Channel.
 What
was perhaps the most amazing part of Bader’s career during the Battle of
Britain was how a lowly Squadron Leader managed to get the ear of Air
Vice Marshal Trafford Leigh-Mallory, the Air Officer Commanding 12
Group, to which 242 Squadron was assigned. It was apparently due to
force of personality on the part of Bader, and the fact that
Leigh-Mallory had no understanding of fighter warfare, having spent his
career in Army Cooperation Command.
Leigh-Mallory was also well-known as being a
sucker for flattery regarding his unseen-by-everyone-else intellectual
abilities. (In 1944, Air Chief Marshal Tedder, second in command of
SHEAF, threatened to resign if Eisenhower didn’t get rid of
Leigh-Mallory for incompetence in his role as commander of Allied
tactical air forces in the invasion.
The problem was solved by kicking Leigh-Mallory
“upstairs” to take command of Air Defense of Great Britain, which by
then was not the crucial command it had been four years previously, and
was thought to be an assignment Leigh-Mallory would not screw up.)
What
was perhaps the most amazing part of Bader’s career during the Battle of
Britain was how a lowly Squadron Leader managed to get the ear of Air
Vice Marshal Trafford Leigh-Mallory, the Air Officer Commanding 12
Group, to which 242 Squadron was assigned. It was apparently due to
force of personality on the part of Bader, and the fact that
Leigh-Mallory had no understanding of fighter warfare, having spent his
career in Army Cooperation Command.
Leigh-Mallory was also well-known as being a
sucker for flattery regarding his unseen-by-everyone-else intellectual
abilities. (In 1944, Air Chief Marshal Tedder, second in command of
SHEAF, threatened to resign if Eisenhower didn’t get rid of
Leigh-Mallory for incompetence in his role as commander of Allied
tactical air forces in the invasion.
The problem was solved by kicking Leigh-Mallory
“upstairs” to take command of Air Defense of Great Britain, which by
then was not the crucial command it had been four years previously, and
was thought to be an assignment Leigh-Mallory would not screw up.)
Where 11
Group’s assignment was to intercept the bombers before they unloaded,
that of 12 Group - which was mostly out of range of the Luftwaffe at its
bases in East Anglia and the Midlands - was to be the “back up” for 11
Group, with an important assignment to defend the airfields in 11 Group
as they increasingly became the targets of the Luftwaffe through August,
1940.
While 11 Group sent interceptors in two-squadron units,
Bader was an advocate of the “Big Wing,” also known as “the Balbo” for
General Italo Balbo, the Italian airman who had pioneered mass long
distance formation flights.
Bader advocated sending forth formations of
anywhere from three to five squadrons.
The argument
against this “Big Wing” strategy was that it took too long to organize
such a large formation, and that the enemy would have already bombed and
be returning home.
In fact, this had happened on several occasions
when 12 Group squadrons were supposed to be flying cover over 11 Group’s
airfields, and failed to appear in time to prevent attacks while
assembling their “big wings”.
There was
the additional argument that involving the RAF in extended
fighter-vs.-fighter combat in large numbers would lead to unnecessary
losses, given the pilot superiority of the Luftwaffe over many of the
hastily-trained RAF pilots.
Dowding just couldn’t afford those potential
losses, not when the losses he was suffering as it was were stretching
Fighter Command nearly to the breaking point.
Bader’s strategy, had it been adopted by 11
Group in August 1940, would have assured the RAF losing the Battle of
Britain
Bader’s
reply to this agreement was strategic nonsense: “I’d rather shoot down
20 going home than 10 before they bomb.”
This was said during a confrontation at Fighter
Command H.Q. between Leigh-Mallory and Keith Park, to which
Leigh-Mallory brought Bader as his intellectual voice.
Park’s reply was “you’re not shooting down 20,
you’re not even shooting down 5!” (This scene is shown in the film “The
Battle of Britain,” sans Bader; no one could bring themselves to put
Britain’s most famous pilot on the wrong side of history.)
Following
Hitler’s decision to divert the Luftwaffe to the bombing of London after
August 24, 1940, the nature of the fighting changed.
Once the RAF knew where the Luftwaffe was going,
there was finally time to organize the “Big Wing” and launch it against
the raiders in time to have an effect.
With the Bf-109s operating at the extreme limit
of their range, the likelihood of an extended air battle was minimized.
On September
7, 1940, Bader led 242, 616 and 310 Squadrons from Duxford against the
Luftwaffe over London.
The wing claimed 20 German planes destroyed, 10
by 242 Squadron.
On September 15, he led a wing of five
squadrons, the largest RAF formation to take on the Luftwaffe, and
claimed 30.
“The Legless Ace” was immediately the toast of
Fleet Street.
Following
the successful end of the Battle of Britain, the usual British policy of
not allowing any good deed to go unpunished resulted in Dowding being
summarily fired as
 1941
saw the RAF take another wrong turn in strategy, a turn lauded and led
by Bader, with the traditionalists making the entirely-idiotic decision
to “lean into France” the way the RFC had “leaned across the Western
Front” on the Somme in 1916.
Granted the Luftwaffe seemed to invite such a
strategy when all Jagdgeschwadern
but JG 1, JG 26 and JG 2 were returned to Germany, but the fact was the
RAF could not really
accomplish anything of strategic value by
exposing six to nine wings of fighters during a mission to potential
combat with enemies mounted on superior aircraft (the new Bf-109F was
clearly superior to the Hurricane I and II, and the Spitfire II, and was
marginally superior to the then-new Spitfire V - not to mention the
average German fighter pilot individually was still superior to his RAF
opponent).
All those fighters were there to defend four
Blenheims, carrying a maximum of four ineffective 250-lb bombs each - a
total of two tons of bombs combined - on raids that never penetrated
further than 50 miles past Dunkirk, hardly the site of strategic targets
in the Third Reich. Even when Stirlings were substituted for the
Blenheims to create a “high value target” to entice the Luftwaffe into
combat, the result was the loss of valuable brand new airplanes for no
military value.
1941
saw the RAF take another wrong turn in strategy, a turn lauded and led
by Bader, with the traditionalists making the entirely-idiotic decision
to “lean into France” the way the RFC had “leaned across the Western
Front” on the Somme in 1916.
Granted the Luftwaffe seemed to invite such a
strategy when all Jagdgeschwadern
but JG 1, JG 26 and JG 2 were returned to Germany, but the fact was the
RAF could not really
accomplish anything of strategic value by
exposing six to nine wings of fighters during a mission to potential
combat with enemies mounted on superior aircraft (the new Bf-109F was
clearly superior to the Hurricane I and II, and the Spitfire II, and was
marginally superior to the then-new Spitfire V - not to mention the
average German fighter pilot individually was still superior to his RAF
opponent).
All those fighters were there to defend four
Blenheims, carrying a maximum of four ineffective 250-lb bombs each - a
total of two tons of bombs combined - on raids that never penetrated
further than 50 miles past Dunkirk, hardly the site of strategic targets
in the Third Reich. Even when Stirlings were substituted for the
Blenheims to create a “high value target” to entice the Luftwaffe into
combat, the result was the loss of valuable brand new airplanes for no
military value.
During the
“Non-Stop Offensive” (called by the Luftwaffe “the Nonsense Offensive,”
a far more accurate name), RAF losses approached those of late 1916 and
early 1917 over the Somme, with the Germans (as in 1916-17) mounted in
the superior fighter - Bf-109F and the even more superior Fw-190A that
appeared that summer - with the additional benefit of being able to pick
and choose the timing of combat, to maximize their strengths.
Had all the
fighter pilots and all those Spitfires and Hurricanes so uselessly
wasted by the RAF traditionalists over the Channel Front in 1941 been
sent where they could do some good - to the Western Desert, to Malta, to
Greece - the outcome of the Second World War might have been
significantly different. The home font propaganda value of the “Non-Stop
Offensive” did not outweigh these military facts.
Not only was
Bader a strategic nincompoop, his grasp of developments in fighter
technology was wrongheaded.
While he used his position as leader of the
Duxford Wing to obtain metal ailerons for his wing’s Spitfire IIs in the
Spring of 1941 - which did provide a serious performance enhancement -
he rejected the introduction of the Spitfire Vb with its armament of two
20mm cannon, saying that it would encourage fighter pilots to open fire
at too great a range.
Bader himself obtained one of the few 8-machine
gun Spitfire Va’s built when the unit switched over in June 1941, with
the rest of the Duxford Wing happy to get the additional punch of the
cannons.
 Bader
became the victim of his own myopic strategic view on August 7, 1941,
when he was involved in a mid-air collision during combat over northern
France. In the battle to extricate himself from his broken Spitfire, he
lost one of his artificial legs.
Even without the leg, his first move after
capture was to attempt to escape from the hospital.
His enemies in JG 26, who admired him, invited
him to visit before he was sent off to POW camp.
Bader
became the victim of his own myopic strategic view on August 7, 1941,
when he was involved in a mid-air collision during combat over northern
France. In the battle to extricate himself from his broken Spitfire, he
lost one of his artificial legs.
Even without the leg, his first move after
capture was to attempt to escape from the hospital.
His enemies in JG 26, who admired him, invited
him to visit before he was sent off to POW camp.
The Germans
had no idea what they were letting themselves in for, once he was in the
POW system. Bader’s one aim was to escape and
rejoin the war effort.
He was involved in so many escape attempts, the
Germans threatened to take away his artificial legs.
Finally,
Bader was sent to Colditz Castle, the “escape-proof” prison camp for the
“bad boys.”
He continued to annoy his captors, blowing pipe
smoke in their faces and refusing to salute those lower in rank.
Too often though, his “goon‑ baiting” wasn’t
favored by the other prisoners, who suffered privations as a result.
Bader's
self-absorption was seen in the way he treated his medical orderly, Alec
Ross, who had to give him piggy‑back rides up and down the stairs of
Colditz Castle when his legs were taken away. When Ross informed Bader
he was returning home in a prisoner exchange, Bader replied: “No, you’re
bloody not. You came here as my skivvy and that’s what you’ll stay.”
Although he
mellowed slightly with age, Bader was frequently still outrageous for
the sake of outrage. Attending a Luftwaffe reunion in Munich, he said,
“My God, I had no idea we left so many of the bastards alive.” During
the filming of “The Battle of Britain,” Bader appeared as a guest of the
filmmakers.
When offered the chance to sit in one of the
Spanish Bf-109s being used, he commented “Bloody Hun kites still stink,”
which caused Adolf Galland to turn away, finally having had enough of
Bader’s bad manners.
Bader’s
greatest legacy was the inspiration he provided others in difficult
circumstances. Mackenzie relates the story of David Butler, who lost a
hand and both legs in a bomb explosion at age 12, who said, “I very much
admire Bader. When you see what he has been able to achieve you go and
try to do it yourself.”
Bader spent much of his time after the war
touring veteran’s hospitals and advocating for better treatment and the
development of superior technology for amputees, which led to the
almost-amazing artificial legs and arms and astounding treatment now
available.
A measure of Bader’s fame can be seen in the fact that for 20 years, Hurricane IIc LF363 flew with the Battle of Britain Memorial Flight in the markings of V7647, the Hurricane I flown by Bader with 242 Squadron in the Battle of Britain.
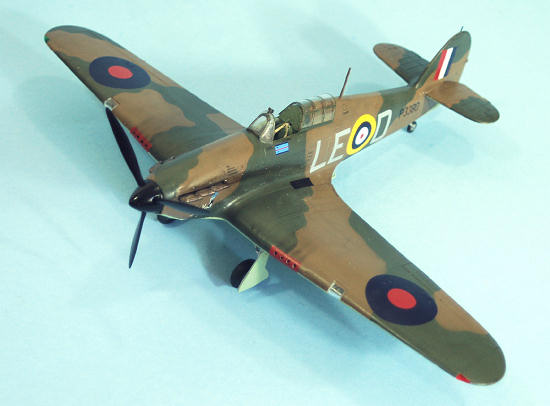
| THE KIT |
This Hurricane Mk. I by Pacific Coast Hobbies
(molded by Sword, photo-etch from Eduard, with decals by Cartograf and
designed by Richard Caruana) is the “metal wing” version flown during
the Battle of Britain. The only other 1/32 Hurricane I in
 injection
plastic is the ancient Revell offering from circa the early 1970s.
In the initial release, it was offered as an
8-gun metal-wing Mark I, though the kit was later changed with a wing
for the 4 20mm cannon of a Mk. IIc, without further modification of the
fuselage to Mk.II standard.
The kit has been recently re-released by Revell
of Germany as a Battle of Britain Hurricane I.
injection
plastic is the ancient Revell offering from circa the early 1970s.
In the initial release, it was offered as an
8-gun metal-wing Mark I, though the kit was later changed with a wing
for the 4 20mm cannon of a Mk. IIc, without further modification of the
fuselage to Mk.II standard.
The kit has been recently re-released by Revell
of Germany as a Battle of Britain Hurricane I.
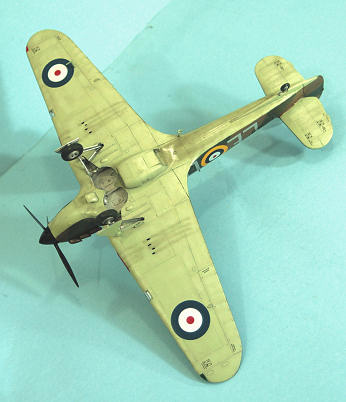
The kit features excellent surface detail, with
superb fabric areas; other manufacturers should look at this when
designing their own releases of fabric airplanes, particularly for World
War I models.
I particularly like that it is the only
Hurricane that has the fabric covering on the upper rear wing next to
the fuselage, which is why there were no walkways there on the
Hurricane.
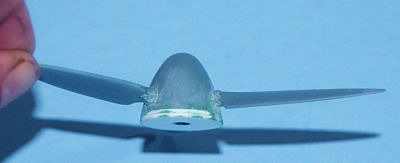
The kit provides the 2-blade Watts prop, the
deHavilland controllable=pitch prop and the Rotol constant-speed prop.
The windscreen is the correct version with the
internally-framed armor glass.
Decals are
provided for no less than six Battle of Britain Hurricane aces,
including the top-scoring pilot, Flight Sergeant Josef Frantisek, the
Polish ace Witold Urbanowicz, Flight Sergeant (not Squadron Leader)
Ginger Lacey, Douglas Bader, Squadron Leader A.A. McKellar, and Robert
R. Stanford-Tuck.
| CONSTRUCTION |
Since this
kit is almost exactly like the previous kit, other than the wings have
surface detail for the metal-wing version, I will quote at length from
the review of the earlier kit, since the instructions for building a
successful model from this kit are exactly the same:
Overall,
this model is not difficult if one has some experience of limited-run
kits.
However, there is a “big secret” to overall assembly
which can have a major effect on the way your model turns out.
The kit
instructions and a modeler’s experience would have one build the kit as
two major sub-assemblies - the fuselage and the wing - and then mate
them once otherwise assembled.
DO NOT DO THIS!
From my experience of now having built three of
these kits, if you follow the “common knowledge,” you will end up with a
huge gap on the upper wing joints, with the wing upper surface not
conforming to the curvature of the fuselage joint, which will require a
lot of filling and sanding, with the result that you will lose a whole
lot of very nice surface detail in that area that you do not want to
replace since you can’t do it as well as it was done originally.
Here’s the
trick to doing this kit with a minimum of hassle and a maximum of good
looks when finished: You have to approach the model as a collective
whole.
There are not two major sub-assemblies to this project,
but rather one overall process.
 The
first thing to do is to assemble the fuselage, including the lower rear
part.
While that is setting up, assemble and paint the cockpit
and install the seat belts. I strongly urge that you attach the rear
cockpit headrest bulkhead and the instrument panel into the fuselage
separately.
Once you have the rest of the cockpit assembled,
slip it inside and glue it in position.
At this point, you need to test fit the canopy
if you plan to pose it open, and to sand down the area of the fuselage
immediately aft of the cockpit so the canopy can sit down properly.
The
first thing to do is to assemble the fuselage, including the lower rear
part.
While that is setting up, assemble and paint the cockpit
and install the seat belts. I strongly urge that you attach the rear
cockpit headrest bulkhead and the instrument panel into the fuselage
separately.
Once you have the rest of the cockpit assembled,
slip it inside and glue it in position.
At this point, you need to test fit the canopy
if you plan to pose it open, and to sand down the area of the fuselage
immediately aft of the cockpit so the canopy can sit down properly.
Once the
fuselage is done, you want to attach the upper wing parts.
You will immediately notice that the curvature
of the upper wing differs from that of the fuselage joint.
You’re going to need to engage in a bit of
industrial-strength bending and curling to get the upper wing to fit -
don’t be afraid to stress the plastic, it is soft enough it won’t crack
or break. Once everything fits nice and tight, work the joint from
inside, to lessen the amount of glue that is used on the exterior.
If you trim and get it just right, you should
need only a very little bit of Mr. Surfacer along the upper wing joint
to get it smooth, which means you won’t be losing any of that wonderful
surface detail.
When you cut
the molding block off the main gear well, be sure to Dremel down the
roof of the well to where you can see light through the outer areas on
each end, and then round down the piece fore and aft on the top.
Assemble the interior parts for the gear well
and attach it to the lower wing.
You then
need to test fit the lower wing to the rest of the model. Trim as
necessary to get a nice smooth fit to the fuselage fore and aft.
Then take the leading edge gun port for one
wing, test fit it to the upper wing, trimming the cutout in the wing as
necessary to get good fit, then glue it in position.
Test fit the lower wing, and trim that cutout as
necessary to get good fit.
Do the same on the other wing.
Then fit the lower wing and be sure the cutouts
for the landing lights are aligned.
Glue the landing light parts into the upper
wing, then glue the lower wing in position.
If you have done this right, you will only need
a little Mr. Surfacer along the joints to the fuselage, and a little
sanding down of the wingtips so they match up.
All that
might sound like a lot of work, but it is really very minor fiddling,
and the end result of not having harmed all the wonderful surface detail
is well worth all the effort taken.
The joint of
the horizontal stabilizers to the fuselage will need a little filling
with cyanoacrylate glue and then some Mr. Surfacer.
The lower fuselage strake will need a little
filling with cyanoacrylate when you attach it.
 Past
that, all you need to do is sand down the joints and do some light
rescribing.
Past
that, all you need to do is sand down the joints and do some light
rescribing.
As regards
the landing gear, assemble the three-part gear doors before attaching
them to the gear legs, to insure proper fit.
For all the Hurricanes presented here, you will
want to use the 4-spoke wheels.
Before making the discovery I reveal below, I was going to use the Rotol propeller. The spinner is too small in diameter, and will exactly fit the nose of the engine cowling if not modified. I added a couple pieces of Evergreen sheet to the rear, sanded it down and then puttied it, to get a spinner that is slightly larger in diameter than the nose, which is what it should be. In the end, however, I used the deHavilland prop, for reasons below.
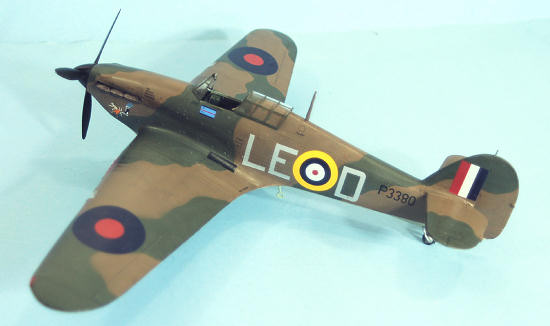
| COLORS & MARKINGS |
There is one
area of the kit that is sadly lacking, and that is accurate markings
information in the profiles that are provided.
Here is the difficulty:
The profile
shows four Hurricanes with “odd-number” serials in “A” scheme
camouflage, and two with “even” number serials in “B” scheme camouflage.
This is wrong!
Between
September 1938 and February 1941 (according to the explanation provided
in detail in the great old Profile Publicans "Camouflage and markings"
series) the rules for applying the two mirror‑image camouflage patterns
- “A” and “B” - were that the “A” scheme went on aircraft with
even‑number serials, while the “B” scheme went on odd‑number serials.
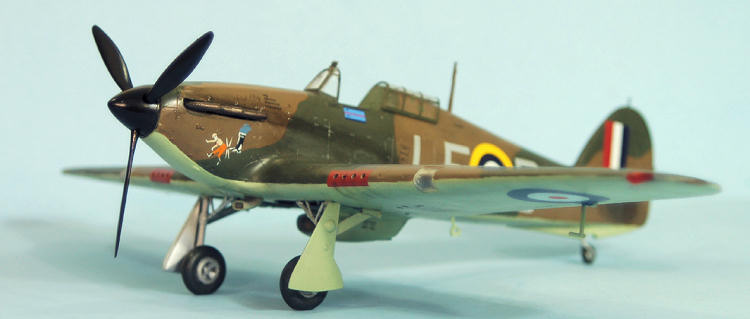
Given that
"Bader's Hurricane," V7467, is an odd number, the rules are it should
have been in a “B” scheme, not the “A” scheme that the profile calls
for. This as a problem for the entire profile sheet.
The fact it is a problem can be seen in a famous
photograph of Tuck’s V6864, which shows the entire airplane, and is
obviously in an “A” camouflage scheme, the opposite of what is shown in
these painting and markings instructions.
Given that
the profiles are by Caruana, who is unfortunately known for doing
beautiful profiles that get such details frequently wrong, such a
situation is not all that surprising.
I’m pretty sure 99.999% of those who ever see
the model will not have access to that knowledge, to it doesn’t really
matter a hill of beans unless it matters to you for historical and
technical accuracy.
Technical
and historical accuracy does matter to me.
One minute
with Google solved my question of how Bader’s airplane could be shown
with the wrong scheme.
The Wikipedia page about Bader and 242 Squadron
contains the following:
 During
the Battle of Britain Bader used three Hawker Hurricanes. The first was
P3061, in which he scored six kills. The serial of the second aircraft
was unknown, but Bader did score one kill and two damaged in it on 9
September. The third was V7467, in which he destroyed four more and
added one probable and two damaged by the end of September.
During
the Battle of Britain Bader used three Hawker Hurricanes. The first was
P3061, in which he scored six kills. The serial of the second aircraft
was unknown, but Bader did score one kill and two damaged in it on 9
September. The third was V7467, in which he destroyed four more and
added one probable and two damaged by the end of September.
Now then,
P3061 and V7467, being odd numbers, should properly be in the "B"
scheme.
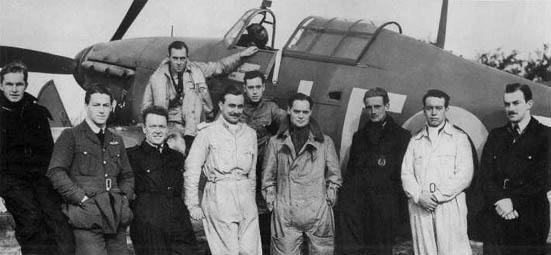
I found a photograph at the “WW II ACE STORIES” website
(shown here for instructional purposes), which shows Bader and his
pilots standing in front of a Hurricane I.
His squadron leader's marking is very obvious,
and the “LE” squadron code is identifiable; this is definitely a Bader
airplane.
It is also equipped with a deHavilland
controllable prop, and it is in the "A" scheme camouflage.
Given that information, it is easy to see that
this is the second Hurricane
Bader flew, the one with the unidentified serial, which is certainly an
“even number” serial.
The
information about painting "A" and "B" schemes is not "rocket science,"
it wasn't lost with the Dead Sea Scrolls, and someone who has the
reputation Caruana claims for himself should have this information
tattooed on his frontal lobes.
The people who claim to be the "experts" are
supposed to figure this out so their customers don’t have to.
Once I was aware of the mistake, it took me a
whole total of 3 minutes to find the relevant information and draw the
relevant conclusions from the evidence at hand.
It wasn't hard at all, and modelers deserve
better from Caruana.
For me,
having made this discovery at the point of having painted and decaled
the model, it was a question of leaving it as is, or figuring out a
“correction.”
My correction was to replace the Rotol prop
(which is incorrect in spinner shape anyway), and use the kit decals to
give the serial “P3380".
That is in the Hurricane serial range, is an
“even number,” and no one can prove it wrong.
Thus my “A” scheme Bader Hurricane is “close
enough” to right for my purposes.
You, dear
reader, can of course not worry about any of this, since you will have
read this review before opening the box, and if you want to make V7467 -
or any of the other options - you will already know how to “get it
right” at the painting stage: do the opposite of what the instructions
say.
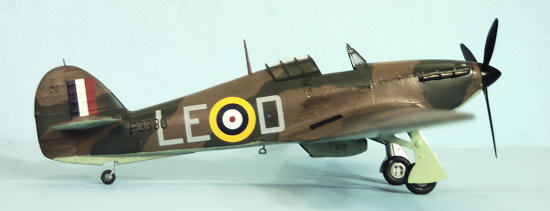
Decals:
The decals are wonderful except for the mistake of the underwing roundels being the same size as the upper wing roundels. This makes them way too big to fit accurately in their correct position. I went into the decal dungeon and found a set of roundels about 3/32 inch smaller in overall size, which fit perfectly. Additionally, the Squadron Leader’s insignia is provided for both sides of the fuselage. RAF rules about this were that the marking was carried only on the left side. Given that there are no photographs of any of Bader’s Hurricanes from the right side, the fact that this sheet follows a well-known “Error-Master” 1/48 sheet probably explains the inclusion and demonstrates how the mistake of one “hex-spurt” gets copied over and over until it becomes “factual common knowledge.”
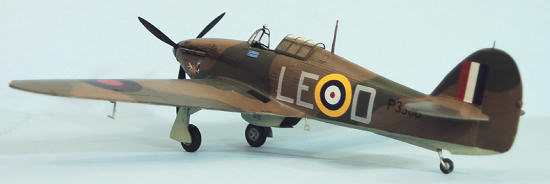
| FINAL CONSTRUCTION |
I gave the model a coat of Xtracrylix “Clear Flat,” then airbrushed exhaust stains using Tamiya “Smoke” and gunfire stains using thinned Tamiya “Flat Black.” I wanted to make the model represent V7467 as she might have looked upon return from her mission on what has come to be known as “Battle of Britain Day,” September 15, 1940.
| CONCLUSIONS |
 Don’t
let my comments about the painting instructions let you think this is
not a great kit.
It is a great kit, and you can make an excellent
model from it, and - as I said above - if you use my hard-won
information at the outset of your painting session, you will have no
problem “getting it right.”
Don’t
let my comments about the painting instructions let you think this is
not a great kit.
It is a great kit, and you can make an excellent
model from it, and - as I said above - if you use my hard-won
information at the outset of your painting session, you will have no
problem “getting it right.”
What better
model could you buy and build in this, the summer of the 70th
Anniversary of the Battle of Britain, than this Hurricane?
The decals are for six of the “greats” of the
battle, several never done before in any scale.
Highly recommended if you have a couple of
limited-run kits under your belt.
Review kit courtesy of Pacific Coast Models. Get yours as www.pacmodels.com
August 2010
If you would like your product reviewed fairly and quickly, please
contact
me or see other details in the
Note to
Contributors.