| KIT #: | |
| PRICE: | $120 for donor kit and conversion parts |
| DECALS: | See review |
| REVIEWER: | Tom Cleaver |
| NOTES: | Xtradecals 32013 and 32020. Greymatter 3202 seat and 3214 FR.XVIII conversion. |
| HISTORY |
It's a strange but interesting fact that the only Spitfire "built for
that specific powerplant" to achieve a large production run was the Mk.I
While there were several other Marks specifically designed to make
maximum benefit of the additional power of later Merlins and then the Griffons,
in each case the "interim" type cobbled together to bring the additional
performance operational as soon as possible was the version that saw the most
widespread production. This began
with the Mk.V, which was essentially a beefed‑up Mk.I/II airframe to take
advantage of the Merlin 45's additional 400 h.p., which was followed by the
Mk.IX, a beefed‑up Mk.V to take advantage of the Merlin 60-series while the
Mk.VIII was being designed to take maximum advantage of this engine; finally,
the Mk.XIV was a beefed‑up Mk.VIII airframe to use the Griffon.
The Type
394 Spitfire Mk. XVIII bears the same relationship to the Spitfire XIV that the
Spitfire VIII bore to the Spitfire IX: designed to use the particular engine to
best advantage, yet not produced in numbers approaching the "interim" type.
This type introduced a new wing which was specific for the "E" type
armament, rather than the "universal" wing used since the Spitfire Vc.
Originally, the aircraft used the same Griffon 65 as the Spitfire XIV, but the
Griffon 67 ‑ which offered an additional 300 h.p. ‑ was quickly introduced.
 The Spitfire XVIII appeared just too late for use in the Second World
War, with the first delivered to the RAF on May 28, 1945; as a result, only 300
F. Mk. XVIIIs and 200 F.R. XVIIIs were produced.
The majority of the pure fighter variants were delivered to maintenance
units and never saw operations, while the F.R. XVIII was delivered to two
squadrons in the Middle East (32 and 208 Squadrons) and two squadrons in the Far
East (28 and 60 Squadrons). The
Spitfires of 32 and 208 Squadrons saw considerable action in the unstable
immediate post‑war years in the
The Spitfire XVIII appeared just too late for use in the Second World
War, with the first delivered to the RAF on May 28, 1945; as a result, only 300
F. Mk. XVIIIs and 200 F.R. XVIIIs were produced.
The majority of the pure fighter variants were delivered to maintenance
units and never saw operations, while the F.R. XVIII was delivered to two
squadrons in the Middle East (32 and 208 Squadrons) and two squadrons in the Far
East (28 and 60 Squadrons). The
Spitfires of 32 and 208 Squadrons saw considerable action in the unstable
immediate post‑war years in the
The F.R.
XVIII had to be handled with respect by its pilot on takeoff, as was common with
all Griffon‑powered Spitfires with the 5‑blade prop; even with full rudder
applied, it was not possible to hold the aircraft straight with full power
applied. Once airborne, the
automatic throttle and boost setting control made aerobatics easy, and the
Spitfire XVIII was completely viceless.
60 Squadron and Operation
Firedog:
60 Squadron, originally equipped with
In September 1945. after the Japanese surrender, 60 Squadron moved to
Java in what was still known as the
The now little-known Malayan Emergency was a guerrilla war fought between
Commonwealth armed forces and the Malayan National Liberation Army
(MNLA), the military arm of the Malayan Communist Party, from 1948 to
1960. The colonial government
called the action "The Malayan Emergency" under pressure from the rubber
plantations and tin mining industries which pushed for use of the term
"emergency" since their losses would not have been covered by Lloyd's insurers
if it had been termed a "war." The MNLA termed it the Anti‑British National
Liberation War.
 In the early 1960s, the Malayan Emergency was held up as proof that a
counterinsurgency operation against Communist guerillas could be successful, and
was frequently used by Americans as an example of how to fight and win in
Vietnam. In fact, the Malayan
Emergency had little in common with such insurgencies as the Vietnam War, the
primary difference being that the guerillas in this struggle were not considered
"indigenous" to the region. They
were primarily Chinese, and were seen by the native Malays as a foreign force.
The "Overseas Chinese" who migrated throughout
In the early 1960s, the Malayan Emergency was held up as proof that a
counterinsurgency operation against Communist guerillas could be successful, and
was frequently used by Americans as an example of how to fight and win in
Vietnam. In fact, the Malayan
Emergency had little in common with such insurgencies as the Vietnam War, the
primary difference being that the guerillas in this struggle were not considered
"indigenous" to the region. They
were primarily Chinese, and were seen by the native Malays as a foreign force.
The "Overseas Chinese" who migrated throughout
The withdrawal of
The Colonial administration responded by outlawing the Malayan Communist
Party and other leftist parties, while the police were given the power to
imprison without trial communists and those suspected of assisting communists.
The communists, led by Chin Peng, retreated to the rural areas, and formed the
MNLA, which began a guerrilla campaign, targeting the colonial resource
extraction industries, the tin mines and rubber plantations.
The British found themselves fighting people they knew, since the MNLA
was a re‑formation of the Malayan People's Anti‑Japanese Army, the communist‑led
guerrilla force which had led the principal resistance in Malaya to the Japanese
occupation (The Malays were happy to see the Japanese kick out the Europeans,
while the Chinese saw the struggle as an extension of the war against Japan in
China). The British had secretly trained and armed the MPAJA during the later
stages of World War II.
Support for the MNLA came from approximately 500,000 of the 3.12 million
ethnic Chinese then in
 The outbreak of the Korean War allowed the British to paint the struggle
not as one of a colonial power resisting a popular movement (it wasn't so much
an independence movement as a movement to obtain social justice), but rather as
one more front against the "international Communist conspiracy," in the same way
the French were able to do with their struggle against the Viet Minh.
This was important for the British, because until they made the struggle
one against international communism, they could not use any of the MDAP supplies
they received from the
The outbreak of the Korean War allowed the British to paint the struggle
not as one of a colonial power resisting a popular movement (it wasn't so much
an independence movement as a movement to obtain social justice), but rather as
one more front against the "international Communist conspiracy," in the same way
the French were able to do with their struggle against the Viet Minh.
This was important for the British, because until they made the struggle
one against international communism, they could not use any of the MDAP supplies
they received from the
Finally, driven deeper into the forests during the late 1950s, the
guerillas eventually faded away by 1960.
The war was won not by large units and traditional maneuvering, but
rather by patrols at the platoon and company level, utilizing information from
the local population, who saw cooperating with the British as the way to achieve
independence.
The outcome, however, of the fanning of anti-Chinese sentiment meant that
the Malaysian Federation that was founded would break up by 1963, with the
Chinese majority in
| THE KIT |
There is no injection-molded 1/32 Griffon Spitfire kit, other than the
1/32 Spitfire 22/24 originally released by Matchbox, which has been re-released
by Revell. The only way a modeler
can create a Griffon Spitfire is by use of aftermarket resin sets.
 completed
the Spit XIV after a long slog).
completed
the Spit XIV after a long slog).
While I could have used the excellent decal sheet provided in the PCM Spitfire IXe kit I based this on, I decided to use the even-better Xtradecals 32-020 sheet for the Tamiya Spitfire IX, which includes the late-war/post-war upper wing "C" roundel. I also used the Xtradecal letters and numbers sheet 32-013 for the serial numbers.
| CONSTRUCTION |
This is a project where construction does not start with the cockpit.
Greymatter provides a good instruction sheet that shows what major
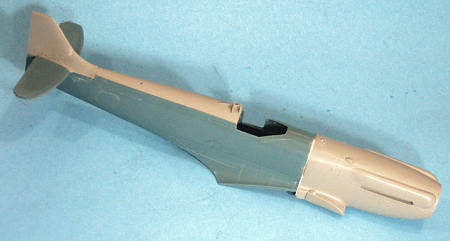
surgery needs to be done to the fuselage.
I cut off the nose, the upper rear spine, the area around the vertical
fin, and the area for the retractable tail wheel.
I glued the fuselage together, and used some sprue trees to create
internal braces that would keep what was left of the fuselage in the proper
positions.
 The lowered rear spine part needs to be measured and cut, since it is
also used for other conversions that do not use the enlarged vertical fin.
I glued it into position, then glued the vertical fin in position.
I made sure the tail wheel well would fit into the cutout, then set it
aside. I finished by attaching the
large, solid resin nose. This made the model so nose heavy that I threw in some
fishweights to the rear fuselage to get better balance.
When the parts were glued in position, I liberally applied Squadron Green
Stuff putty and set it aside to dry.
The lowered rear spine part needs to be measured and cut, since it is
also used for other conversions that do not use the enlarged vertical fin.
I glued it into position, then glued the vertical fin in position.
I made sure the tail wheel well would fit into the cutout, then set it
aside. I finished by attaching the
large, solid resin nose. This made the model so nose heavy that I threw in some
fishweights to the rear fuselage to get better balance.
When the parts were glued in position, I liberally applied Squadron Green
Stuff putty and set it aside to dry.
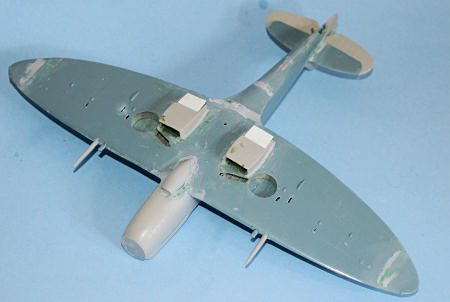
The lower wing has to be modified so the larger radiator housings will
fit. This means filling in the
attachment area for the kit radiator housings, which I did with more Green
Stuff. Additionally, the outer 1/4
inch of the ailerons need to be filled in and a new aileron scribed to show the
shorter-span aileron associated with the Mk.VIII wing.
Once the putty had set up, I proceeded to get everything sanded smooth.
When this was accomplished, I gave liberal applications of Mr. Surfacer
to the joints and sanded them smooth when dry.
At this point, I attached the radiators.
Fortunately, the photoetch radiator faces from the kit fit better with
these radiators than they do with the smaller ones.
I also attached the horizontal stabilizers to the fuselage, so they could
be fitted properly and sanded smooth where needed.
At this point, I assembled the kit cockpit.
Fortunately, I had the Greymatter seat, which is much better than the
too-large seat the kit provides, which is based on the oversized Hasegawa
original. I needed to test fit the
fore and aft bulkheads to insure smooth fit, then assembled the very nice resin
cockpit after painting it, and slipped it into position.
With the two major sub-assemblies of wing and fuselage finished, I
attached the wing to the fuselage.
There are some "fit issues" with the PCM kit about the wing and fuselage, so I
ended up using quite a bit of Green Stuff and Mr. Surfacer to get the
wing-fuselage joint smooth. I also attached the carb intake, which required a
lot of filling to get it smooth to the wing and lower nose.
 Once all the sanding was accomplished, the model was rescribed where
necessary. I had drilled out the
holes for the windows in the camera compartment. It was at this point that my
research showed that the majority of F.R. XVIII airplanes were not used in the
tactical reconnaissance role, and had those windows covered.
I then used a plug from sprue, glued it in, sanded smooth, and got rid of
the windows.
Once all the sanding was accomplished, the model was rescribed where
necessary. I had drilled out the
holes for the windows in the camera compartment. It was at this point that my
research showed that the majority of F.R. XVIII airplanes were not used in the
tactical reconnaissance role, and had those windows covered.
I then used a plug from sprue, glued it in, sanded smooth, and got rid of
the windows.
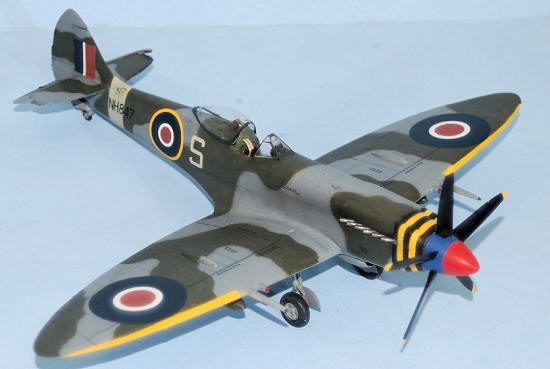
I found I had to drill the spinner in order to get holes deep enough for
the prop blades to fit.
I also scratchbuilt a Mark 14 gyro sight, since the kit only supplies the
earlier sight.
I finished the assembly by inserting the tail wheel well with its
attached gear doors into position and gluing it.
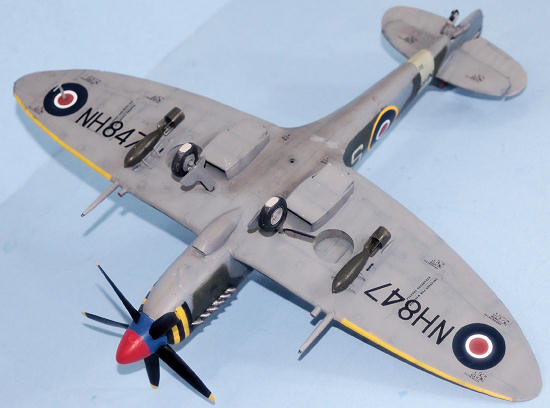
I used the bomb rack and braces left over from the Tamiya kit to the
underwing ordnance. The F.R. XVIII had zero-length launcher stubs for three RPs
under each outer wing, but I couldn't find an acceptable substitute in the
spares box, so this will be a later addition in the future.
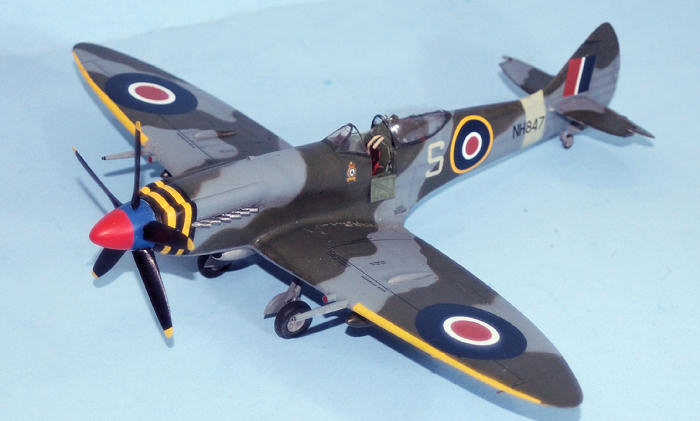
| COLORS & MARKINGS |
Painting:
I first "pre-shaded" the model with flat black along the panel lines. I
then painted the leading edges of the wings with Tamiya Flat Yellow, and painted
the fuselage stripe; I found that Tamiya "Japanese Army Grey" was closer in
color to the "sky" used in the decals.
The nose stripes were d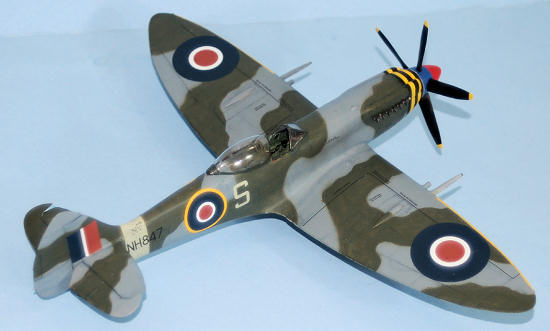 one
with the black originally applied masked over, then Yellow over the black. Once
dry, all these areas were masked off.
one
with the black originally applied masked over, then Yellow over the black. Once
dry, all these areas were masked off.
The model was painted in the standard Temperate Day Scheme of Ocean Grey
and Dark Green uppers, with
When dry, the model was unmasked and two coats of Xtracrylix Gloss
Varnish were applied.
Decals:
While the serials were "fiddly", being applied individually, the decals went on without problem otherwise. The Squadron crest is not really the 60 Squadron crest, but merely one that was in the decal dungeon; hopefully no one will ever look closely. When all was set, the model was washed, and several coats of Xtracrylix Flat Varnish were applied.
| FINAL CONSTRUCTION |
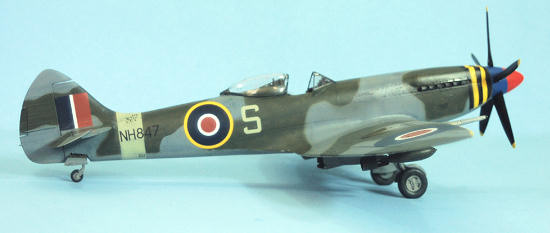
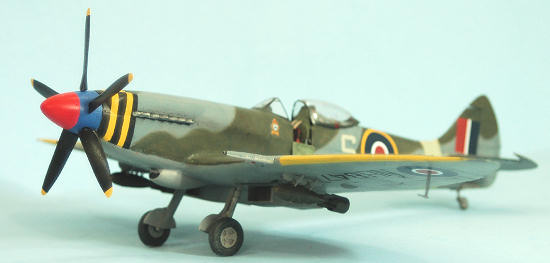
I had a bit of a problem with the landing gear, since the Greymatter 4-spoke wheels were intended to be attached to the Hasegawa gear legs, which have the flat plate of the inner side of the hub attached to the leg. I used leftover bits from the Tamiya kit to fix that, and also used the extra "bulged" gear doors that came with that kit (never throw away anything!). There is also the fact that the gear legs are "fully extended" and thus about 1/16 inch too long. Given the weight of this model, I decided to live with the slight uptilt of "sit" in return for gear legs strong enough to support the model. I attached the cockpit flap and then set the vacuformed canopy in the open position. I attached the very nice exhaust stacks - they are molded with "open tips" - after applying exhaust staining with Tamiya "Smoke."
| CONCLUSIONS |
 This looks as nice as the 1/48 Falcon vacuform of the "Super-Spit" as the
F. XVIII was termed during its development, and certainly makes up into the most
accurate Griffon-powered Spitfire other than the Falcon kit or the Airfix
Spitfire 22/24 . I personally think
the later Griffon Spitfires with their cut-down fuselages and bubble canopies
evoke the Spitfire's racing heritage and are the "fastest" looking piston engine
fighters ever.
This looks as nice as the 1/48 Falcon vacuform of the "Super-Spit" as the
F. XVIII was termed during its development, and certainly makes up into the most
accurate Griffon-powered Spitfire other than the Falcon kit or the Airfix
Spitfire 22/24 . I personally think
the later Griffon Spitfires with their cut-down fuselages and bubble canopies
evoke the Spitfire's racing heritage and are the "fastest" looking piston engine
fighters ever.
Yes, $70 bucks for the basic kit, and another $50 or so for the
conversion set is expensive, but the result is worth the price in terms of fun
creating a one-off model, and the beautiful airplane that sits next to my other
Spitfires. I'm definitely ready to
do more of these Greymatter conversions.
Highly recommended.
PCM kit courtesy of my
wallet. Greymatter conversion set
courtesy of Greymatter Figures. Get
yours at:
http://www.greymatterfigures.com
July 2010
If you would like your product reviewed fairly and quickly, please contact me or see other details in the Note to Contributors.