Tamiya 1/32 Spitfire XVIe
| KIT #: | 60321 |
| PRICE: |
Yen 7,700 (US$100.65) at HobbyLink |
| DECALS: | Three options |
| REVIEWER: | Tom Cleaver |
| NOTES: |
Lifelike
Decals “Supermarine Spitfire Mk. XVIe Part 2"
32-011 used. |
| HISTORY |
 specifications,
the Merlin-266 was built to the
specifications,
the Merlin-266 was built to the
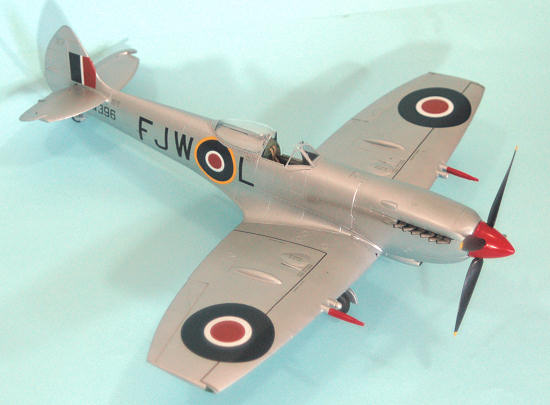
The Mk. XVI utilized the taller pointed rudder and the
“E” wing with 20mm cannon and 50-caliber machine gun.
Almost all Mk. XVI Spitfires were produced with clipped
wingtips to improve low-altitude performance, since the type was primarily
utilized by 2TAF in
| THE KIT |
 This is the third release of Tamiya’s Merlin-60 series
Spitfires.
Like the Spitfire IX and the Spitfire VIII releases, it includes
a full Merlin engine, in this case the Merlin-266.
There are different parts for the wheel well if one
chooses to do the post-war conversion with the blister on the upper wing
surface, as well as different parts for the cockpit to fit the cut-down
fuselage.
The parts for the engine include the different supercharger and
intercooler that visually distinguish the Packard-Merlin-266 from the
Rolls-Royce version.
The fuselage differs by providing the cut down fuselage
with the sliding bubble canopy.
This is the third release of Tamiya’s Merlin-60 series
Spitfires.
Like the Spitfire IX and the Spitfire VIII releases, it includes
a full Merlin engine, in this case the Merlin-266.
There are different parts for the wheel well if one
chooses to do the post-war conversion with the blister on the upper wing
surface, as well as different parts for the cockpit to fit the cut-down
fuselage.
The parts for the engine include the different supercharger and
intercooler that visually distinguish the Packard-Merlin-266 from the
Rolls-Royce version.
The fuselage differs by providing the cut down fuselage
with the sliding bubble canopy.
The canopy is the correct shape and amazingly clear,
though it has a mold seam right down the middle. For purists, this is easily
dealt with:
a light scrape-down with an X-acto blade, sand smooth with 3000
grit sanding pad, then polish out.
Or you can leave it alone since it is not that visible.
Decals are provided for three different aircraft, along with full stencil decals.
| CONSTRUCTION |
 I began by painting all the interior of the fuselage and
the various cockpit parts.
While that was drying, I assembled the wing, horizontal
stabilizer, elevators and rudder.
I also attached the side panels of the cowling to the
interior frame, getting them attached in perfect position, then gluing each to
the respective fuselage half and reinforcing that joint with some Evergreen
sheet.
This will considerably ease the assembly of the cowling if you choose
not to build it with the engine displayable.
I began by painting all the interior of the fuselage and
the various cockpit parts.
While that was drying, I assembled the wing, horizontal
stabilizer, elevators and rudder.
I also attached the side panels of the cowling to the
interior frame, getting them attached in perfect position, then gluing each to
the respective fuselage half and reinforcing that joint with some Evergreen
sheet.
This will considerably ease the assembly of the cowling if you choose
not to build it with the engine displayable.
I then assembled the cockpit, following the instructions
closely, then finished by assembling the fuselage.
I then attached the wing sub-assembly to the fuselage.
I assembled the front plate and the oil tank from the engine, and then glued them to the cowling side panels. I then attached the lower cowling, following that with the upper cowling. If you take care, you can fit them together perfectly. I set things aside to set up for awhile, then finished off by attaching the radiators and their housings, the horizontal stabilizers and elevators, and the rudder.
| COLORS & MARKINGS |
 I had been planning to do Air Marshall Robb’s light blue
Spitfire, but at this point I learned from Robert “Mr. Spitfire” Swaddling that
Robb’s Spitfire had been modified with different upper panels to the cannon bays
that did not have the bulges, and that it had full-span wings from the outset of
his use.
This would have requited some major parts removal and changes at a stage
where more harm would have been done than good.
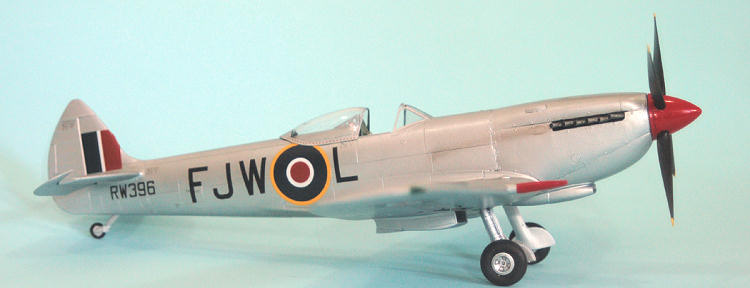
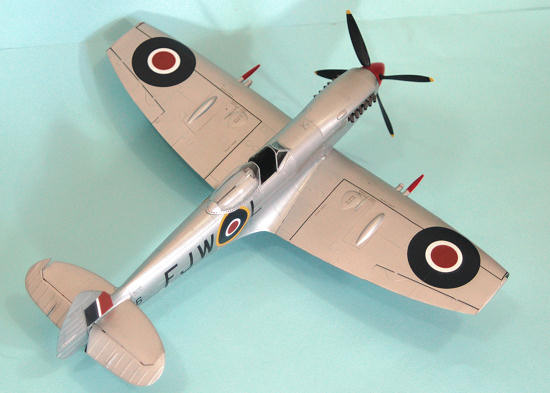
With that option closed, I decided to do the well-known
silver Spitfire XVI flown by the Central Gunnery School at Leconfield in
1946-47, which is an option on the Lifelike Decals sheet, “Supermarine Spitfire
Mk. XVIe, Part 2" (32-011).
I had been planning to do Air Marshall Robb’s light blue
Spitfire, but at this point I learned from Robert “Mr. Spitfire” Swaddling that
Robb’s Spitfire had been modified with different upper panels to the cannon bays
that did not have the bulges, and that it had full-span wings from the outset of
his use.
This would have requited some major parts removal and changes at a stage
where more harm would have been done than good.
With that option closed, I decided to do the well-known
silver Spitfire XVI flown by the Central Gunnery School at Leconfield in
1946-47, which is an option on the Lifelike Decals sheet, “Supermarine Spitfire
Mk. XVIe, Part 2" (32-011).
I painted the model with Tamiya Flat Aluminum, then
masked off the fabric control surfaces and applied a thin coat of Talon Acrylics
“Aluminum.”
With a final coat of Xtracrylix Satin Varnish, this would give a
good approximation of “Speed Silver,” the aluminum lacquer paint used on RAF
aircraft of the period.
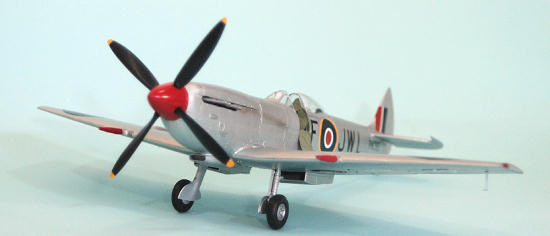
The Spinner and cannon barrels were painted with
Gunze-Sangyo “Red Madder,” a glossy scarlet red. The exhausts were painted with
Tamiya “Metallic Grey” while the prop was painted Tamiya “Flat Black.”
I used Lifelike Decals “Spitfire Mk. XVI Part 2".
This sheet includes an addendum sheet with very fine
stenciling, which looks better on a silver airplane like this than the heavier
Tamiya kit decals.
The Lifelike Decals are very thin and melt down
beautifully into the very petite surface detail on this model.
Caution: they are thin enough you must take care not to
let them fold up on themselves, and use plenty of water on the surface while
moving them into position; blot the water with tissue, then apply a light coat
of Micro-Sol and all is well.
When decals set up, I washed the model to get rid of
decal solvent residue, then applied the coat of Xtracrylix Satin Varnish to get
the final look.
| FINAL CONSTRUCTION |
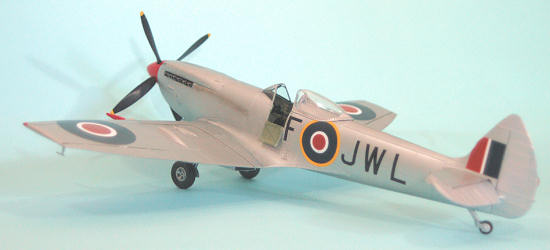
I attached the exhausts, the main wheels, and the prop. After unmasking the canopy and windscreen, I mounted the canopy in the open position and then attached the open side flap. I gave light exhaust staining on the cowling aft of the exhausts with Tamiya “smoke”, as well as a light “oil stain” on the lower wing center section and aft fuselage.
| CONCLUSIONS |
I still wish that Tamiya followed Hasegawa’s example and
did these kits as “curbside” models without the engine.
The kit price would be half what it is (which means I
would buy more), and those who want to display an engine could get a resin set
for 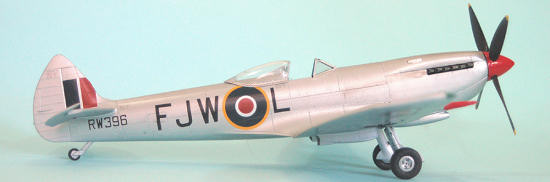 the
difference in price of that kit and this one, and all would be happy. I note
that several “advanced modelers” have recently admitted that they too have had
sufficient difficulty getting the cowling panels to fit and stay in position
with the magnets that they have also glued their cowlings shut, so I do not
think I am being a Luddite on this matter.
the
difference in price of that kit and this one, and all would be happy. I note
that several “advanced modelers” have recently admitted that they too have had
sufficient difficulty getting the cowling panels to fit and stay in position
with the magnets that they have also glued their cowlings shut, so I do not
think I am being a Luddite on this matter.
August 2011
Review Kit courtesy
HobbyLink
Decals courtesy
Lifelike Decals - order at:
http://www16.ocn.ne.jp/~lifelike/ If you would like your product reviewed fairly and fairly quickly, please contact the editor or see other details in the
Note to
Contributors.