
| KIT #: | 11149 |
| PRICE: | $100.00 SRP |
| DECALS: | Twelve options |
| REVIEWER: | Tom Cleaver |
| NOTES: | Dual Combo kit |
| HISTORY |
The Spitfire Vc was developed from experience with the Spitfire Vb and began to appear in 1942. Unlike the earlier version, which was essentially a Spitfire I airframe “beefed up” around the engine mounts to allow use of a Merlin 45 engine, the Spitfire Vc embodied more changes. These included a re-stressed and strengthened fuselage structure with the new windscreen design which featured the armor glass integral with the rest of the structure; this was also used on some late-production Spitfire Vb’s. The Vc also introduced the Type C or "Universal" wing along with the revised main undercarriage; the tops of these wings featured large, bulged fairings to provide clearance for the ammunition feed motors of two Hispano cannon. Because two cannon were seldom fitted, these fairings were later reduced in size to more streamlined shapes. A deeper radiator fairing was fitted under the starboard wing and a larger oil cooler with a deeper, kinked air outlet was fitted underneath the port wing. In addition more armor was added, protecting the bottom of the pilot's seat and the wing ammunition boxes.
 The
tropicalized Spitfire Vc was the first variant to be sent overseas in large
numbers. The majority of these were operated by Allied squadrons in the
Mediterranean Theater, SEAC (Burma and India)and Australia. A limited number
were also provided to the US 31st and 52nd Fighter Groups to supplement their
Spitfire Vb’s. A total of 2,467 Spitfire Vc were produced, 478 by Supermarine,
1,494 at Castle Bromwich, and 495 by Westland. A limited number of Spitfire Vc
were converted to the Seafire II.
The
tropicalized Spitfire Vc was the first variant to be sent overseas in large
numbers. The majority of these were operated by Allied squadrons in the
Mediterranean Theater, SEAC (Burma and India)and Australia. A limited number
were also provided to the US 31st and 52nd Fighter Groups to supplement their
Spitfire Vb’s. A total of 2,467 Spitfire Vc were produced, 478 by Supermarine,
1,494 at Castle Bromwich, and 495 by Westland. A limited number of Spitfire Vc
were converted to the Seafire II.
The “Churchill Wing” at Darwin:
Australia realized its isolation and vulnerability to enemy attack when 200 Japanese bombed Darwin on the north coat on February 19, 1942, creating widescale damage and injury. The attack sent profound shock through Australia. Over the next 20 months, the JNAF and JAAF would raid Darwin and the surrounding area in 64 over the next 20 months. With the seemingly-invincible Japanese sweeping all before them, there was a genuine fear of invasion of northern Australia itself. Another devastating strike at Broome in Western Australia, nearly 700 miles south-west of Darwin, on March 3 convinced the Australian government that extraordinary measures be taken.
The newly-arrived USAAF 49th Fighter Group was assigned to protect Darwin following the Broome attack. The young pilots averaged 200 hours total in their logbooks. Flying from Brisbane to Darwin was the equivalent of flying from Boston to Houston, around the edge of the continent, with no navigation aids, few maps and those with most of the territory flown over prominently labeled “Unexplored Territory.” John D. Landers recalled being told by an Australian bush pilot that the trip to Darwin would be easy - “just follow the crashed P-40s.” The trip was so hard that losses of 25-50 percent, due to mechanical failure or unforecast bad weather, was not uncommon. Between March and July 1942, the pilots of the 49th faced repeated Japanese raids. When the Forty-Niners were sent on to New Guinea in August, their place was taken by two RAAF P-40 squadrons.
In the meantime, the Australian government requested the return of two RAAF Spitfire squadrons then based in Britain. Despite the hard-pressed situation in Britain, Prime Minister Winston Churchill realized that politically this request could not be ignored and directed that a wing of Spitfires be sent to Australia with all haste. The two RAAF units, 452 and 457 Squadrons, were ordered to depart immediately, together with 54 Squadron, RAF.
The three squadrons departed Britain on June 21 and arrived in Melbourne on August, traveling around the Cape of Good Hope and across the Indian Ocean. However, to Churchill’s irritation, their original shipment of Spitfires was commandeered for the Middle East while in transit. The tropicalized Spitfire Vc fighters finally arrived in early October. The three squadrons formed No. 1 Fighter Wing, and were known thereafter as the “Churchill Wing.” Group Captain Alan “Wally” Walters was in overall comand with Wing Commander Clive R. Caldwell - the leading RAAF ace - assigned as wing leader flying.
54 Squadron recorded it’s first “kill” in Australia on November 19, 1942 - a stray dog that jumped into a Spitfire’s spinning prop. The squadron began moving up to Darwin in mid-January 1943, followed by 452 and 457. The oppressive humidity and frequent thunderstorms created a difficult situation for both men and aircraft at the remote strips in the bush outside Darwin. They were at the end of a very long, very difficult supply line.
The Spitfire’s first combat action in Australia came on February 6, 1943. When Flight Lieutenant Bob Foster of No 54 Squadron shot down a Ki-46 “Dinah” from the 70th Independent Chutai, flying that unit’s first reconnaissance of Australia from Timor. After chasing the enemy aircraft through the clouds north of Darwin, Foster closed to 300 yards astern and opened fire. Both bursts of 20mm hit the port engine without apparent effect. Closing to 200 yards, foster fired again and hit the fuselage and both engines. Closing to 100 yards he fired again and the Dinah’s port engine finally caught fire, with the flames quickly spreading to the rest of the airplane when went into a terminal dive and crashed into the sea off Bathurst Island. The Dinah was the first of 65 Japanese aircraft credited destroyed by the Spitfires over the next nine months, for the loss of 15 pilots in combat.
On March 2, 1943,the first raid was picked up incoming on radar. Wing commander Caldwell was on standby with 54 Squadron. When the enemy was 120 miles away, 54 scrambled, led by Caldwell, followed shortly by 457 fir a total of 26 Spitfires. By the time they had assembled, the enemy had bombed Port Patterson and had turned back. Eventually only six Spitfires led by Caldwell made contact; having been airborne over an hour, fuel was close to critical. The Spitfires waded into the enemy formation 20 miles off the coast over the Timor Sea. Caldwell took on what he first identified as a B5N Kate, but was later determined to be a Zero. He commenced firing at 400 yards and closed to 100 yards. The enemy aircraft broke formation at this point. Caldwell broke to avoid the escorts, and saw the airplane crash into the sea.
Five minutes later, Caldwell spotted a Zero on the tail of a Spitfire. He immediately turned in on the Zero and opened fire. Closing to 50 yards, he saw pieces fly off the enemy fighter before it caught fire and dived into the sea below.
54 Squadron CO Bill Gibbs also engaged, spotting an enemy formation, he dived into them with his two wingmen. Setting one “single engine bomber” afire, he came under fire from the pair of Zero escorts and took a hit in his engine and saw “liquid escaping.” He managed to return with only five gallons remaining and nearly all the glycol run out of the engine. Wingman Pilot Officer Ashby also claimed second Kate.
Actually, all had overclaimed, with only two Zeros damaged and both returning to Timor. There had been no Kates in the strike. The leader of the eight G4M2 Betty bombers reported he never saw any defending fighters. However, Prime Minister John Curtin made a public announcement that “The famous British Spitfire is now in the South Pacific and has engaged the enemy at Darwin.”
The next raid on March 15 saw things go bad for the Spitfires. A formation of 25 Bettys, escorted by 25 Zeros, attacked Darwin’s oil storage facilities. Scrambled late, the Spitfires were at an altitude disadvantage when they found the enemy. In the fight that followed, 7-victory ace Squadron Leader Raymond thorold-Smith, commander of 452, was shot down and was lost near Point Charles. 54 Squadron, flying top cover, was bounced by the escorts, though Flight Lieutenant Foster was credited with a Zero. Three other pilots of 452 were shot down and missing, while 13-victory Malta ace Tim Goldsmith shot down a Zero after being damaged by another. It was later determined that oxygen problems in 452's Spitfires had likely contributed to the loss of the four pilots. Thorold-Smith was remembered as “An inspiring commanding officer who endeared himself to every member. He was a man of enthusiasm and bursts of great energy. He had an acute intellect and could not only grasp the essentials of fighter combat, but also swing music and modern poetry.”
 The
raid of May 2 saw another formation of 25 bombers and 25 escorts met by Caldwell
leading 33 Spitfires. Again, the Spitfires were positioned badly by ground
control. Caldwell refrained from and attack and continued climbing to 32,000
feet. By that point, the enemy had bombed their target and turned away. In a
long-running 25 minute fight following an uncoordinated attack, a number of
kills were claimed that were later assessed as damaged. Placed against a loss of
15 Spitfires. only five of which were lost in combat with the other ten
succumbing to mechanical failures or running out of fuel - most landed on fumes
after being airborne for two hours, a very long time in a Spitfire without a
drop tank. Despite only one cannon working, Caldwell was credited with two
Zeros. Tim Goldsmith was among those shot down, but he was rescued after
parachuting into the bush.
The
raid of May 2 saw another formation of 25 bombers and 25 escorts met by Caldwell
leading 33 Spitfires. Again, the Spitfires were positioned badly by ground
control. Caldwell refrained from and attack and continued climbing to 32,000
feet. By that point, the enemy had bombed their target and turned away. In a
long-running 25 minute fight following an uncoordinated attack, a number of
kills were claimed that were later assessed as damaged. Placed against a loss of
15 Spitfires. only five of which were lost in combat with the other ten
succumbing to mechanical failures or running out of fuel - most landed on fumes
after being airborne for two hours, a very long time in a Spitfire without a
drop tank. Despite only one cannon working, Caldwell was credited with two
Zeros. Tim Goldsmith was among those shot down, but he was rescued after
parachuting into the bush.
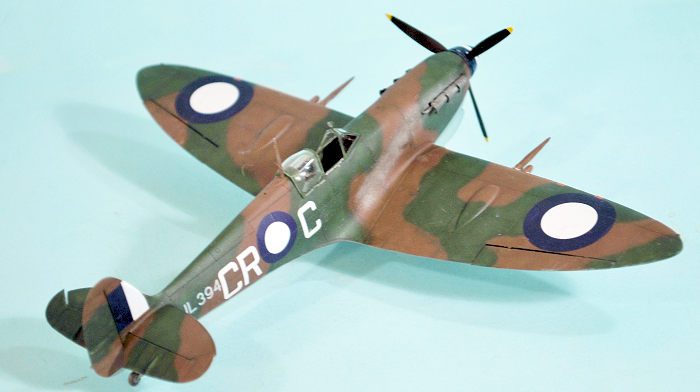
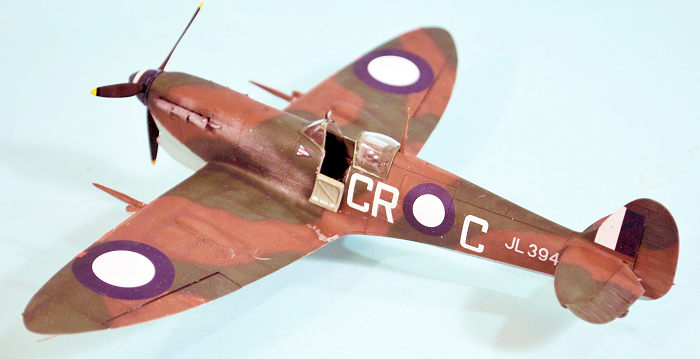
In August, flying JL394, his third Spitfire, Caldwell shot down a Dinah for his fifth Japanese victory, making him the most successful Australian Spitfire pilot against the Japanese. All pilots in the wing ended up flying more than one Spitfire, as the environment around Darwin led to corrosion of the electrical systems in the airplanes, while the dust damaged engines. Supply was so poor that they were barely able to obtain replacements for losses. Caldwell left as Wing Commander on September 27, 1943, relieved by fellow Desert Air Force ace Wing Commander Peter Jeffreys.
The Japanese made their 64th and final bombing raid on the Australian mainland on November 12, 1943, causing only slight damage. However, they continued occasional reconnaissance sorties over northern Australia and so the Churchill Wing remained on stand-by, though morale suffered as the pilots watched the war move away. 452’s Flight Lieutenant Ron Cundy, a Western Desert veteran, recalled, “The monotony of sitting around the flight hut on readiness waiting for the Japs who never came was relieved from time to time with line-astern chases, battle climbs in squadron formation, shadow-shooting and aerobatics. We had some outstanding young pilots who would have made excellent combat pilots but were destined to serve without clashing with enemy aircraft.”
Squadron Leader Eric “Billy” Gibbs, who had led 54 Squadron successfully throughout 1943, handed over to Squadron Leader Robert Newton on January 11, 1944. In mid- February, Wing commander Dickie Cresswell, previously CO of 77 Sqyuadron, was appointed as wing leader. In early April 54 began re-equipping with Spitfire VIIIs.
On April 18, Spitfires from all three squadrons mounted No 1 Fighter Wing’s first offensive mission across the Timor Sea, to attack the Japanese camp at Tepa in the Babar Islands and the nearby wireless telegraphy station. The Spitfires were led by a 31 Squadron Beaufighter for navigation assistance; it was 54’s finish with the Spitfire Vc.
Red Section was comprised of Newton and Flight Sergeant Knapp from 54 Squadron. Blue Section was led by Cresswell and his wingman from 452 Squadron. Green Section was led by Group Captain Peter Jeffrey with Flight Sergeants Donaldson and Finney of 54. Yellow Section came from 457. The Spitfires refueled at Bathurst Island and then strafed in sections. The attack was over in less than ten minutes, after which they made the 325-mile over-water return flight.
This was the last occasion that 54 flew with the RAAF squadrons; on May 10 the squadron was deployed to Learmonth to protect refueling facilities for the new British Pacific Fleet.
Spitfire Vc’s were used by two other squadrons based in Western Australia, which finally replaced the well-worn fighters with Spitfire VIIIs in June 1945.
| THE KIT |
 This
is the first kit of the Spitfire Vc in 1/48 by Eduard. Last year, 1/72 modelers
were provided this variant by Airfix. Special Hobby has released a Spitfire Vc
several years ago, which has dimensional problems (noticeably too short in the
rear fuselage) and Sword released a Spitfire Vc in 1/72. (Editor's Note: Revell
released a 1/48 Spitfire Vc that was based on their Spitfire II kit. Classic
Airframes also did a 1/48 Spitfire Vc that was later reboxed by Eduard, but that
is not this kit).
This
is the first kit of the Spitfire Vc in 1/48 by Eduard. Last year, 1/72 modelers
were provided this variant by Airfix. Special Hobby has released a Spitfire Vc
several years ago, which has dimensional problems (noticeably too short in the
rear fuselage) and Sword released a Spitfire Vc in 1/72. (Editor's Note: Revell
released a 1/48 Spitfire Vc that was based on their Spitfire II kit. Classic
Airframes also did a 1/48 Spitfire Vc that was later reboxed by Eduard, but that
is not this kit).
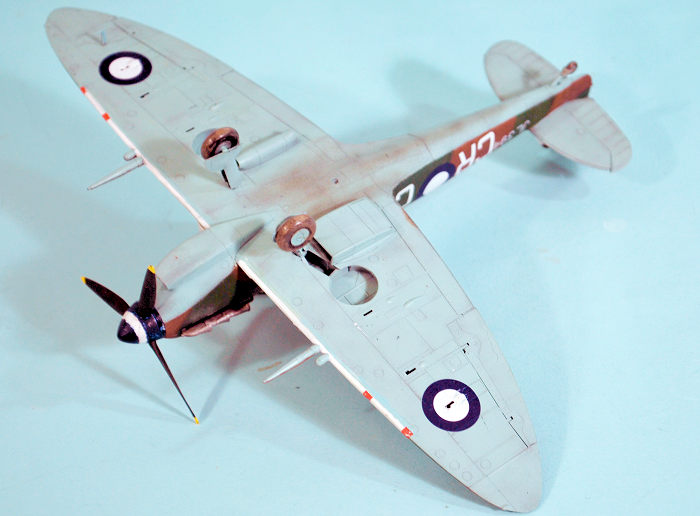
This kit lives up to all the other new tool Spitfires released so far by Eduard. The wing features separate cannon covers, with the classic large teardrop fairing, a squarish teardrop fairing and the later narrow fairing, to fully cater to the “C” wing. A second pair of cannon are also included, for Malta based Spitfires and for the Spitfire Vc fighter-bombers operated by 2 Squadron SAAF in Italy. A special sptrue “T” has the Vokes filter and two different “Aboukir” filters, as well as the deeper radiator and oil cooler for the Spitfire Vc. This “Eagle’s Call” limited release includes two “late” and an “early” fuselages, so that both types of Spitfire Vb as well as the Spitfire Vc can be modeled.
Decals of this release cover several Spitfires operated in North Africa and Italy by the 31st and 52nd Fighter Groups, as well as Spitfire Vb’s flown by the Eagle Squadrons. Several options were the mounts of well-known pilots.
For those who can’t wait to do Australian Spitfires, Aeromaster released 48-667, which has four Australian Spitfires; it’s long out of production, but I was easily able to source one on eBay at a reasonable price. Clive Caldwell’s JL394 is an option on the “Spitfire: Aces of the Empire” decal sheet.
| CONSTRUCTION |
 With
ALL the Eduard Spitfire kits, you MUST insure that EVERY SPRUE NUB IS REMOVED.
The mating surfaces must be ABSOLUTELY CLEAN. Take your time fitting parts
together and be sure they are EXACTLY where they should be before committing any
glue. Get the fuselage together nice and tight with that cockpit assembled and
positioned perfectly.
With
ALL the Eduard Spitfire kits, you MUST insure that EVERY SPRUE NUB IS REMOVED.
The mating surfaces must be ABSOLUTELY CLEAN. Take your time fitting parts
together and be sure they are EXACTLY where they should be before committing any
glue. Get the fuselage together nice and tight with that cockpit assembled and
positioned perfectly.
Then be prepared for some “industrial strength pushing and shoving” to get the wing and fuselage sub assemblies together. You will have to bend the wing down to spread it wide enough to get the fuselage into position. Do not fear – it won’t break and when you are done, if you got all the prior assembly done as perfectly as possible, the wing will have the proper dihedral, and there will be no need of any putty on any seams. That wing/fuselage meet-up is the one difficult part. All else just goes together.
I have entertained the thought of attaching the lower wing to the fuselage, then attaching the upper wing and assembling then to get all aligned that way. I think that is possible and I will try it on the next one (there will ALWAYS be another Eduard Spitfire). You could consider that if what I described above is scary. But remember the kit is molded very precisely and you can’t just slap things together. Doing these Spitfires and the P-51s has turned me into a more careful, precise modeler, which is a good thing.
| COLORS & MARKINGS |
Unlike the earlier Spitfire Vc’s that were delivered to Australia in desert markings, with the Mid Stone repainted with Foliage Green, leaving the RAF Dark Earth and Azure Blue, JL394 was one of the later ones that got a full repaint in Australian colors: Earth Brown, Foliage Green and Sky Blue. I went with Brett Green’s interpretation of the upper colors, for which I used Tamiya XF-79 “Linoleum Deck Brown” for the Earth Brown, lightened to imitate sun facing with some XF-72 “JGSDF Brown.” The Foliage Green was done with XF-26 “Deep Green”, with some XF-3 “Flat Green” to lighten for post-shading. The Sky Blue was mixed from eyeballing the color used for squadron codes on the Aeromaster sheet 48-667 “Aussie Spits Mk. V Part II”, for which I used XF-23 “Light Blue,” XF-21 “Sky” and XF-2 “Flat White” to get “close.”
 Fortunately one of the shots of JL394 shows the leading edge of the wing, which
had a much narrower area of white on the leading edge, which only extended as
far out as the outer machine guns.
Fortunately one of the shots of JL394 shows the leading edge of the wing, which
had a much narrower area of white on the leading edge, which only extended as
far out as the outer machine guns.
Fortunately, Spitfires repainted in Australia didn’t have the stencils reapplied, so I only had to apply the national insignia and Caldwell’s personal marking. The decals from Spitfire: Aces of the Empire went on without problem.
Photos of JL396 show it well-maintained, for operating at Darwin. Being the Wingco’s plane, it got special attention. From photos, there are few “dings” and the big weathering thing is the oil-stained belly and the exhaust stains with large grey areas from running a lean mixture. I used tamiya “smoke” for the oil stains, and XF-66 “Light Grey” for the exhaust stains.
The kit doesn’t supply an accurate DeHavilland wider-blade prop, and the narrow-blade Rotol wasn’t actually used on Spitfire Vs. However, a few minutes with a sanding stick turned that prop into something that looks “close enough” to the DeHavilland prop. The spinner was painted white, then masked off for the stripe, and the rest painted X-3 Royal Blue. I “muddied” the wheels as shown in photos. I unmasked the canopy and posed it open.
| CONCLUSIONS |
It’s an Eduard Spitfire. And a Spitfire Vc! What’s not to like? Not a kit for a beginner, but anyone with some experience can tackle it successfully. Take your time, be sure the parts are clean, be precise in fitting things together, and you will have a model you’ll be proud to display. Recommended for all Spitaholics. I’ve now got a bunch of nice options for all the Spitfire V overtrees I’ll certainly be getting.
23 September 2021
Copyright ModelingMadness.com. All rights reserved. No reproduction in
part or in whole without express permission.
Review kit courtesy of Eduard.
If you would like your product reviewed fairly and fairly quickly, please
contact
the editor or see other details in the
Note to
Contributors.