Airfix 1/48 Spitfire FR.XIVe
| KIT #: | A05135 |
| PRICE: | $31.95 |
| DECALS: | Two options |
| REVIEWER: | Tom Cleaver |
| NOTES: | Xtradecal 48127 |
| HISTORY |
It's a strange but interesting fact that the only "built for that
specific powerplant" Spitfire to achieve a large production run was the Mk.I;
while there were several other Marks specifically designed to make maximum
benefit of the additional power of the later Merlins and then the Griffons, in
each case the "interim" type cobbled together to bring the additional
performance operational as soon as possible was the version that
 saw the most
widespread production. This began with the Mk.V, which was essentially a
beefed-up Mk.I airframe to take advantage of the Merlin 45's additional 400 h.p.
This was followed by the Mk.IX, a beefed-up Mk.V to take advantage of the Merlin
60 series while the Mk.VIII was being designed to take maximum advantage of this
engine. The last was the Mk.XIV, a beefed-up Mk.VIII airframe to use the
Griffon.
saw the most
widespread production. This began with the Mk.V, which was essentially a
beefed-up Mk.I airframe to take advantage of the Merlin 45's additional 400 h.p.
This was followed by the Mk.IX, a beefed-up Mk.V to take advantage of the Merlin
60 series while the Mk.VIII was being designed to take maximum advantage of this
engine. The last was the Mk.XIV, a beefed-up Mk.VIII airframe to use the
Griffon.
The Spitfire XIV first arrived in the Southeast Asia Theater in June 1945. The first arrivals were F.XIV “highback” Spitfires, followed by F.R. XIVe “bubble-top” Spitfires. The aircraft all arrived just too late to see operational service in the war.
In the years following the war, RAF squadrons in Southeast Asia were reduced in number and run down in numbers of operational aircraft. Typical of such units was 28 Squadron, based at Kuala Lumpur Malaya. The Squadron would see operational combat service beginning in 1948 with the outbreak of the communist insurgency in Malaya and would be one of the last squadrons to fly the Spitfire in combat.
| THE KIT |
 Airfix’s Spitfire XIV is the first really accurate 1/48 Spitfire
XIV released, and is clearly superior to the Academy kits issued 20-some years
ago. The kit can be turned into the F.XIV, F.R. XIV or F.R. 18 without
difficulty. After a period of unavailability following the initial release this
past summer, a second release came this past fall. The good news for these kits
is that the quality control difficulties about warpage, short-shot parts and
poor clear parts appears to have been dealt with.
Airfix’s Spitfire XIV is the first really accurate 1/48 Spitfire
XIV released, and is clearly superior to the Academy kits issued 20-some years
ago. The kit can be turned into the F.XIV, F.R. XIV or F.R. 18 without
difficulty. After a period of unavailability following the initial release this
past summer, a second release came this past fall. The good news for these kits
is that the quality control difficulties about warpage, short-shot parts and
poor clear parts appears to have been dealt with.
| CONSTRUCTION |
Several modelers have complained about the difficulty of building the kit without use of putty and with loss of detail. There is a very easy way to assemble this kit, such that one will have perfect fit and will use no putty or other filler in the process. Here it is:
 1. Before assembling the fuselage, glue some Evergreen strip inside
along the lower join line for the gas tank. Assemble the fuselage without
attaching the cockpit. This allows you to work the fit of the gas tank to the
fuselage from inside and out to get a perfect fit. If you take care in attaching
the fuselage halves, you will only have to scrape down the centerline joint to
have a smooth result. Before attaching the fuselage halves, cut open the side
hatch if you want to pose it open on the finished model.
1. Before assembling the fuselage, glue some Evergreen strip inside
along the lower join line for the gas tank. Assemble the fuselage without
attaching the cockpit. This allows you to work the fit of the gas tank to the
fuselage from inside and out to get a perfect fit. If you take care in attaching
the fuselage halves, you will only have to scrape down the centerline joint to
have a smooth result. Before attaching the fuselage halves, cut open the side
hatch if you want to pose it open on the finished model.
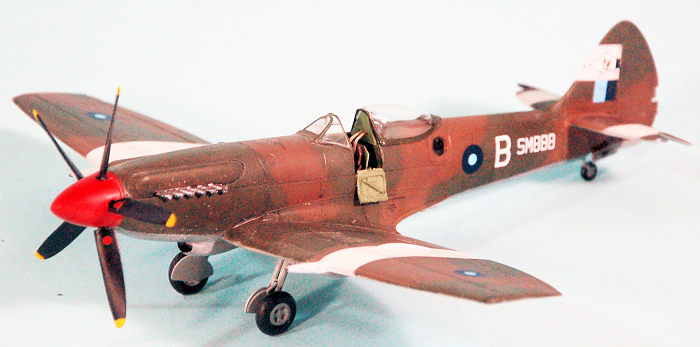
2. Assemble the cockpit. Cut off the ferschlugginah “gun sight” and make a Mk.14 sight, which is easy since it’s a cube with an adjusting wheel on either side. All Spitfire XIVs used it and it solves the one “mistake” in the kit. (There are photos of the gunsight to be found on the net, google “photos of Mark 14 gyro gunsight”) I only used Eduard photo-etch seatbelts, the rest of the cockpit looks fine when it’s viewed inside the fuselage.
3. Insert the cockpit into the fuselage, it will “click” into position, then glue it in place.
 4. Assemble the main gear wells to the lower wing part, then glue the
lower wing to the fuselage.
4. Assemble the main gear wells to the lower wing part, then glue the
lower wing to the fuselage.
5. Carefully make sure that the inner edge of the upper wing part will fit perfectly to the fuselage, smoothing off the sprue nubs. Attach the upper wing by starting with the wing-fuselage joint, then glue the upper part to the lower.
6. Attach the horizontal stabilizer. Cut the elevators apart. Attach the plug in the vertical fin, then attach the elevators as you wish them posed.
7. Assemble and attach the radiators and housings and the carburettor intake. If you flood the area where these parts will be attached with liquid glue, it will fill any gaps and you will not need putty anywhere.
You now have a perfectly-assembled model, ready for paint.
| COLORS & MARKINGS |
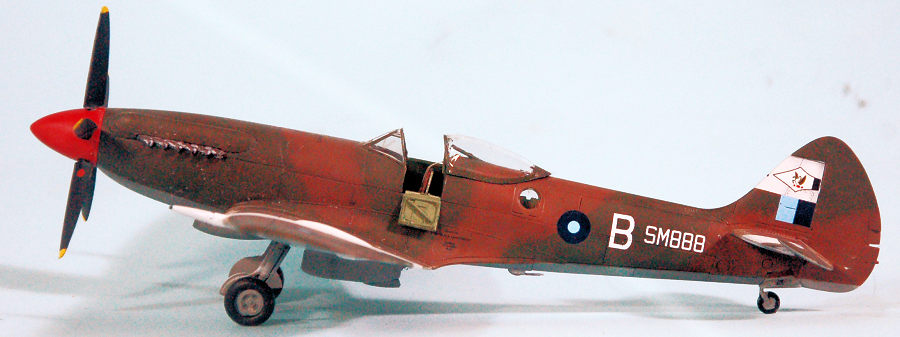
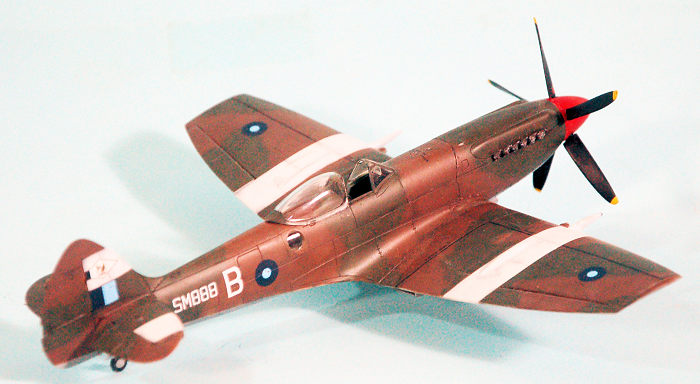
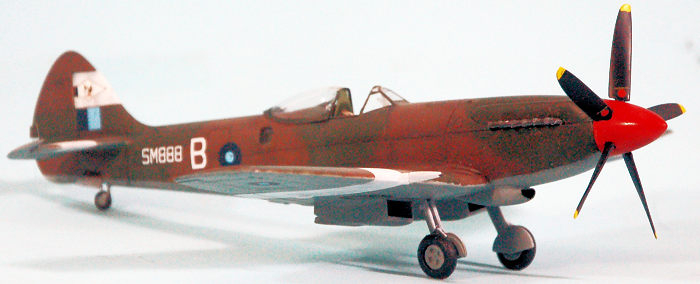
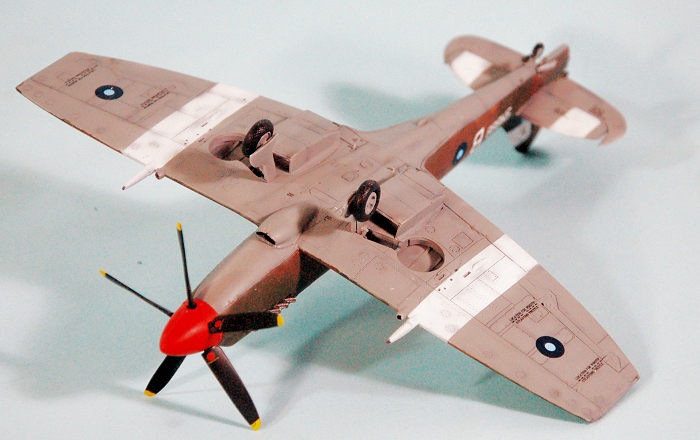
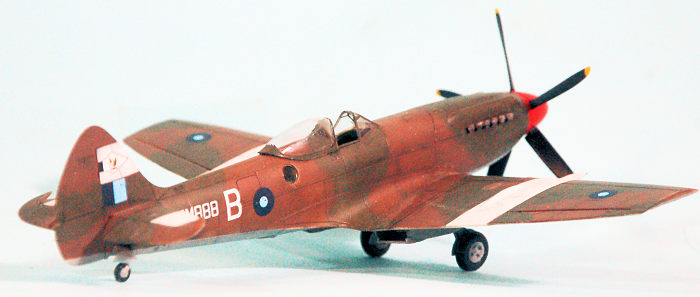
I chose to do a SEAC Spitfire XIV because I liked the Tropical Day Scheme many of the Spitfires carried. They originally arrived in India in the Temperate Scheme of Ocean Grey/Dark Green disruptive upper camouflage with lower surfaces painted Sea Grey Medium. Before being passed on to the squadrons, the Ocean Grey was painted over with Dark Earth. One good thing out of that is that the upper colors are “soft edge” because of the method of painting.
 I first “pres-shaded” the model with flat black over the panel lines,
then applied Tamiya Flat White XF-2 for the SEAC ID stripes, which I then masked
off. I freehanded the camouflage pattern using Tamiya RAF Dark Green and Sea
Grey Medium and my “custom mix” of Dark Earth. The paints were “post shaded” by
adding in white and going back over the areas, to simulate tropical sun fading.
I first “pres-shaded” the model with flat black over the panel lines,
then applied Tamiya Flat White XF-2 for the SEAC ID stripes, which I then masked
off. I freehanded the camouflage pattern using Tamiya RAF Dark Green and Sea
Grey Medium and my “custom mix” of Dark Earth. The paints were “post shaded” by
adding in white and going back over the areas, to simulate tropical sun fading.
I used the kit decals for the stencils, while using the Xtradecals for the national markings and individual aircraft markings. I used the “arrowhead” for 28 Squadron from a different aircraft, since this was eventually applied to all 28 Squadron Spitfires.
When finished, I gave the model a coat of clear matte, then applied very limited ‘dings” with Vallejo Aluminum and a 0000 brush. Past that I didn’t do a lot of weathering since the airplanes were not flown that often and were better cared-for in peacetime operations.
I then attached the exhausts, attached the landing gear and prop, unmasked the canopy and placed it in the open position.
| CONCLUSIONS |
This is a very nice kit and makes up into the most accurate 1/48 injection-molded kit of the Griffon-powered Spitfire. Everything is there in the box to turn it into any particular sub-type of the “bubble-top” Griffon Spitfire. Xtradecals has released 48-127 and 48-130, which have some very interesting schemes for the Spitfire XIV, FR XIV and F 18.
12 December 2019 Copyright ModelingMadness.com Review kit courtesy my wallet. If you would like your product reviewed fairly and
fairly quickly, please
contact
the editor or see other details in the
Note to
Contributors.